
This site is a work in progress and will continue to change as our software evolves. Every effort will be made to publish updates promptly as they are released. Please email any questions or comments to pburgio@foscd.com.

Work Orders #
In This Section #
- Introduction
- Create a Work Order
- Update a Work Order
- Work Order Information
- Contacts
- Request for Proposal – RFP
- NTP – Notice to Proceed
- Close Out
- Generate Documents
- Uploaded Documents
- Project Tracking
- Work With Work Order Documents
- Upload New Document
- Sensitive Documents
- Change Document Description
- View Document
- Delete Document(s)
- Work With Scope of Work
- New Item Request (NIR)
Introduction #
The Work Order module is where a majority of the job order contracting process occurs. Within each work order, users may create detailed scopes of work, plan dates, issue requests for proposals, share documents with contractors, and perform other tasks in the JOC workflow.
Work orders are located at the Projects level. On the Work Orders tab, you can view or edit existing work orders by clicking the Work Order Number link, or you can click Create A New Work Order to create a new one. The process for both is described in the following sections.

Create Work Order #
A new work order can be created by clicking the Create A New Work Order link from the Work Order tab. The Work Order tab is accessed by clicking the Project ID on the main Projects screen. Once on the Work Order screen, you can enter your work order details as outlined below.
Update a Work Order #
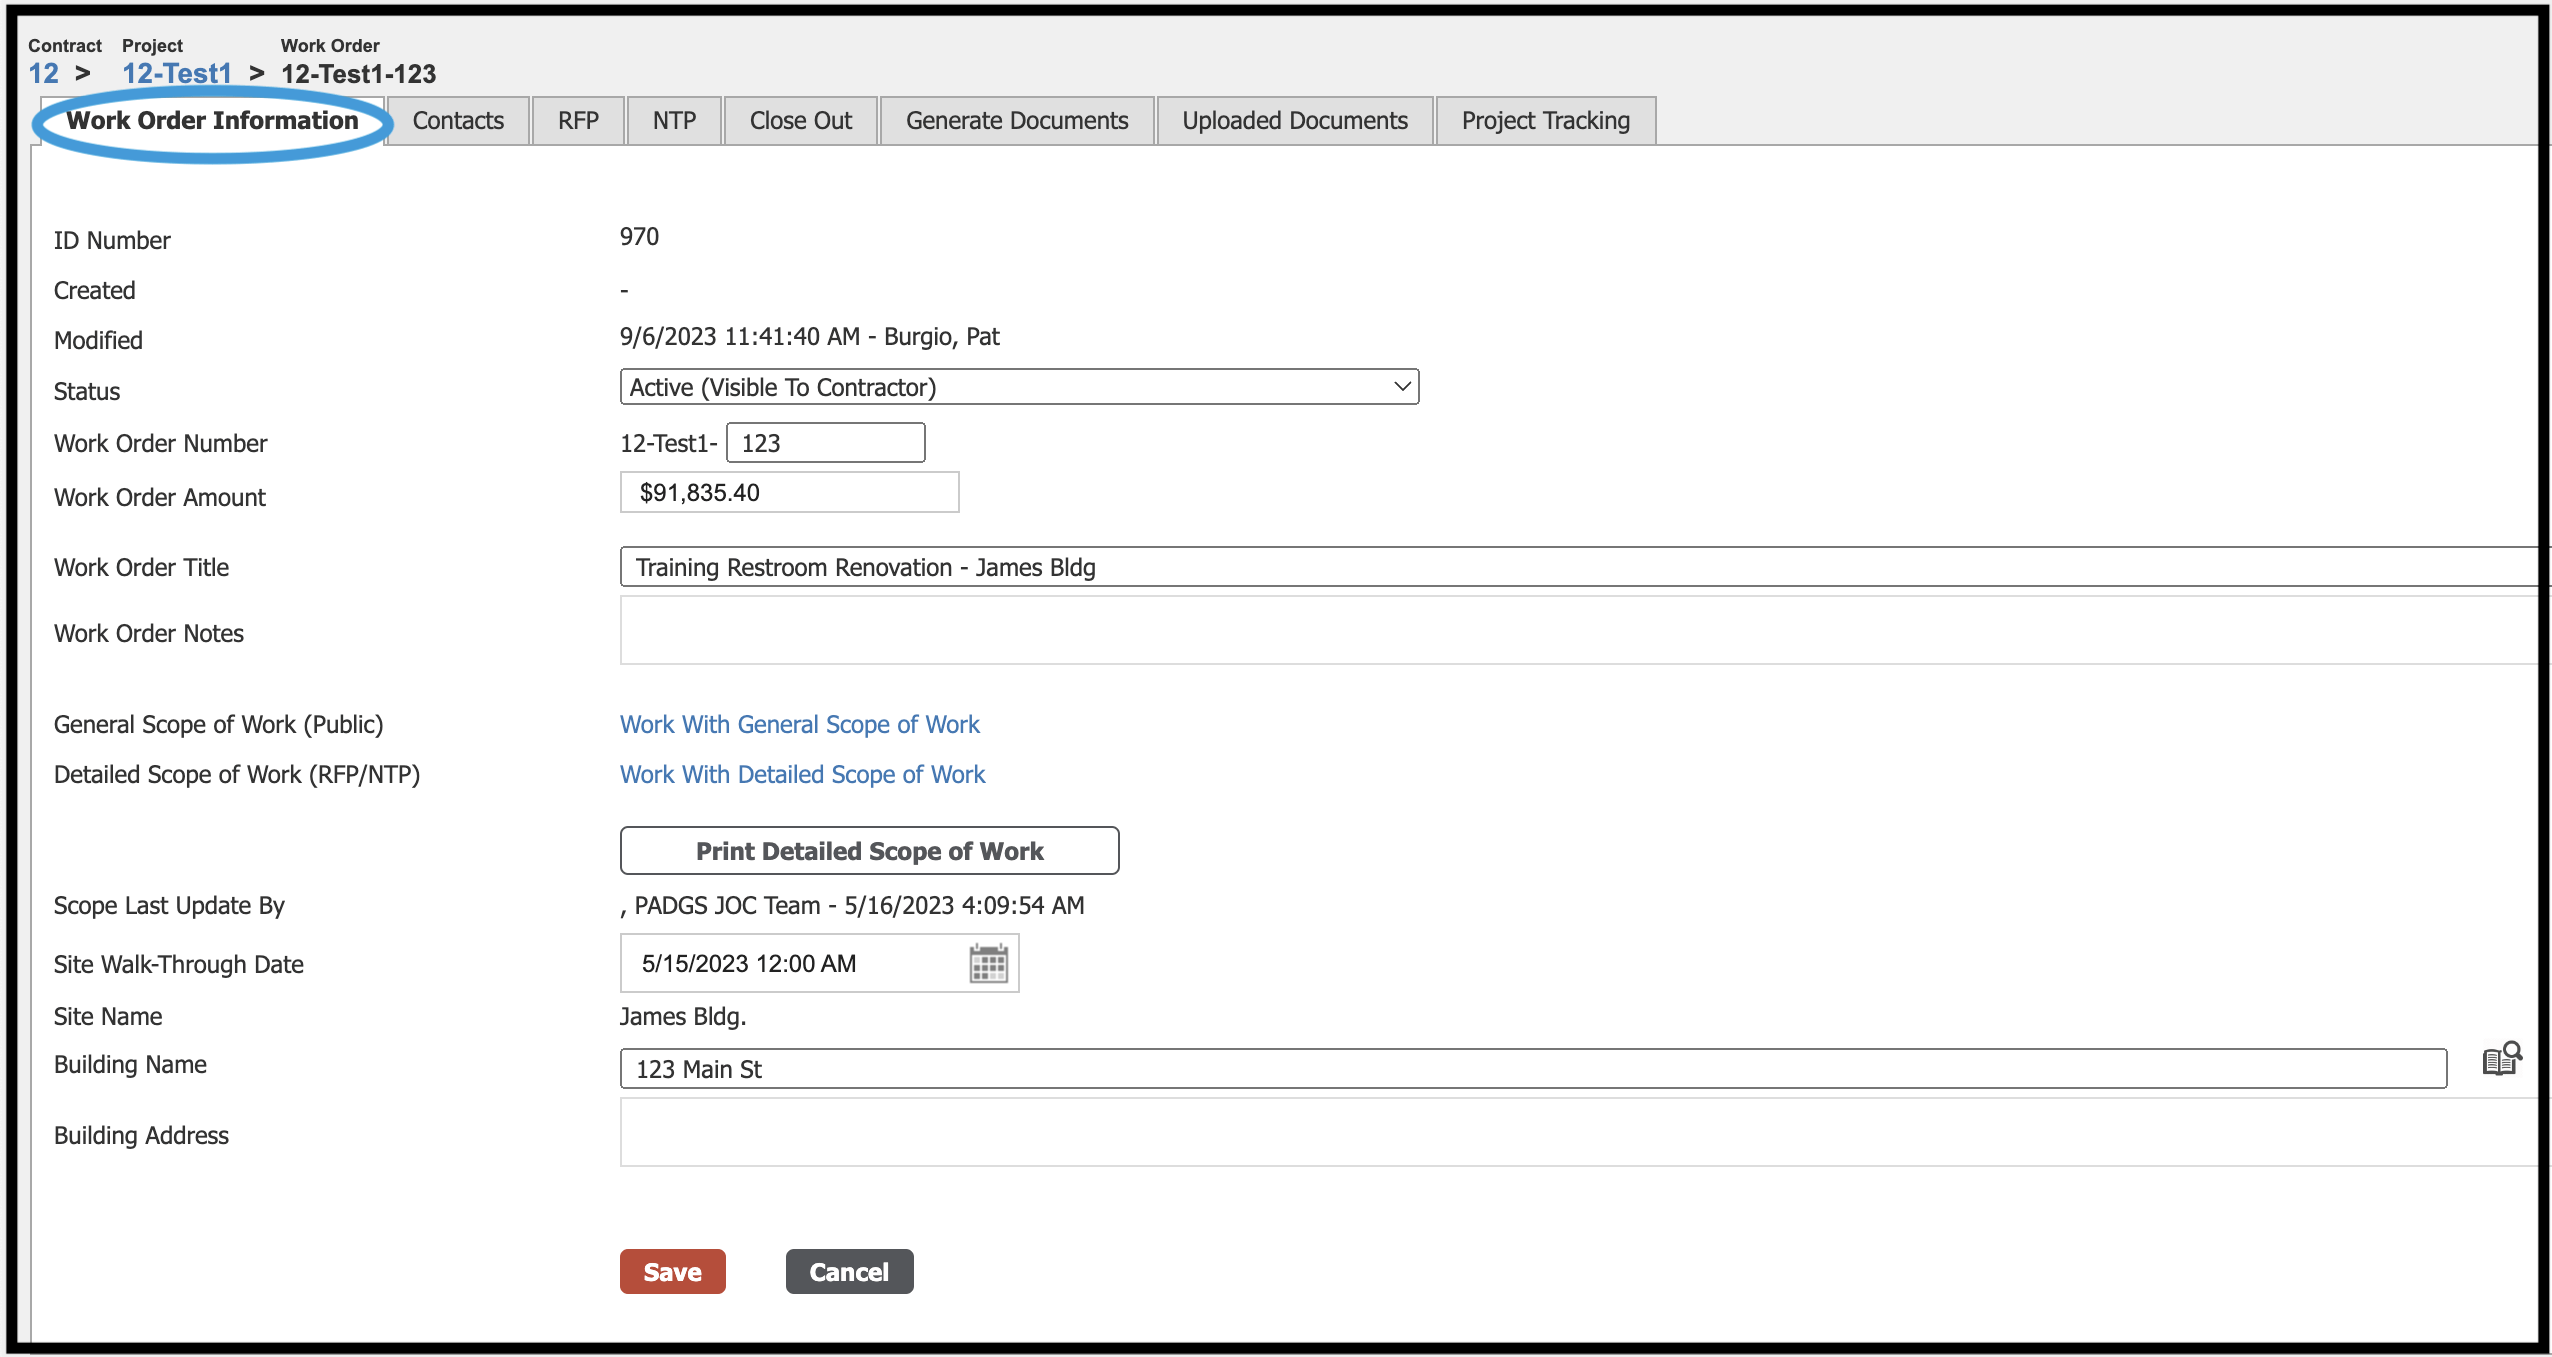
The first section of the work order creation process is shown below. Data entry fields on the screen are responsive and may differ slightly based on the data collection requirements of your department or organization.
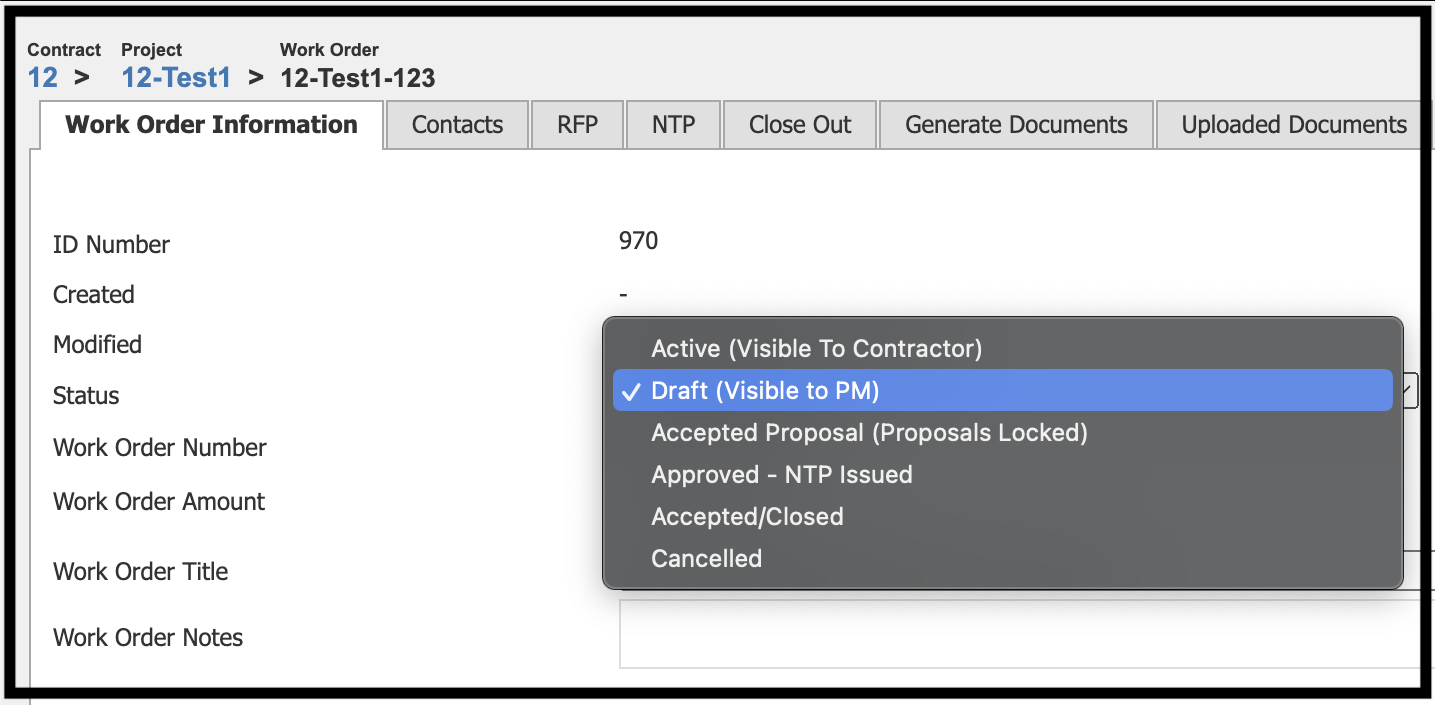
By default, all work orders are created in Draft status and are only visible to the contracting entity’s authorized representative(s). The work order becomes visible to the contractor once it moves to Active status and is moved either by manually advancing the status field or by completing the Send RFP To Contractor process which will automatically advance the work order to Active status upon completion; at this time the contractor is then able to begin creating a proposal.
The following data entry fields are typical but may vary based on the user’s software configuration:
- ID Number: A system-generated unique identifier for the work order.
- Status: As described above, a drop-down menu of work order status options.
- Work Order Number: A unique alpha-numeric identifier that cannot be repeated; user-generated.
- Work Order Amount: The total amount of the work order. This will be auto-populated with the approved proposal amount after you approve a contractor’s proposal.
- Work Order Title: The name of the work order.
- Work Order Notes: Any notes you would like tracked in the system associated with this work order.
- General Scope of Work (Public): Clicking on the Work With General Scope of Work link opens a word processing screen described in detail below. Typically a one or two-sentence work order scope overview is entered here.
- Detailed Scope of Work (RFP/NTP): Clicking on the Work With Detailed Scope of Work link opens a word processing screen described in detail below. Once finalized and approved, the detailed scope will become part of the RFP document. Clicking on the Print Detailed Scope of Work button will open the detailed scope in a formatted PDF document.
- Scope Last Updated By: Indicates the most recent user and time at which the detailed scope of work was updated.
- Site Walk Through Date: Often referred to as the Joint Scope Meeting, the date and time when this occurs should be entered here.
- Site Name: Prepopulated from the Project Information tab if a site was selected or entered.
- Building Name/Building Address: If the owner/agency has multiple locations associated with their account, clicking on the book icon next to the Building Name field will bring up a table of buildings listed for the selected site. Search for and click on a building and the name and address will auto-populate. You can also manually enter this information.
After completing the data entry fields, click on Work With General Scope of Work (Public) and Work With Detailed Scope of Work (RFP/NTP) to compose the Scope of Work that accompanies each proposal.
The General Scope of Work is an abbreviated form of the Scope of Work and is suitable for a website or a more generic audience. The Detailed Scope of Work is typically included in the RFP/NTP template documents along with your formal RFP/NTP release. More information on creating, editing, and printing the Scope of Work documents is detailed below.
On the Contacts tab of the Work Order Information section, you will find the Owner and Contractor Team setup fields. The dropdown lists are populated with names of users who have been set up in the system. If you have a new team member you need to include please make sure they are properly entered into the system beforehand. Select the appropriate members for the project team (once all team members have been added/ verified in the system).
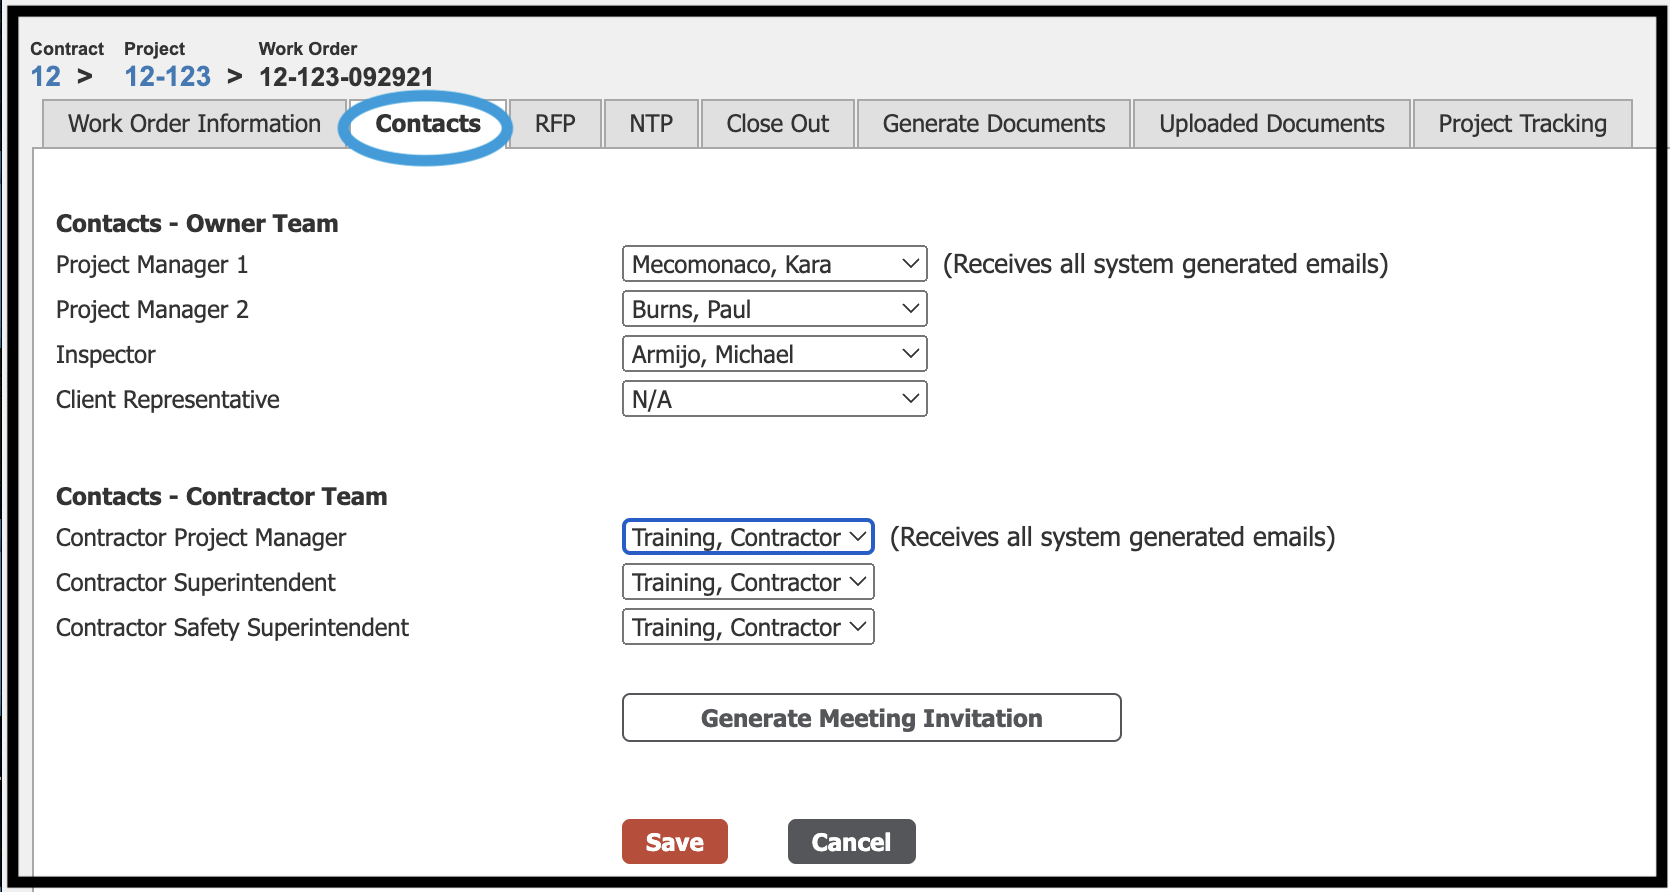
Contacts – Owner Team: Project Manager 1 is the primary user assigned to the work order and will receive all system-generated emails related to the work order. Other than those assigned administrative roles, only users identified on the owner team will have access to the work order.
Contacts – Contractor Team: The Contract Project Manager is the primary contractor user assigned to the work order and will receive all system-generated emails related to the work order. Only contractor users identified on the owner team will have access to the work order.
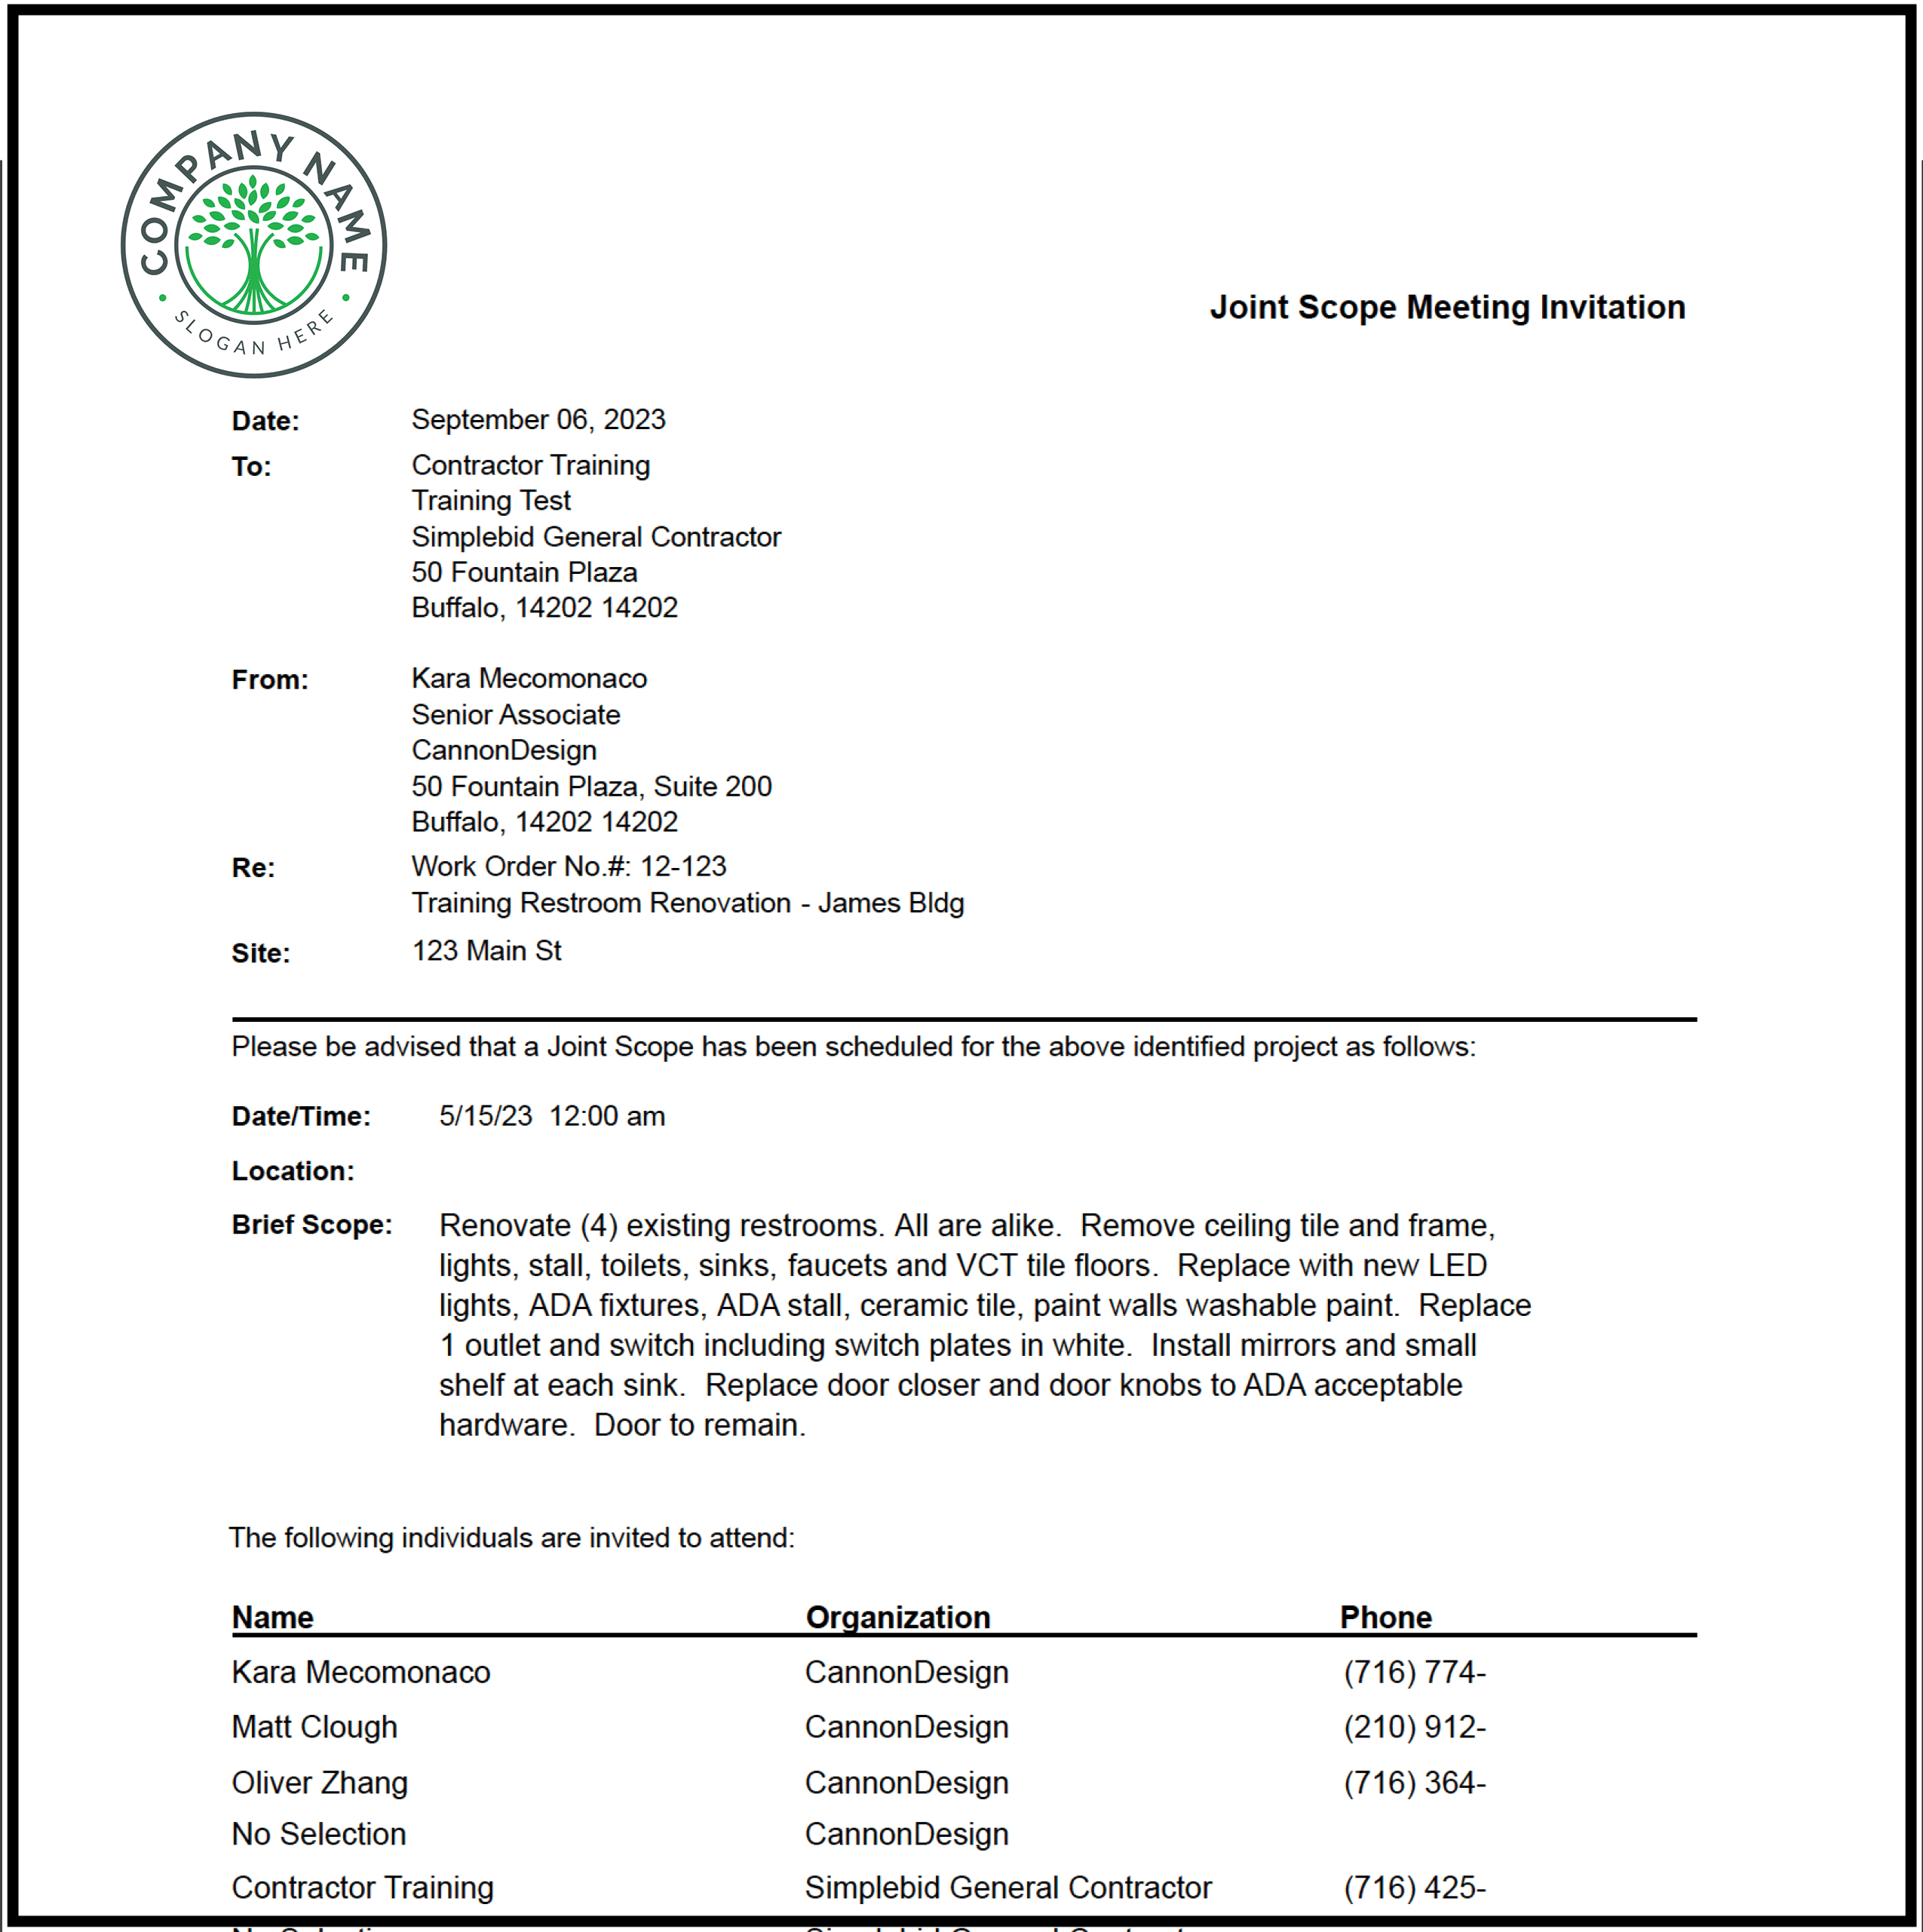
It is important that team members go to the Account page and provide their First Name, Last Name, Job Title, and Honorific/ Salutation because the information from this page is used on all correspondence generated by the system. For example, the image below is a system-generated Meeting Invitation that would be emailed to the designated participants.
Request for Proposal (RFP) #
After assigning users to the various owner and contractor roles on the Contacts tab, the next stage in the work order process is filling out details on the RFP tab (Request for Proposal).
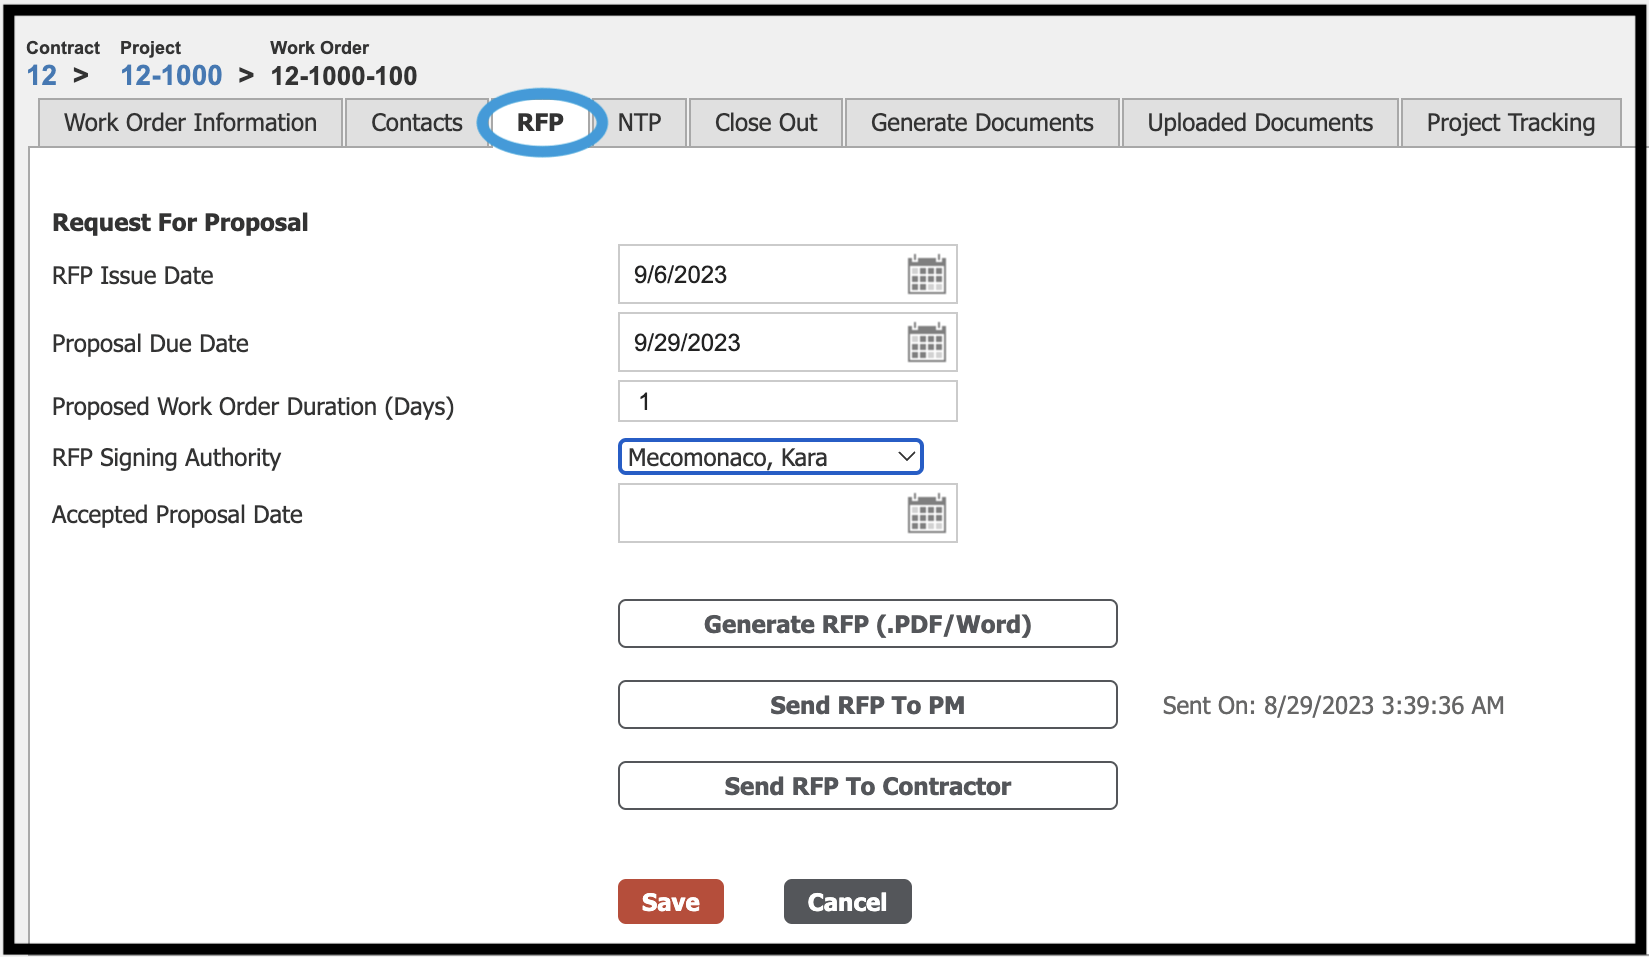
After filling out the RFP details you can take the appropriate actions to generate an RFP document and send the RFP to the Project Manager (PM). The Project Manager can also send the RFP to the Contractor.
The RFP tab requires the following information:
- RFP Issue Date: The date the RFP will be issued to the contractor.
- RFP Due Date: The date that the proposal is due back from a contractor.
- Proposed Work Order Duration: The number of days that the owner has defined for this work order to be completed.
- RFP Signing Authority: If applicable, the individual authorized to sign the RFP document should be selected using this dropdown.
- Accepted Proposal Date: The date the proposal is accepted.
Generate Request for Proposal (RFP) #
To generate the RFP document, click the Generate RFP (PDF/Word) button and the system will generate the requested document based on your organization’s requirements. Documents are template-based and can be customized per your organization’s requirements.
The system will generate links to allow you to choose between Adobe PDF format and Microsoft Word documents. Clicking the link will download/open the requested document.
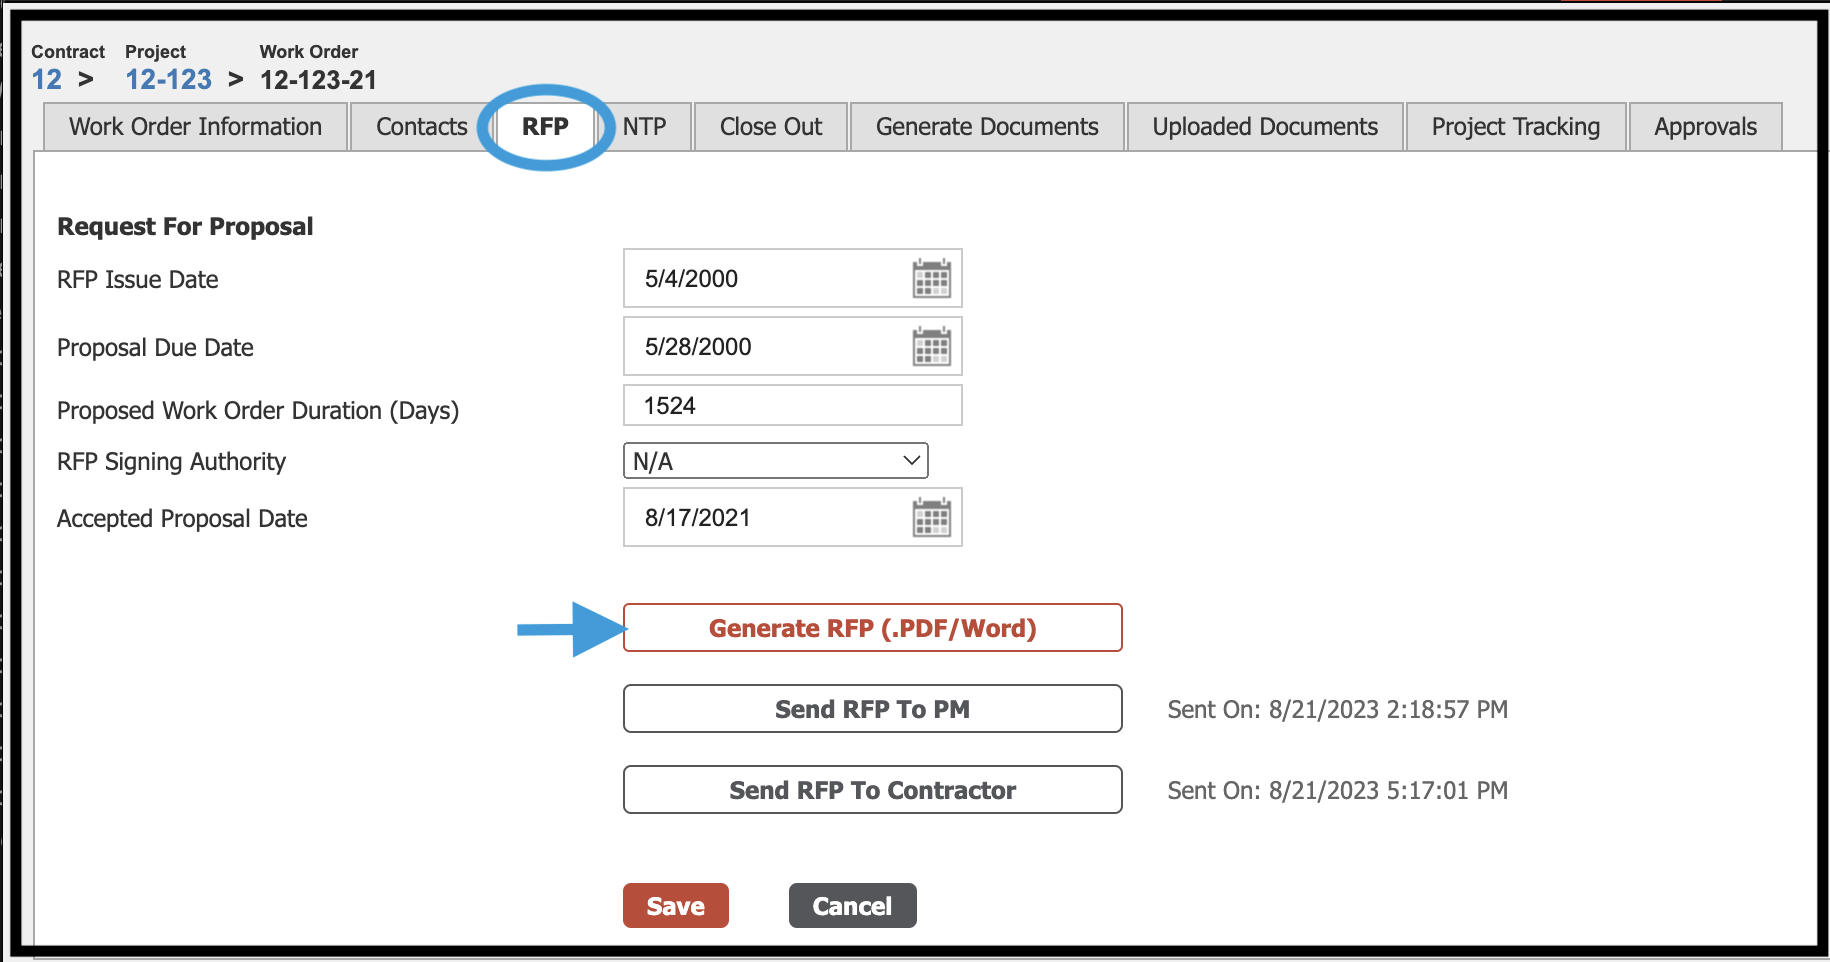
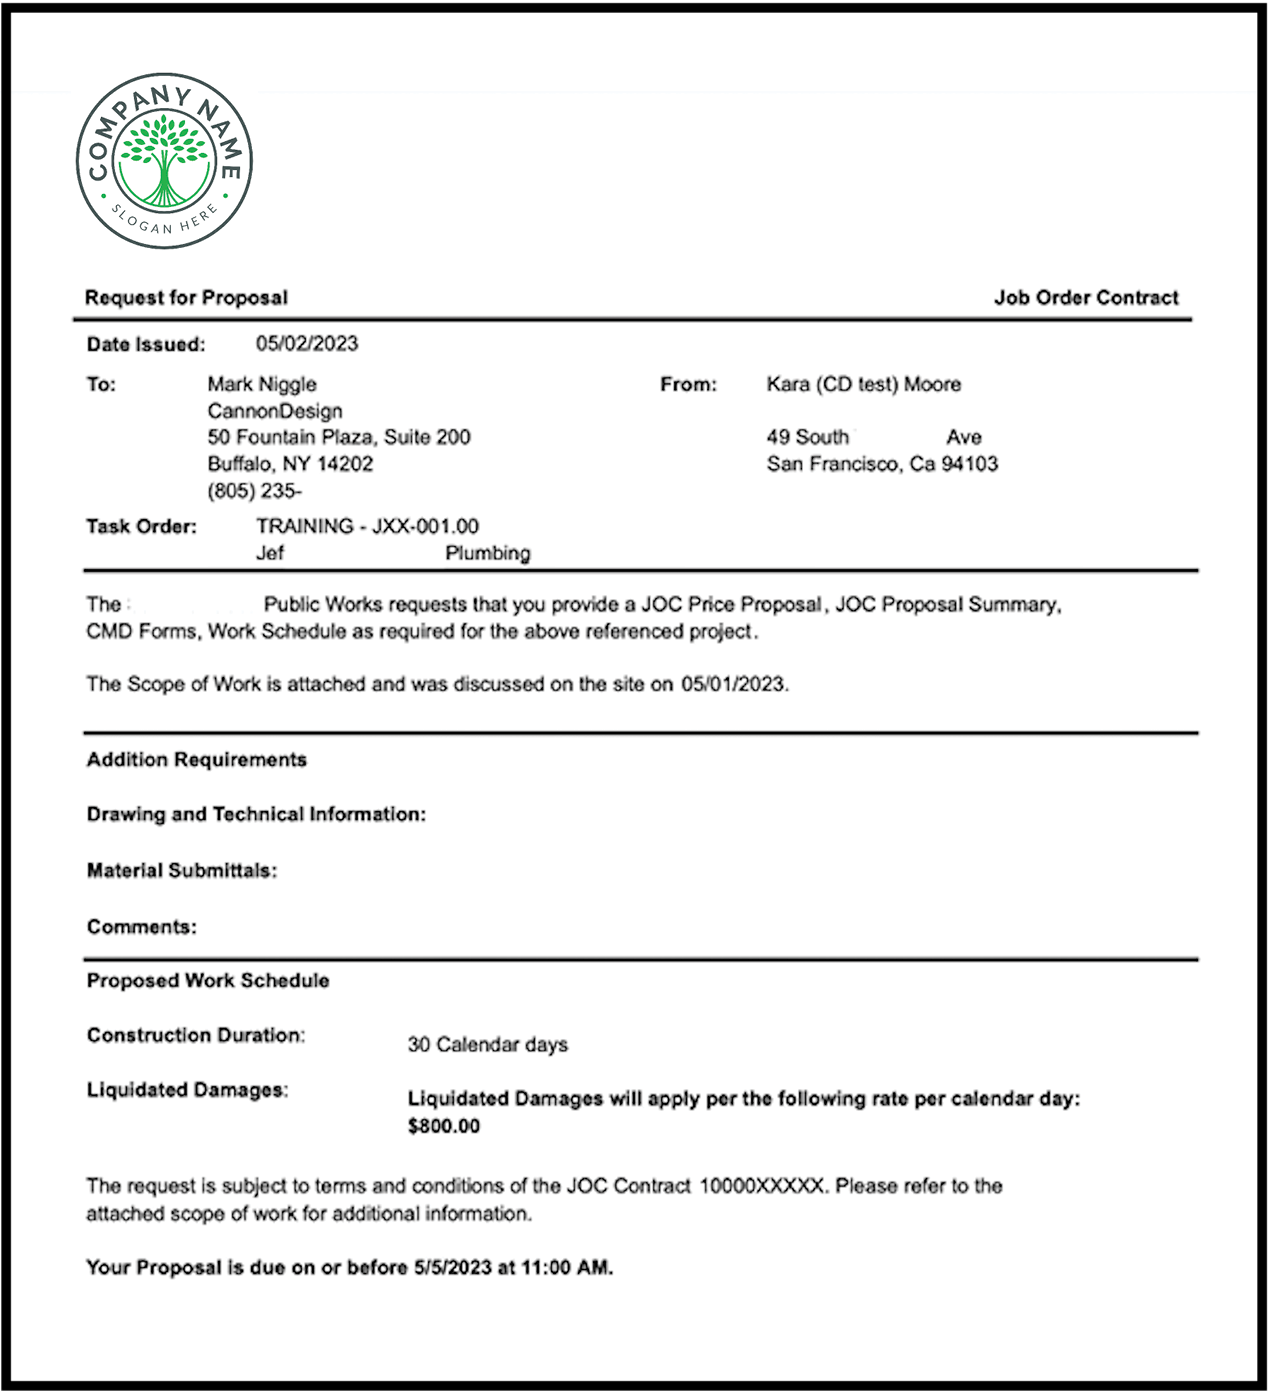
Below is an image of a document that was generated using this process. You would then follow your departmental guidelines to route and sign the document for use in the next section (Send RFP To Contractor).
The customized document can be formatted by your IT department or the Simplebid® team to fit your organization’s requirements and can include any system-generated data such as the detailed scope of work in the example document.
Send RFP to Project Manager #
Choosing the Send RFP to PM button will generate the RFP document and email it to the Project Manager that is specified in the Owner Team as Project Manager 1.
Upon receiving the file via email, the Project Manager can follow their departmental instructions on reviewing and approving the document.
Send RFP to Contractor #
Choosing the Send RFP to Contractor option will take you to the Send RFP to Contractor screen shown below. Before proceeding to this screen, you should have a signed RFP document saved on your computer. The RFP document can be obtained from the Generate RFP procedure.
Upon receiving the file via email, the Project Manager can follow their departmental instructions on reviewing and approving the document.
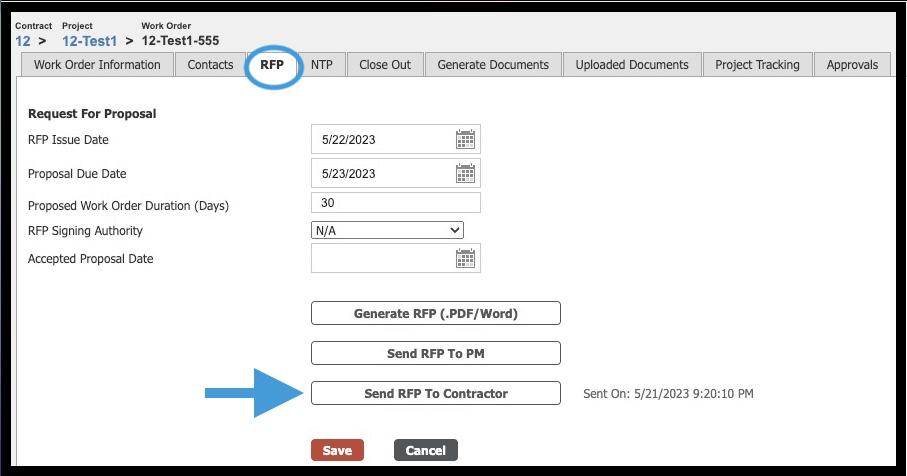
On the Send RFP To Contractor screen, the system will prompt you for the location of the signed document when you click ‘Choose Files’. After selecting the file choose Send and the following will occur:
- The file will be emailed to the contractor; the email address is controlled by the selection in the Contractor Team under Contractor Project Manager;
- The file will be uploaded to the Work Order Documents and be visible to the contractor, and;
- The work order status will change to Active and become visible to the contractor.

Note: The Project Manager must use this system-generated email to transmit the RFP; failure to do so will result in the contractor’s inability to submit a proposal.
Notice to Proceed (NTP) #
Once you have completed an RFP and accepted a proposal from the contractor the next stage of the work order process is the issuance of the Notice To Proceed (NTP). After completing the various NTP data entry elements click on the link to generate the NTP document and send the NTP to the Contractor.
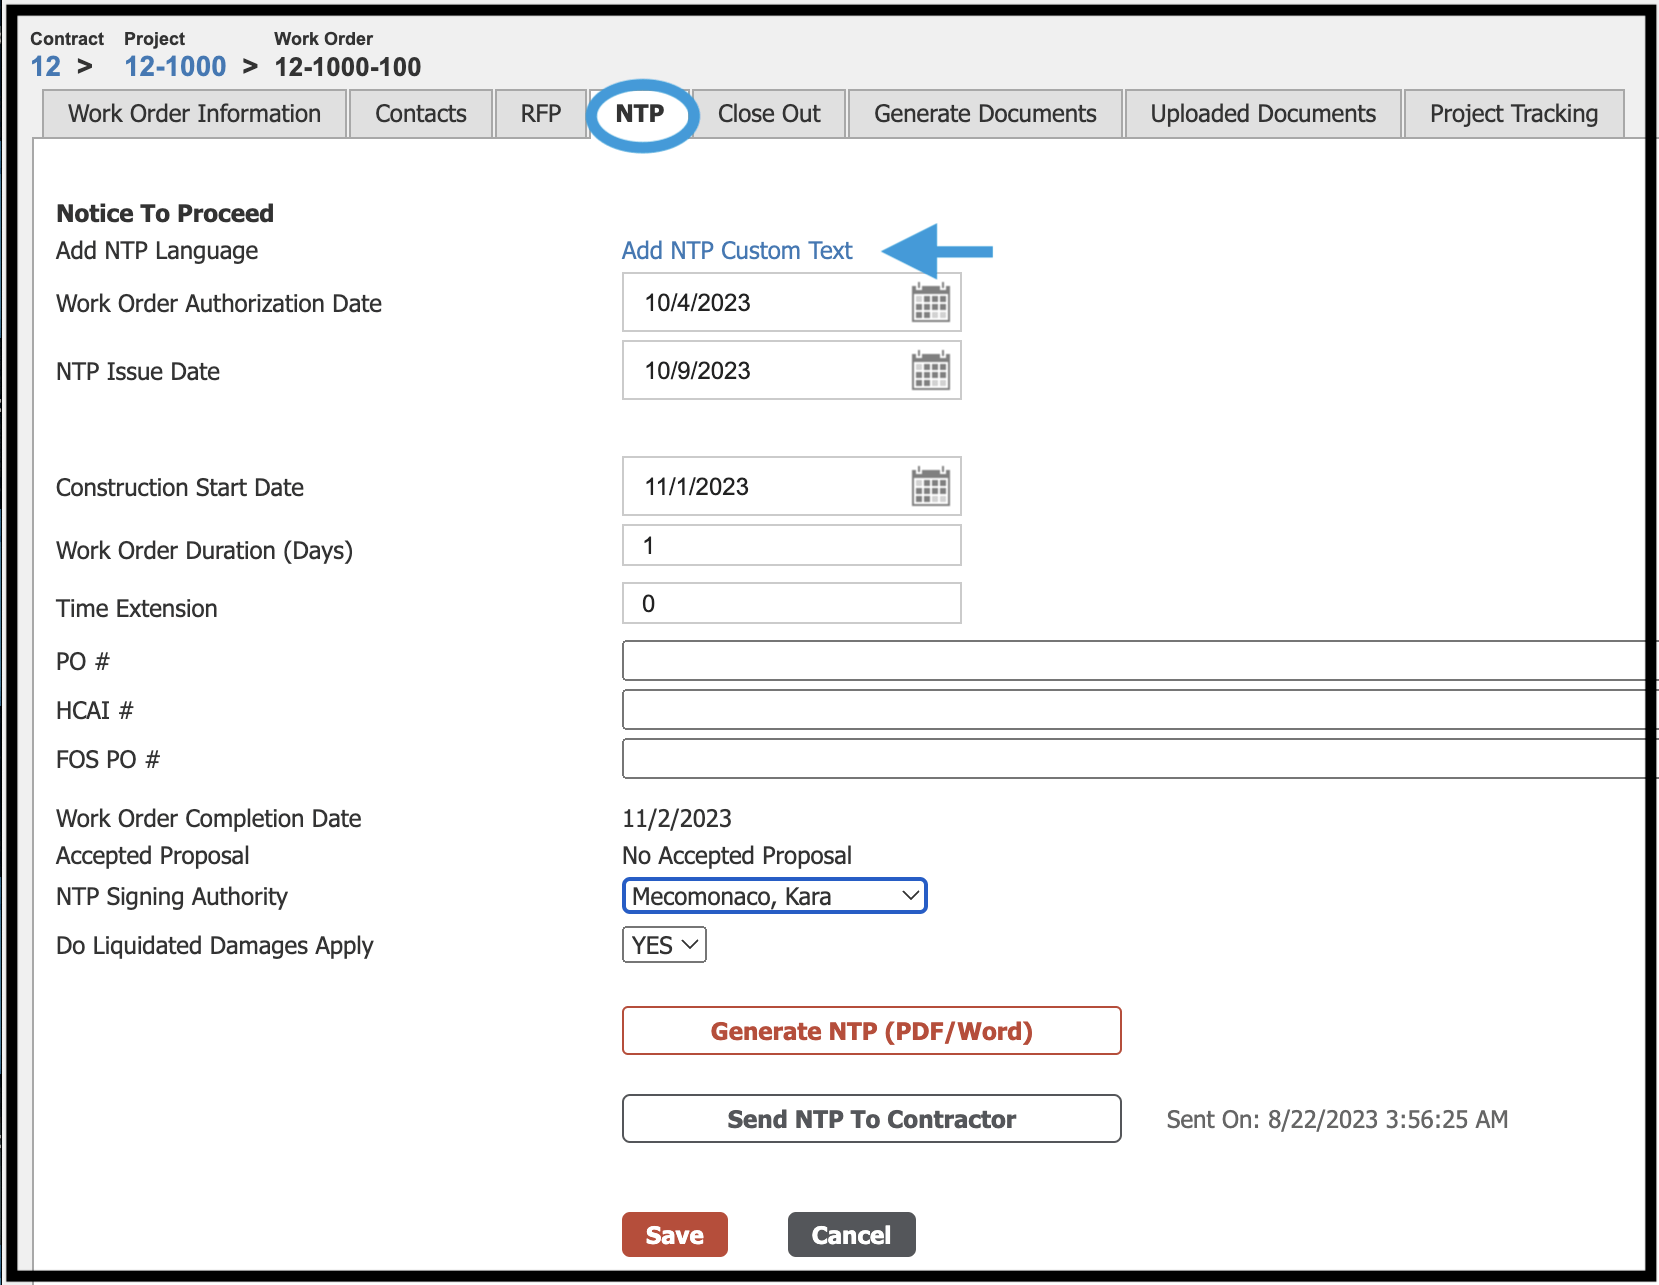
If additional details need to be added to the NTP document, click on the Add NTP Custom Text link (as shown above) to be taken to the built-in word processor.
The NTP tab requires the following information:
- Work Order Authorization Date: The date the work order is authorized by the owner.
- NTP Issue Date: The date the NTP is issued to the contractor.
- Construction Start Date: The anticipated start date for work order construction.
- Work Order Duration: The duration of the work order as prescribed by the owner.
- Time Extension: If applicable, a time extension may be added using this field.
- Work Order Completion Date: The date of completion for the work order will auto-populate based on the user’s inputs in the Construction Start Date and Work Order Duration fields.
- Accepted Proposal: If a proposal has been accepted, the proposal ID number and date/time will appear in this field.
- NTP Signing Authority: If applicable, the authority to sign the NTP document should be selected using the drop-down.
- Liquidated Damages: A drop-down selection to determine whether liquidated damages apply to the work order.
Generate NTP #
To generate the NTP document, click the Generate NTP (PDF/Word) button and the system will generate the requested document based on your organization’s requirements. (Documents are template-based and can be customized per your organization’s requirements).
The system will generate links to allow you to choose between Adobe PDF format and Word format documents. Clicking the link will download/open the requested document.
Send NTP to Contractor #
Choosing the Send NTP to Contractor option will take you to the Send NTP To Contractor screen shown below. Before proceeding to this screen, you should have a signed NTP document saved on your local computer or network location. The NTP document can be obtained from the Generate NTP procedure.
At the Send NTP To Contractor screen, the system will prompt you for the location of the signed document when you click Choose Files.

After selecting the file click Send and the following will occur:
- The file will be emailed to the contractor.
- The email address is controlled by the selection in the Contractor Team under Contractor Project Manager.
- The file will be uploaded to the Work Order Documents and be visible to the contractor.
- The work order status will change to Accepted Proposal and the proposals module for this work order will become locked and allow no further changes to the proposal.
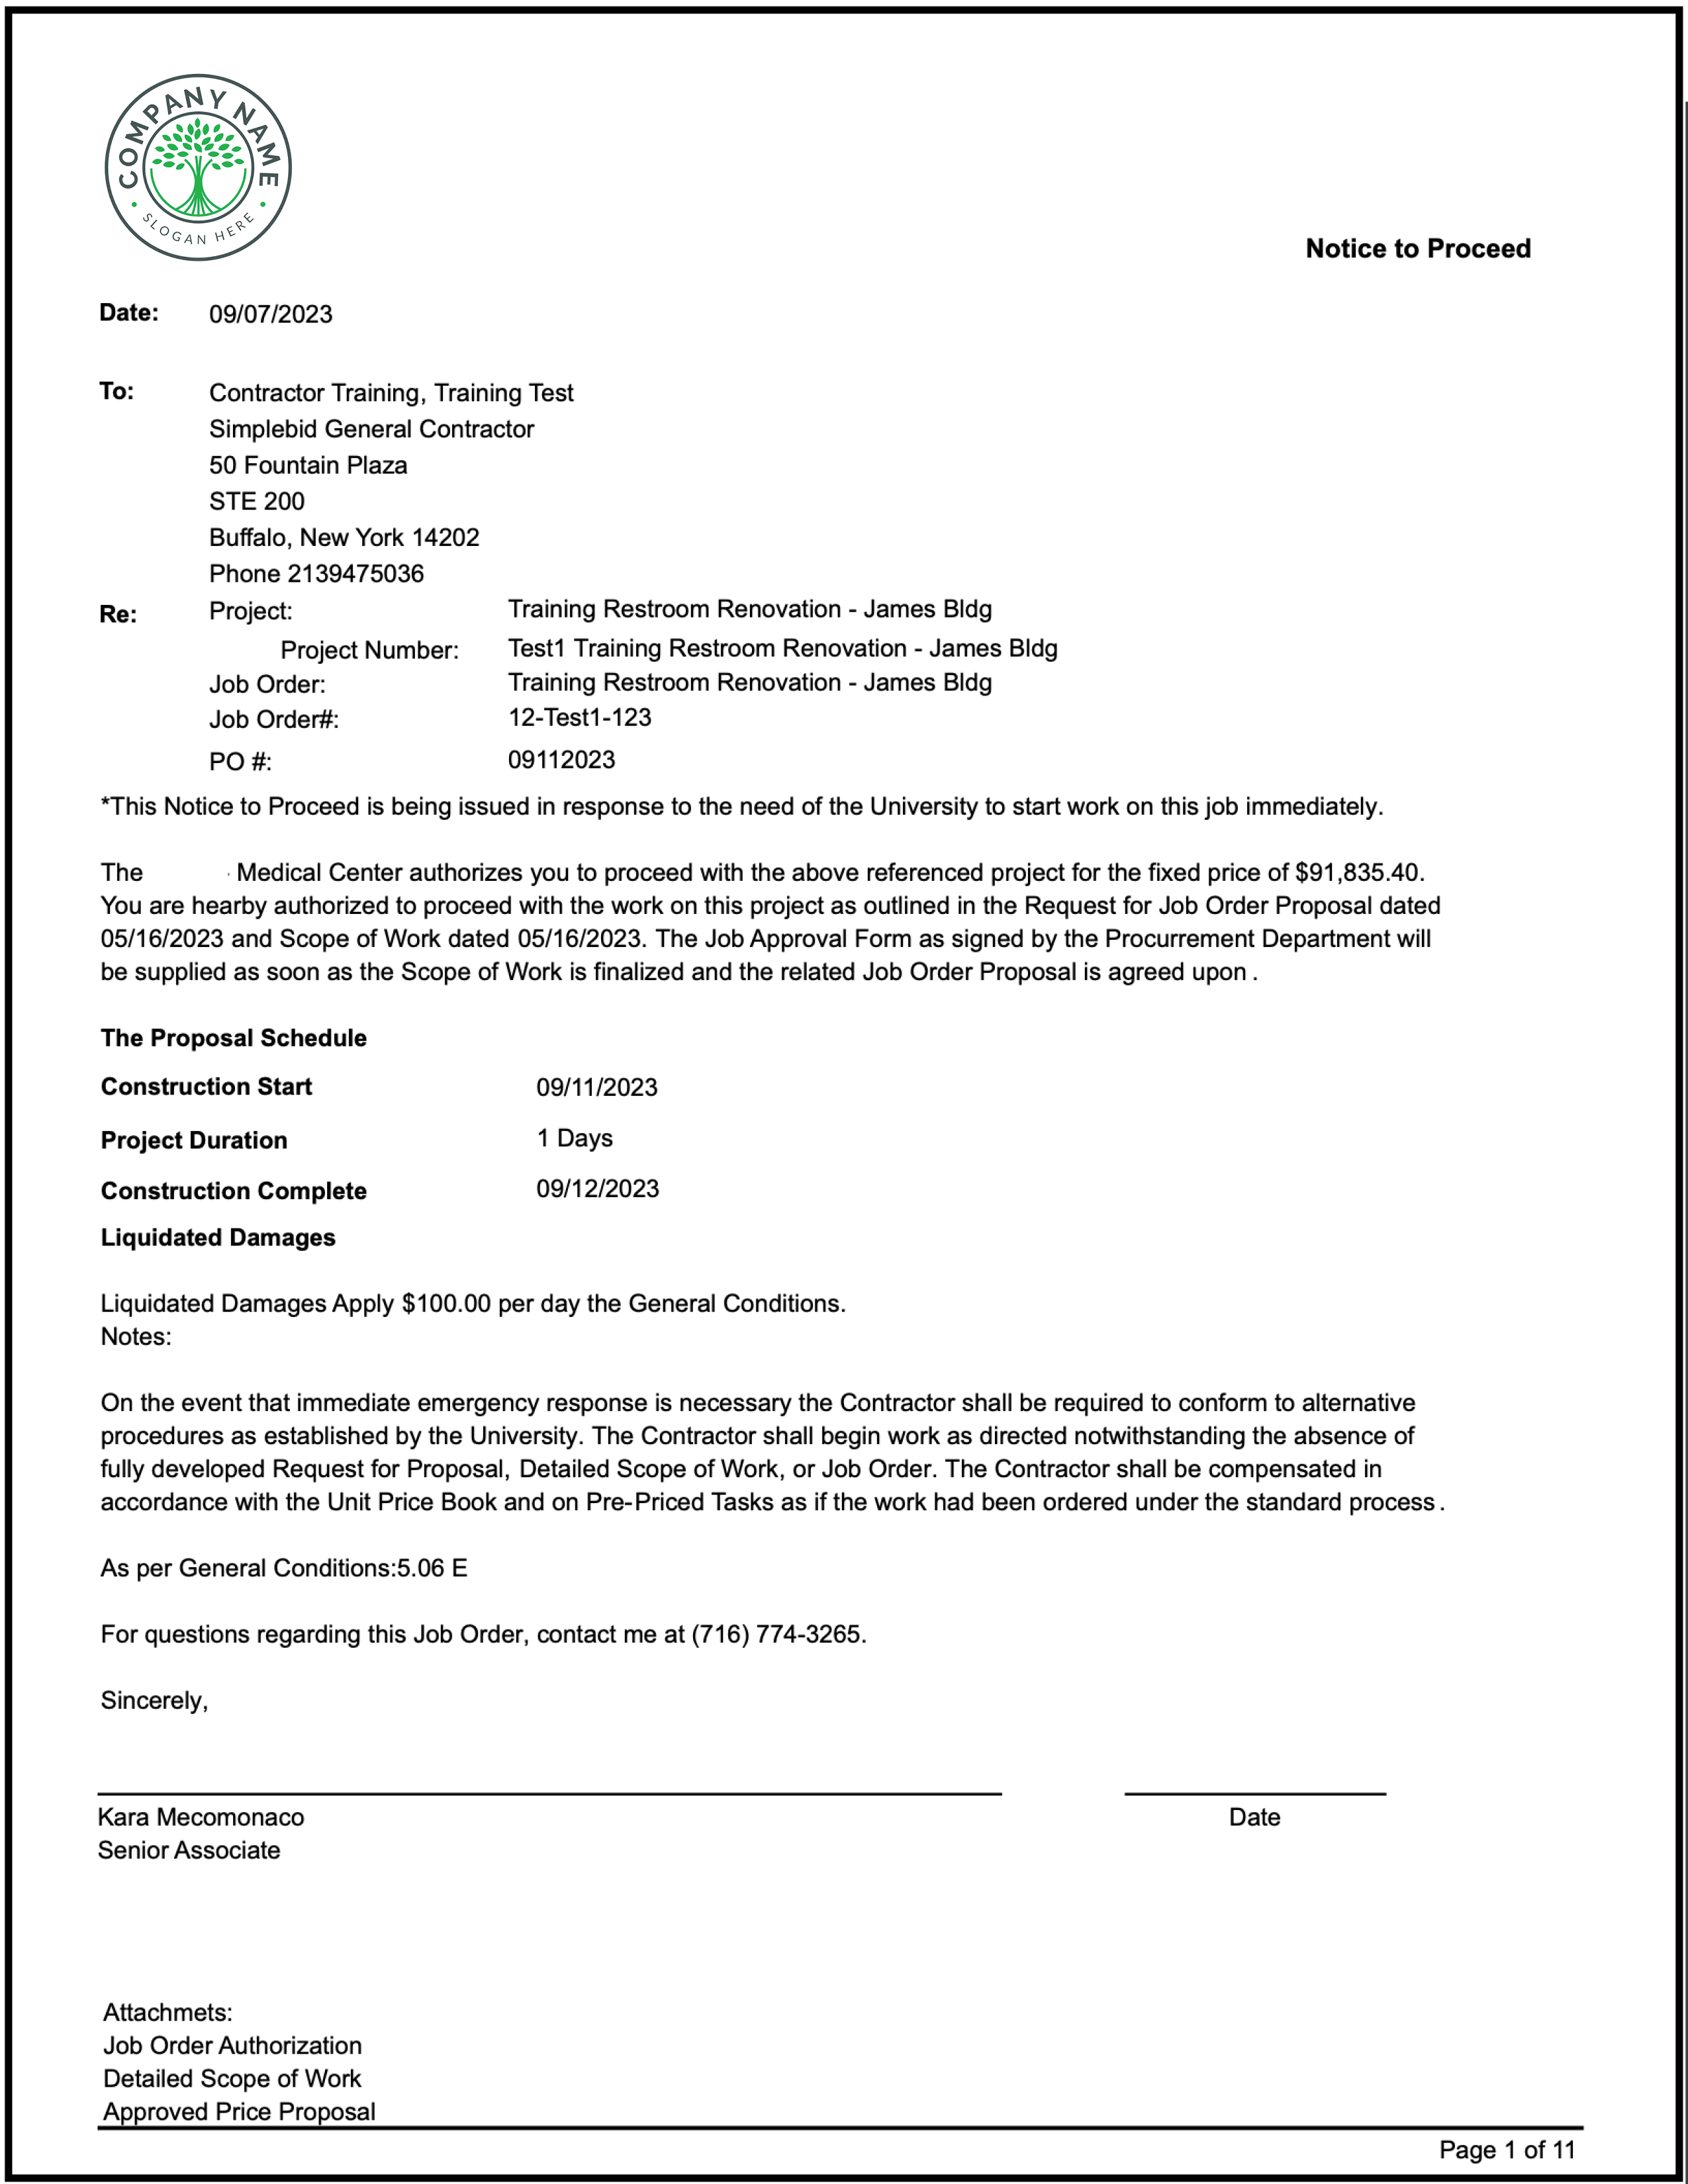
Below is an example of a document that was generated using this process. You would then follow your departmental guidelines to route and sign the document for use in the JOC process.
The customized document can be formatted to fit your organization’s needs by your IT department or the Simplebid® support team.
Close Out #
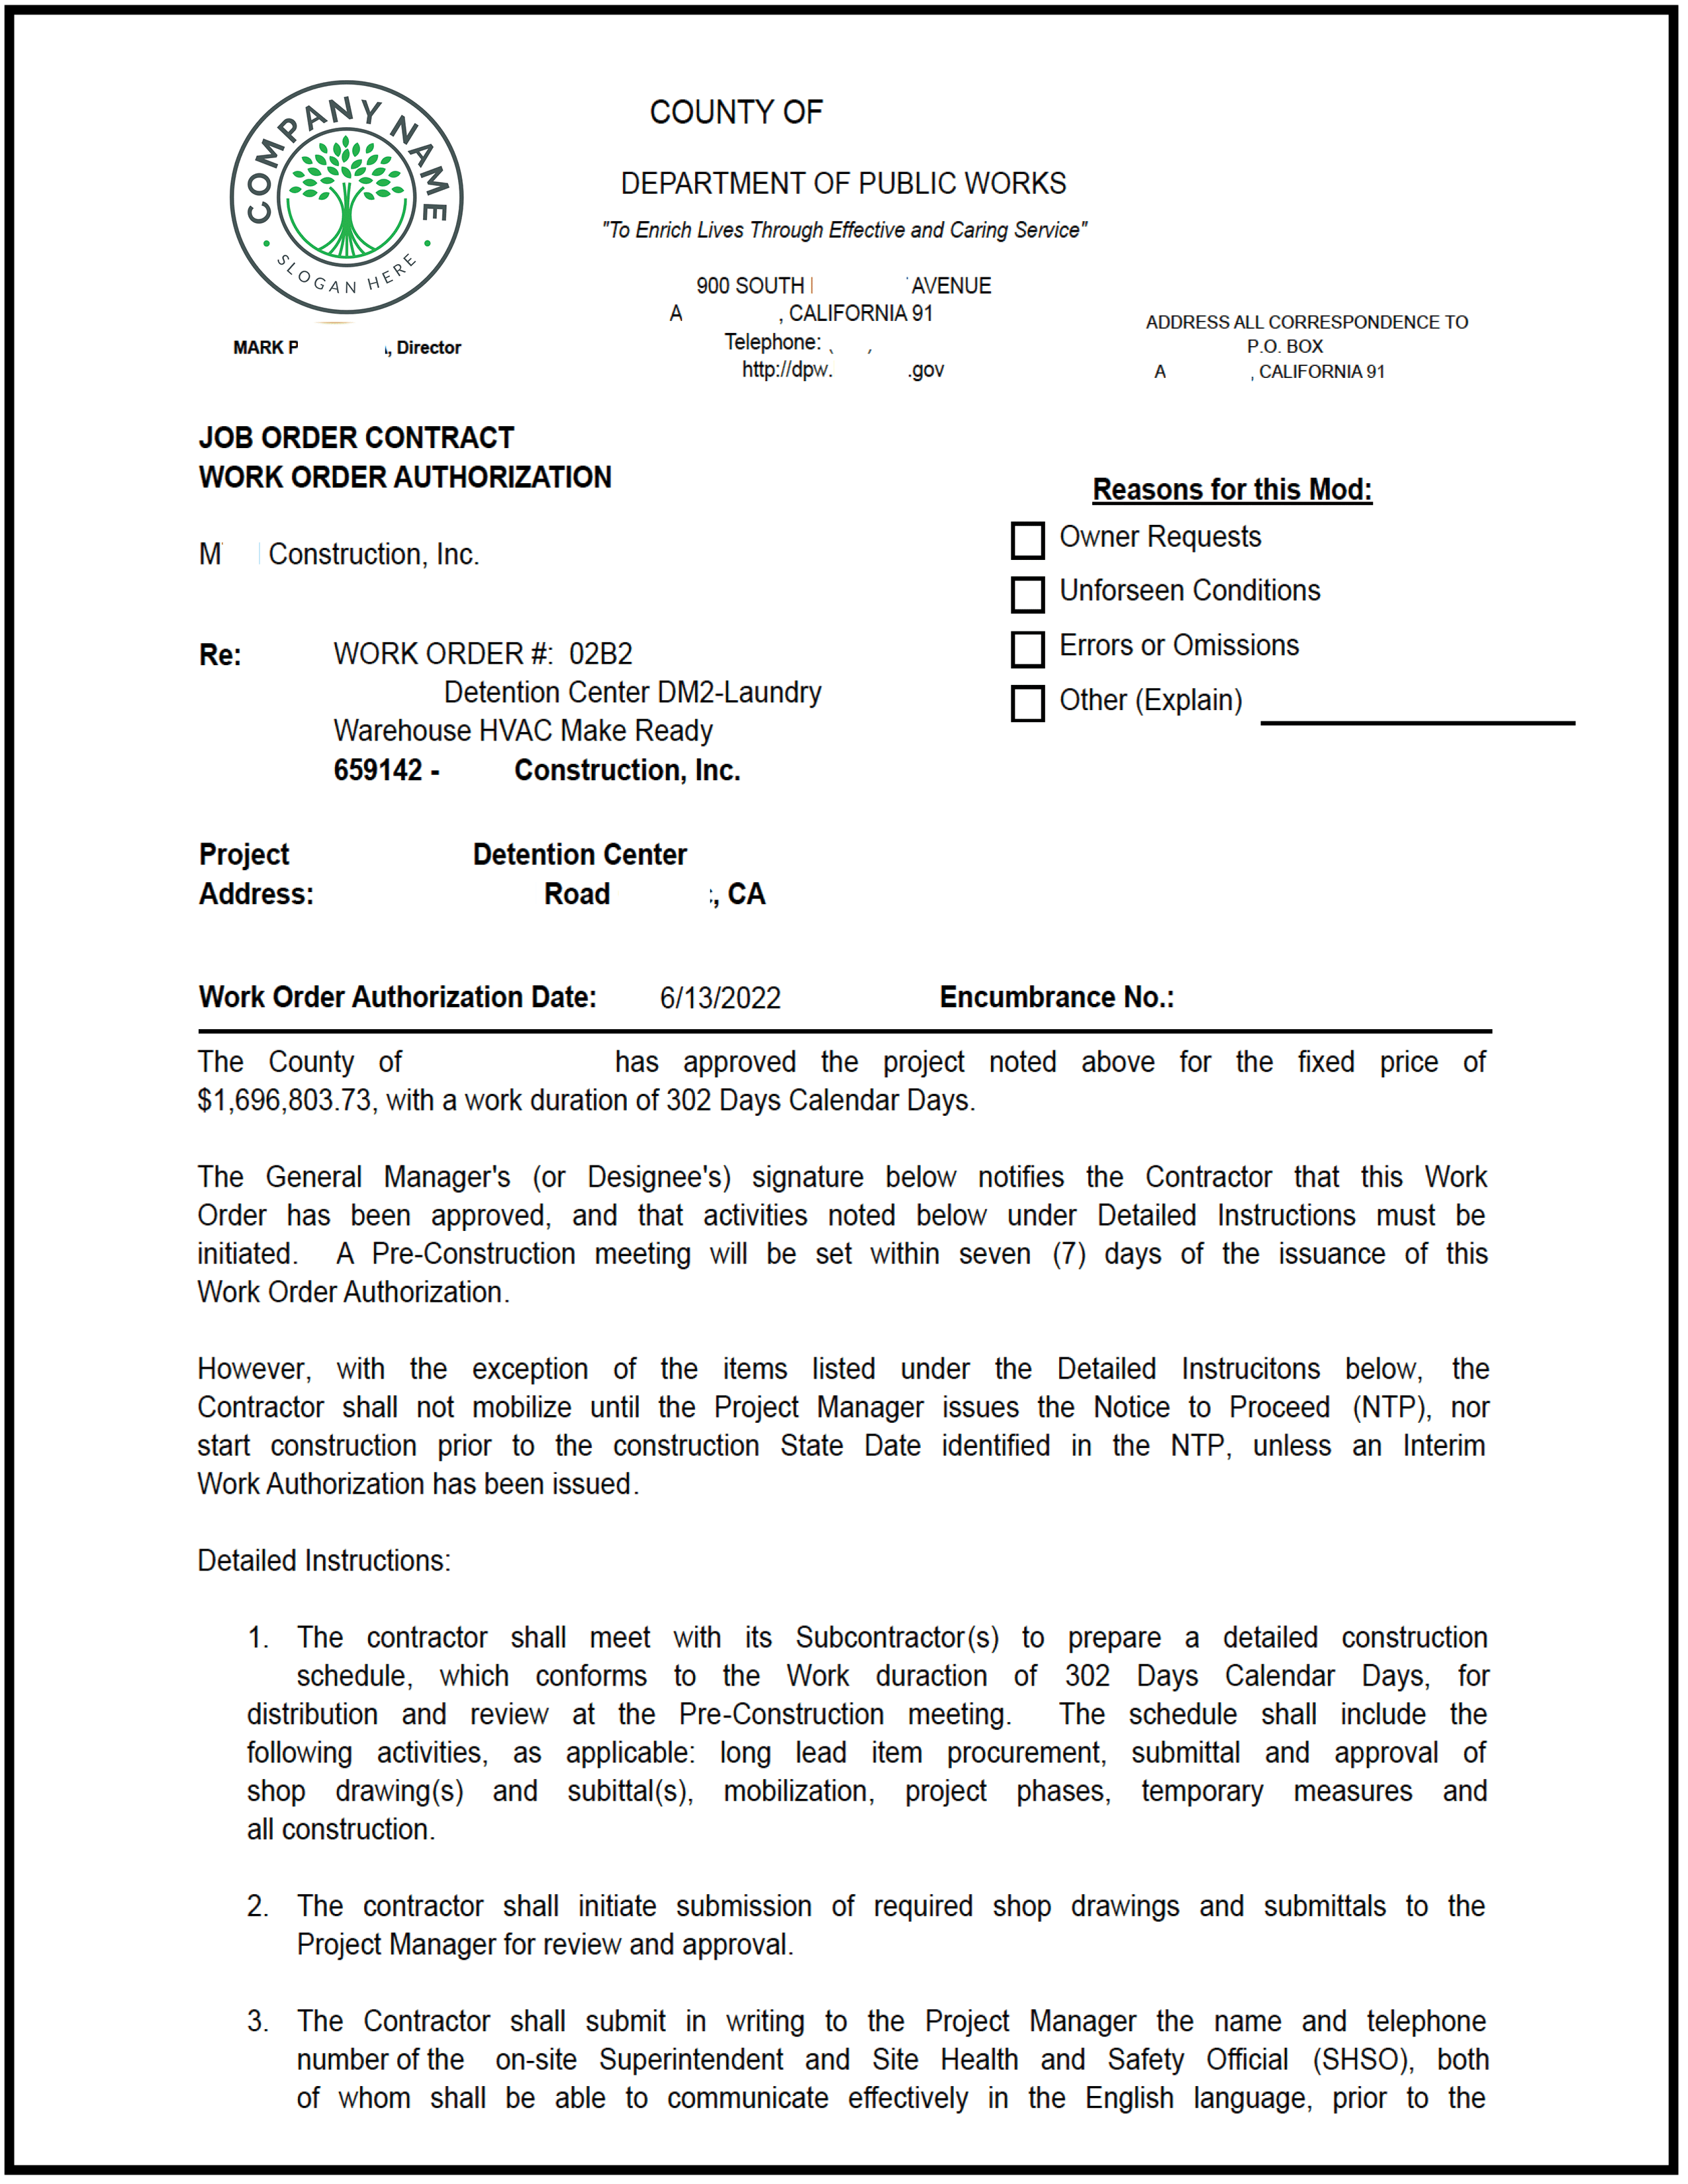
The next steps of the Work Order module are the Work Order Acceptance and Work Order Authorization documents which are generated on the Close Out tab. After entering the requisite data fields, click Save and click on the appropriate boxes to create the Work Order Acceptance Document and/or Work Order Authorization Document.
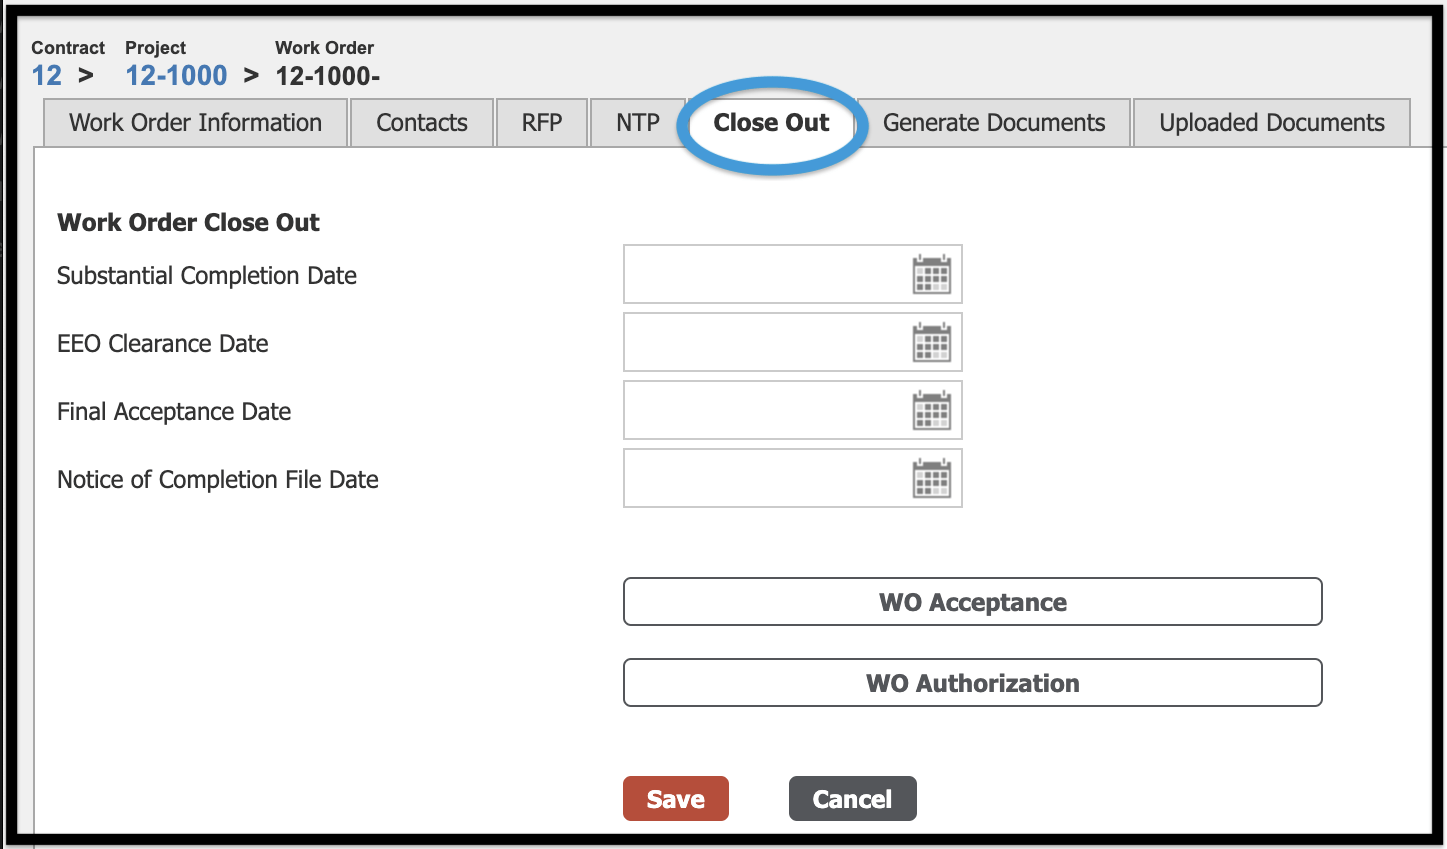
- Substantial Completion Date: The date the work order is determined to be substantially complete.
- Final Acceptance Date: The date the work order is complete and determined to be accepted as complete by the owner.
- Notice of Completion File Date: The date the work order is closed out and final paperwork has been signed and completed.


The final sections of the Work Order module are the work order documents, and the save and cancel options. You will manage work order documents here (as described in the following section).
To save your changes, click the Save button, or choose the Cancel option to return and discard your changes.
Work with Work Order Documents #
All uploaded work order documents are available to your contractor to view during the proposal process. There are multiple operations available when working with work order documents. The uploaded work order documents section of the data entry/update screen provides a preview of the upload document, a hyperlink to open the document, a description of the document, an option to delete the document, and an opportunity to upload additional documents.
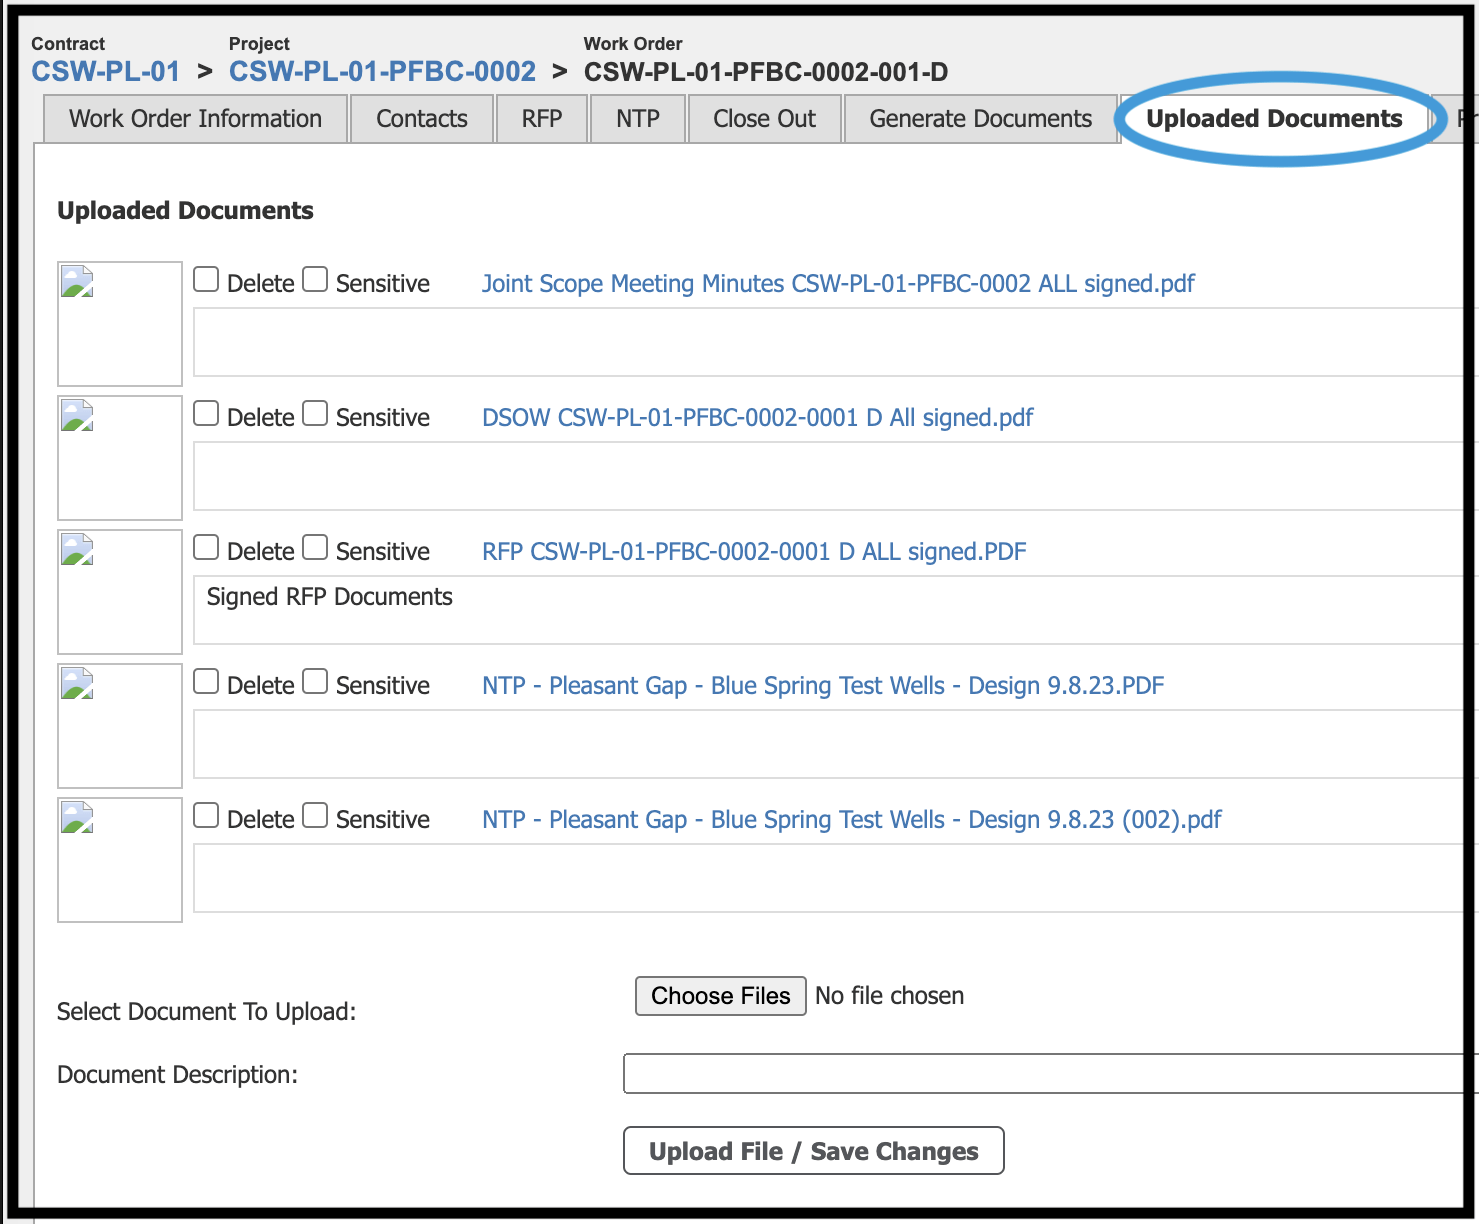
Options available when working with contract documents are as follows:
Delete Contract Document(s) #
To delete one or more contract documents, click in the ‘Delete’ checkbox to place a checkmark next to one or more documents you would like to delete. Once your selections are complete press the Save button at the bottom of the screen and your documents will be removed during the save operation.
Upload New Document #
To upload a new work order document, click the Choose Files button and your web browser will prompt you for the location of the file you would like to upload. This process may vary slightly based on your operating system and web browser but should be familiar as it uses the standard web browser prompt.
After selecting a file enter a document description in the Document Description field and choose Upload File to send your file to the system.
Files uploaded here will be seen by both owner and contractor users with access to the work order. This is a good place to save project-related documents such as plans, drawings, specifications, and other relevant files that a user may want to share with the contractor and/or access at a later date. Files uploaded here are often used to help the contractor understand the scope of work and develop an accurate price proposal.
Sensitive Documents #
To mark one or more work order documents as sensitive, click in the Sensitive checkbox on the documents you would like to mark as sensitive. Once your selections are complete, save the project by clicking the Save button at the bottom of the screen and your documents will be updated during the save operation. The intention of the sensitive flag is to provide a visual indicator to contractors that the document should be treated as sensitive.
As you can see in the image of the contractor’s Proposal view, documents that are marked as sensitive are called out visually as well as having the sensitive flag checked.
Change Document Description #
To change the document description simply edit the description of the document directly in the text area where the description is displayed. You can update the description of as many documents as you like before saving. Once your work is complete, click the Save button at the bottom of the screen.
View Document #
To view the document in a new window, click the blue link above the document description. Your web browser will open a new window with the document displayed or download the document to a file on your computer depending on your browser settings. Please note you must have the appropriate document viewer installed on your computer (Adobe Reader, etc.) depending on the document type.
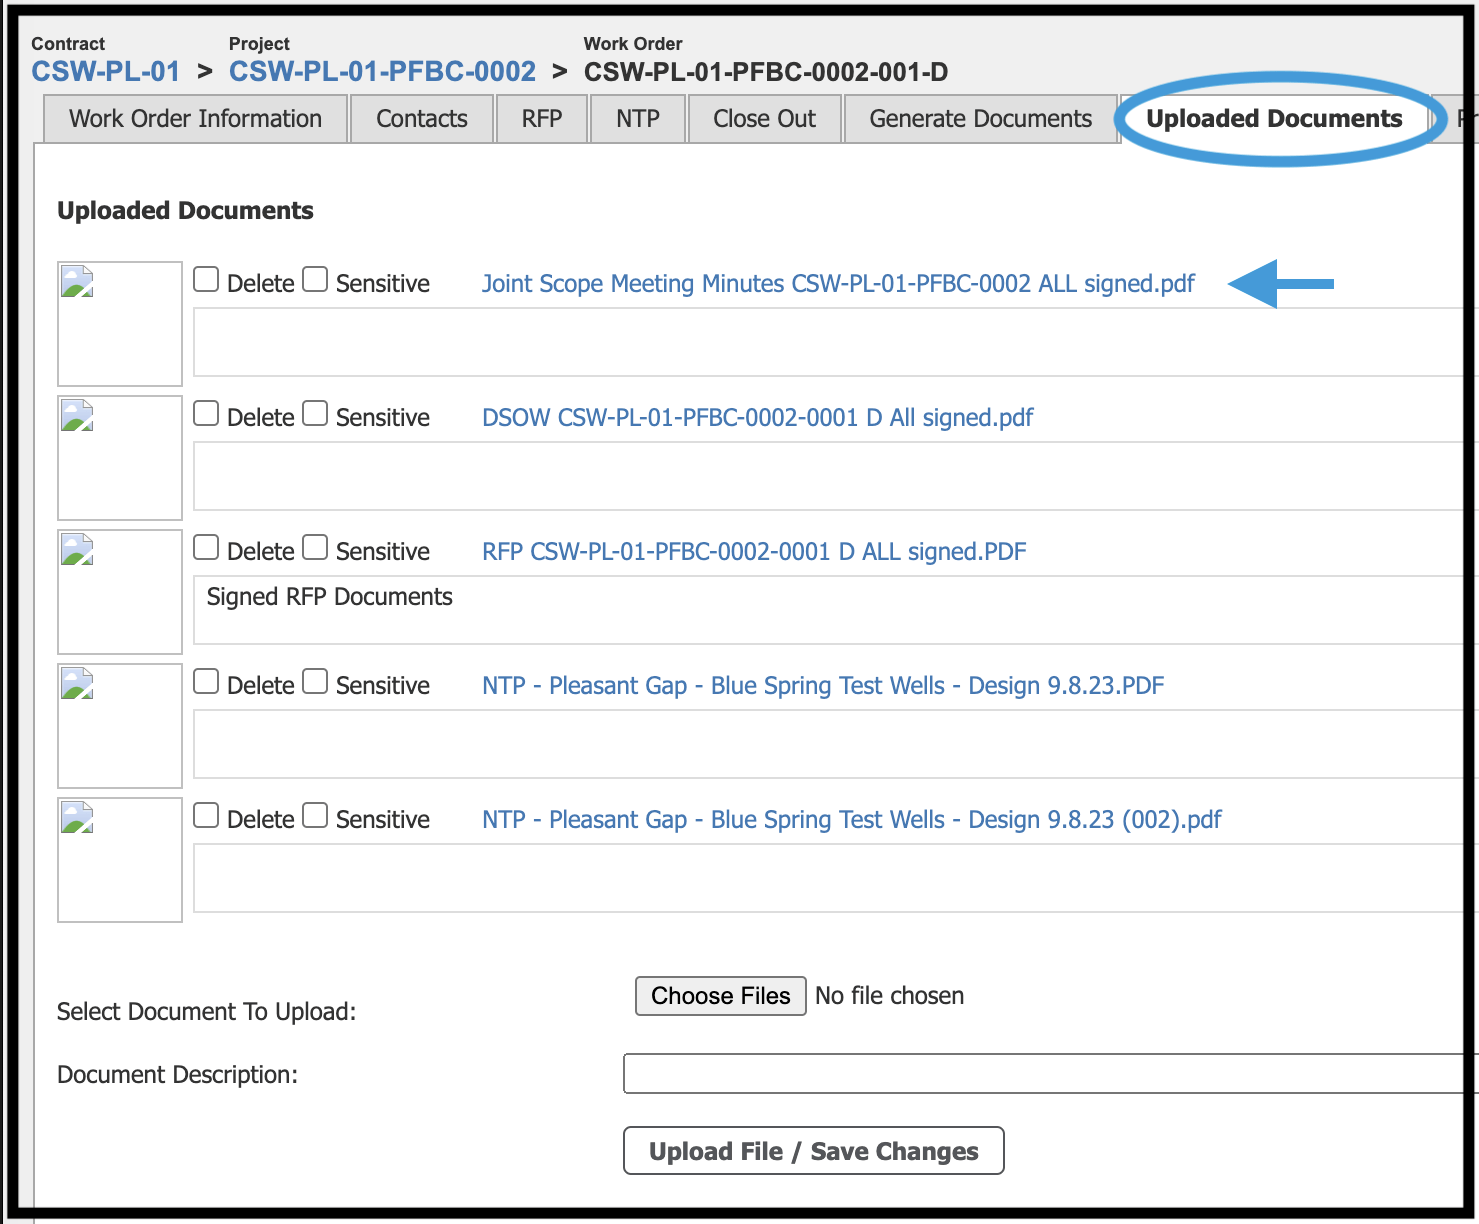
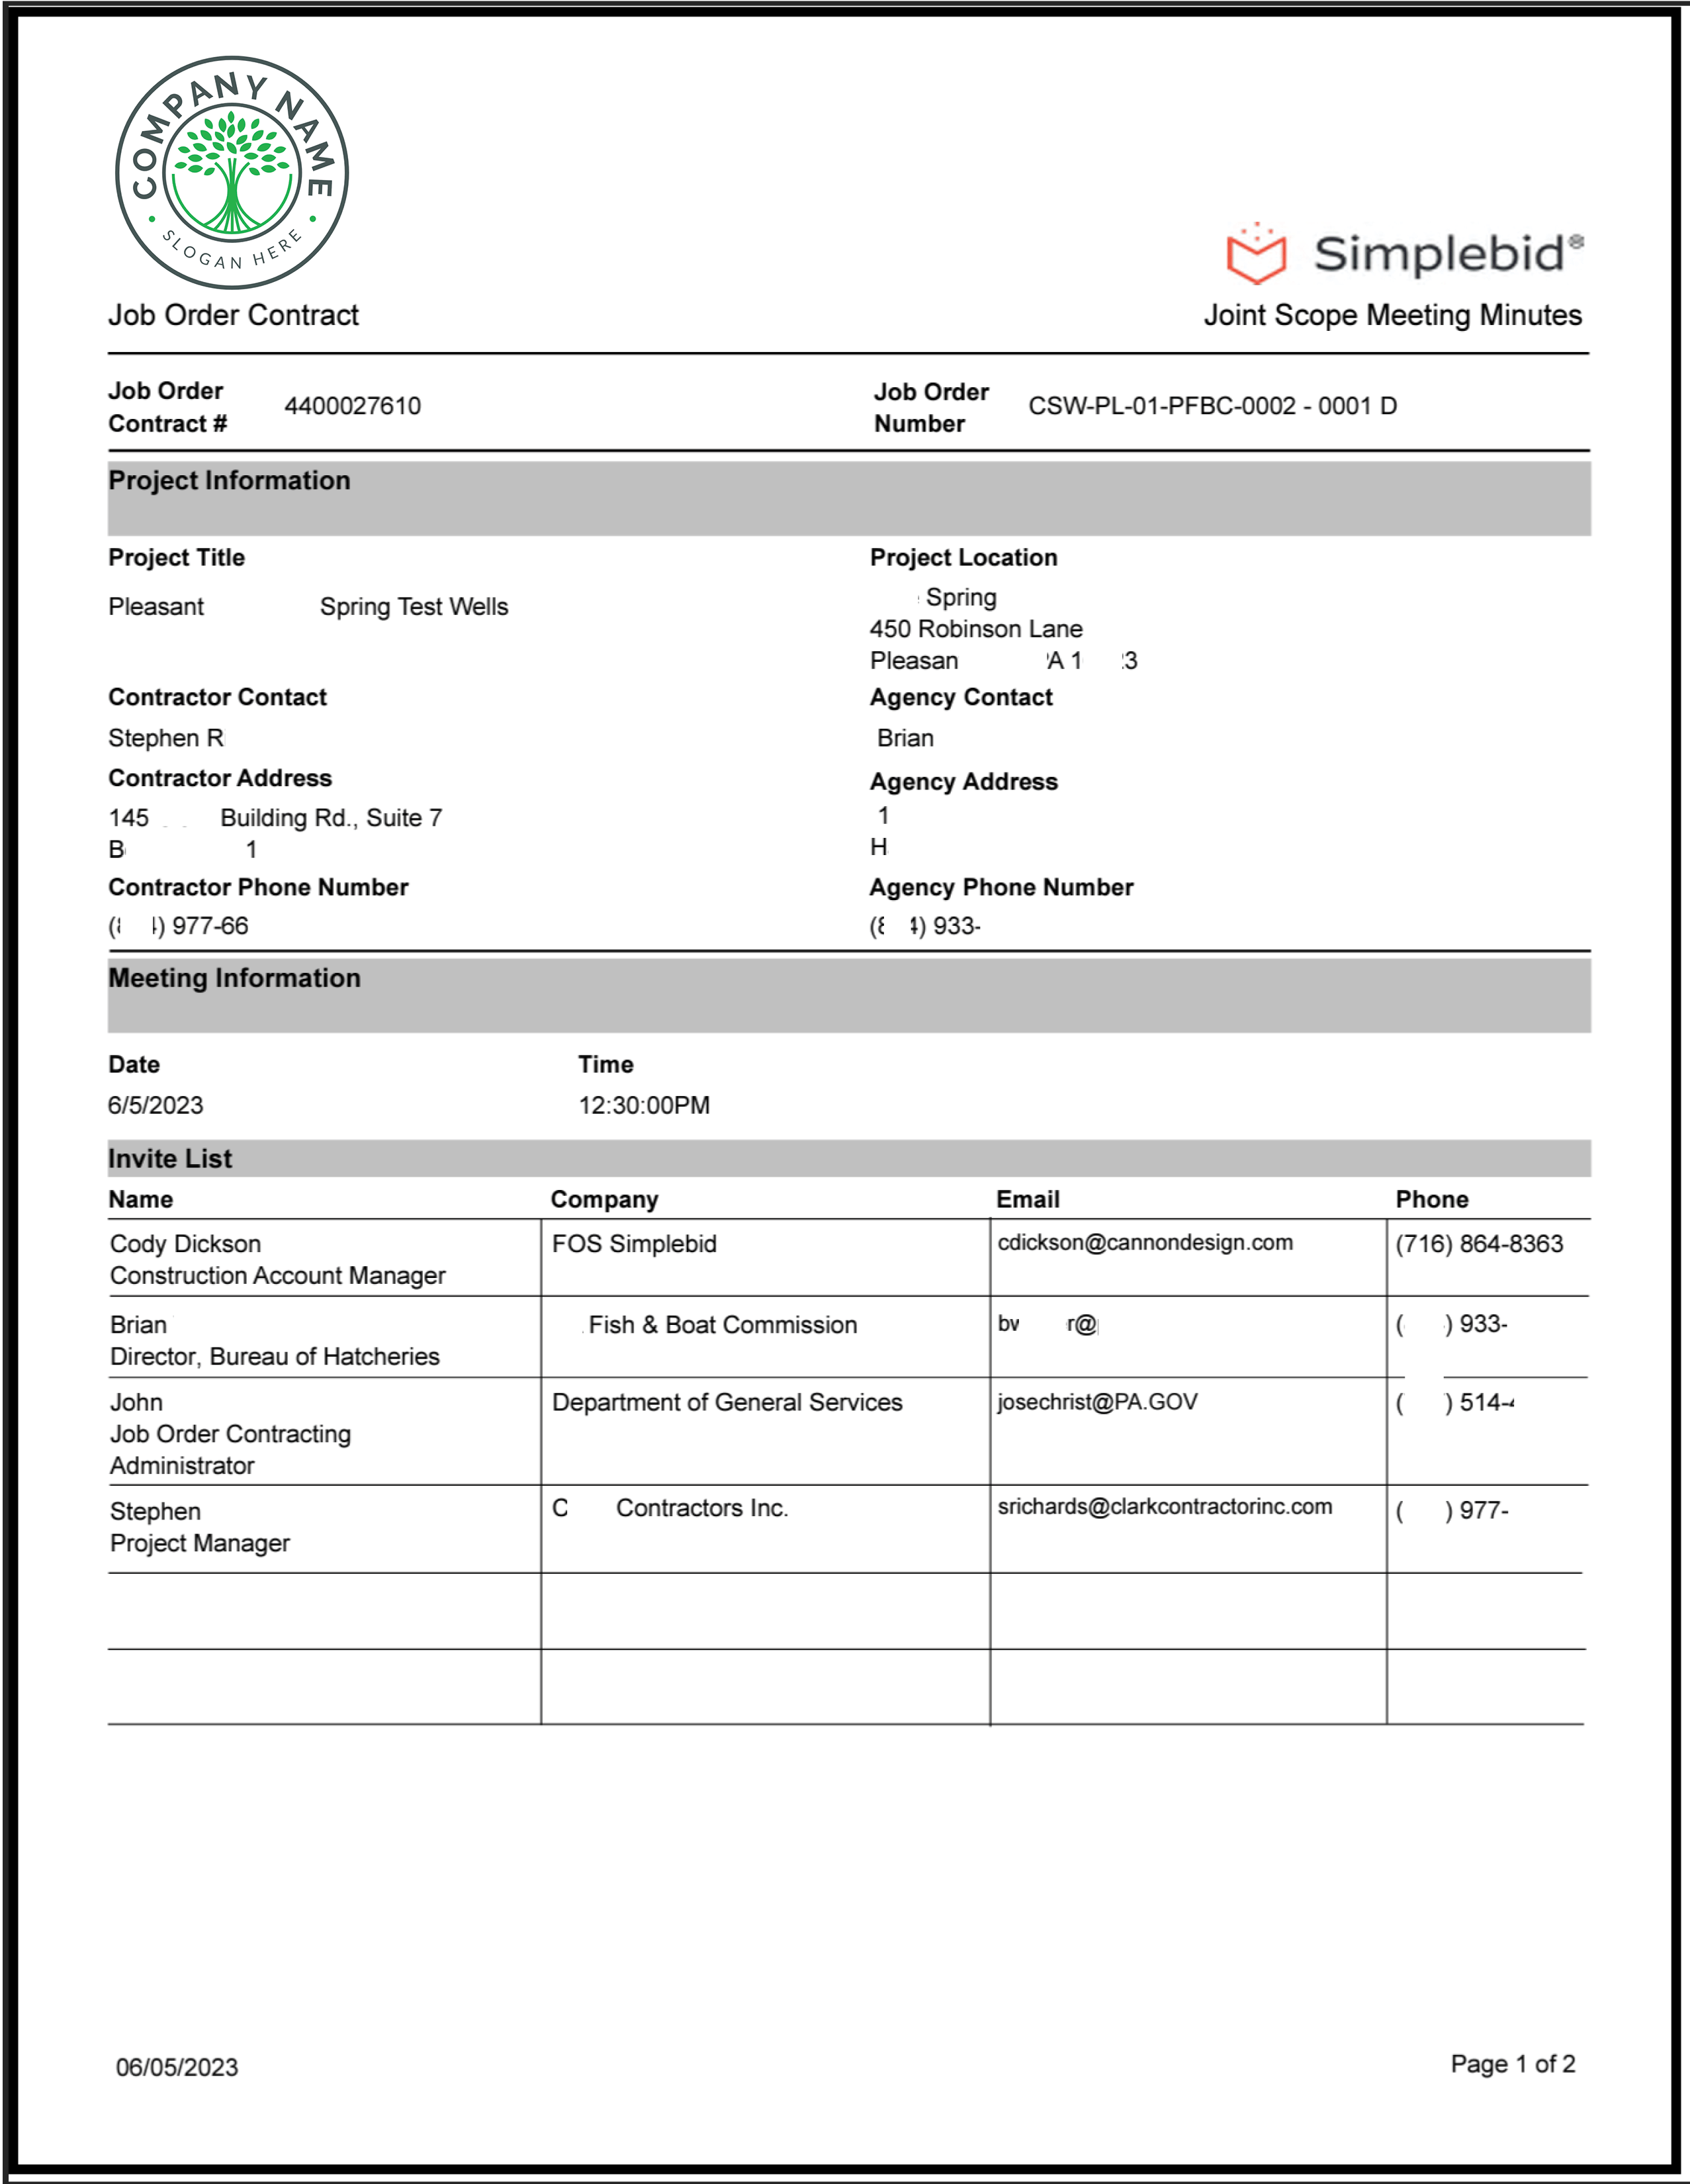
Following is an example of a system-generated document that was uploaded to the work order and viewable by the contractor during the proposal process.
Work with Scope of Work #
As previously mentioned, the General Scope of Work is provided by the project manager for use within a general publication to a contracting entity website or other short, generalized public posting. Typically a one to two-sentence work order overview is entered here.
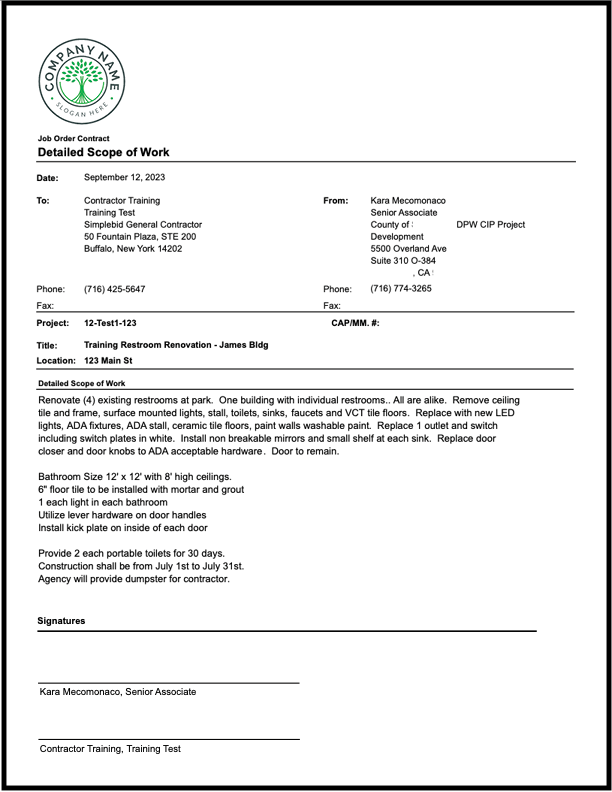
The Detailed Scope of Work is also typically provided by the project manager for specific and descriptive detail of the work order. Once finalized and approved, the detailed scope of work will become part of the RFP and NTP documents and is used by the contractor to develop their price proposal It is important for the detailed SOW to be as specific as possible. Typically, it should be developed jointly between the owner and contractor and approved by the owner representative.
Samples of both are shown below.
During the create or update work order process, clicking either Work with General Scope of Work or Work with Detailed Scope of Work opens a built-in word processor. We highly recommend that you create your Scope of Work using the SimpleBid® editor for maximum compatibility with the system and proper formatting of your system-generated documents; however, if you choose to use a different word processing program, you should copy/paste the complete document rather than beginning outside of the software and finishing within. This will ensure consistency of formatting.

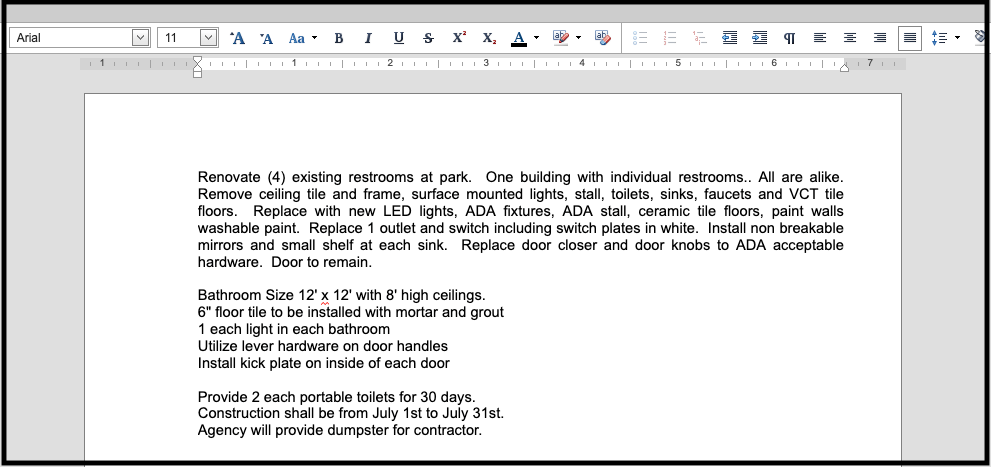
Once the Scope of Work has been created, click Print Detailed Scope of Work to have a copy generated on your organization’s stationery that has been added to the system by your Simplebid® representative. A sample is shown below. In addition to the work detail, the document includes signature lines and is customizable to fit your needs.
Project Tracking #
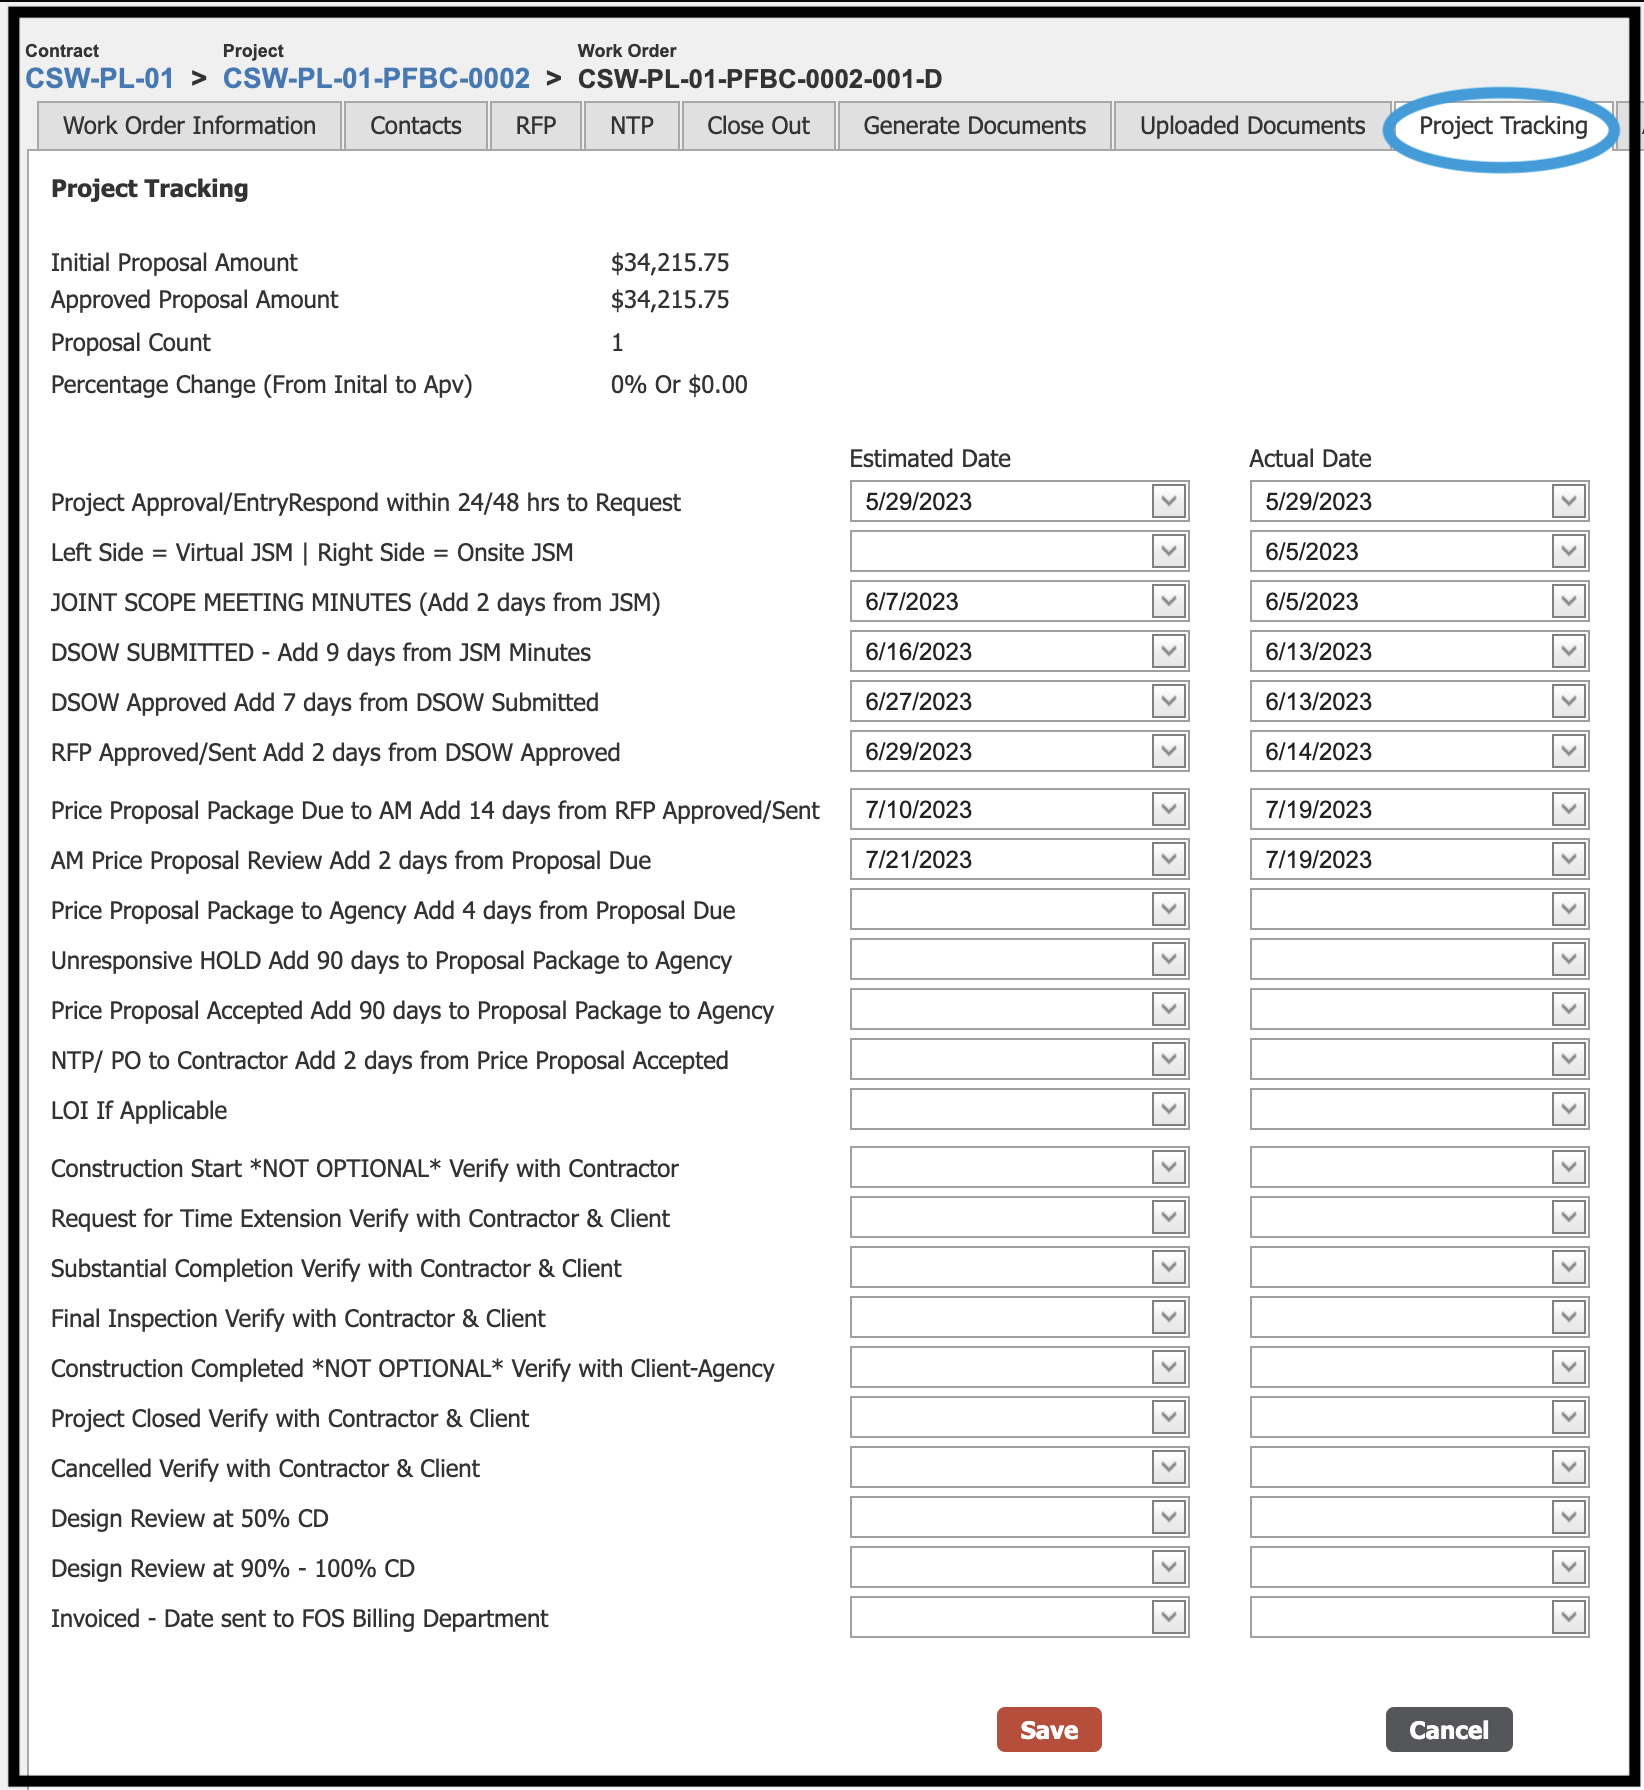
Your Simplebid® representative can help you set up fields for the Project Tracking tab that can then be used in the Reports module for accountability and auditing purposes.


New Item Requests (NIR) #
From time to time, owners and contractors will come across a unique item that does not exist in the Simplebid® cost book and therefore needs to be added in order to complete an accurate proposal and work order.
From the Work Order grid, click on the link associated with the record you would like to view.

If there is an NIR associated with this work order, the NIR tab will be present. If there are no NIRs associated with this work order, the tab will not be present.
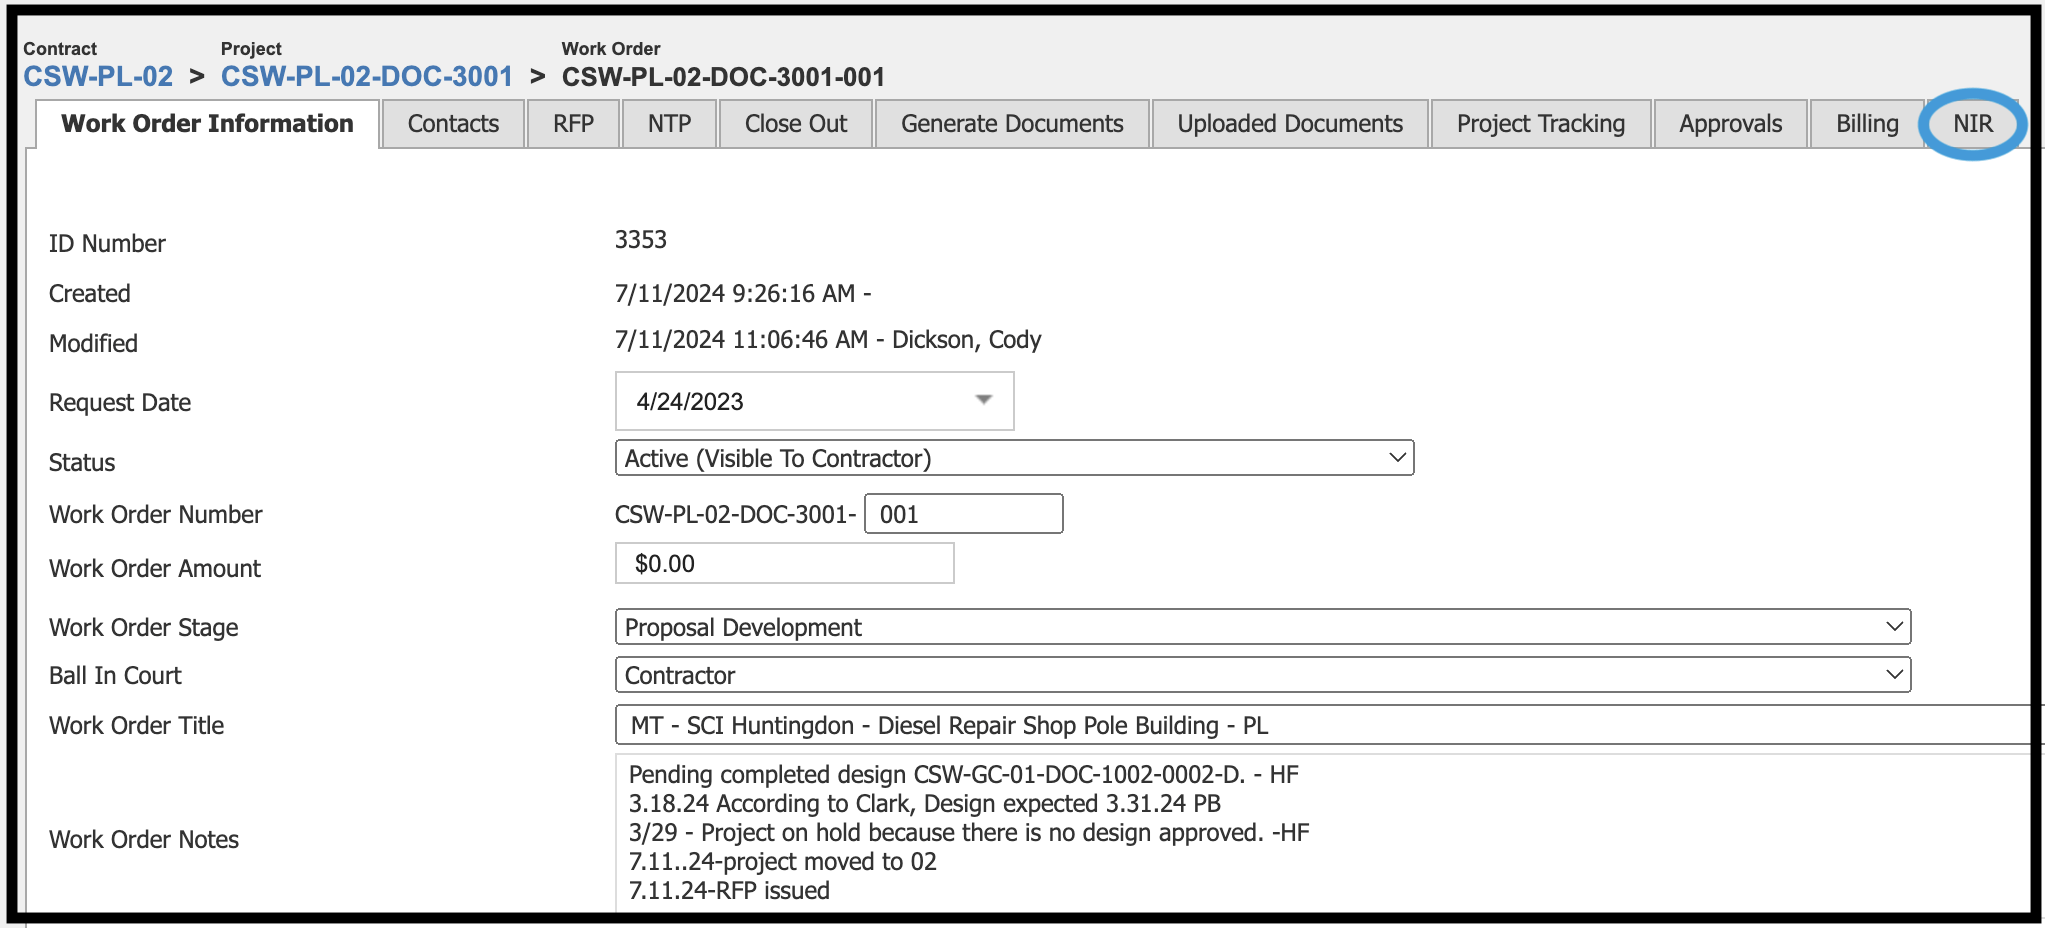
Click on the NIR tab to be taken to a grid showing all NIRs associated with this work order. As shown below, click on the NIR# to be taken to the individual Item Request.

The workflow of an NIR begins with the Item Request form shown below.
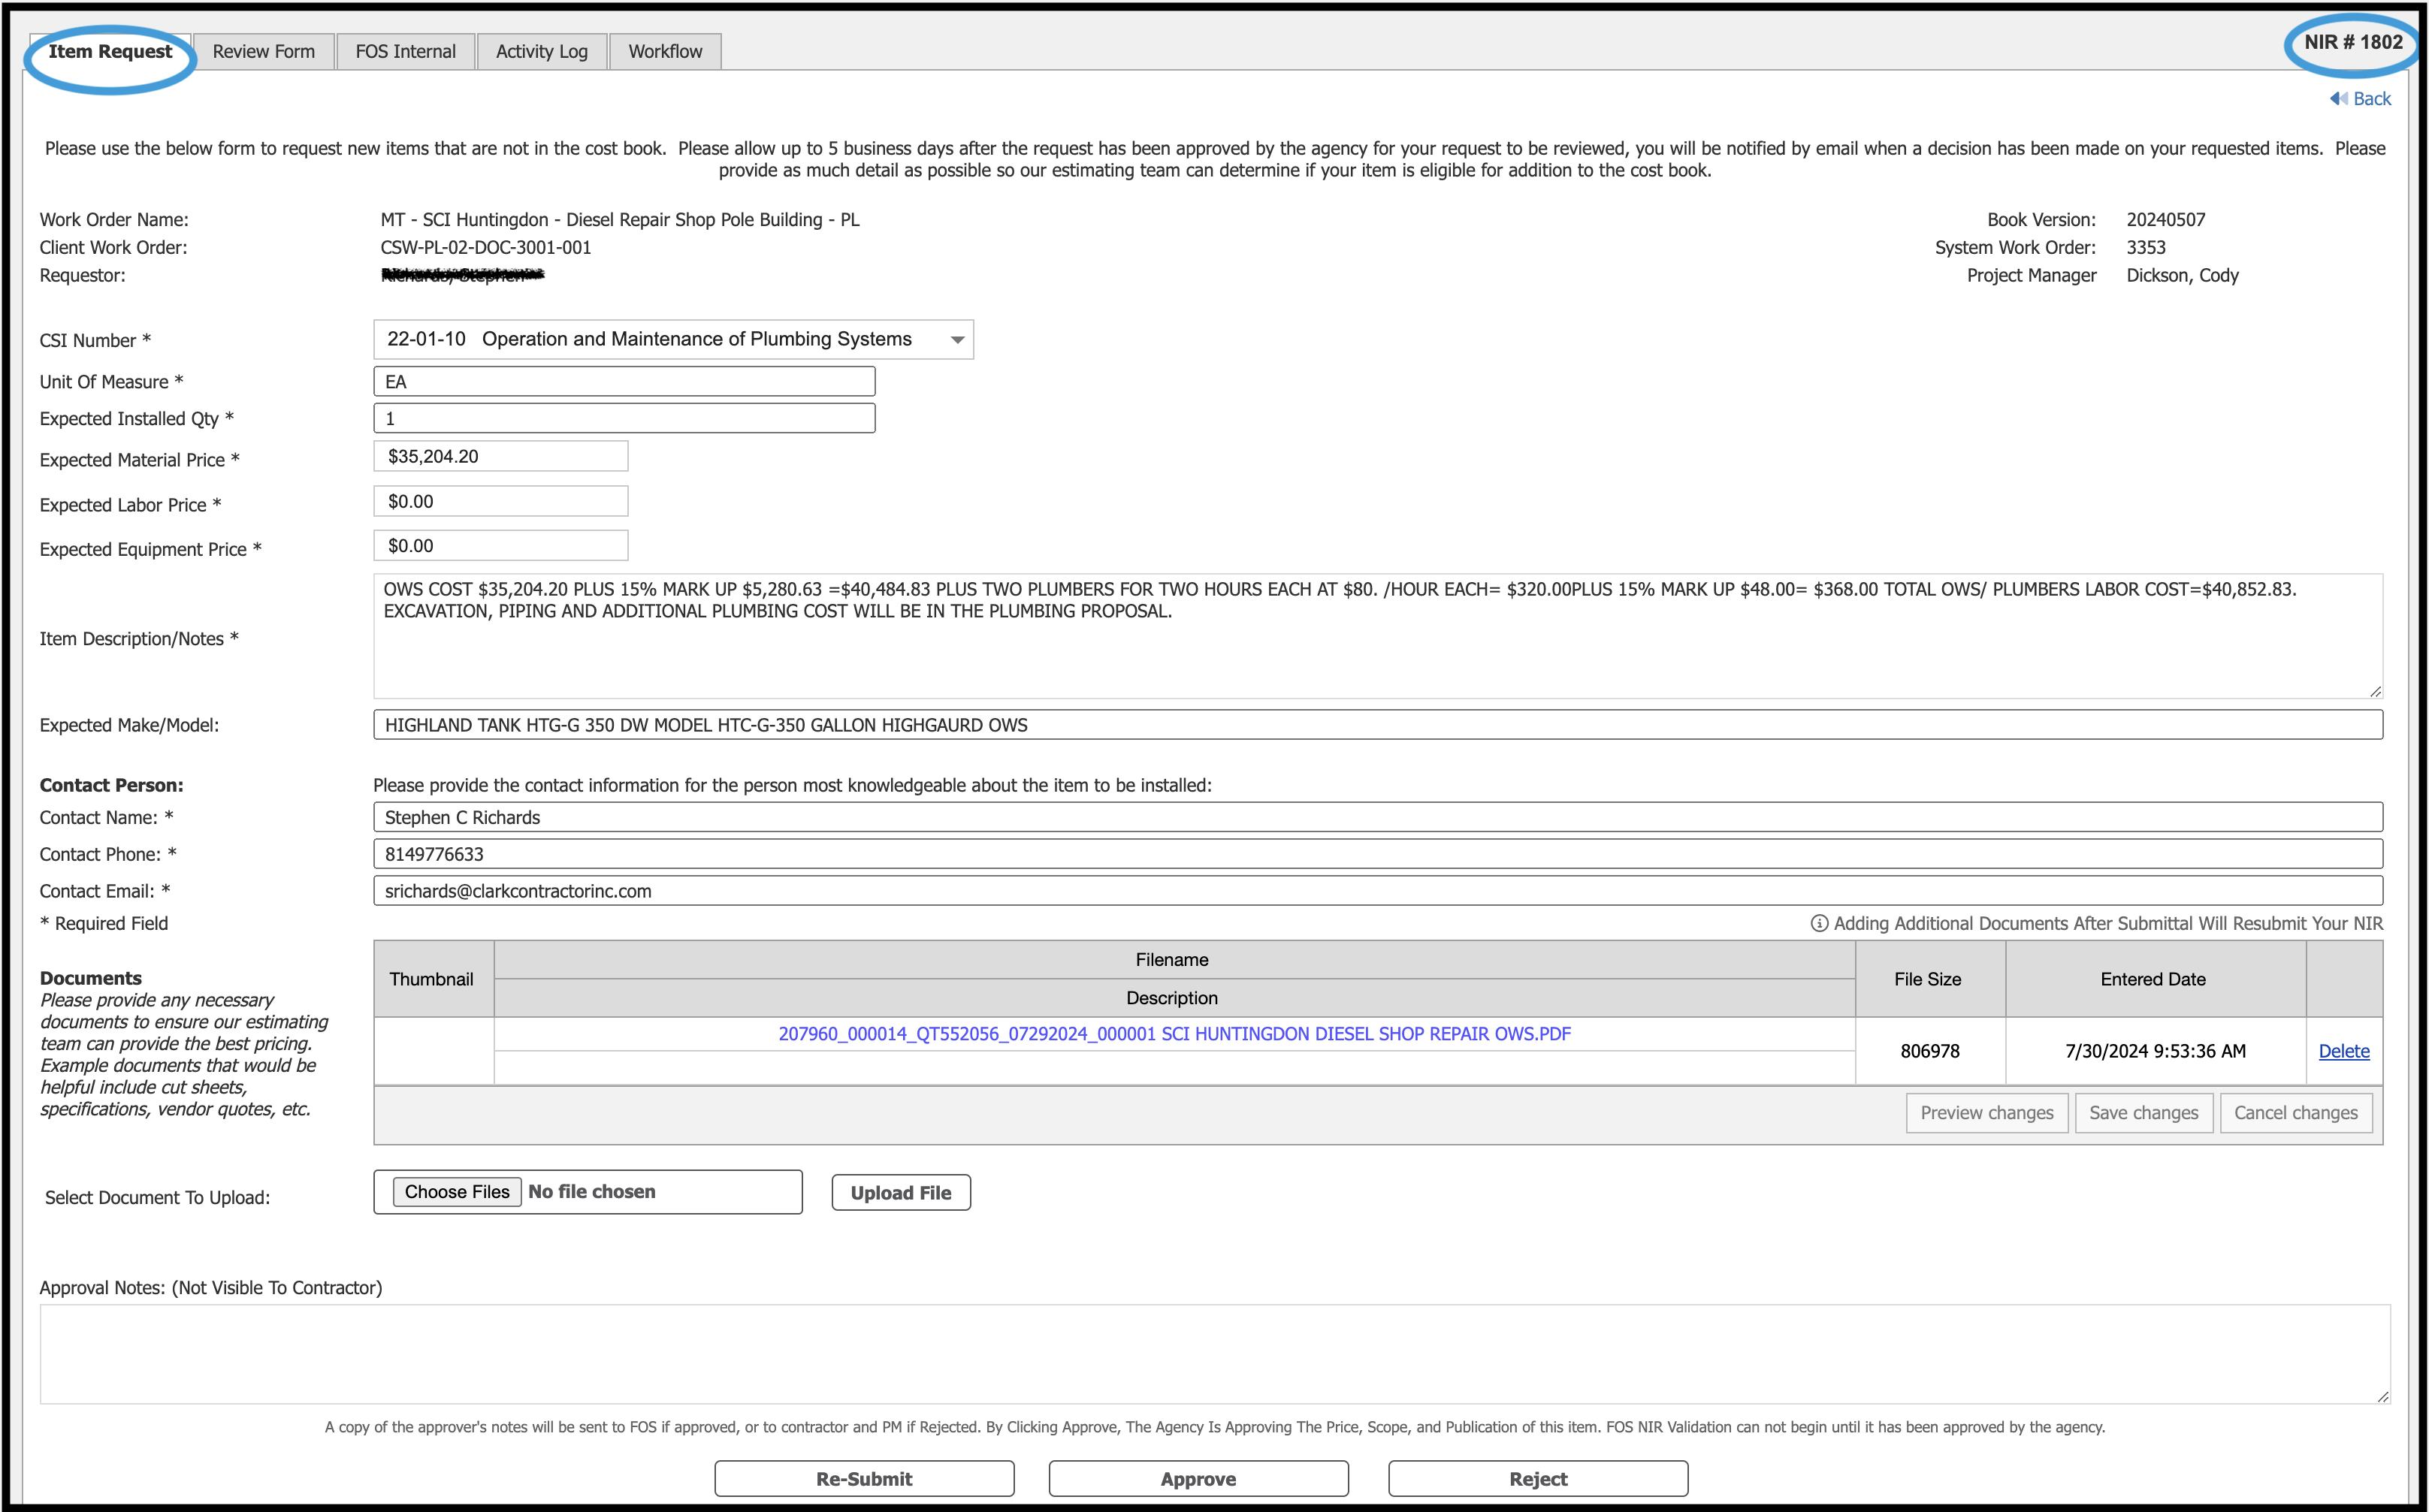
For more information on how the NIR process works, please see: Understanding the New Item Request (NIR) Process.
Depending on your subscription agreement and access level, documentation may be shown for areas that are not included in your menu bar. Simplebid is highly customizable to meet our clients’ individual needs; as such, some of the terminology that appears in this guide might be slightly different than what your organization uses.
© Copyright 2024, FOS of CannonDesign – All Rights Reserved – Confidential and Proprietary