
Assets #

In This Section #
- Introduction
- Visualization
- Data
- Portfolio
- Portfolio Grid Descriptions
- Add a Portfolio
- Sort a Portfolio
- Edit a Portfolio
- Show Inactive Portfolios
- Search
- Portfolio Visualization
- Site
- Site Data Grid
- Add a Site
- Edit a Site
- Show Inactive Sites
- Sort a Site
- Site Visualization
- Building
- Building Data Grid
- Add a Building
- Building Information
- Discipline
- Industry Standard – Uniformat
- General
- Conditions
- Planning
- Photos/Files
- Risk
- Costs
- Additional Inventory Fields
- Client Fields
- History
- Assessment Record Actions
- Add a System or Component
- General Info
- General Description
- ADA
- Photos/Files
- Asset Tracking
- Floors/Locations
- Job Tracking
- CRV
- ECM Data
- ECM Reports
- TCO Data
- Building Visualization
- Discipline
- Portfolio
Clicking the Assets navigation link will show all Portfolios within the selected client. A summary of how the application is structured is provided below to depict how data is organized within the Assets module.

Introduction #
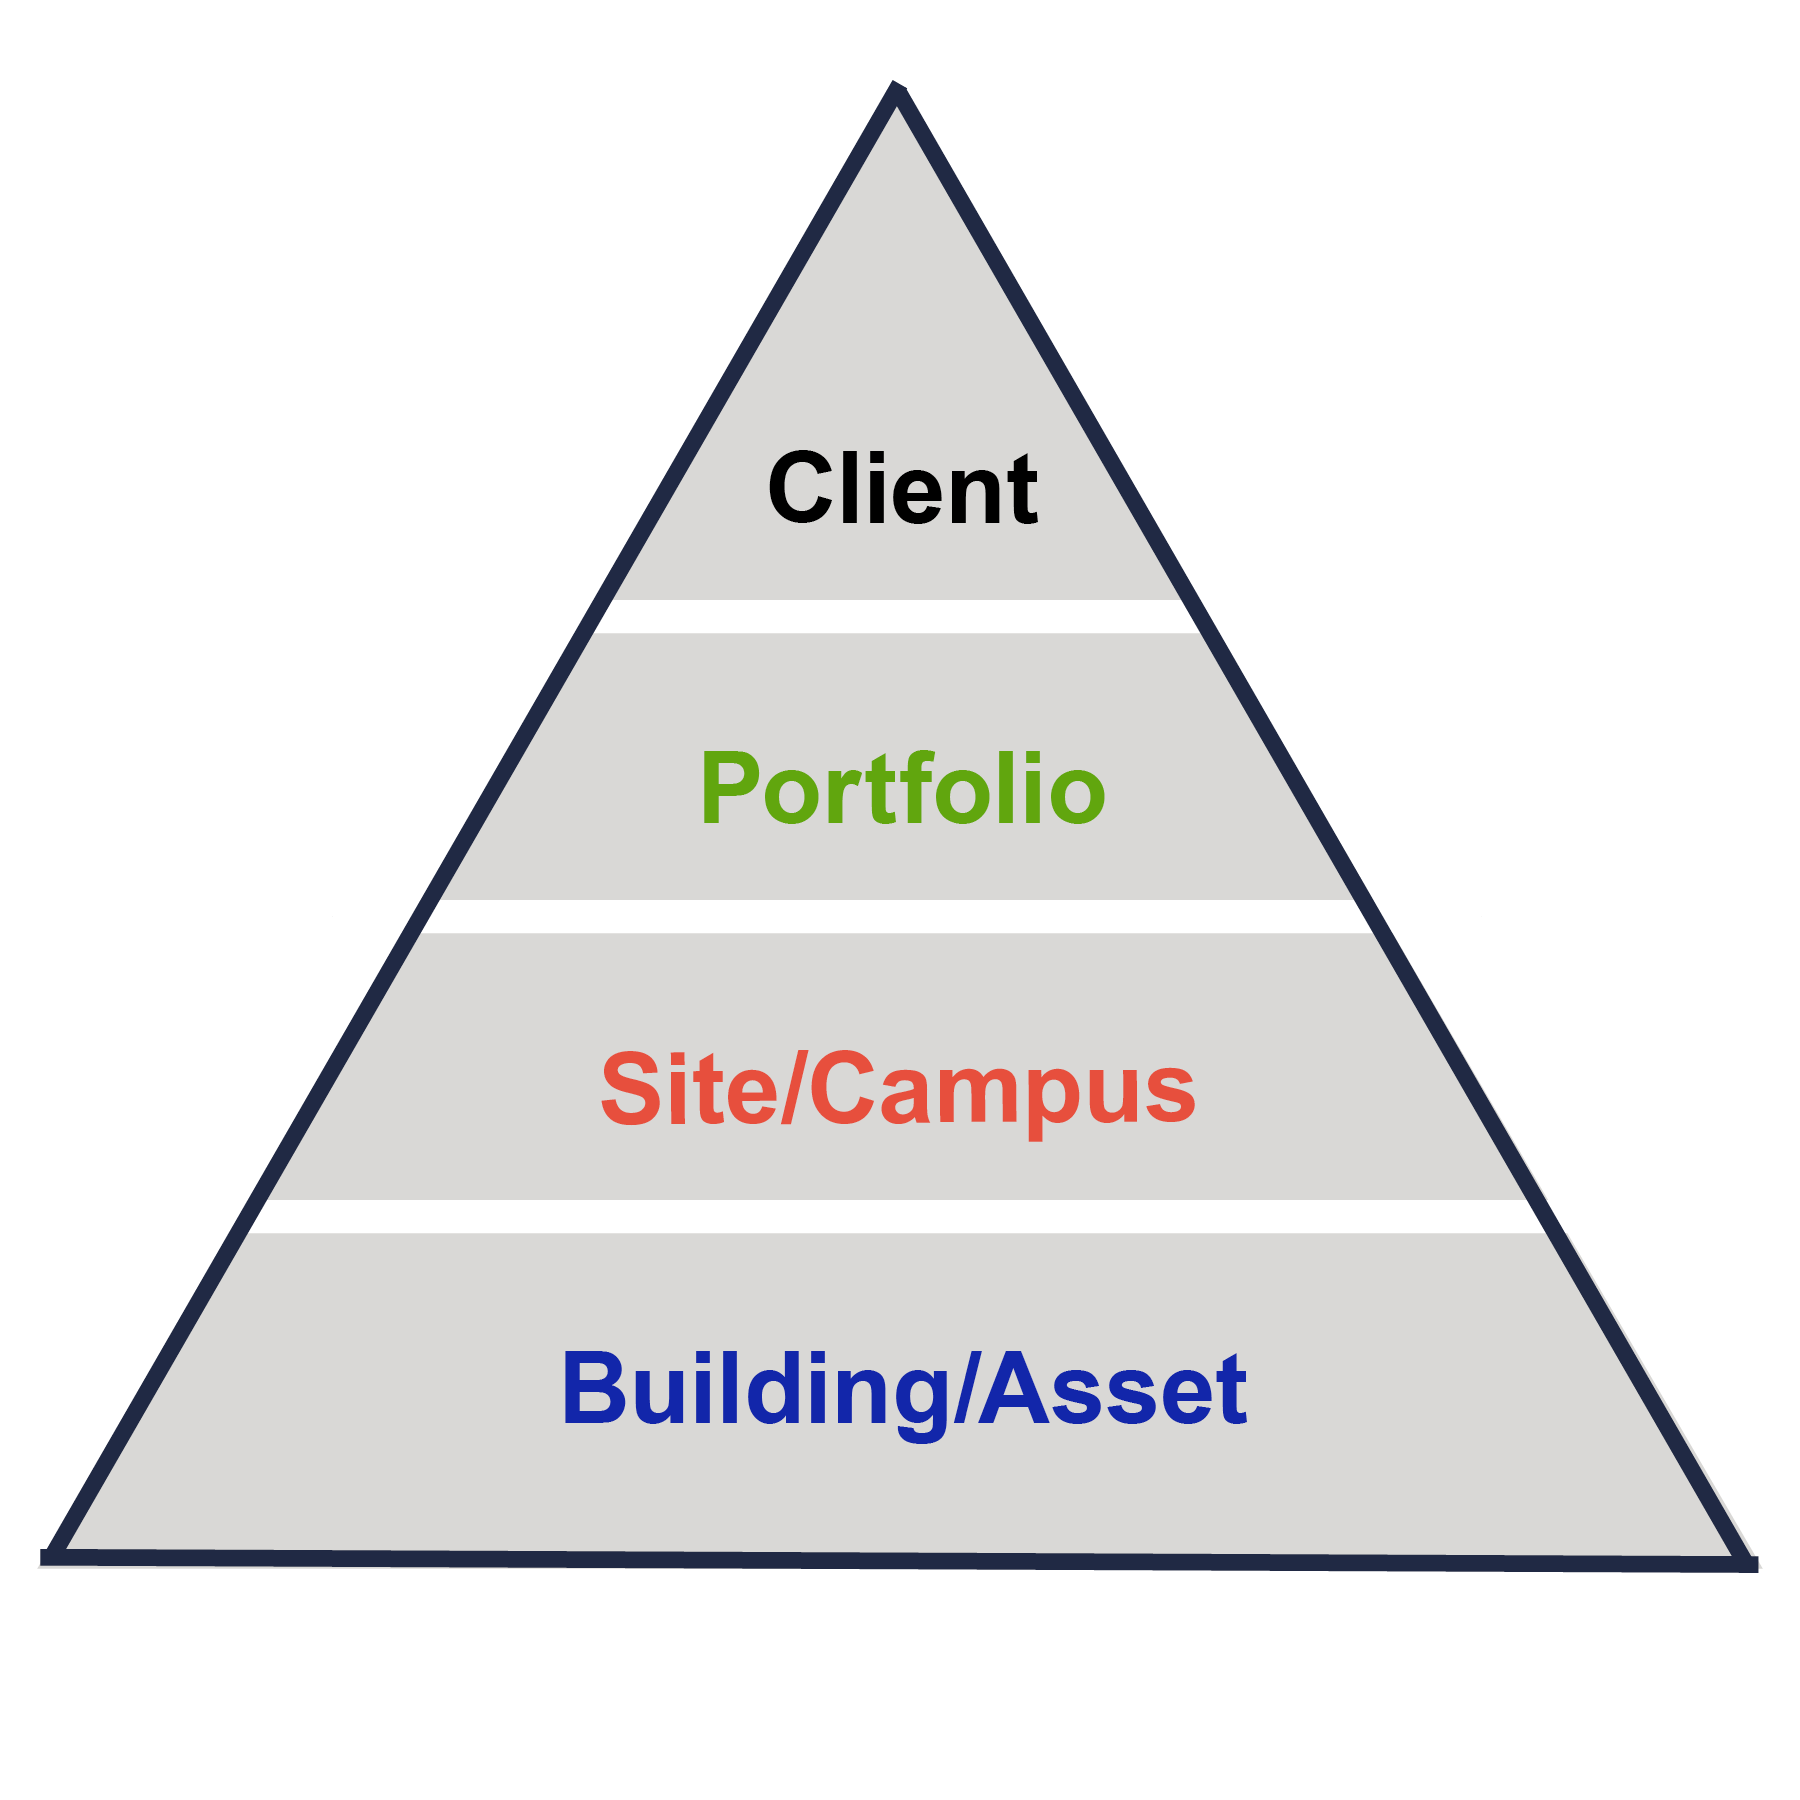
The Assets module is organized into the following four levels of hierarchy:
- Client: This is the highest level of the organization.
- Portfolio: Portfolios are generally organized by building type, department, geographic location, or client preference. Portfolios can be hidden from users at the administrator’s discretion.
- Site/Campus: This is the mid-level organization within the client. The Site (or campus) level resides below the Portfolio level. When multiple Sites exist, the client will generally organize Sites by address to distinguish among them. Sites can be hidden from users.
- Building or Asset: This is the most detailed level of a client. Buildings/Assets reside within each Site. One or many Buildings can exist within a Site.
Within the hierarchy of the Assets Module, you will see two tabs, Data and Visualization.
Visualization #
The Visualization tab provides graphic representations of your assets’ data, with basic reporting at the Client, Portfolio, and Site levels and more enhanced reporting at the Building level.
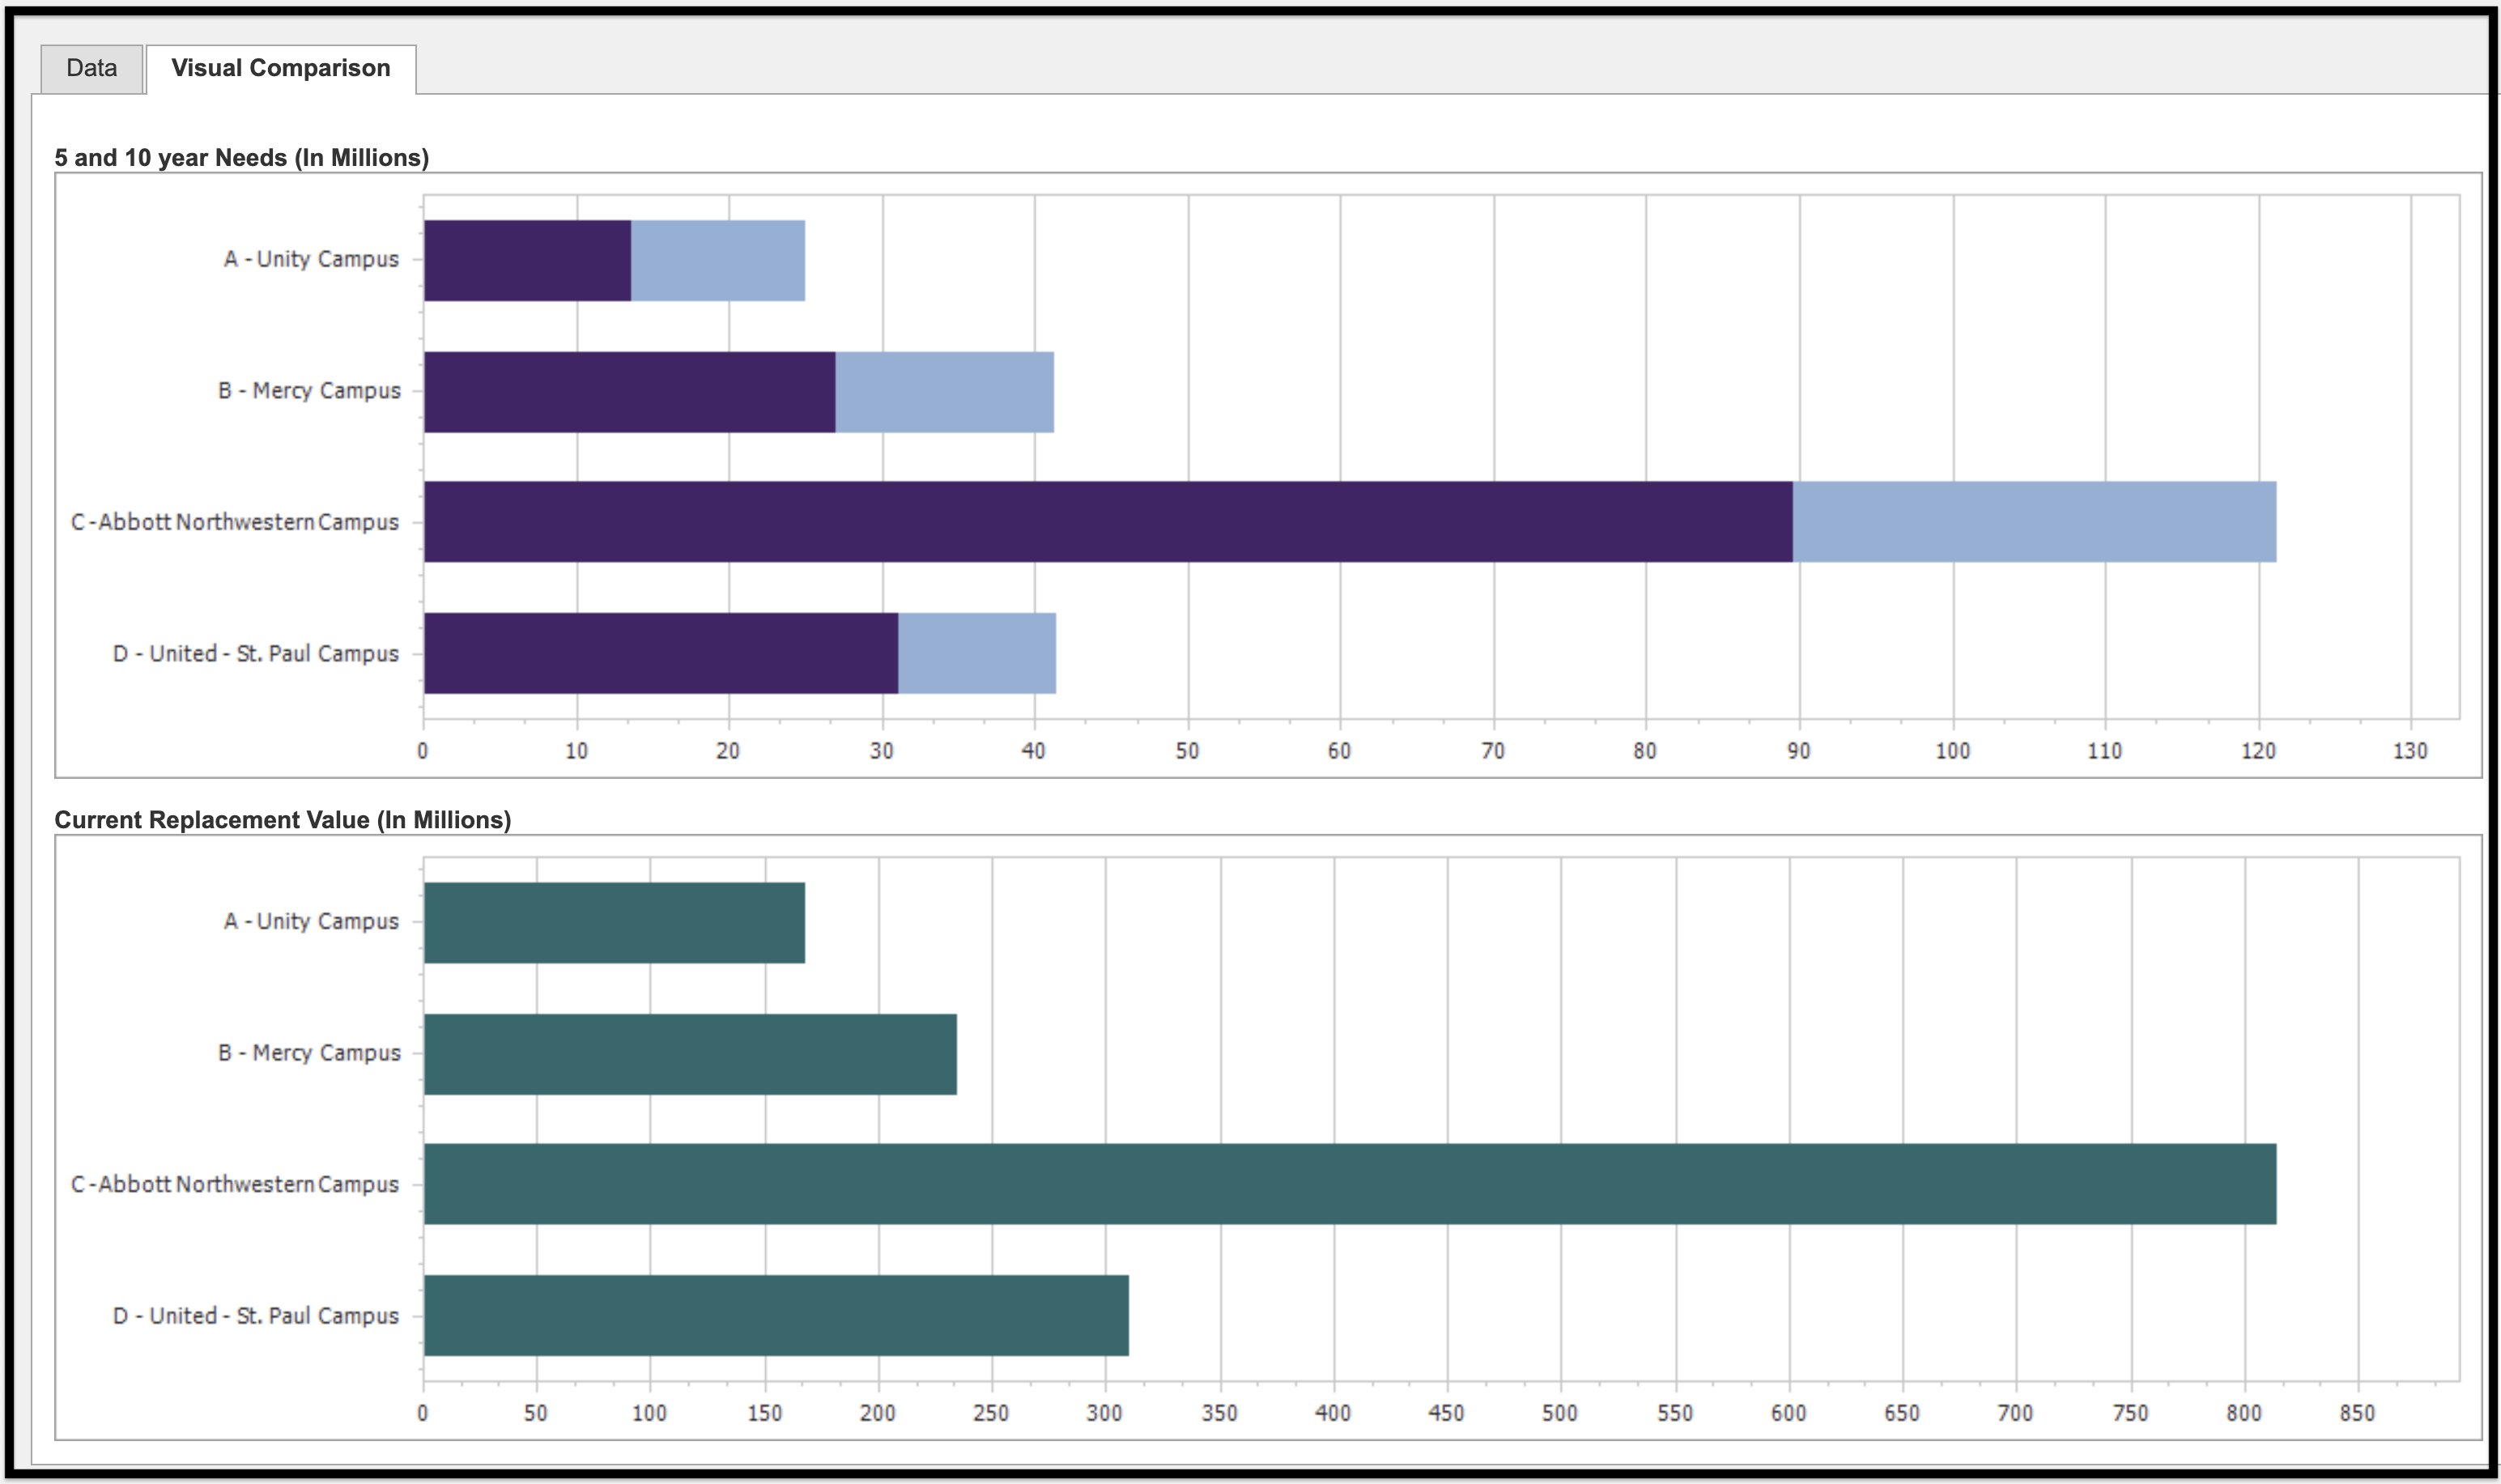
At the Client level, click on the Visual Comparison tab to view graphic representations of 5 and 10-Year Needs and Current Replacement Value (CRV). The graphs have a hover note feature so that you are able to view data contained within.
Examples of all other levels of Visualization will be nested within the corresponding levels of Assets module documentation.

Data #
The Data tab is the information hub for your organization’s assets, including horizontal and vertical structures and assessments; specifics related to mechanical, electrical, and other systems and disciplines; furniture and fixtures, etc. By collecting and recording this data, we are able to provide you with a complete understanding of your current and future facility needs. Historical records, tracking, and inventory are all possible within the functions of the Data tab. The ability to generate and store reports is an added benefit. The top tier of the Data structure is the Portfolio.
Portfolio #
When you enter the Assets module, you will see a list of Portfolios within a client. The list is referred to as the Portfolio Data Grid (shown below).

Portfolio Data Grid Descriptions #
| Portfolio | The Portfolio Name |
| Edit | Brings you to a new page with various fields that you can modify |
| # of Sites | The total number of Sites (mid-level) that are within the Portfolio |
| CRV (Current Replacement Value) | The direct cost of labor, material, and equipment, including demolition, at the present time, which would be required to replace the total Portfolio in its current configuration |
| SF (Square Footage) | Total square footage of the Portfolio |
| CRV/SF | Total CRV per square foot at the Portfolio level |
| 5 YR Needs | The sum of the action costs for assessment items that have an action timeframe between 0 and 5 years |
| 10 YR Needs | The sum of the action costs for assessment items that have an action timeframe between 0 and 10 years |
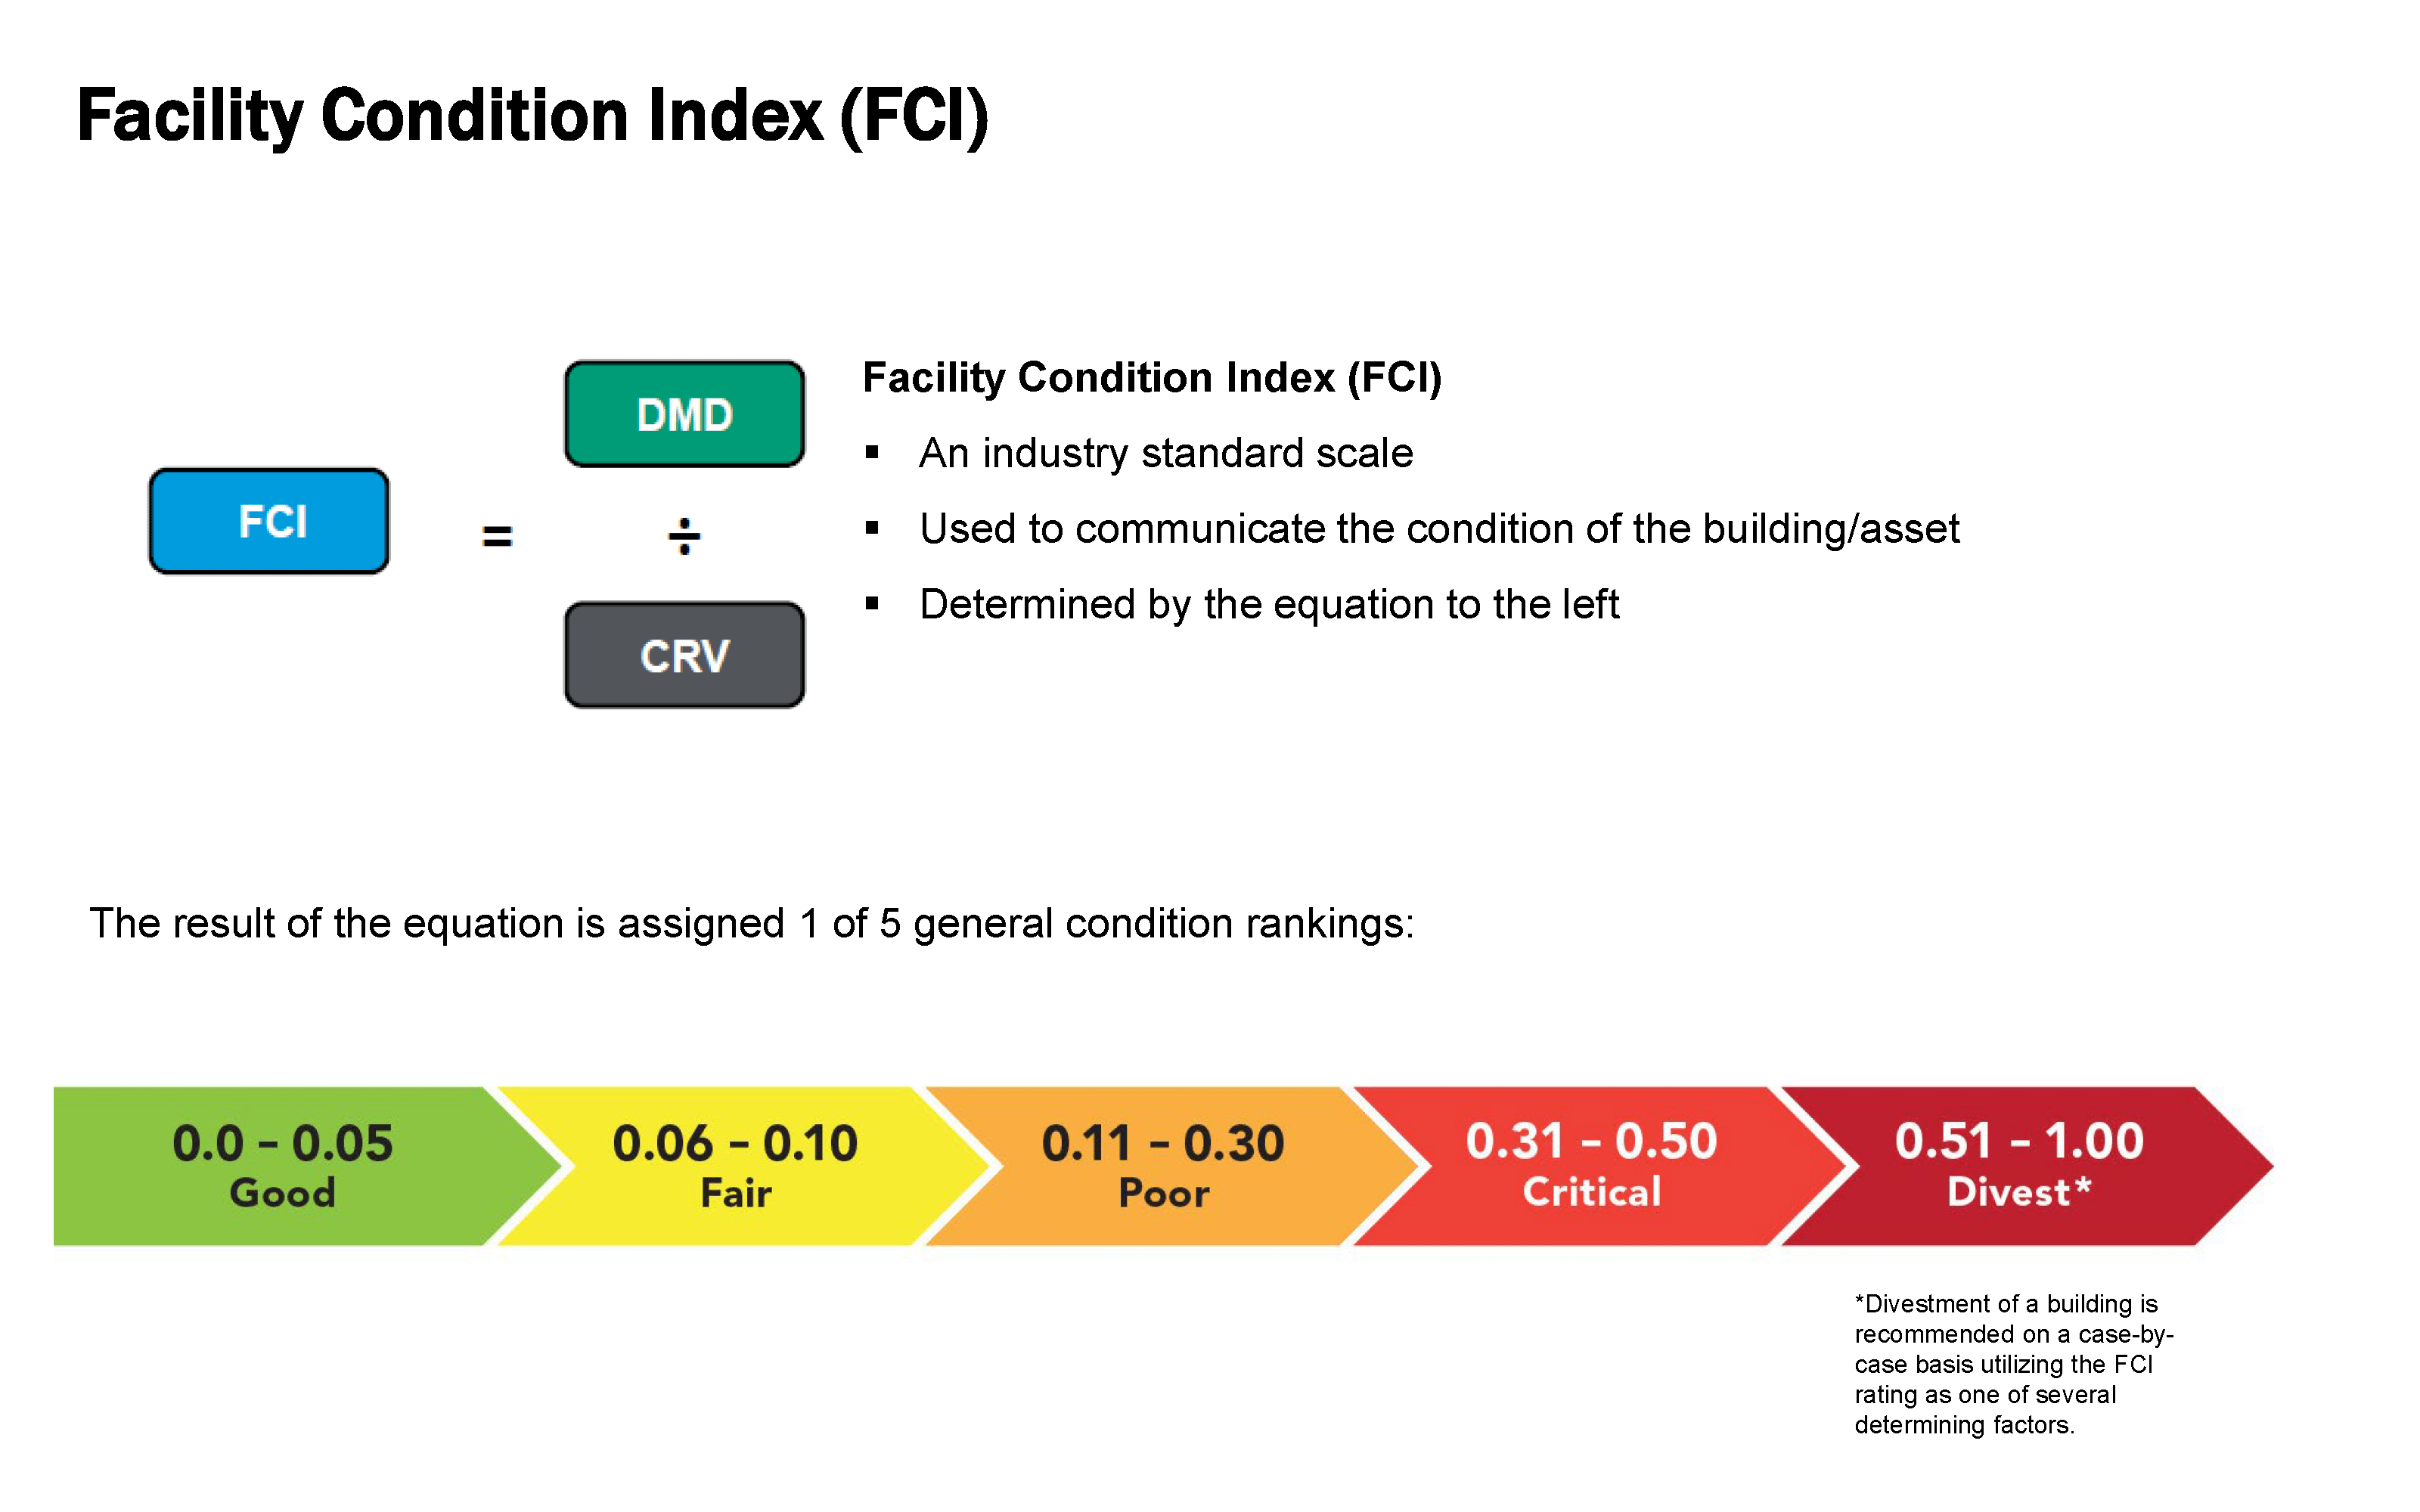
| 5 YR FCI (Facility Condition Index) | Divides the 5 year needs by the CRV to determine the condition of a facility. Higher FCI values represent an asset in worse condition; conversely, lower FCI values represent an asset in better condition. |
| 10 YR FCI (Facility Condition Index) | Divides the 10 year needs by the CRV to determine the condition of a facility. Higher FCI values represent an asset in worse condition; conversely, lower FCI values represent an asset in better condition. |
Add Portfolio #
To create a new Portfolio, click Add Portfolio in the upper right corner of the screen, above the 10 YR FCI column, as shown below.

Selecting Add Portfolio will take you to the Edit Portfolio screen where you can edit the Portfolio data entry fields.
Edit Portfolio #
You will then be directed to the Edit Portfolio page, as shown below. See the Glossary of Terms section of this guide for descriptions of all of the fields.

Title is the only required field on the Edit Portfolio page. The rest of the data entry fields on the page pertain to the deliverable report that FOS® can provide at the conclusion of an assessment or that a subscriber or site administrator can run at any time.
Note: If you would like a breakdown of where in the deliverable report these fields appear, please contact the FOScore® support team.

To deactivate a Portfolio, uncheck the Active checkbox. The Portfolio will then be moved to Inactive Portfolios. The Portfolio can be reactivated by checking the Active checkbox.
Click the Save button when all desired information is complete.
To cancel, click the Cancel button.
Once saved, you will then be taken to the Site page; i.e., the page displaying the Site Data Grid.
Show Inactive Portfolios #
In order to view the Portfolios that have been deactivated, click Show Inactive Portfolios as shown upper right, below.

The designation Inactive Portfolio means that all the assets in this Portfolio are also inactive and costs will not be counted toward the client/organization’s current replacement costs (CRV) or Facility Condition Index (FCI).
To make the Portfolio active again, select the Edit link and check the box next to Active. To go back to Active Portfolios, click on Hide Inactive Portfolios.

Sort Portfolio #
You can sort the Portfolio Data Grid by any of these columns: Portfolio, # of Sites, CRV, SF, CRV/SF, 5 YR Needs, 10 YR Needs, 5 YR FCI, or 10 YR FCI. The first image below shows the grid sorted A-Z by Portfolio.

- Click the column header of the field you want to sort by.
- Clicking the column header once will sort in ascending order.
- Clicking the column header twice will sort in descending order.
- Hovering over the column header with your cursor will result in the header being underlined.
- Finally, to go to the next page (level) where you can choose your Site, click on the Portfolio name.


Search #
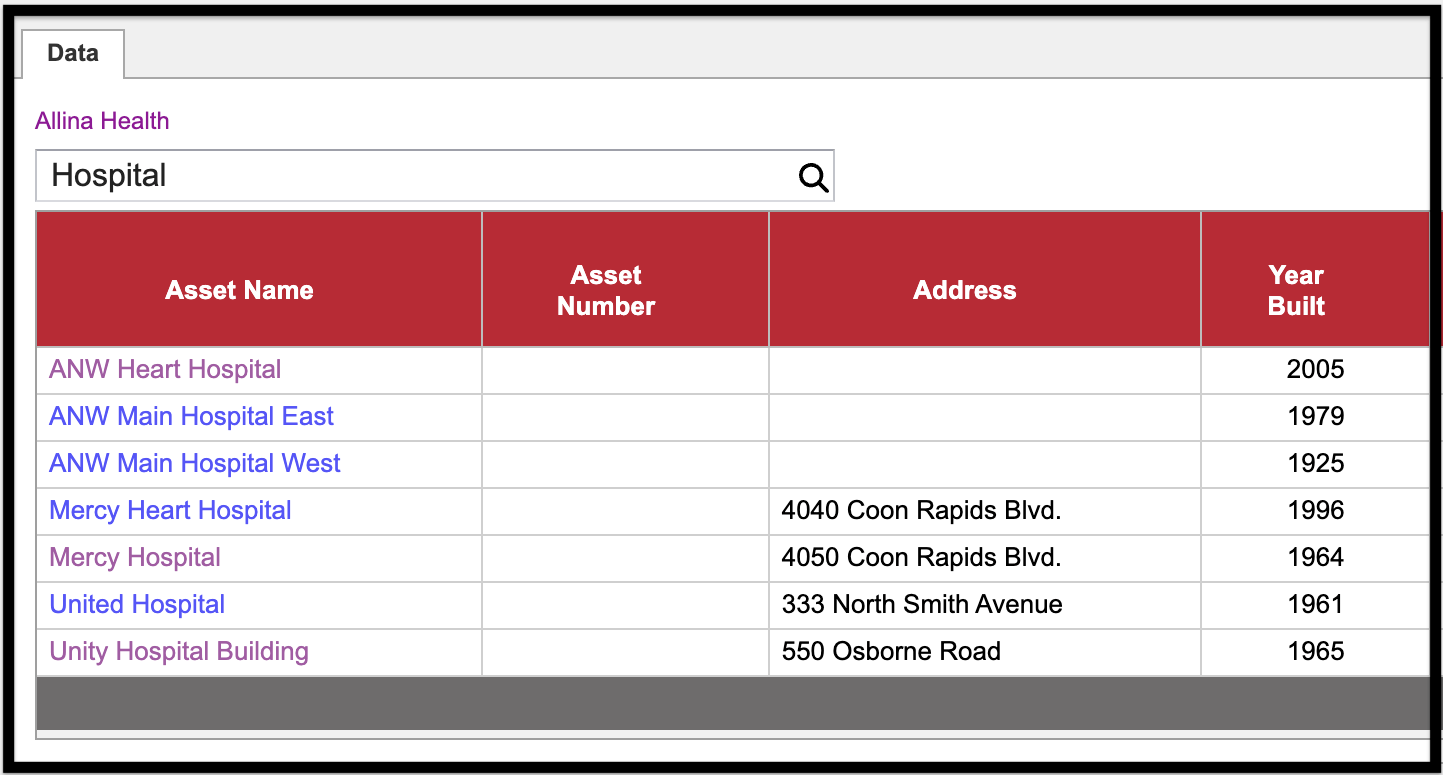
Using the Search bar at the Portfolio level, you are able to easily locate records from multiple sites by keyword.

Portfolio Visualization #
At the Portfolio level, the Visual Comparison tab provides a way to view relative 5 and 10 Year or CRV needs. A hover notes feature offers an additional way view the data.
Site #
After clicking the Portfolio name, you are taken to the Site page where you will see a list of Sites within the Portfolio. This list is referred to as the Site Data Grid.
Site Data Grid #
Below is an example of the Site Data Grid. It is similar to the Portfolio Data Grid, but with the following fields:
- Region Factor
- City
- Building Count

Select a Site #

Add a Site #
You may add a new Site if your organization acquires and/or includes multiple buildings and/or assets.

To add a new site:
Click Add Site located to the right of the page above the Site Data Grid.
Once you click the link, you will be directed to the Edit Site page as shown below.
- The only required field is Title.
- When you are finished entering information, click the Save button.
- To cancel, click the Cancel button.
- You are then directed back to the Site page, i.e., the page displaying the Site Data Grid.
Note: The Region Adjustment Factor determines accurate costs based on the geographical region. The number can be increased or decreased. If you do not know what your region adjustment factor is, please let the FOS® support team know and you will be provided with it.
Edit Site #
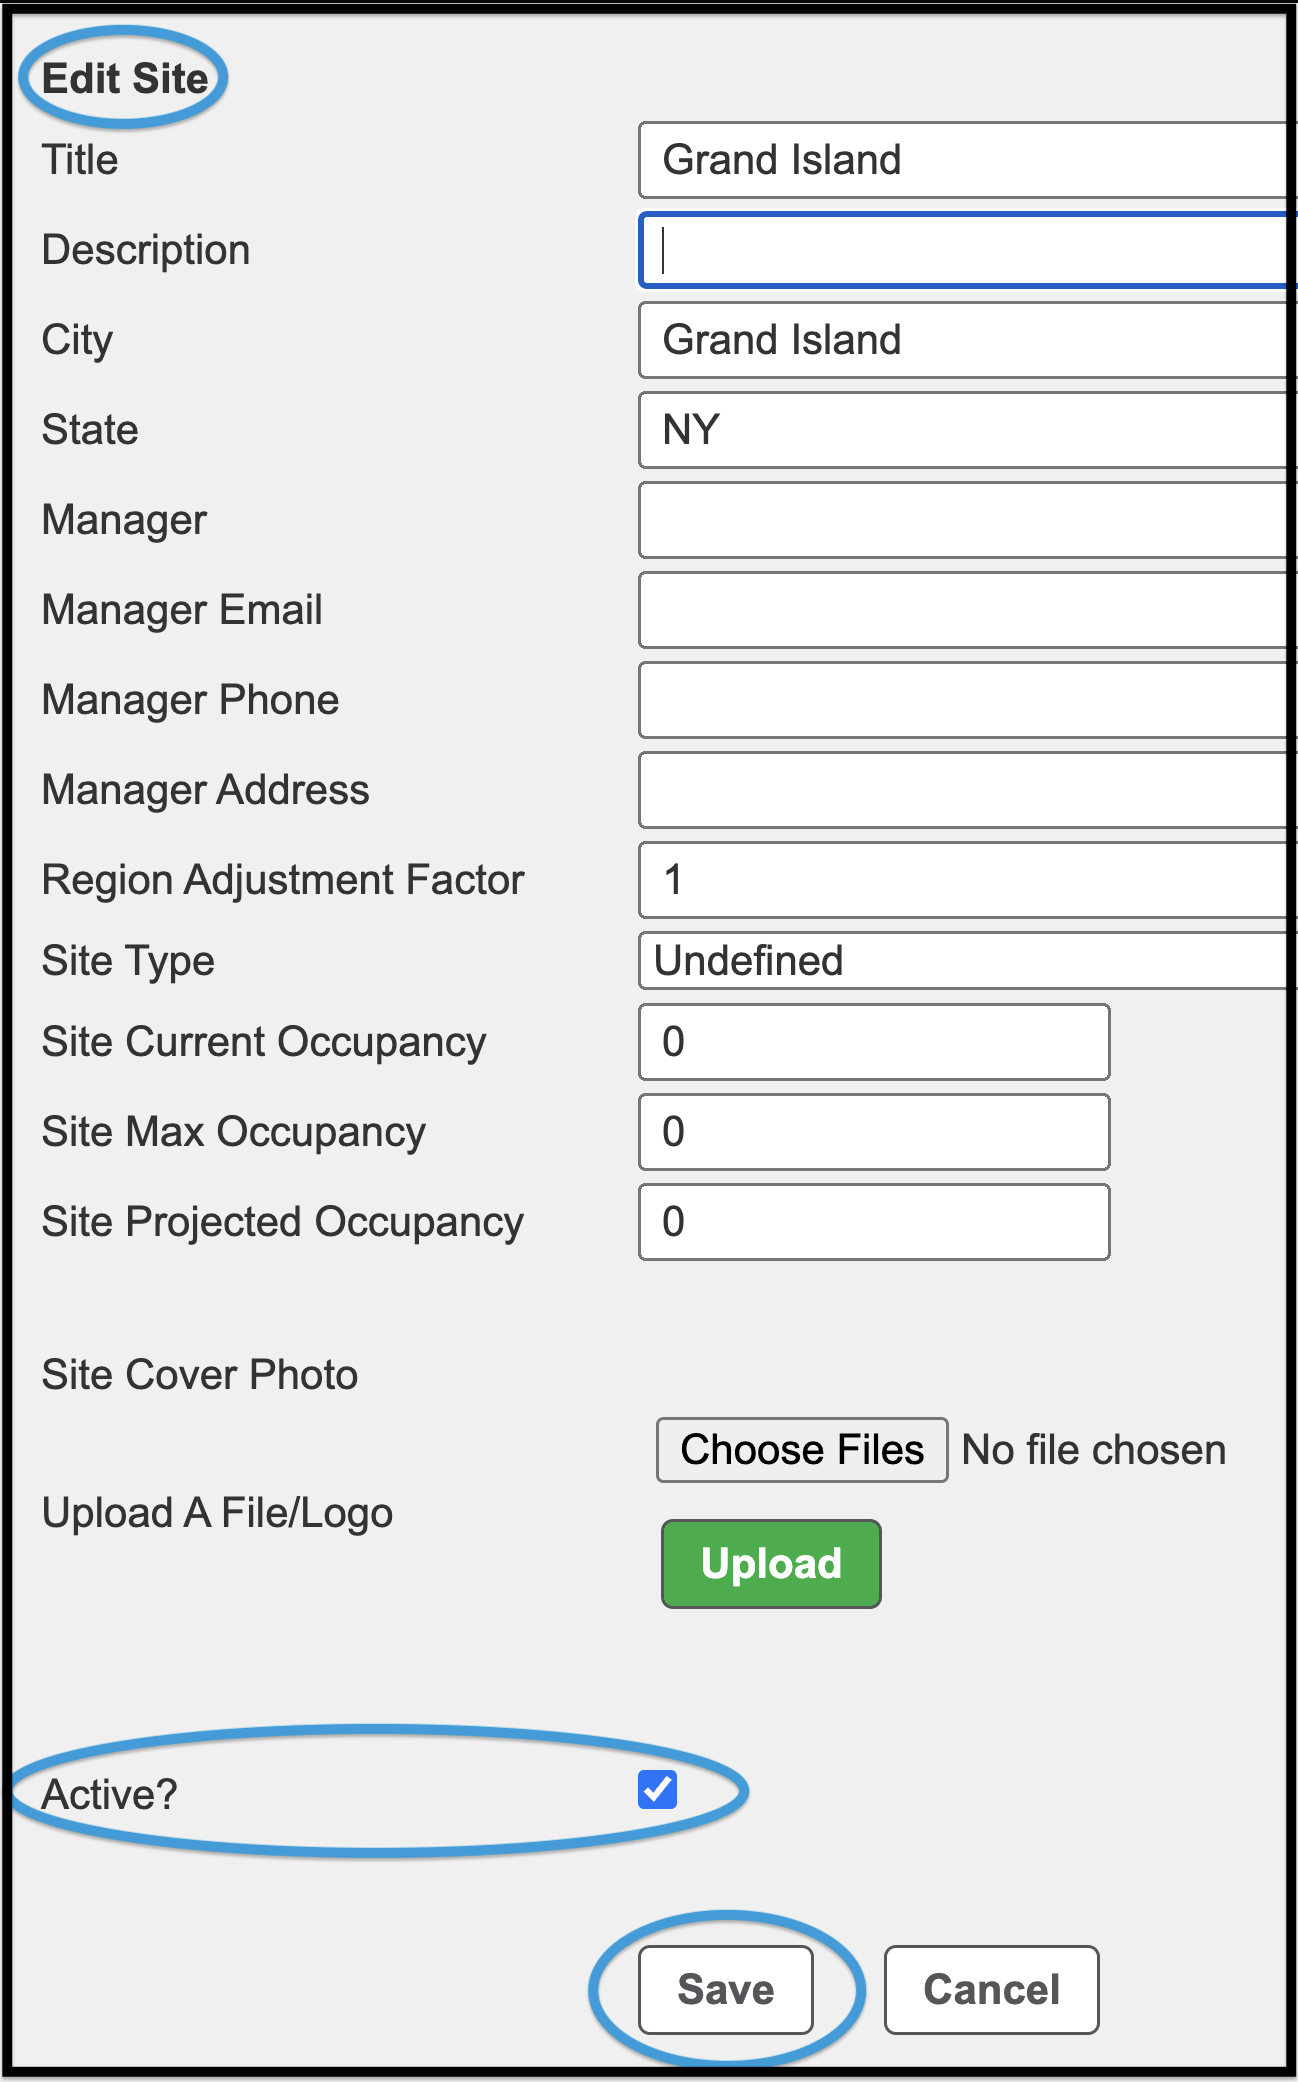
You are able to edit any Site within a Client.
To edit a Site:
- Click the Edit link to the right of the Site name.
- This will open the Edit Site window as shown above.
- To deactivate a Site, uncheck the box to the right of Active.
- Once all information is updated, select Save.
Show Inactive Sites #

To see Sites you’ve previously deactivated:
- Click Show Inactive Sites.
- This will show all Sites that are inactive. Active Sites will not be shown.
Sort a Site #
Sort a Site to view data organized by a specific column.
To sort the Site Data Grid:
- Click on the column header of the field you want to sort by.
- Clicking on the column header once will sort in ascending order.
- Clicking on the column header twice will sort in descending order.
- Hovering over the column header with your cursor will result in the header being underlined.

To go to the next page (i.e., level) where you can choose a Building located within a Site, click on the Site Name, as shown below:

Site Visualization #
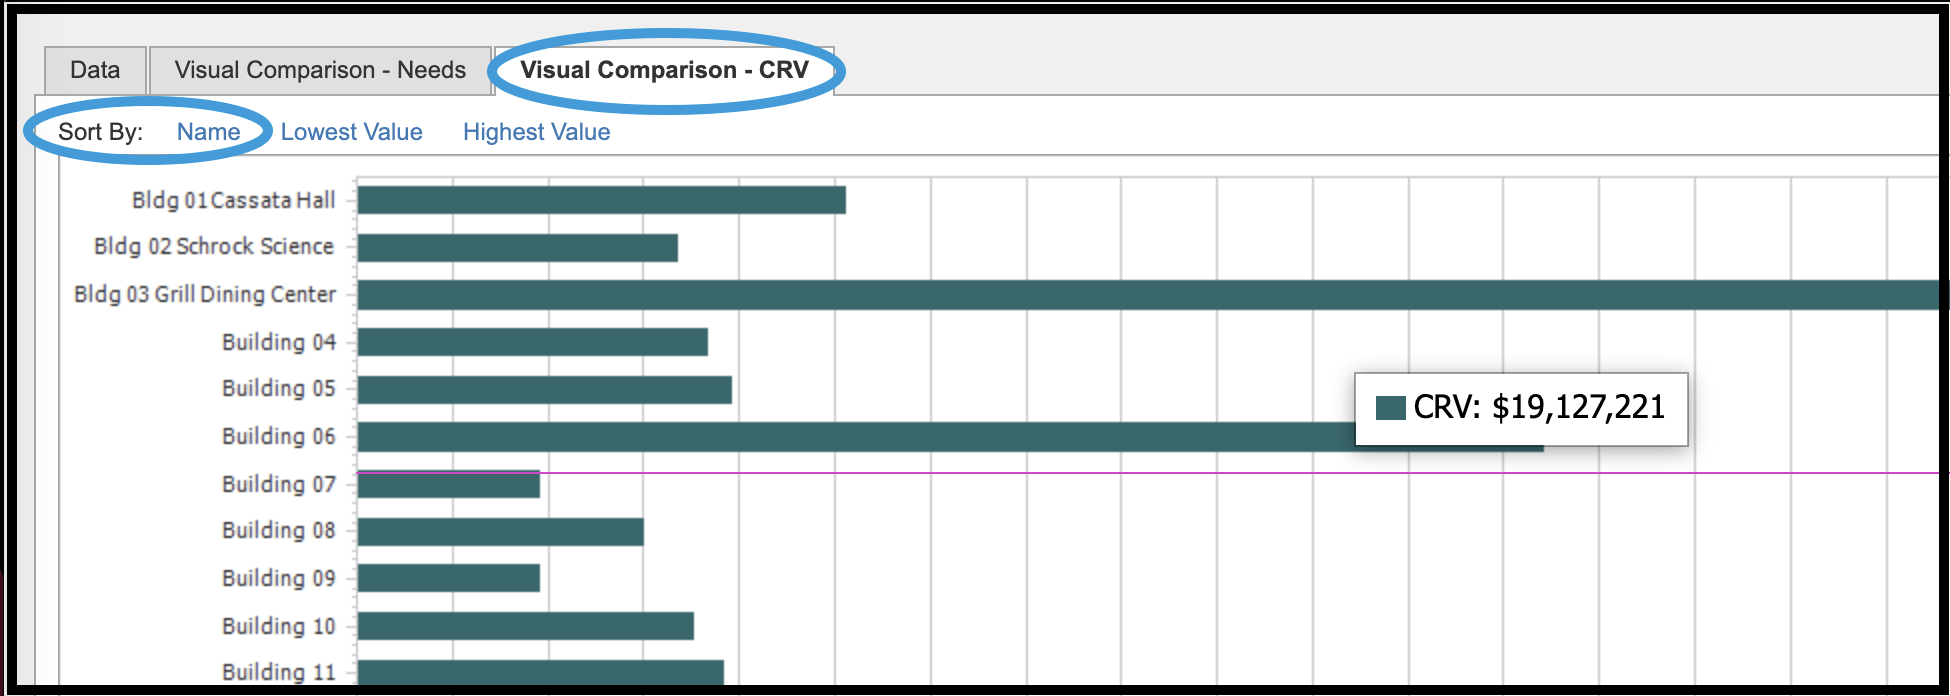
At the Site level, Visual Comparison – Needs and Visual Comparison – CRV are featured, with the ability to sort by name and lowest to highest values, as shown below:

Building #
After clicking the Site Name, you will be taken to the Building/Asset page where you will see a list of Buildings/Assets within the Site. This list is referred to as the Building Data Grid.

Building Data Grid #
Below is an example of the Building Data Grid. It is similar to the Site Data Grid, but with the following additional fields:
- Building Name
- Building Number
- Address
- Year Built
- Last Reno (renovation)
- Assessment Date
To sort the Building Data Grid:
- Click on the column header of the field you want to sort by.
- Clicking on the column header will sort in ascending order.
- Clicking on the column header twice will sort in descending order.
- Hovering over the column header with your cursor will cause the header to be underlined.
Add a Building #
You may add a new building if your organization acquires and/or includes multiple buildings and/or assets.

To add a new building:
- Click Add Building located to the right of the page above the Building Data Grid.
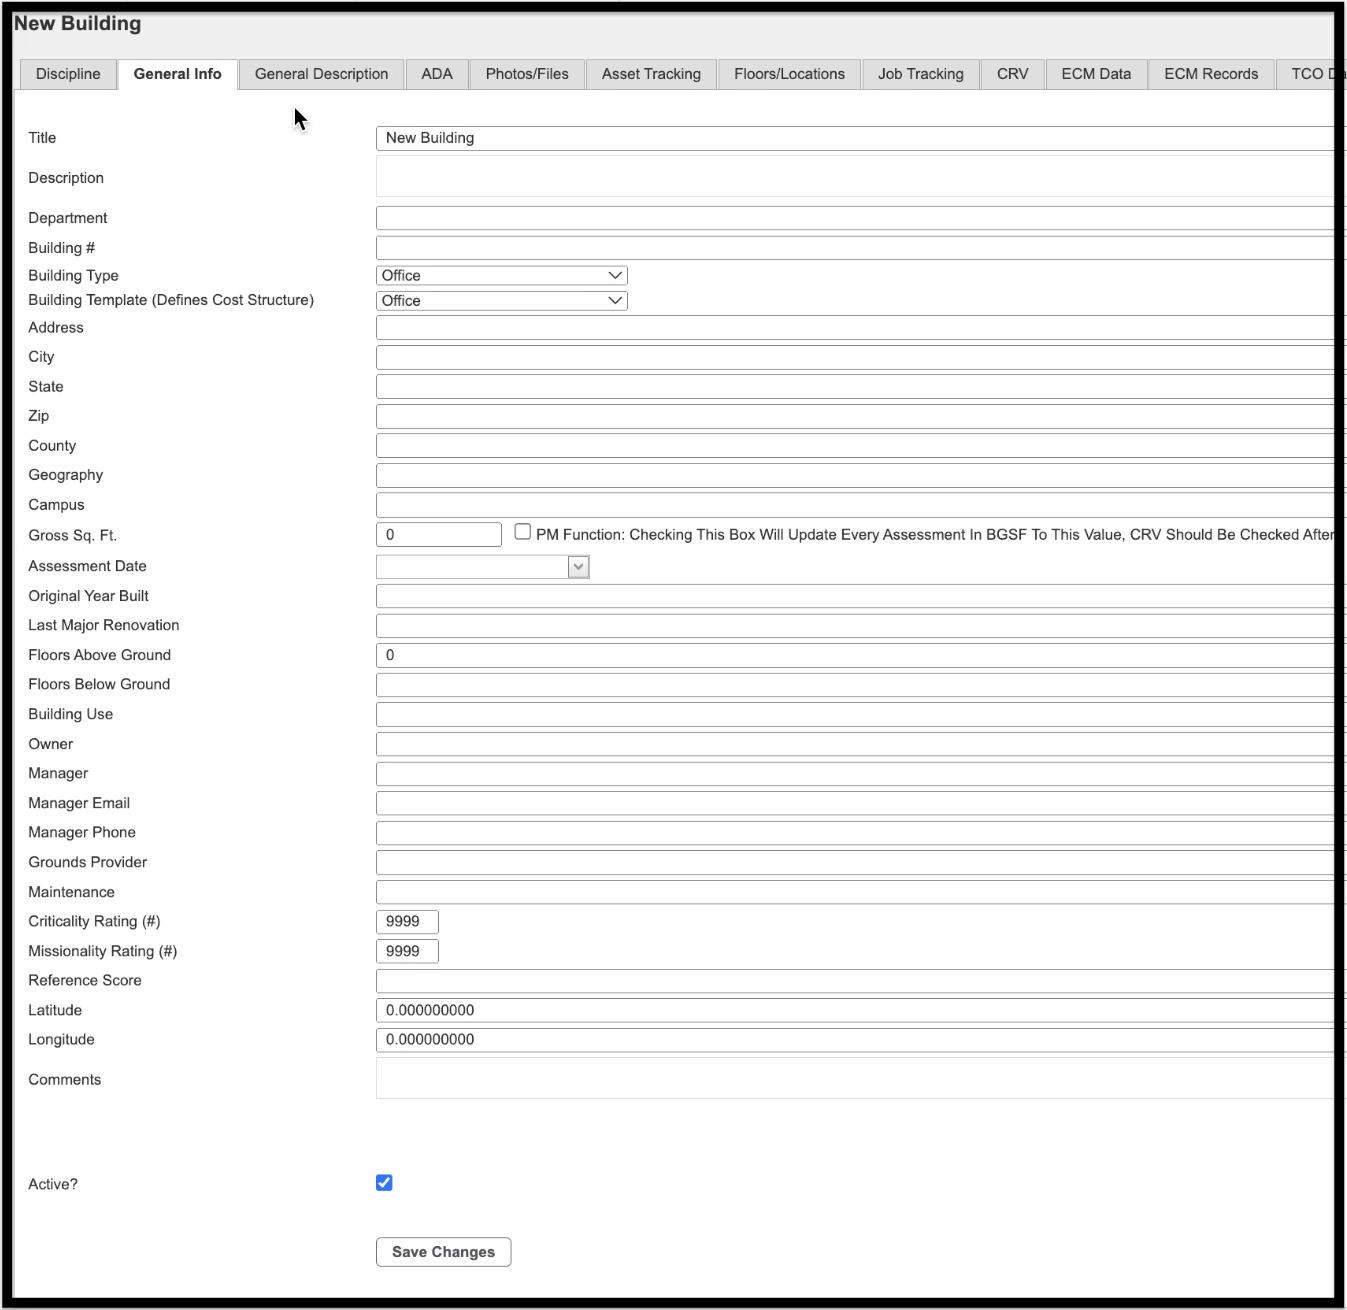
- Once you click the link, you will be directed to the New Building page, as shown below.
- Click General Info to begin entering information about the new Building.
- When you are finished entering the information, click Save Changes.
- To cancel, click the Back button.
- You are then taken back to the Building page, i.e., the page displaying the Building Data Grid.
The Building Type refers to the type of asset, i.e., boat launch, dining hall, conference center, greenhouse, etc. If the correct Building Type isn’t available, contact your designated in-house system administrator in order to have it added.
The Building Template is the market sector. The Building Template defines the cost structure that is applied to the Building.
Building List Search #
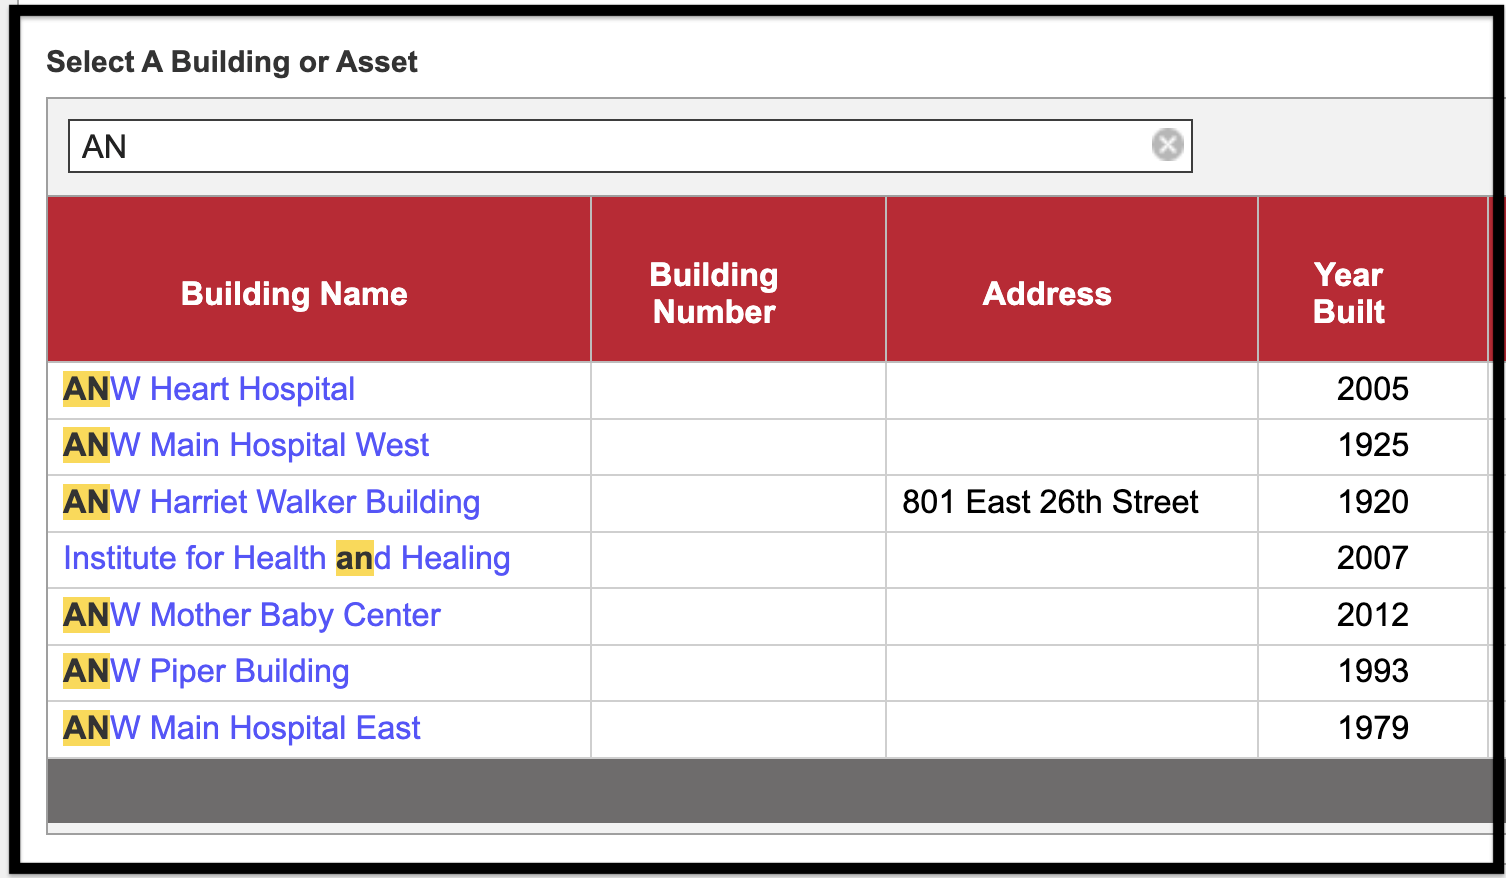
Type in a partial name, or series of letters, to confine the list to a limited number of entries, as shown below:
Page Through List #
At the bottom of the Select a Building or Asset screen, use your mouse to page through a long list of buildings and assets.
Building Information #
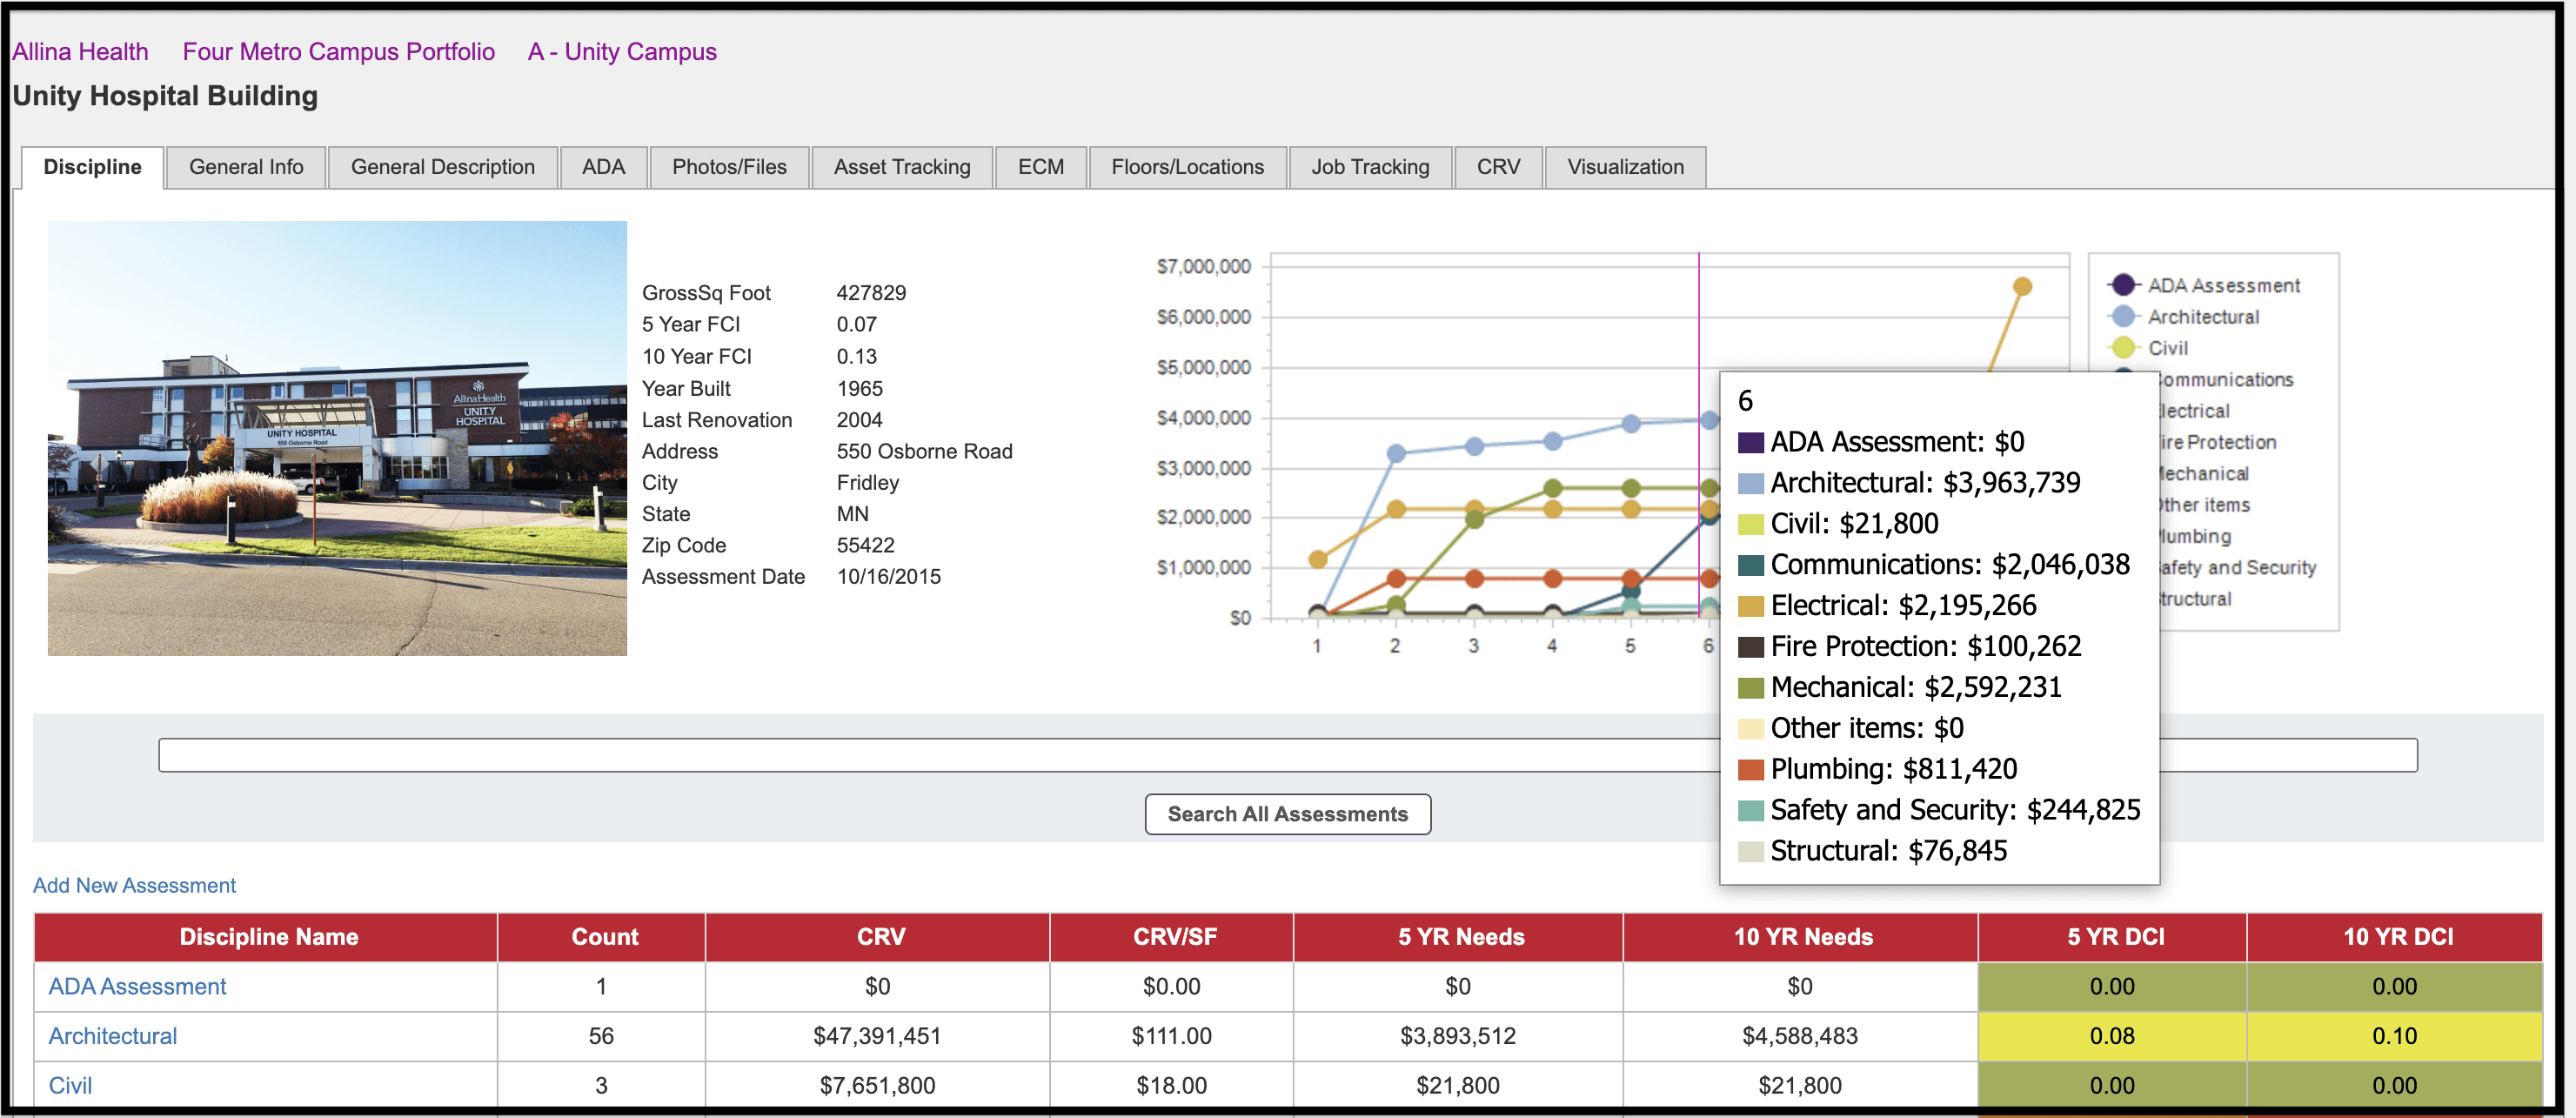
After clicking the Building Number or Name, you will be taken to the Building Information page where you will see the following:
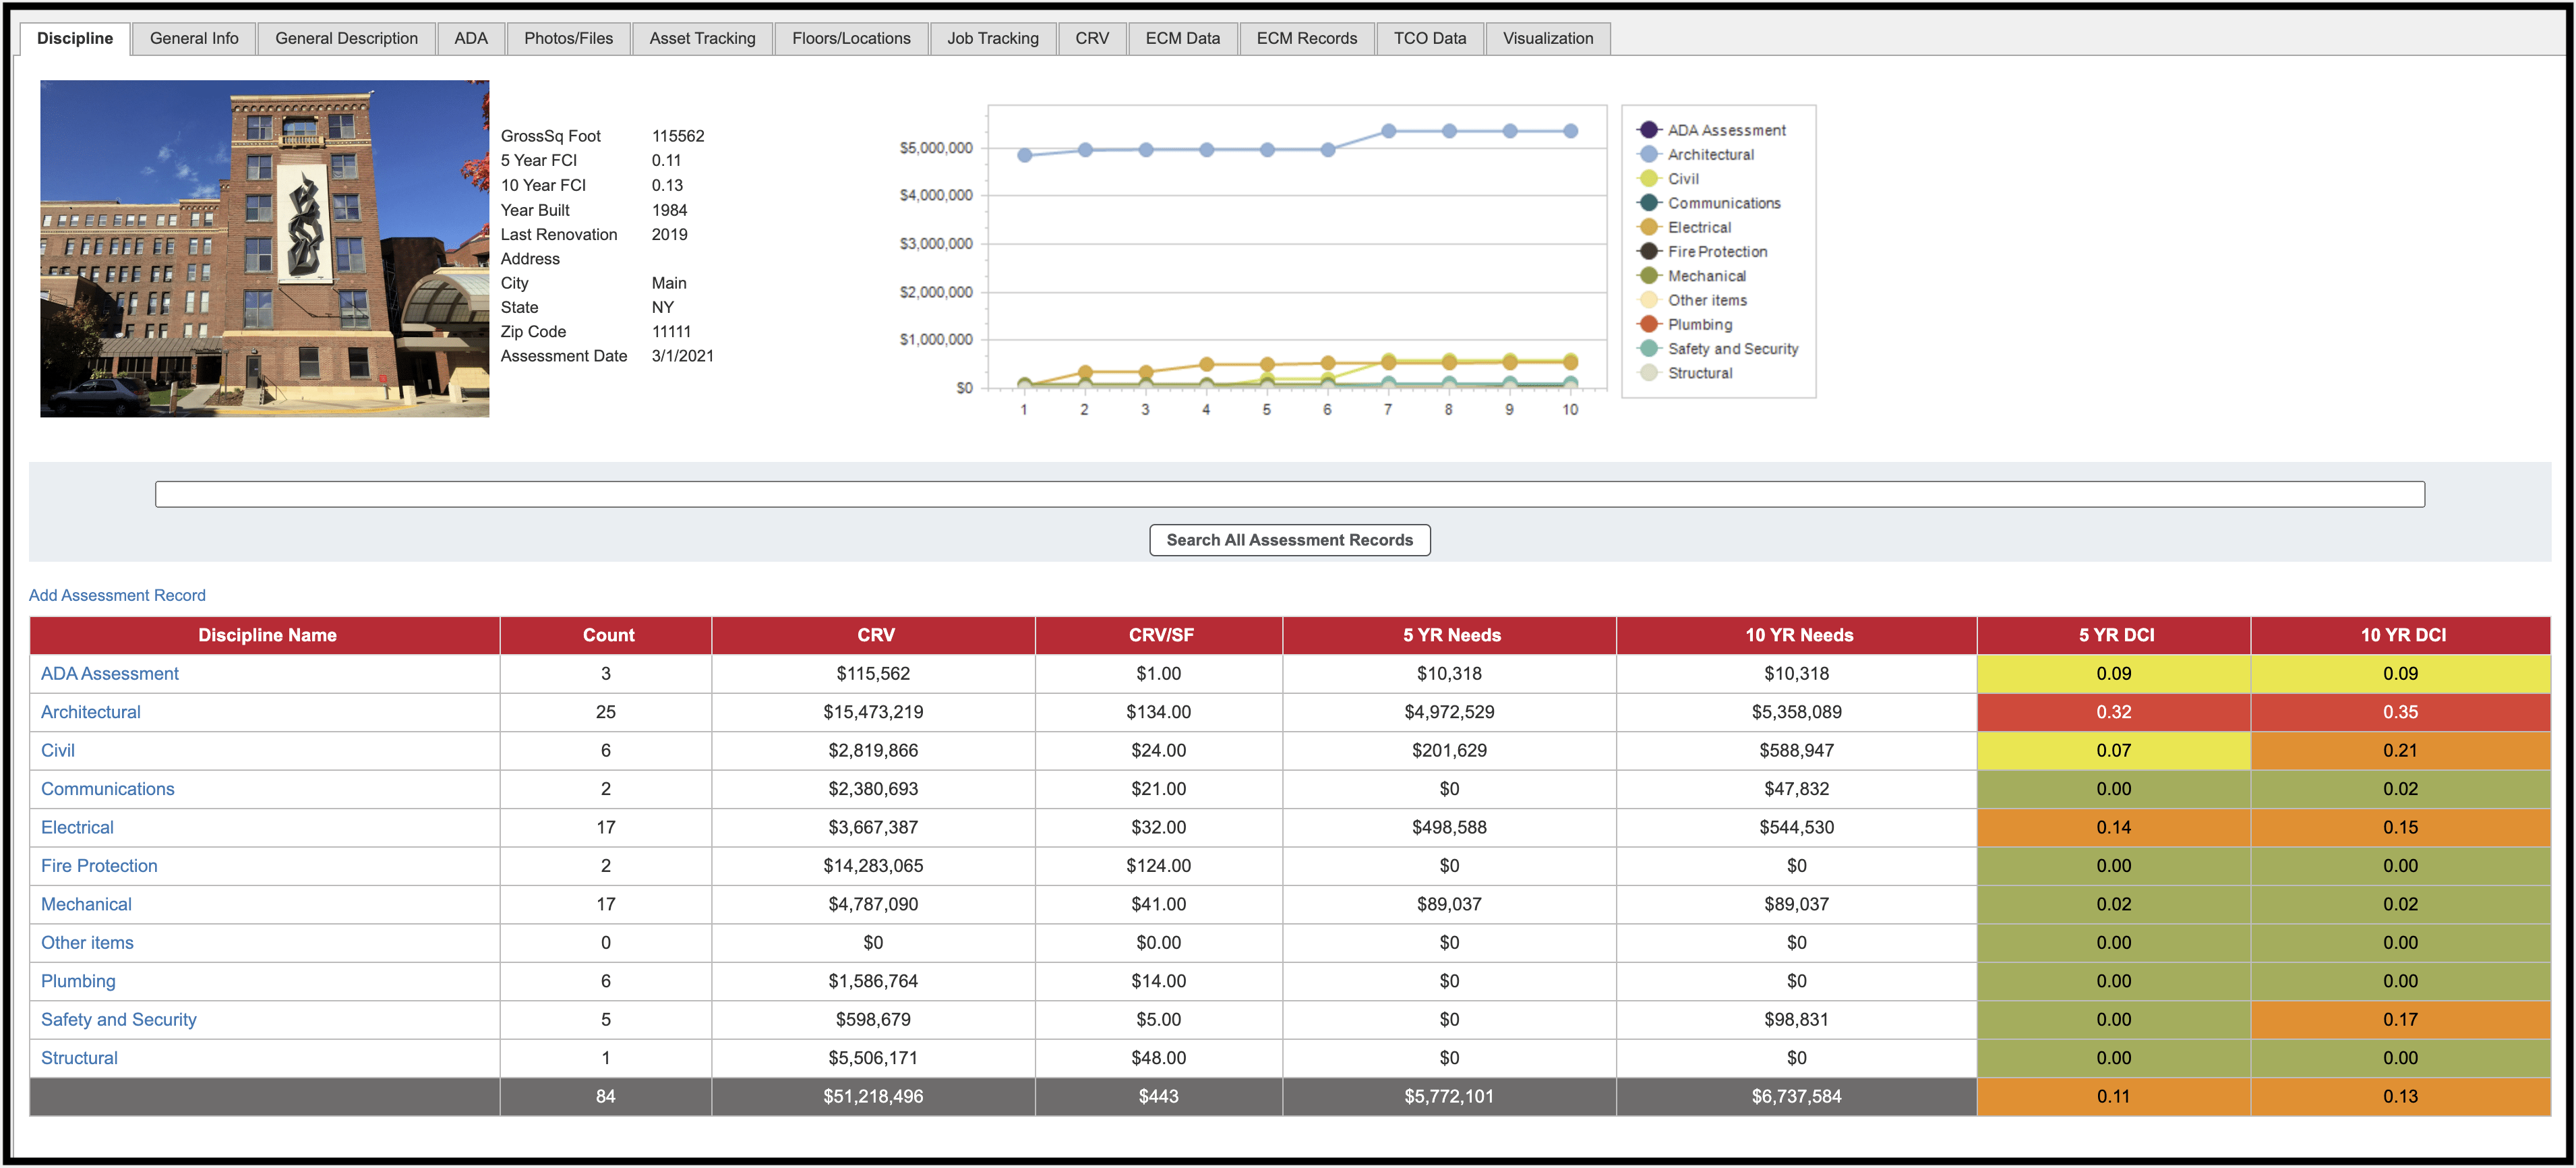
The layout of the Building Information page is similar to other Asset data grids, with the following differences:
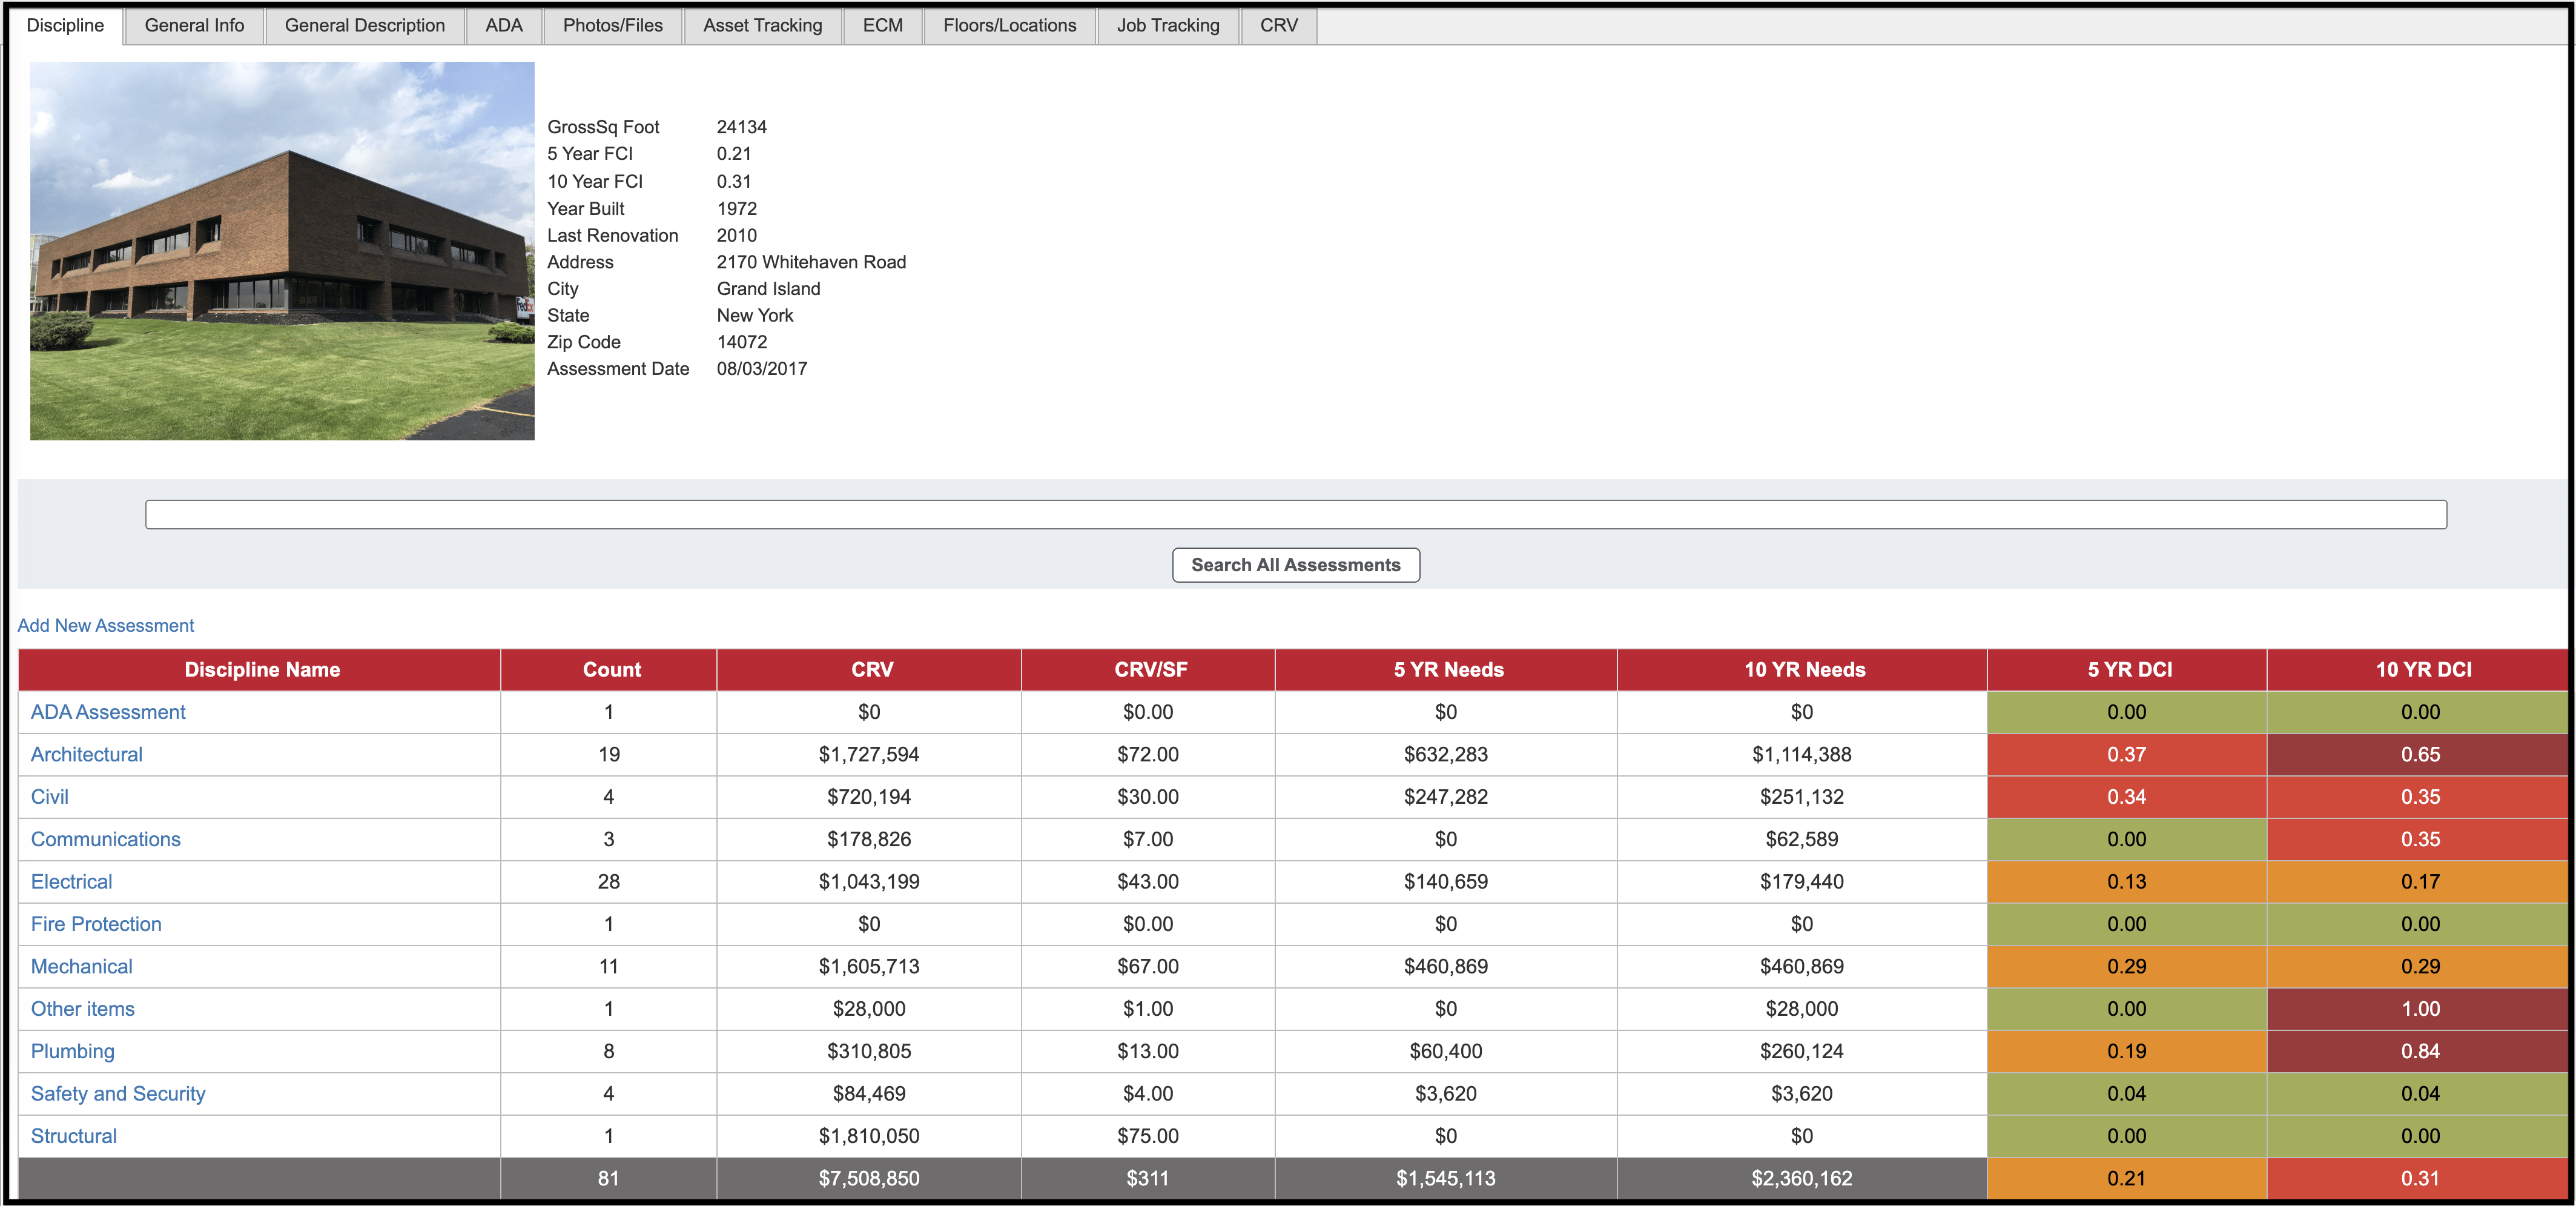
- Discipline Name: Assessments unique to the various disciplines can be accessed by clicking one of the disciplines in the list, for example, Safety and Security.
- Count: The number of assessments for this building or asset, categorized by discipline.
- The remaining columns, CRV, CRV/SF, 5 Year Needs, etc. show discipline-specific values.
In the center of the page is a series of tabs containing the following information: #
| Discipline | All system and/or component information is viewed here |
| General Info | All general building information, i.e., building name, address, assessment date, etc. is viewed here |
| General Description | The General Description tab shows descriptions of different aspects of the building, for example structure, plumbing, electrical, etc. |
| ADA | The ADA tab is where the building’s Americans with Disabilities Act assessment is scored |
| Photos/Files | Any building-specific images and files can be uploaded and viewed here. Examples include: .doc, .dwg, .gif, .jpeg, .pdf, .png, .ppt, .xslx |
| Asset Tracking | This tab lists all asset tags (and corresponding information) used for systems and/or components within the building |
| Floors/Locations | All floor, levels, and building locations, i.e., basement, roof, first floor, etc., are viewed here |
| Job Tracking | The purpose of the Job Tracking tab is to ensure the job is being completed and progress is being tracked |
| CRV | Populating the fields in the CRV tab results in a simple Current Replacement Value adjustment by discipline |
| ECM Data | This ECM Data tab is used to record all Energy Conservation Measure observations, costs, and details that would be summarized in an ECM report. |
| ECM Records | The ECM Records tab lists all Energy assessments. This tab is not used as a part of our standard FCA assessment. |
| TCO Data | The TCO Data tab is used to add, edit, or delete building or asset-specific costs that will be used in the calculation of Total Cost of Ownership. |
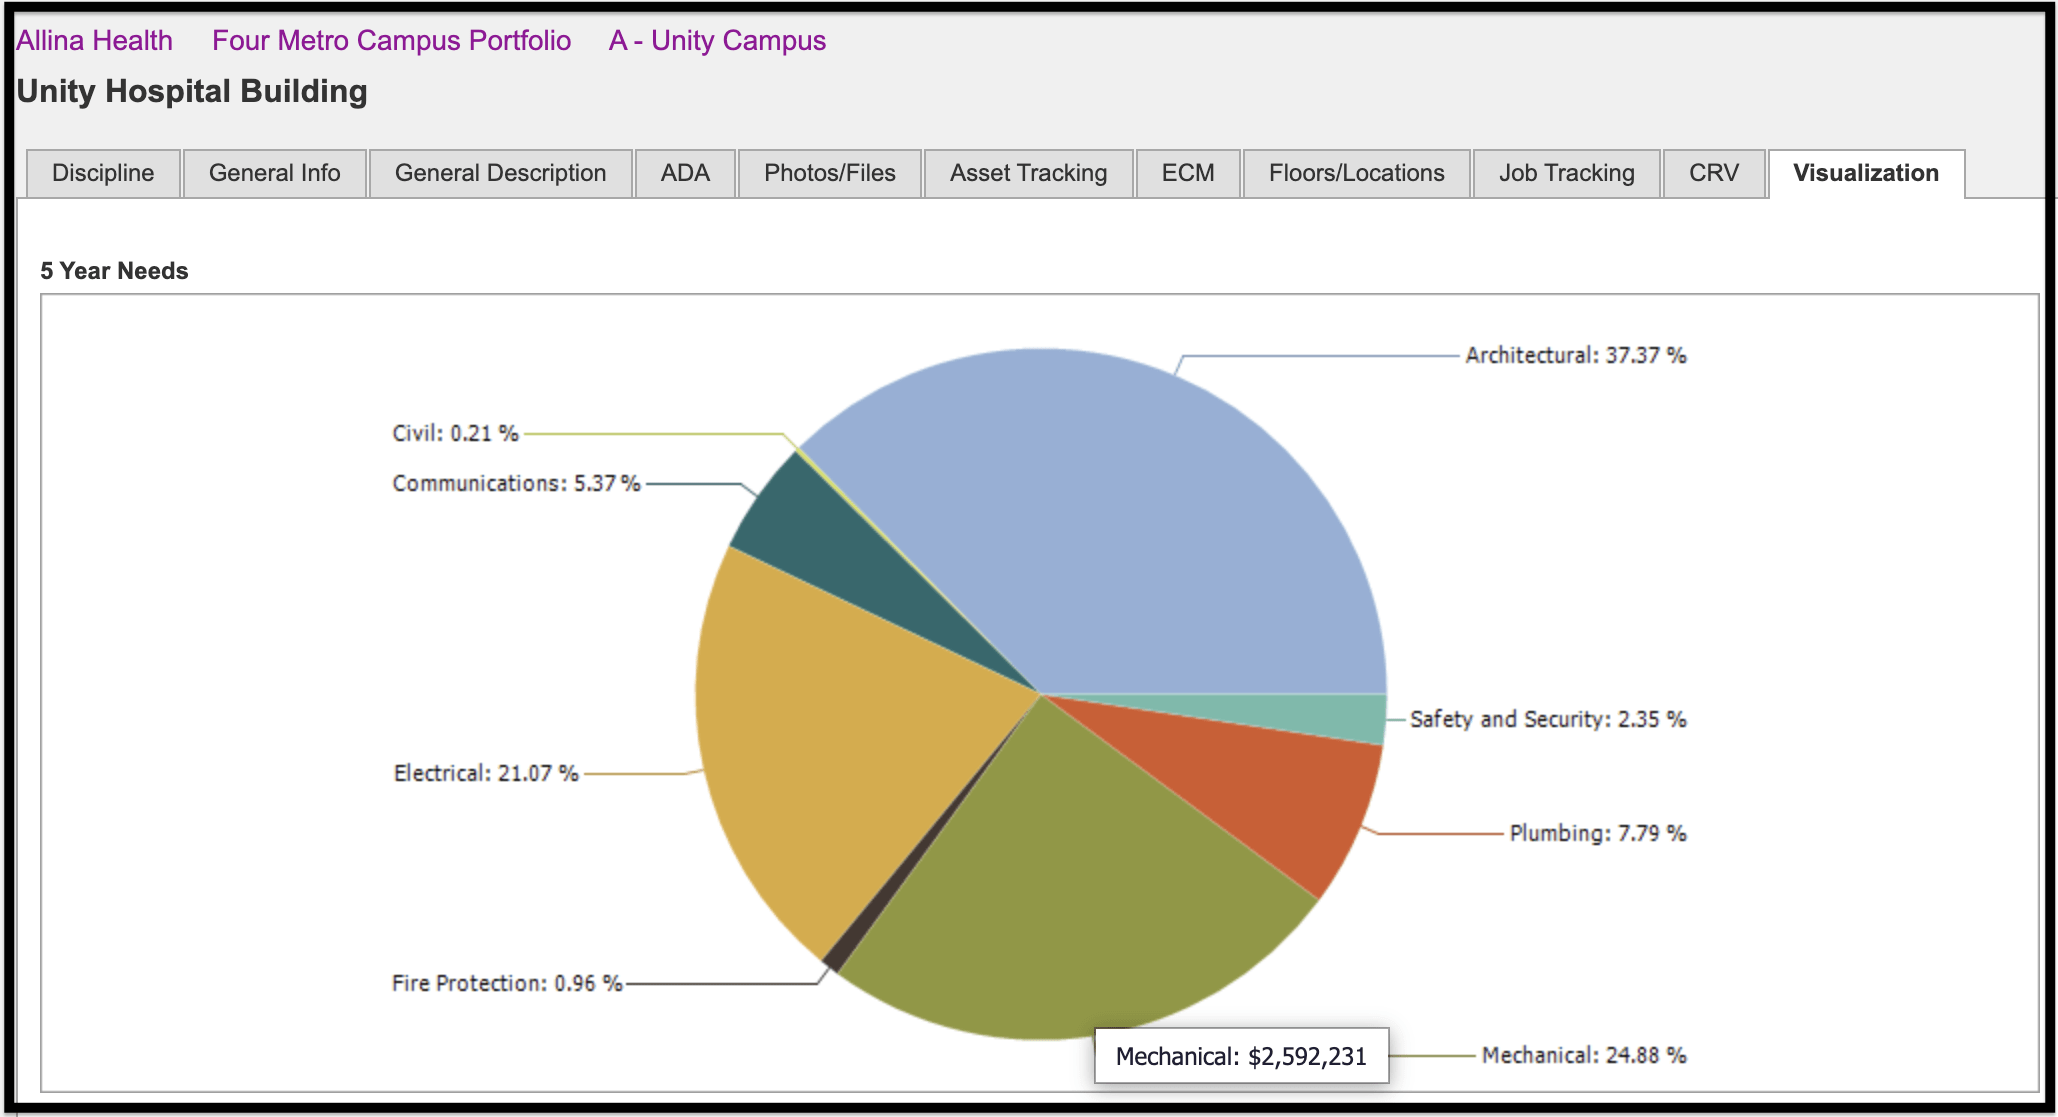
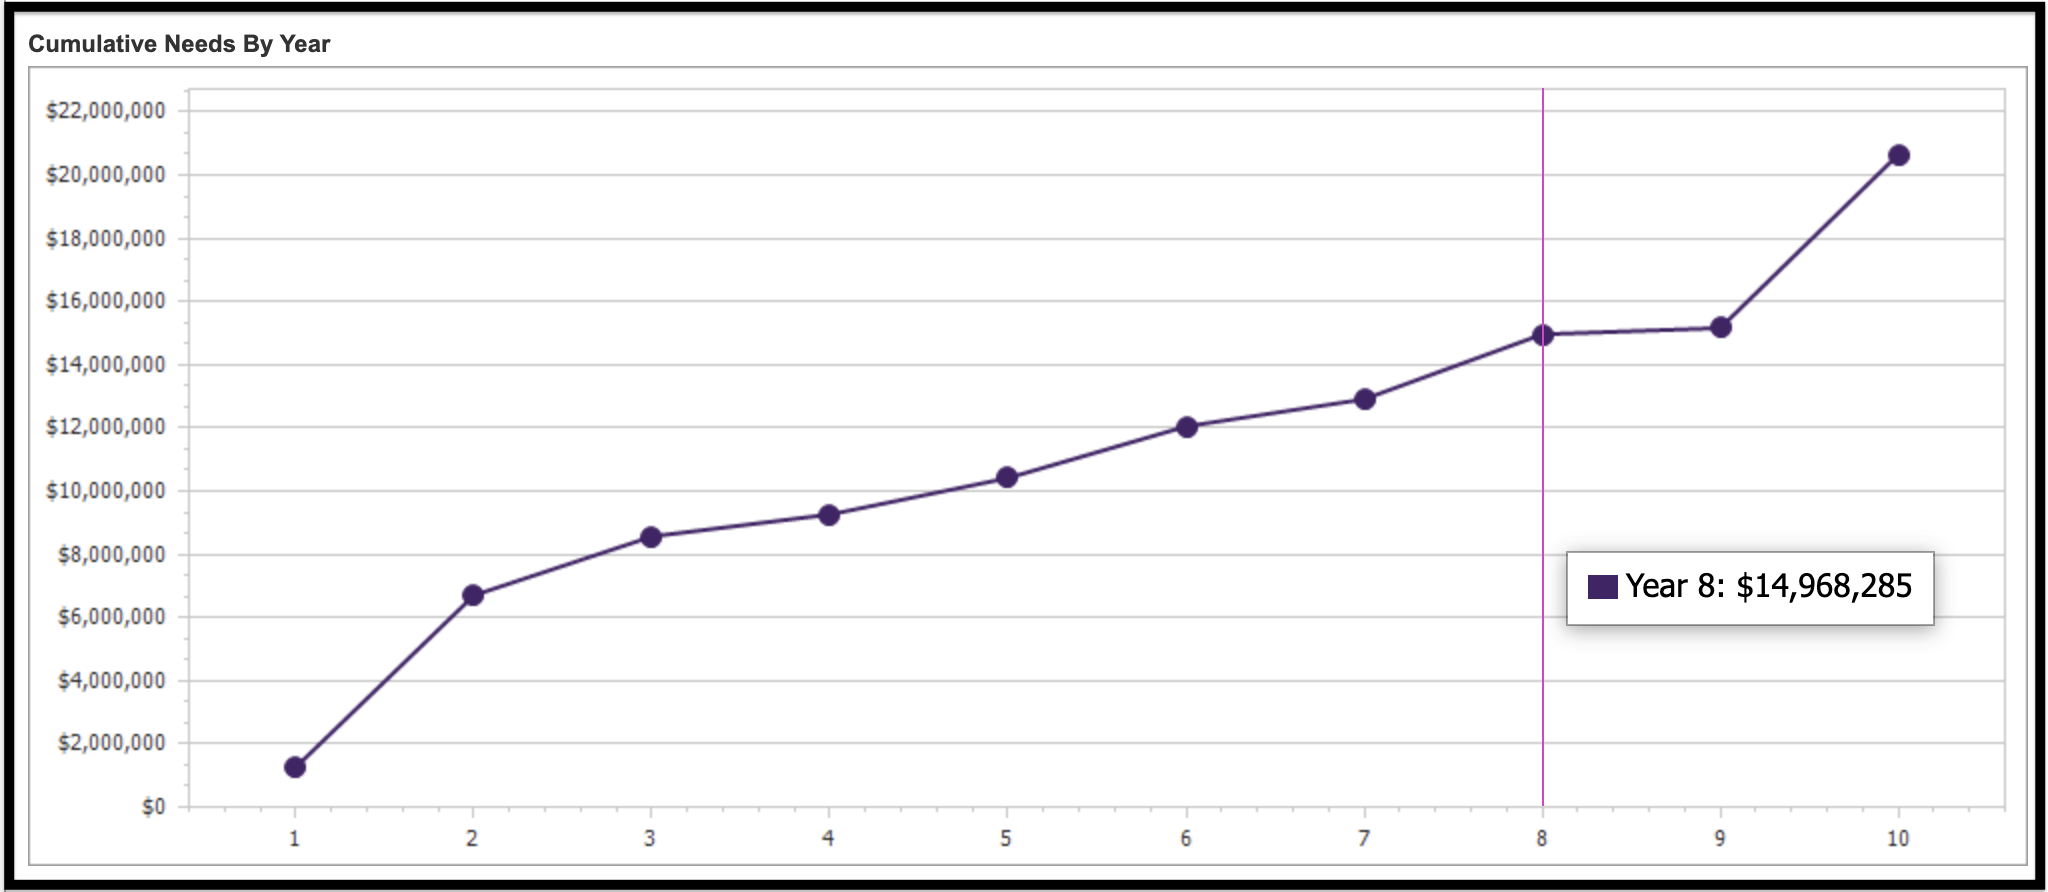
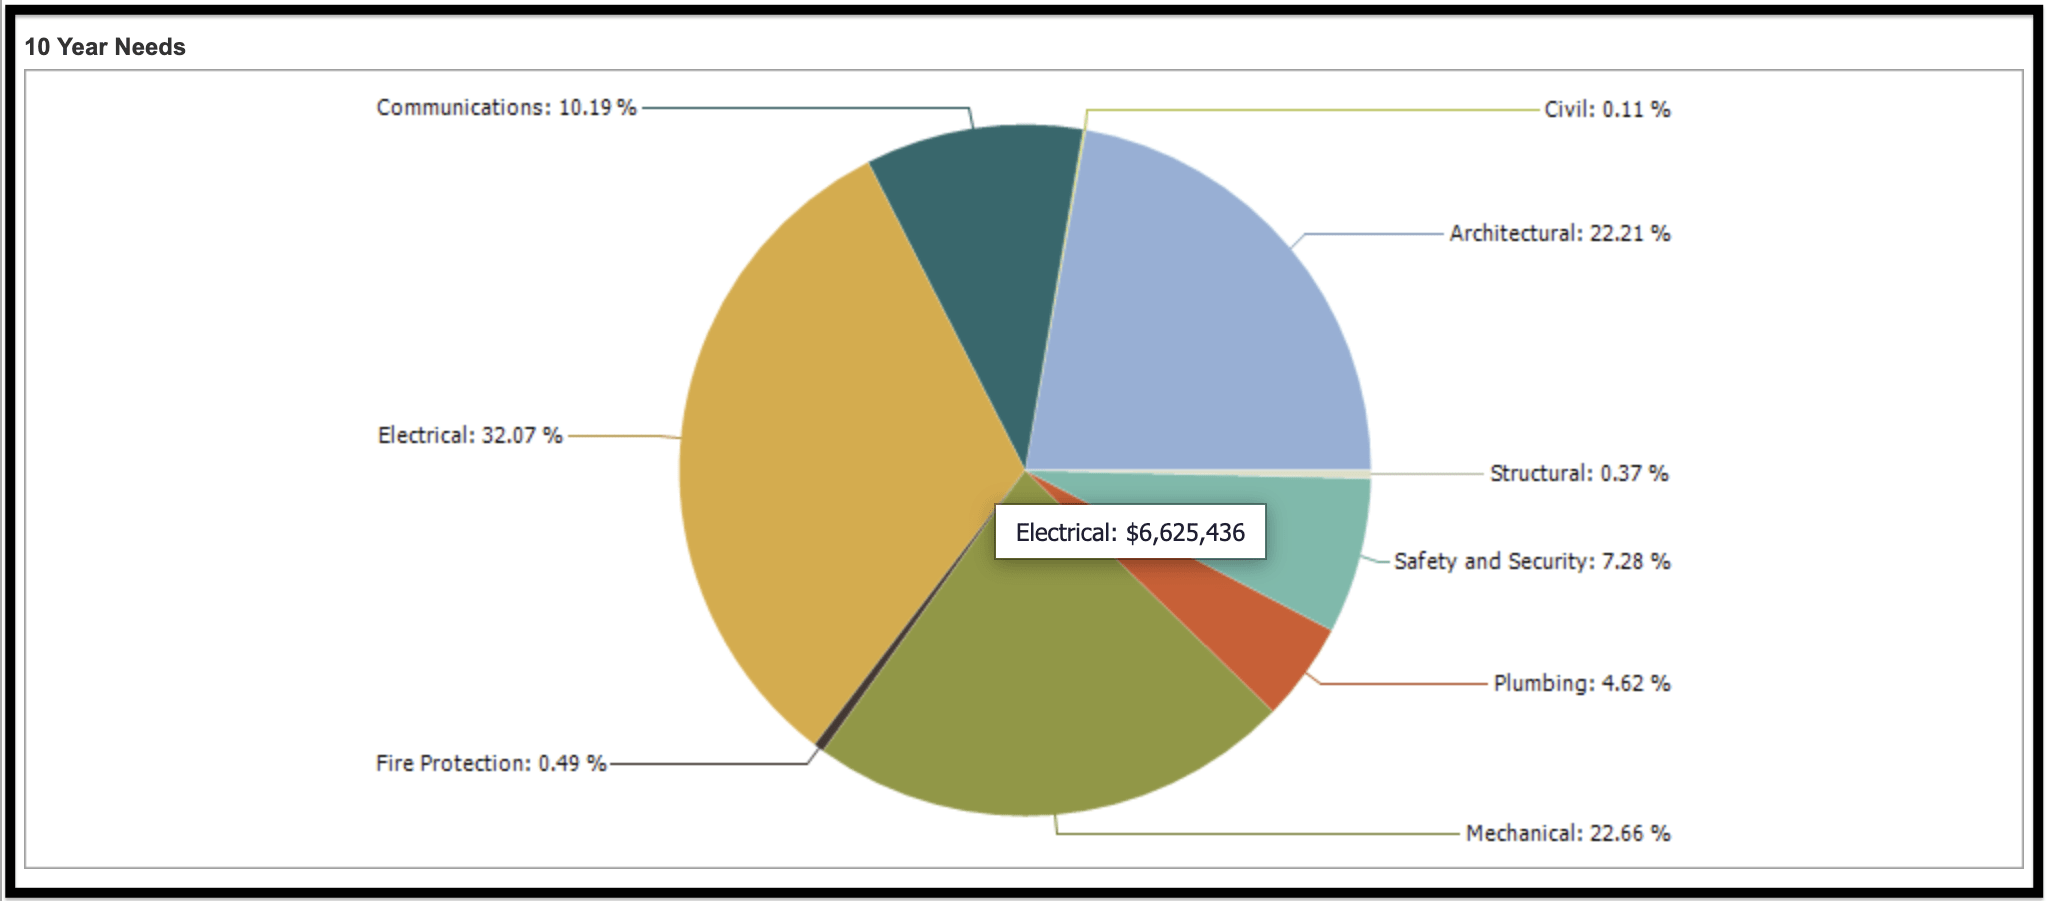
| Visualization | The Visualization tab at the Building level provides this module’s most comprehensive set of charts and graphs for enhanced reporting |
Discipline (Assessment Records) #
FOScore® uses UniFormat 2010 to organize assessment records. UniFormat 2010 is an industry-standard classification method published by CSI (Construction Specification Institute) for cataloging building systems and components.
UniFormat 2010 organizes categories of construction as follows:
| A. Substructure | F. Special Construction and Demolition |
| B. Shell | G. Sitework |
| C. Interiors | H. ADA* |
| D. Services | Z. General |
| E. Equipment and Furnishings |
*ADA is a unique category added by FOS to execute ADA assessments.
As the UniFormat level increases, so does the level of detail. You can create records using Level 2, 3, or 5 UniFormat standards.
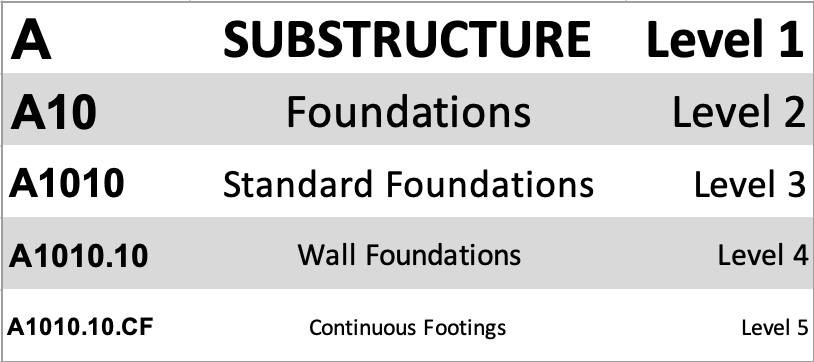
The image below provides a more detailed illustration:
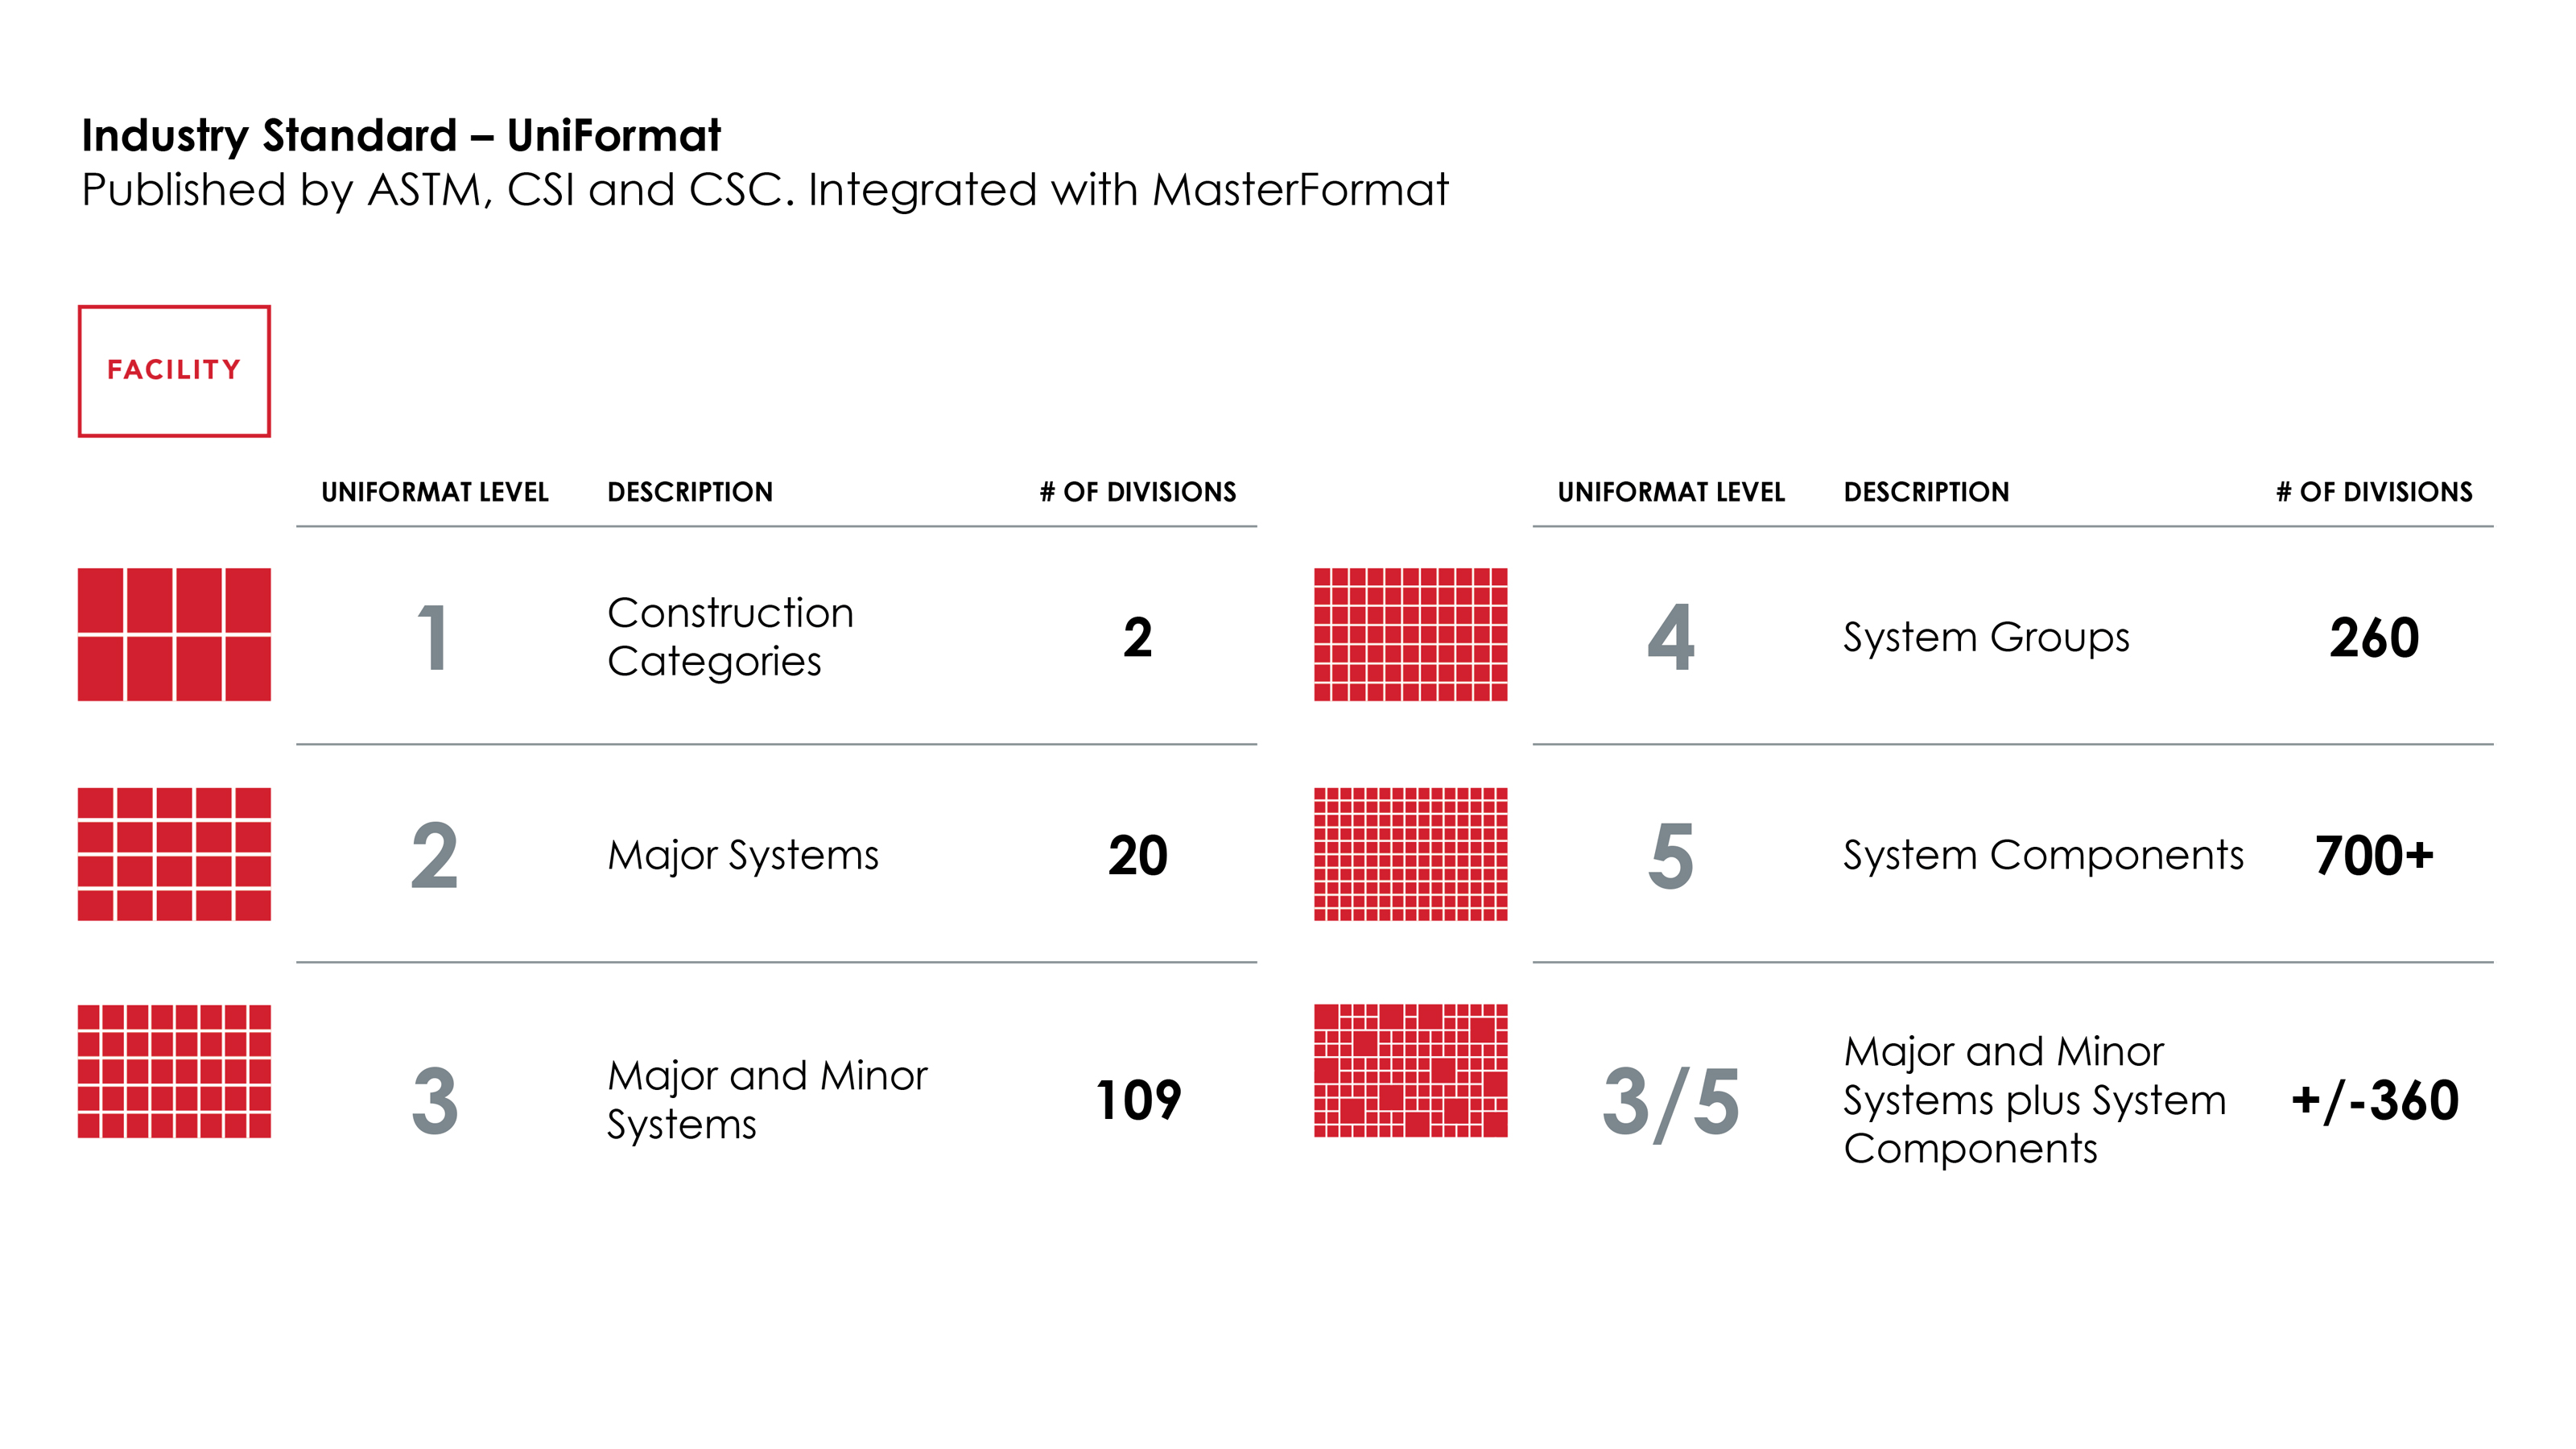
In the software, UniFormat 2010 is divided into the following disciplines:
- ADA* Assessments
- Architectural
- Civil
- Communications
- Electrical
- Fire Protection
- Mechanical
- Plumbing
- Safety and Security
- Structural
*ADA is a unique category added by FOS to execute ADA (Americans With Disabilities Act) assessments.
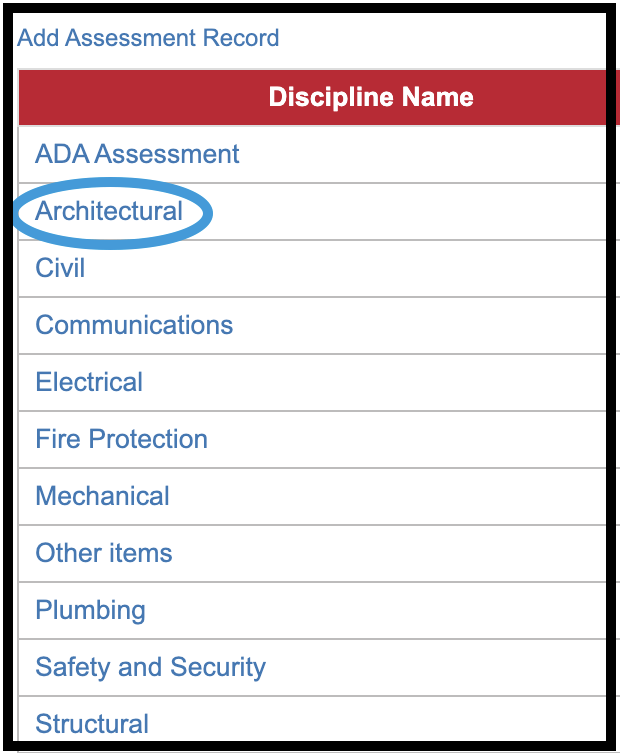
To see the items in a specific discipline, click the Discipline Name, for example Architectural.
Click on the Search All Assessment Records button to be taken to the All Assessments page as shown below:

You can also use the search box to look up an item by the UniFormat number, name, item ID, or keyword. Type in your information and matching records will be be brought up. Leaving the search bar box blank will bring up a grid showing all assessments that have been entered into the system.
To Sort the Assessment Data Grid:
- Click on the column header of the field you want to sort by.
- Clicking on the column header once will sort in ascending order.
- Clicking on the column header twice will sort in descending order.
- Hovering over the column header with your cursor will cause the header to be underlined.
- In the example shown below, the grid is sorted by the Priority field.

To open a system or component:
- Click on the numeric Item link for that record; this number is unique to every assessment record in the system.
- The item will open, and you can see/edit any information.
- No matter what item you open, the data points you are able to collect will remain the same.

Customize Layout #
In the upper right corner of the Assessment Records screen, you will find the Customize Layout feature. Click this option if you would like to modify the look of the grid by changing what items you see and how they are sorted and grouped, in addition to other options.
The image below shows some of the options available in the Sorting tab of the Customize Layout feature.
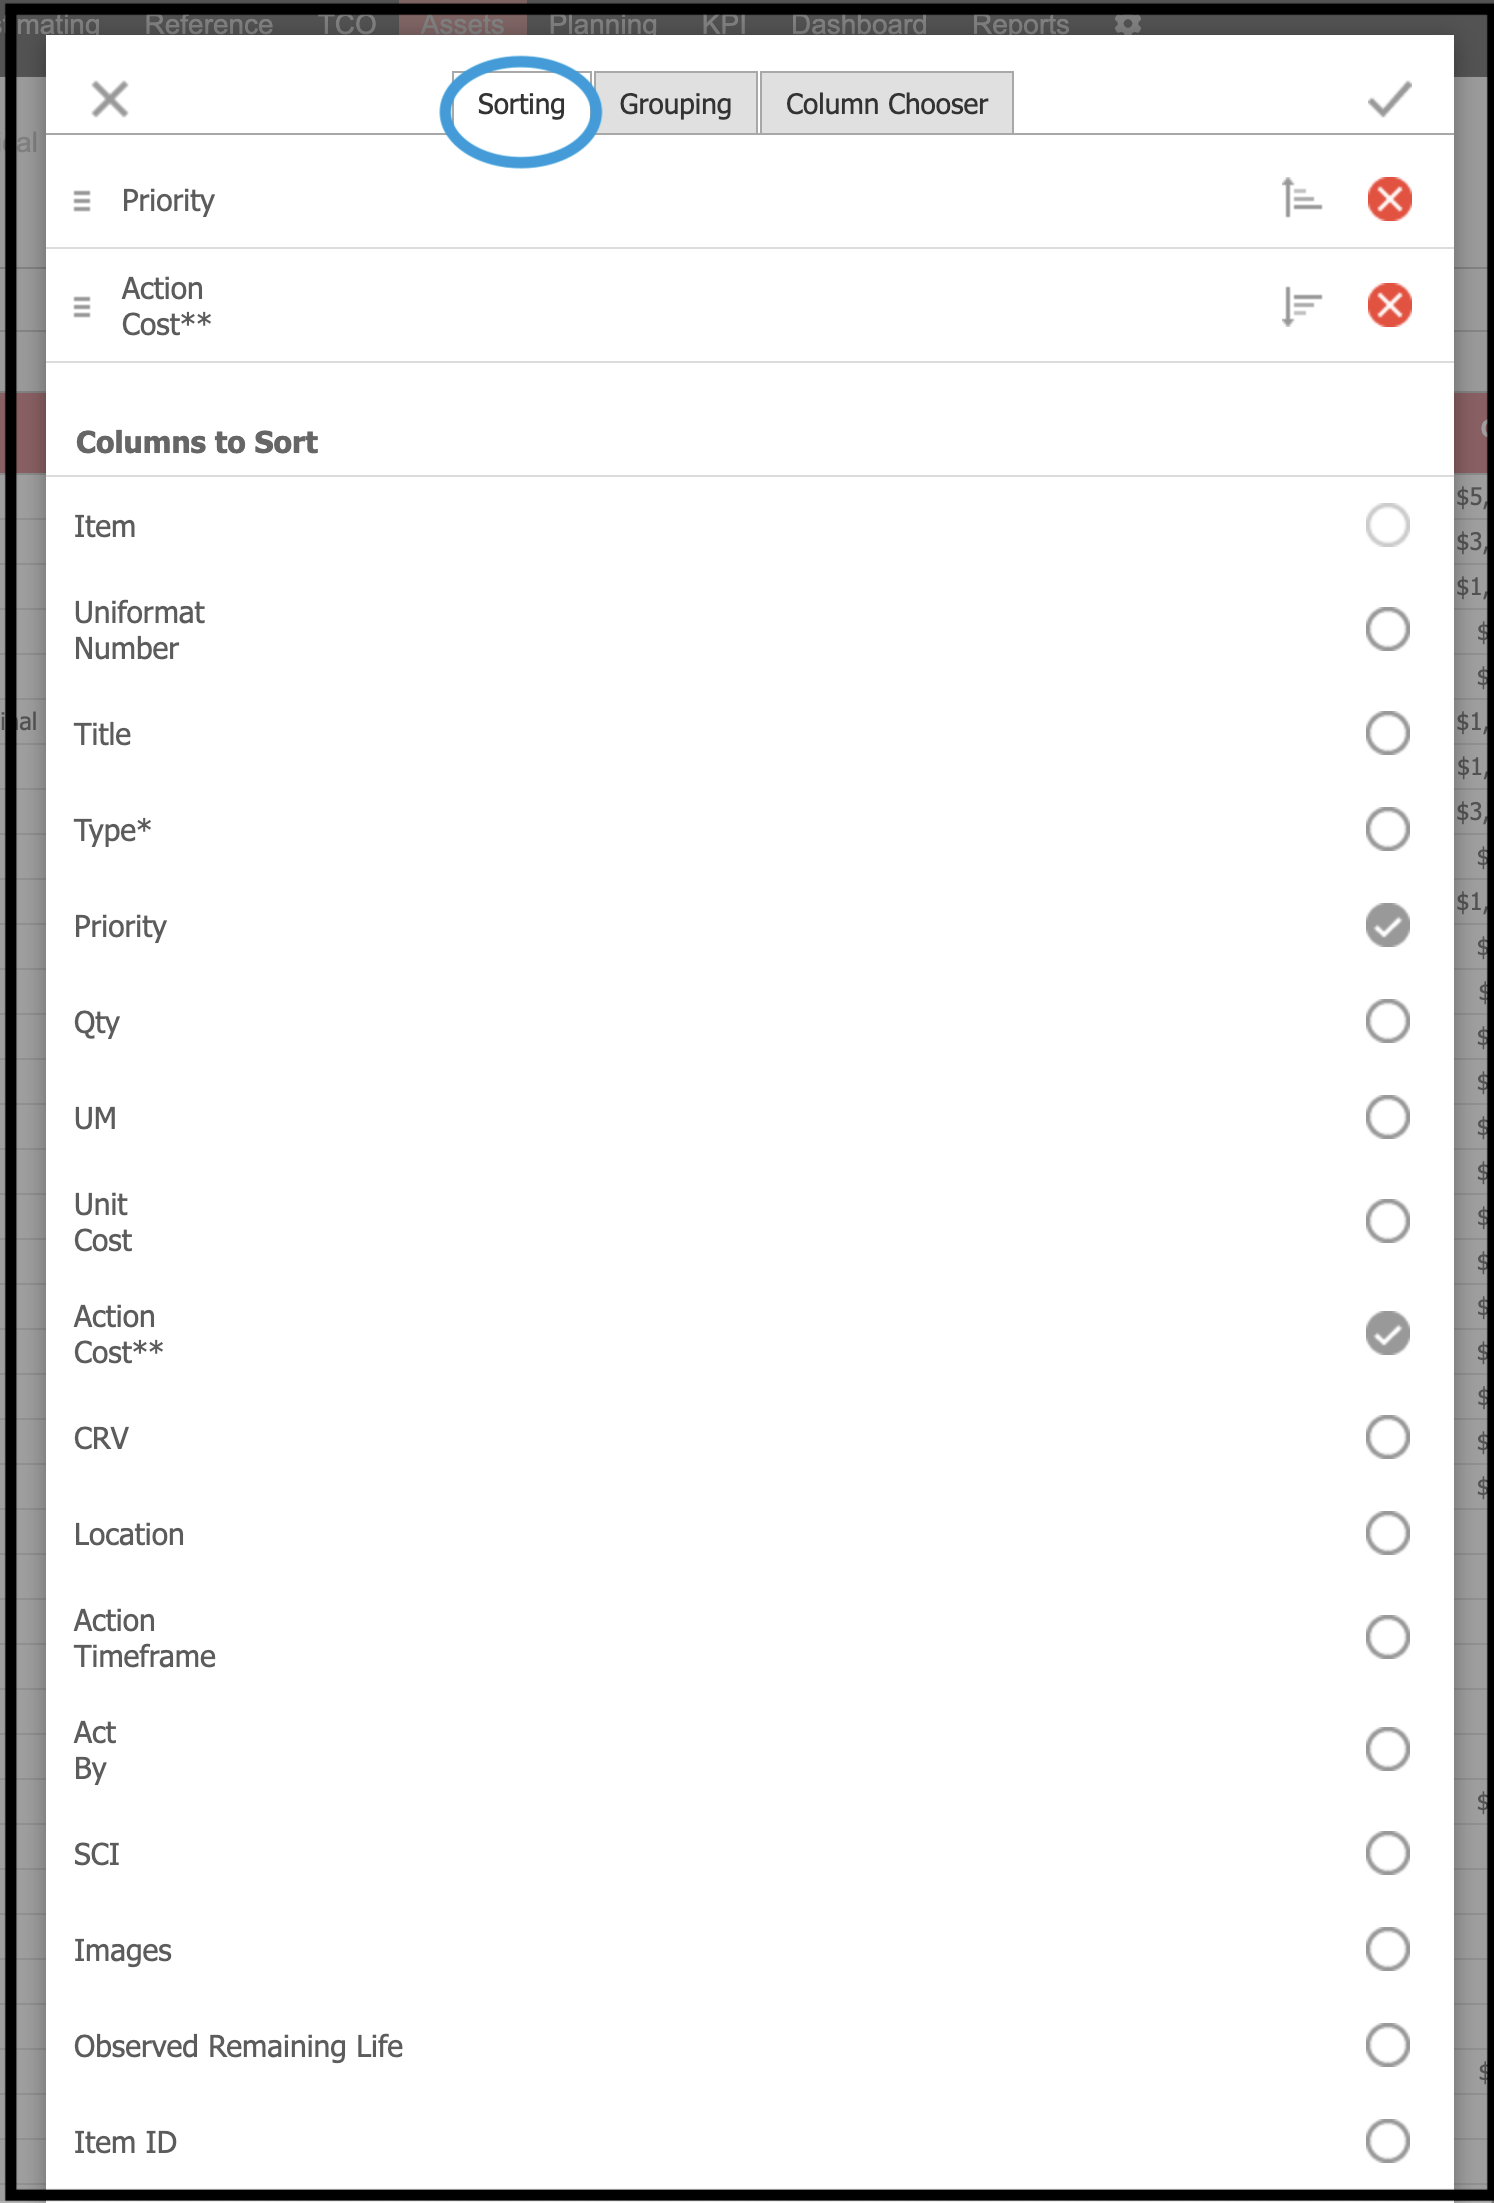
In the example shown, data in the grid is being sorted by 1) Action Cost – descending; 2) Priority – descending; and 3) Observed Remaining Life – ascending. The results of this sort sequence are shown below.

To activate the sort, choose columns you would like to work with in the desired sequence. Toggle between ascending and descending order by clicking on the arrow with lines to the right of the column name. To remove a column from the sorting arrangement, click the red circle with an x. To initiate the sort, click the checkmark in the upper right corner.
Grouping and Column Chooser are the two other options of the Customize Layout feature. Options can be used independently or together to provide a more granular view of the data.
The following columns are available for customization:
| Item | Uniformat Number | Title |
| Type | Priority | Qty |
| UM | Unit Cost | Action Cost |
| CRV | Location | Action Timeframe |
| Act By | SCI | Images |
| Observed Remaining Life | Item ID | Uniformat L2 Number |
| Areas Served | Adj Unit Cost | Life Cycle In Years |
| Impact Title | Risk Title | Tag |
| Item Unique ID | Adjustment Factor | Repair Factor |
General #
General displays these read-only fields:
- UniFormat Number
- Assessment Number (Item ID)
- Created Date: The date, time, and user information for when the record was created.
- Modified Date: The date, time, and user information for the last time the Save button was clicked for the record.
This screen also displays these editable fields:
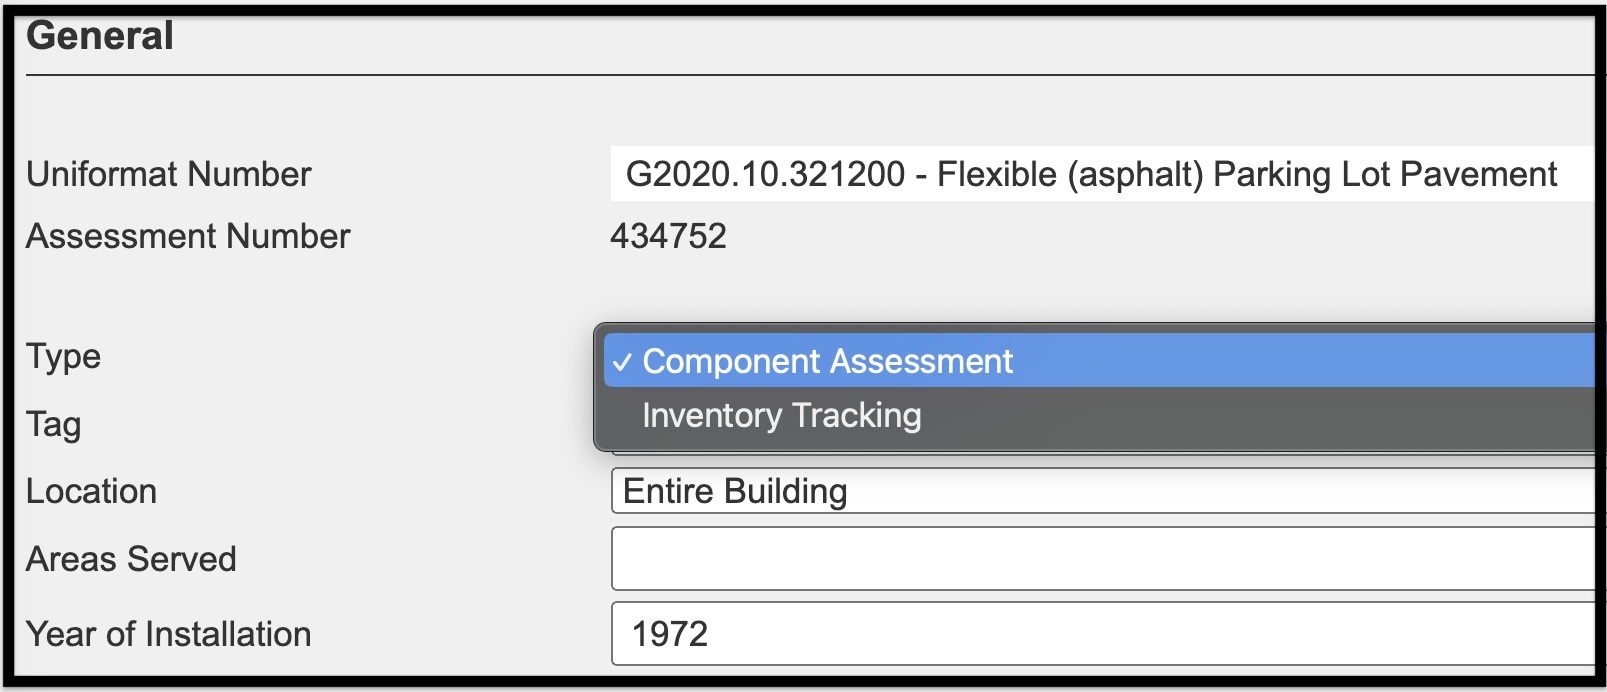
Type: Component Assessment or Inventory Tracking
- Component Assessment: The cost of the item is counted toward the CRV (Current Replacement Value), Action Cost, and FCI (Facility Condition Index).
- Inventory Tracking: The cost is shown within the item, but it is not counted toward the CRV (Current Replacement Value), Action Cost, and FCI (Facility Condition Index).
- Inventory Tracking items are those that are moveable from building to building; for example, a chair, a desk, or a hospital bed.
- The Inventory Tracking selection can also be used if you want to keep a history of items that you have replaced instead of deleting them.
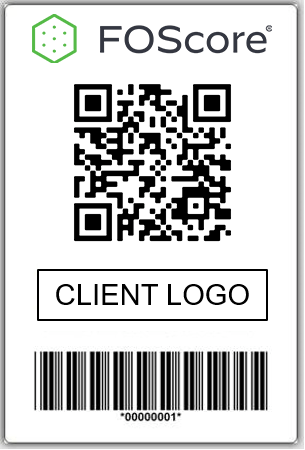
Tag: Place the number/value listed below the barcode in this field when using Asset Tagging to add QR Codes to your assets, thus enabling the use of a mobile device to pull up the records in the software.
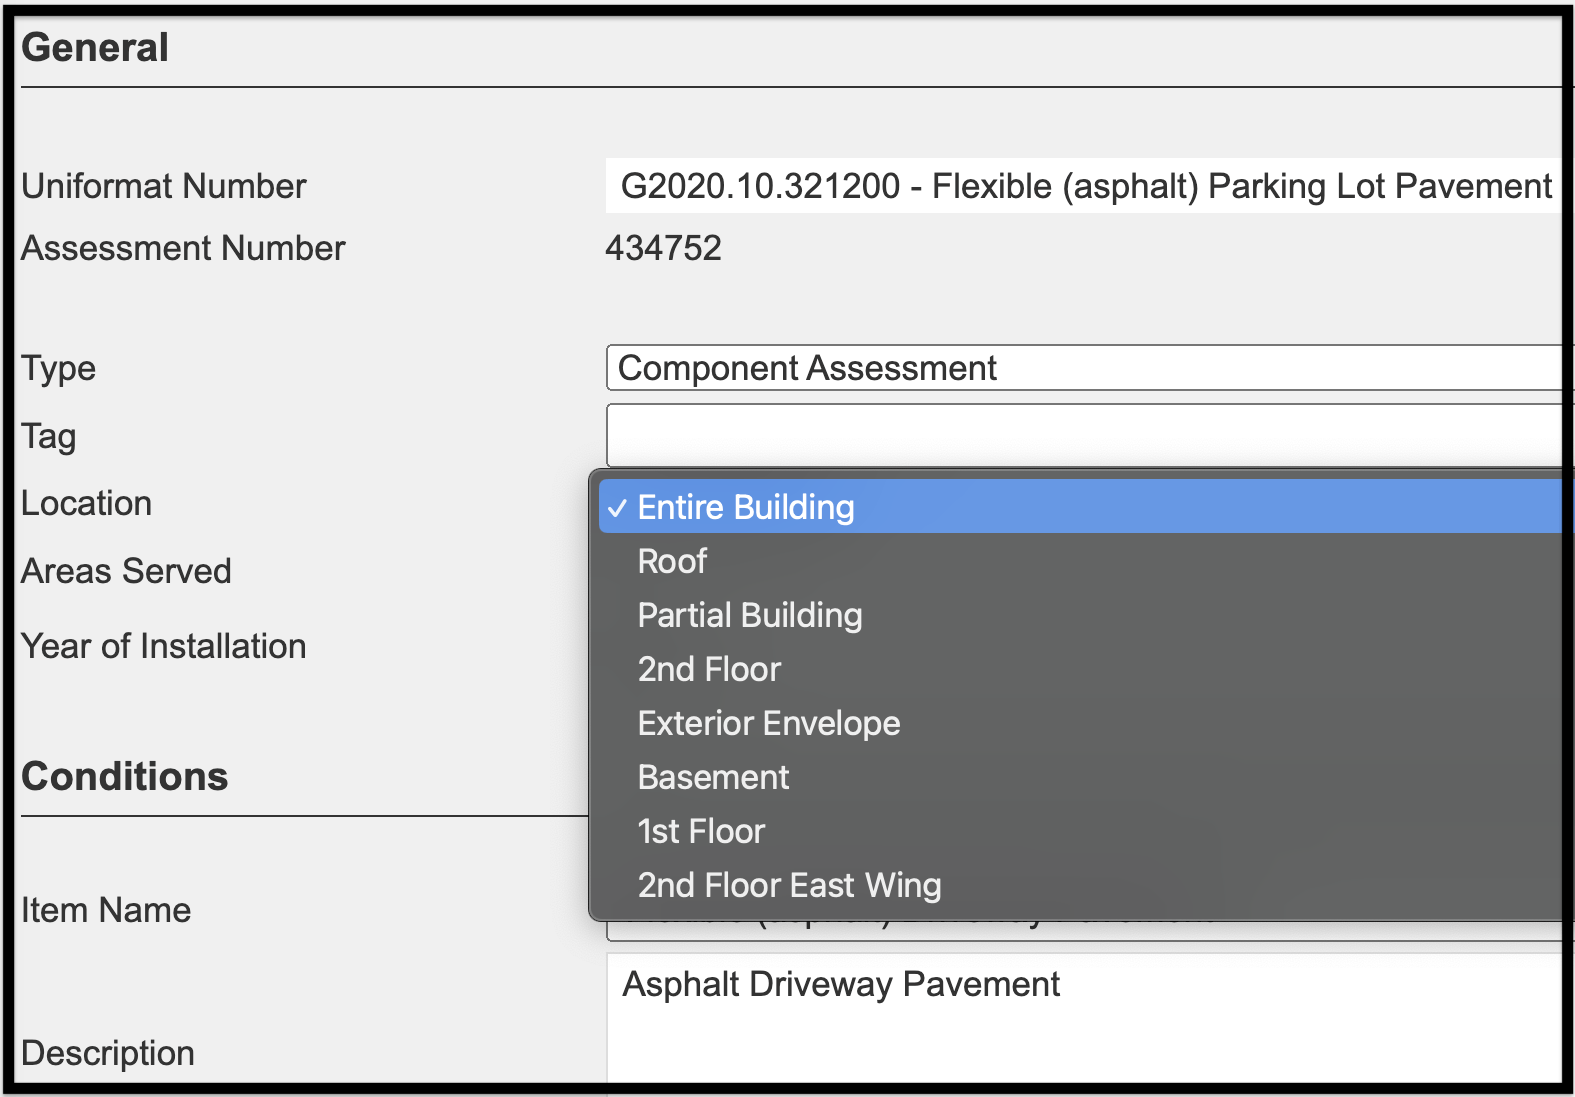
Location: a drop-down menu that allows you to choose where the item is located, i.e., a floor, a section of the building, etc. To add to or modify the drop-down list, see the Floors/Locations tab.
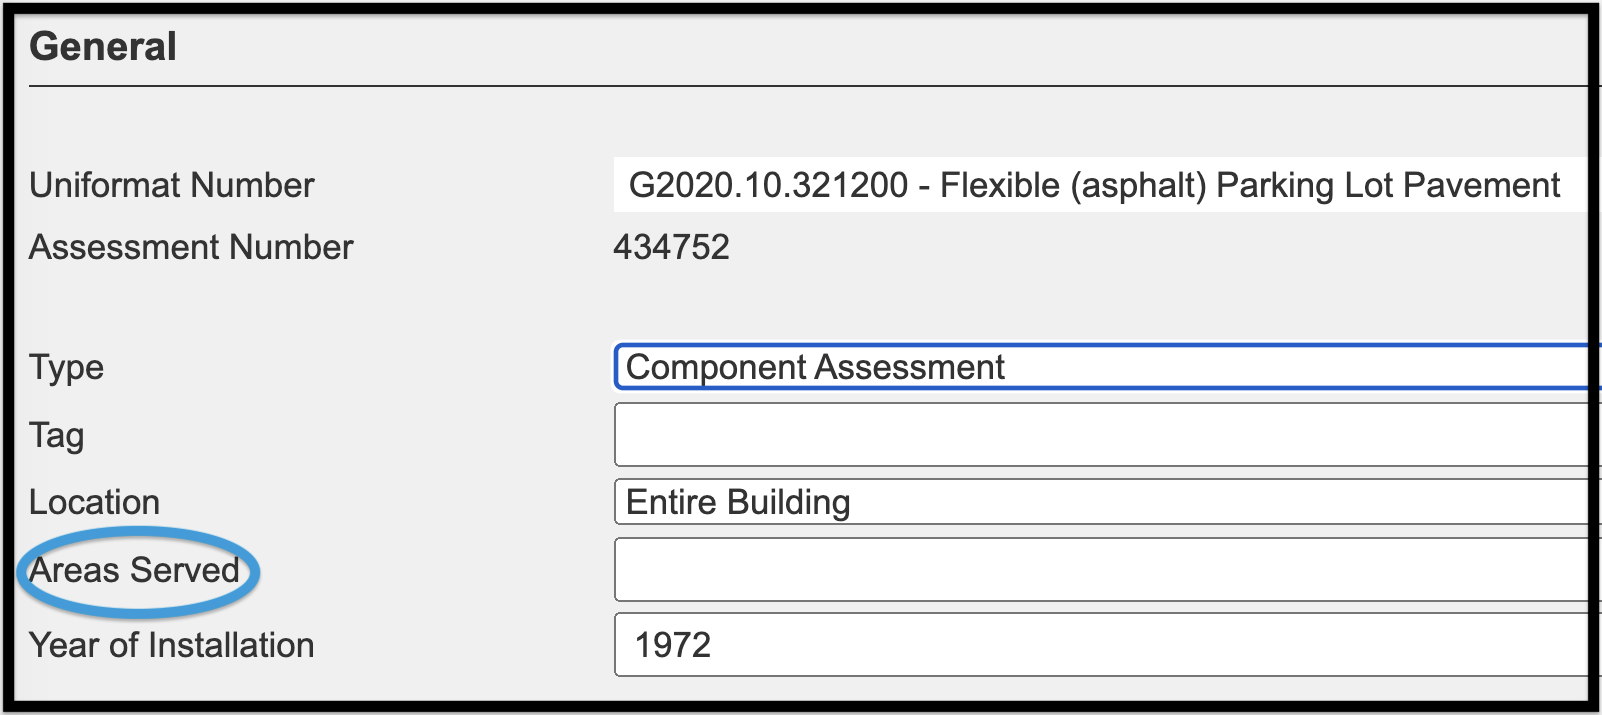
Areas Served: This text field allows you to describe the parts of the building or asset served by the system or component.
Example: a boiler is located in the basement. The Areas Served would be the Entire Building as the boiler heats the entire building.
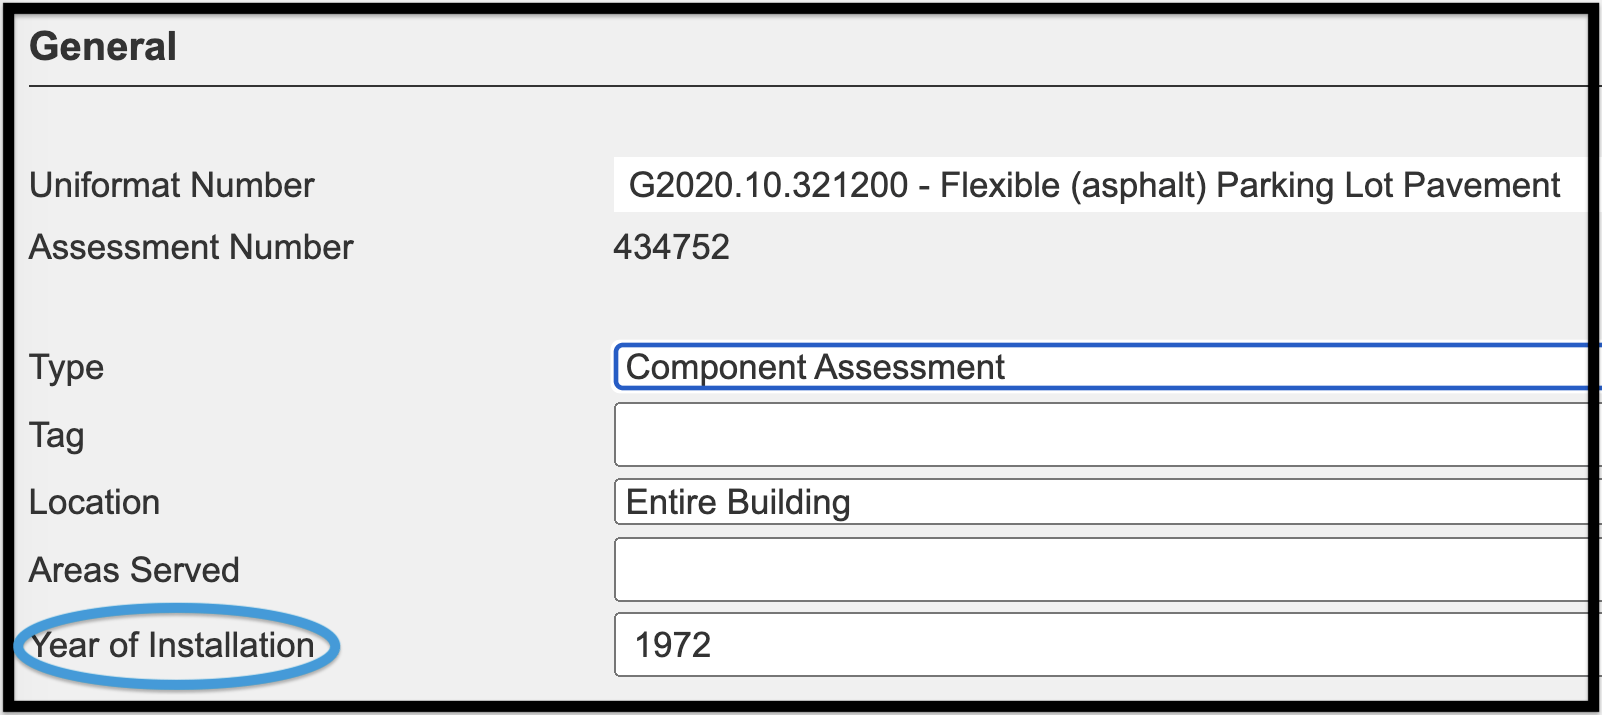
Year of Installation: The known, or estimated, year the item was installed.
- The input must be one year, i.e., 2023.
- In general, go with the older year, the date of the original building, or the last renovation.
- If the installation is unknown, please estimate.
Conditions #
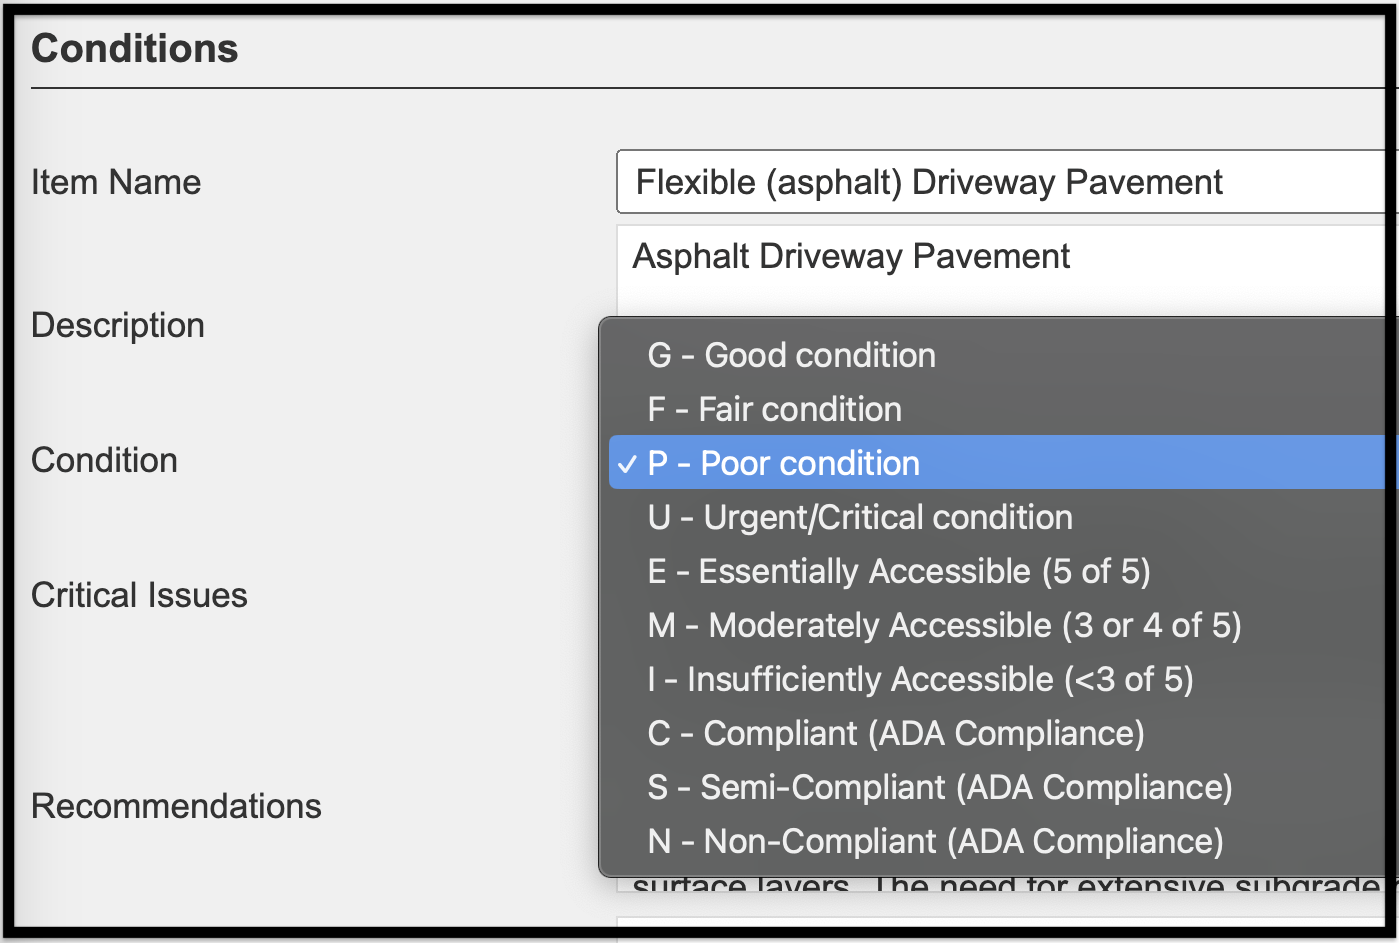
Displays these editable fields:
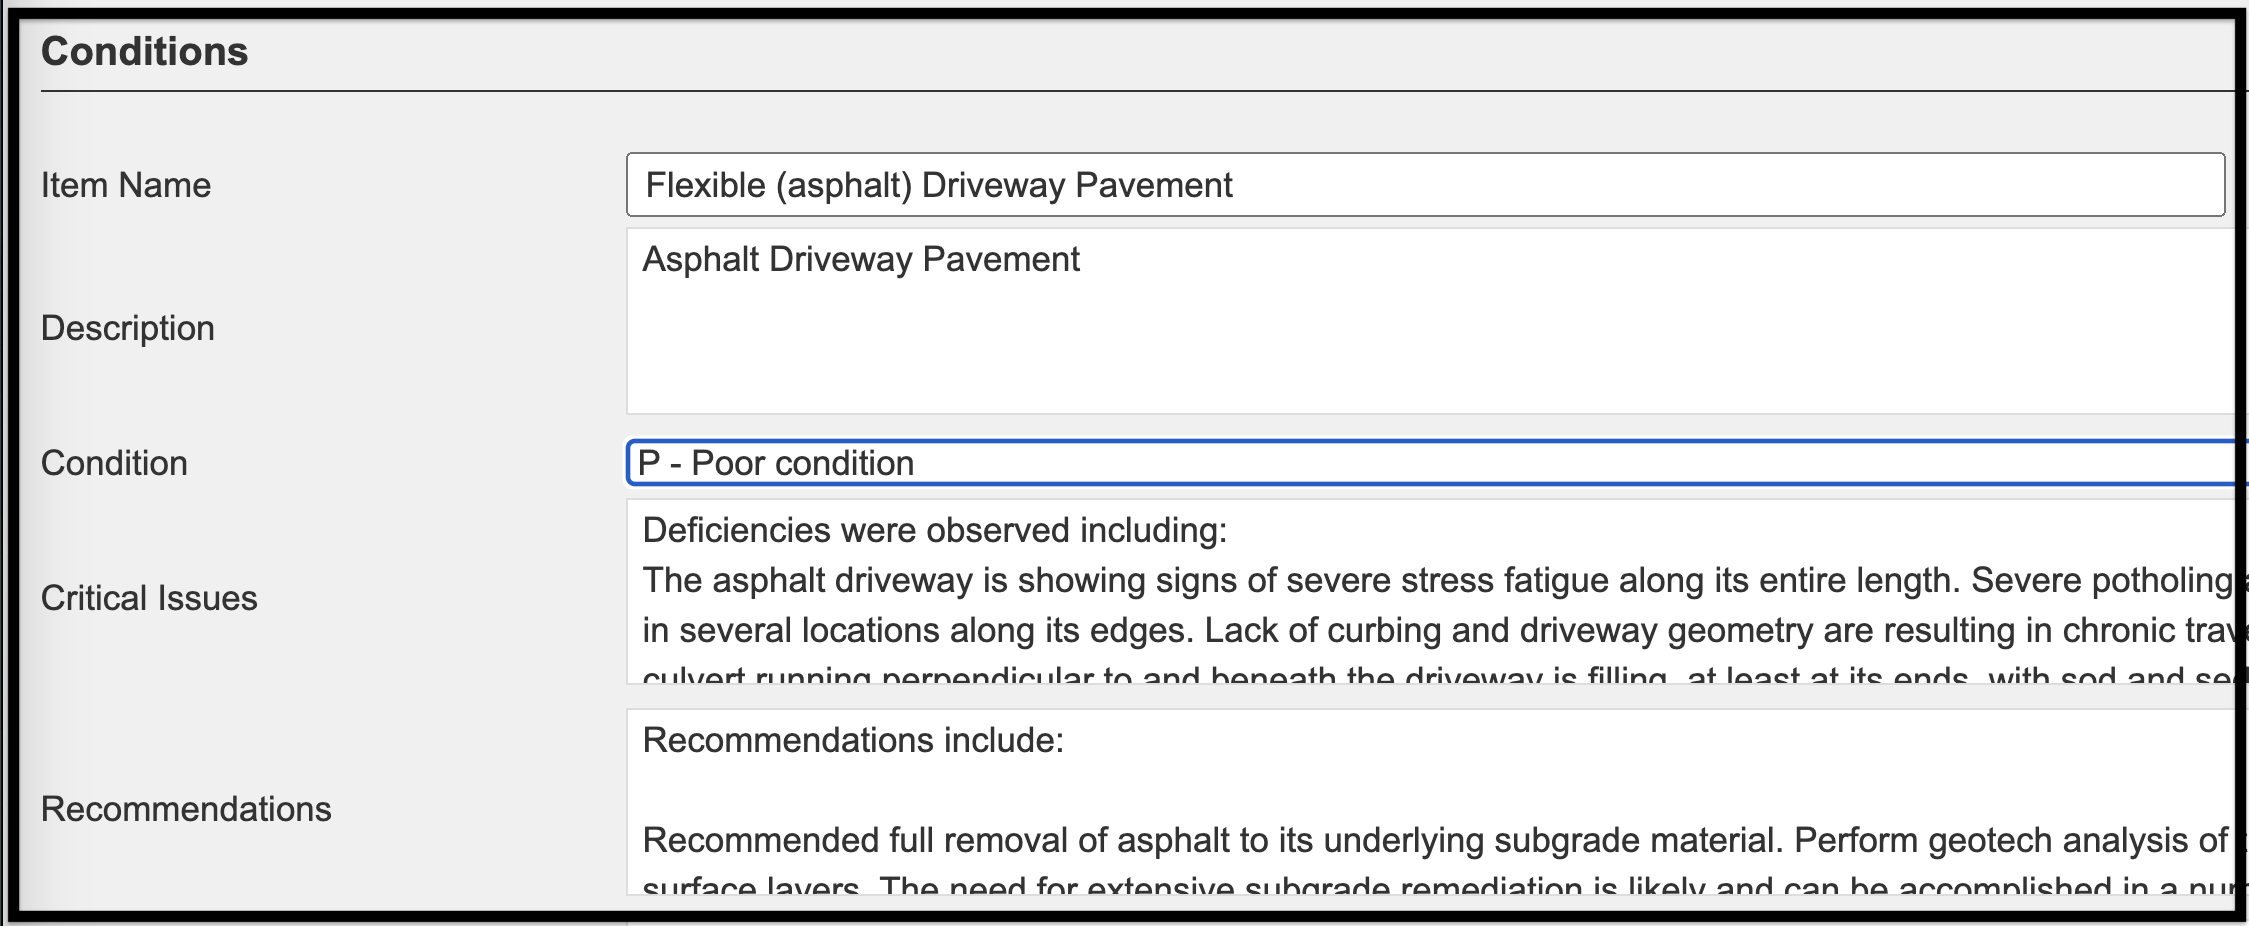
- Item Name: By default, the Item Name is the UniFormat Name. The Item Name can be edited to distinguish one item from another.
- Description: This text field describes the system or component.
- Condition: This field is a pre-populated drop-down menu. It displays the assessor and/or user’s observed condition of the asset or component (as shown in the second image above).
- The four main Condition Assessment options are:
- G: Good Condition
- F: Fair Condition
- P: Poor Condition
- U: Urgent/Critical Condition
- The six Accessibility/Compliance assessment options are:
- E: Essentially Accessible (5 of 5)
- M: Moderately Accessible (3 or 4 of 5)
- I: Insufficiently Accessible (<3 of 5)
- C: Compliant (ADA Compliance)
- S: Semi-Compliant (ADA Compliance)
- N: Non-Compliant (ADA Compliance)
- E, M, and I are part of a general ADA overview. C, S, and N are part of a legal ADA compliance assessment.
- The four main Condition Assessment options are:
- Critical Issues: This text field describes the deficiencies.
- Recommendations: This is the text field that lists how the item’s need(s) or deficient condition(s) should be addressed. This may include but is not limited to, deferred maintenance, code issues, functional requirements, and capital improvements.
- Comments: Any additional information that does not fall in the aforementioned fields is placed here.
- Comments are not printed in reports; assessors may choose to enter their initials to indicate work on a record is complete.
- Description, Critical Issues, and Recommendations have suggested information based on the preliminary choice of Condition and UniFormat #. Since this information is pre-populated, it is recommended that it be edited to reflect the actual condition.
Planning #
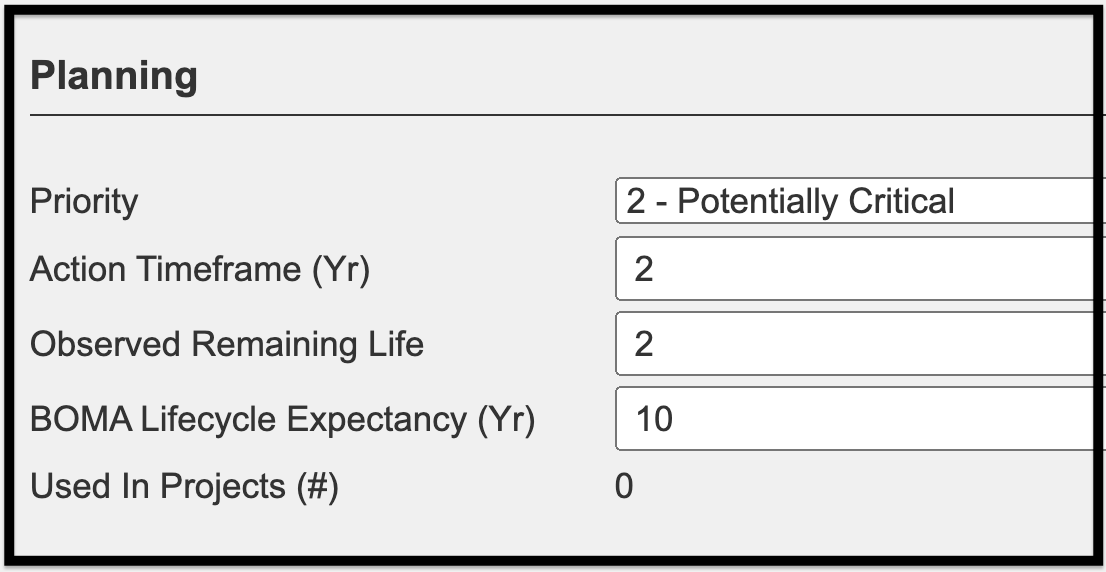
Displays these editable fields:
- Priority: This is a five-tier ranking matrix based on the action timeframe. Priorities are designed to provide a reference point for maintenance projects, Capital Improvement Planning (CIP), and budgeting.
- Priorities can be customized to meet clients’ individual needs.

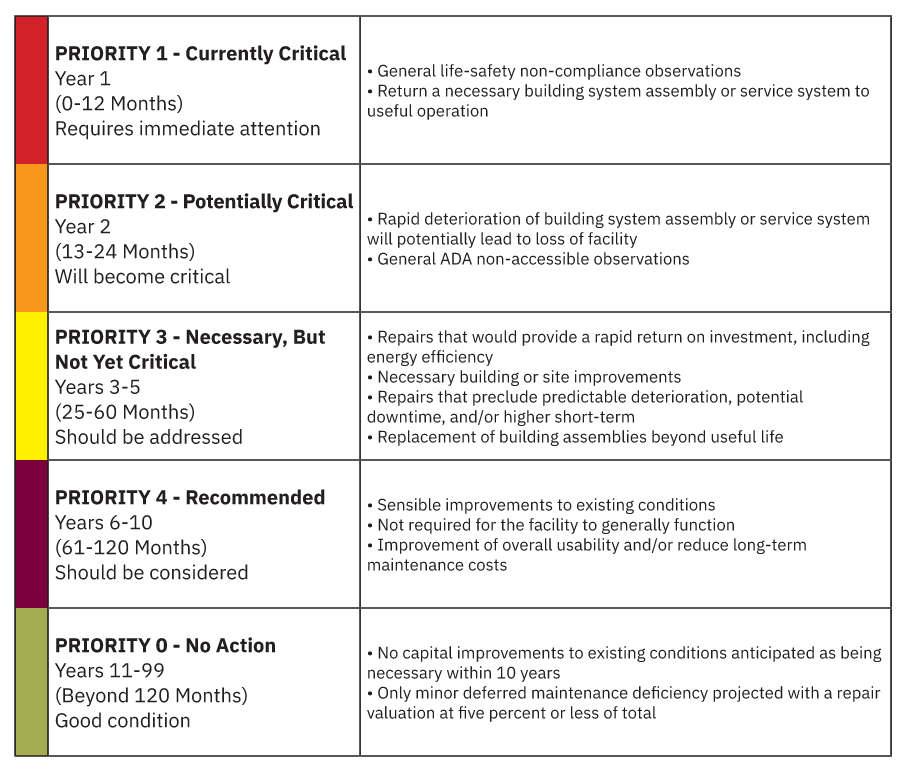
The following criteria will be applied to establish consistent recommended actions and current operating status:
Action Timeframe (Yr): The recommended window of time in which to make a repair or replacement. The action timeframe determines whether the item is included in short- or long-term needs.
Observed Remaining Life: Indicates how long the item is expected to last in its current state, as determined by the field assessor and based on the BOMA (Building Owners and Managers Association) life expectancy.
- This number may be greater than or less than the action timeframe based on maintenance, operational conditions, installation practices, etc.
- If the action timeframe is greater than the BOMA life expectancy, then the BOMA life expectancy, followed by the action timeframe, is used. If a repair factor is equal to 100, and the priority is not 0, then the action timeframe is used.
BOMA Lifestyle Expectancy (Yr.): This reference number is based on the assessment item’s UniFormat number and is not editable.
Used in Projects: This assessment item is included in the FOScore® Planning Module, either in a Plan or a Budget. If it is used in a project, the delete button for the assessment item will be hidden; the item cannot be deleted.
Photos/Files #
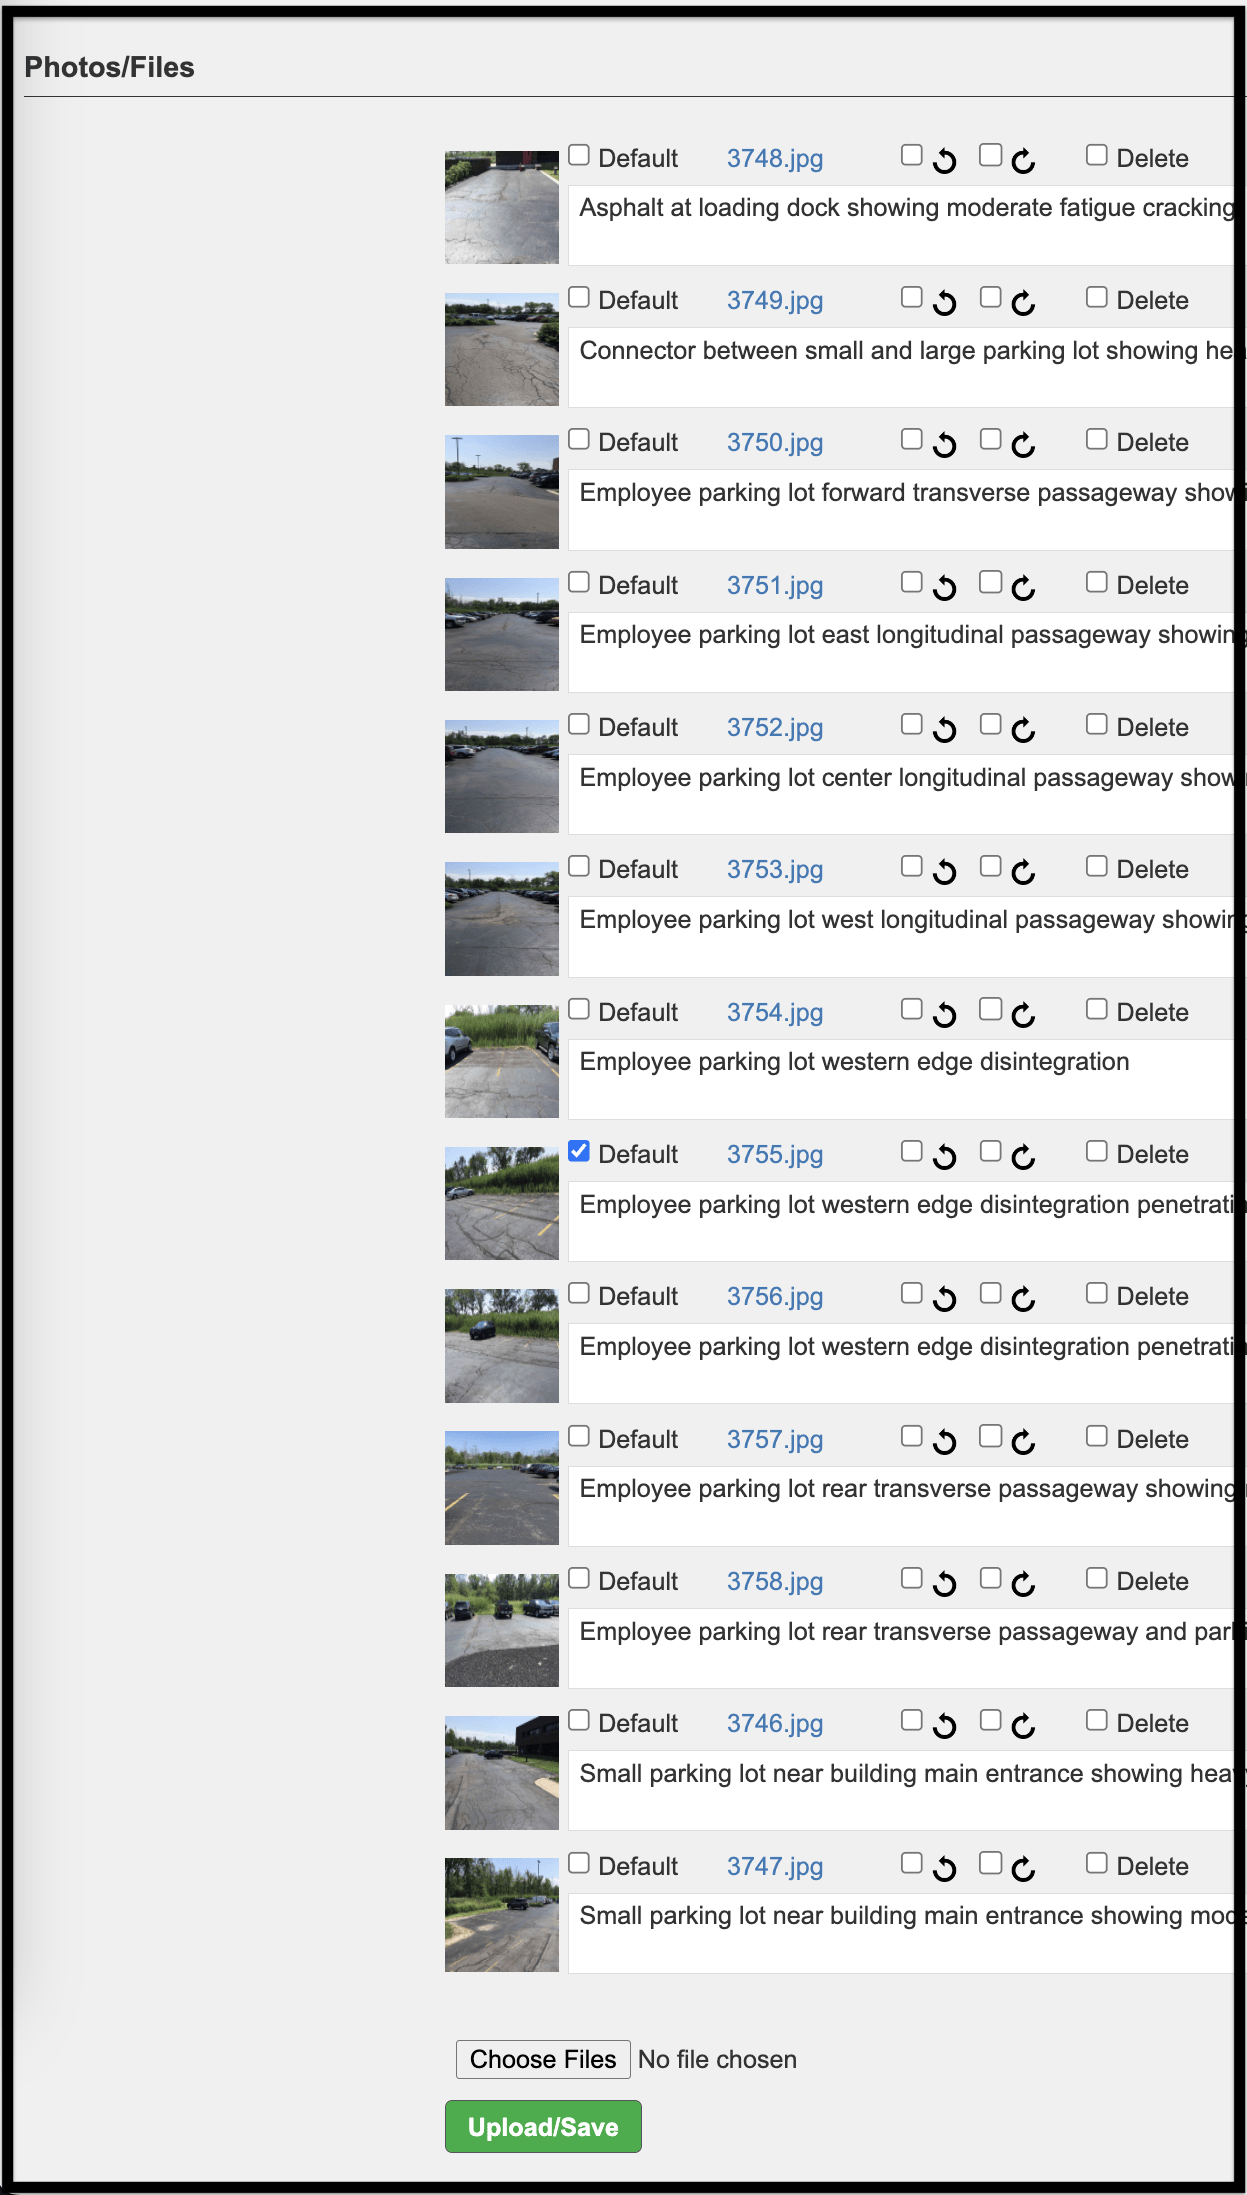
Displays these editable fields:
- Photos/Files: You are able to upload an unlimited number of photos and files, add captions to any uploaded photo or file, and click a box to choose the default photo.
To upload photos and files:
- Click Choose Files.
- Locate and select your image.
- Click Open.
- Click the check box to the left of Default to make this photo the default photo for the assessment; each item must have one default photo that will be the main image displayed in reports.
- Add a caption for the photo/file.
- Click Upload when complete.
- If you are using a mobile device, you will have a choice of taking a photo with your camera or uploading it from your device’s library.
- Files can include warranty information, manuals, etc. in formats like Microsoft Word, Excel, and .pdfs.
Risk #

Displays these editable fields:
- Category: This field is a pre-populated drop-down menu. It displays the category deficiency of the assessment item. This allows for sorting by deficiency type for planning and/or budgeting purposes.
- Additional categories can be added as needed.
- Risk of Failure: This field is a pre-populated drop-down menu. The risk of failure is the potential risk of the system or component to stop functioning as intended.
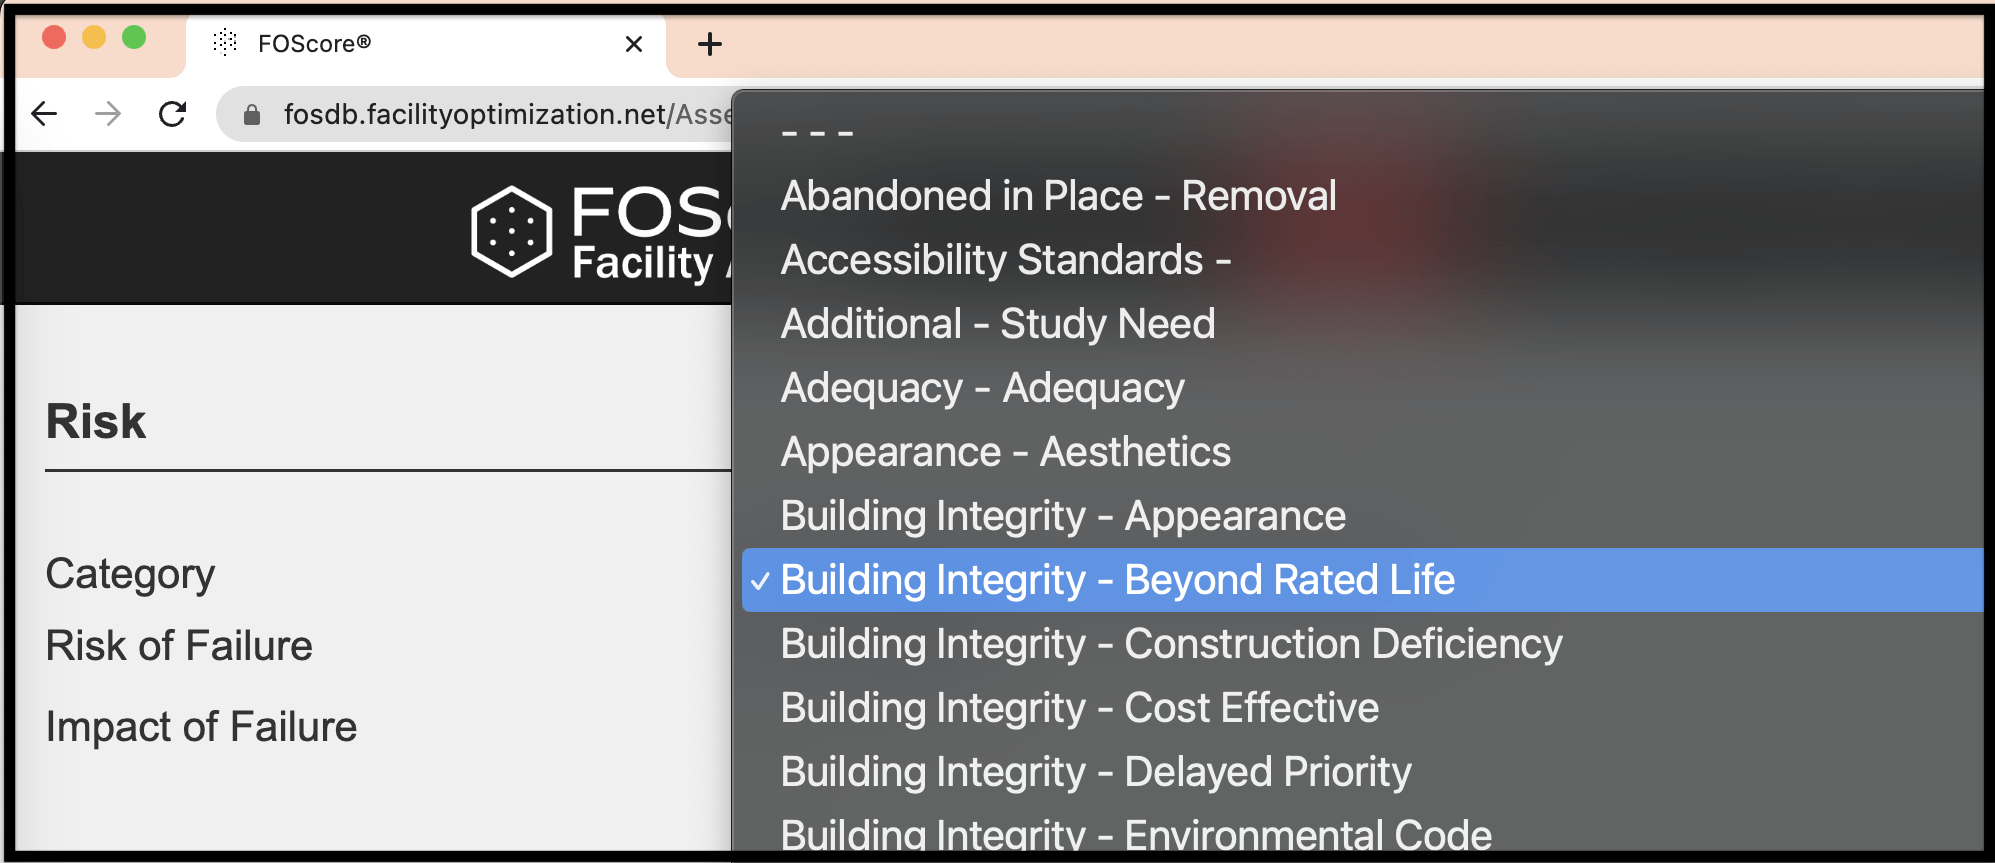
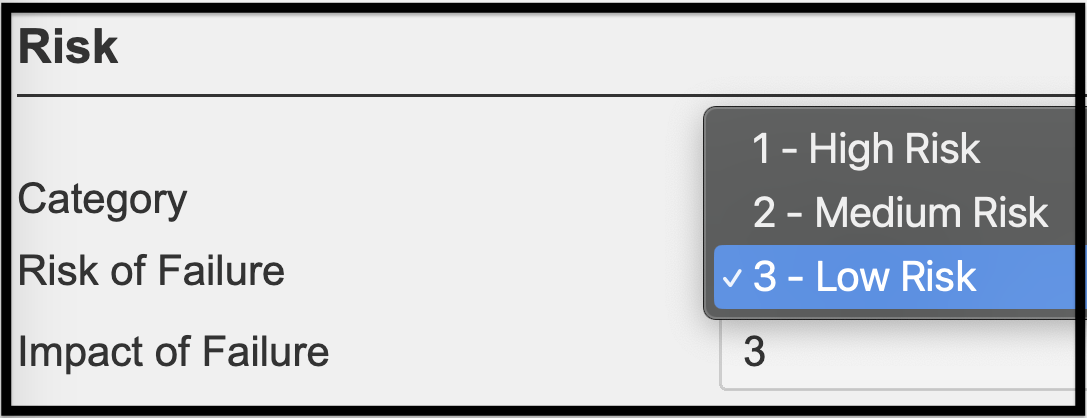
Displays this non-editable field:
- Impact of Failure: This field is assigned from the BOMA standards. The impact is the effect the item will have on the asset if that item fails to function as intended.
Costs #
Displays these fields:
- Quantity: The quantity unit of measure (UOM) is assigned to each UniFormat number.
- The actual unit of measure is displayed in parentheses.
- Unit Cost: These costs are maintained by our Cost Estimating Department. They are determined by historically based bids, national costing benchmarks, industry-accepted percentages, and commercial databases. Unit cost includes all labor, material, and equipment required to replace a system or component.
- Region Factor: Determined by nationally recognized baseline standards. Region factors are adjusted regularly for cost of living and inflation.
- Adjusted Unit Cost: Unit Cost * Region Factor
- Adjustment Factor: By default, the adjustment factor is set to 1. However, it may be increased or decreased to suit systems or components that warrant special cost attributes, i.e., complexity factors, historical renovations, etc.
- CRV (Current Replacement Value):
- Adjusted Cost * Adjustment Factor * Quantity
- The direct cost of labor and materials, including demolition, required to replace the building in its current configuration.
- The CRV does not include project costs such as design, general conditions, a contractor’s overhead and profit, land acquisition, or soft costs.
- The CRV does not include inflation or escalation which can be accounted for in the Planning Module.
- Repair Factor: Used to calculate how much of a repair or replacement is the total CRV. This figure is represented as a percentage in which 100% illustrates full replacement of the assessed system or component and a percentage less than 100 would indicate partial replacement or repair only is required.
- Full Renewal
- Action Cost:
- CRV * Repair Factor
- It is the estimated cost for the repair or replacement of the item.
- Assumptions: A description of what is included in the unit cost.

While in the software, clicking on the ‘i’ next to the Costs heading will open a new browser tab with the FOScore® Assessment Pricing Methodology guide.
- Needs Cost Estimation Review: This check box is used to indicate that the cost needs to be reviewed. Please contact your Project Manager or support team if an item needs review.
- Assessment is Completed: This check box is for verification purposes.
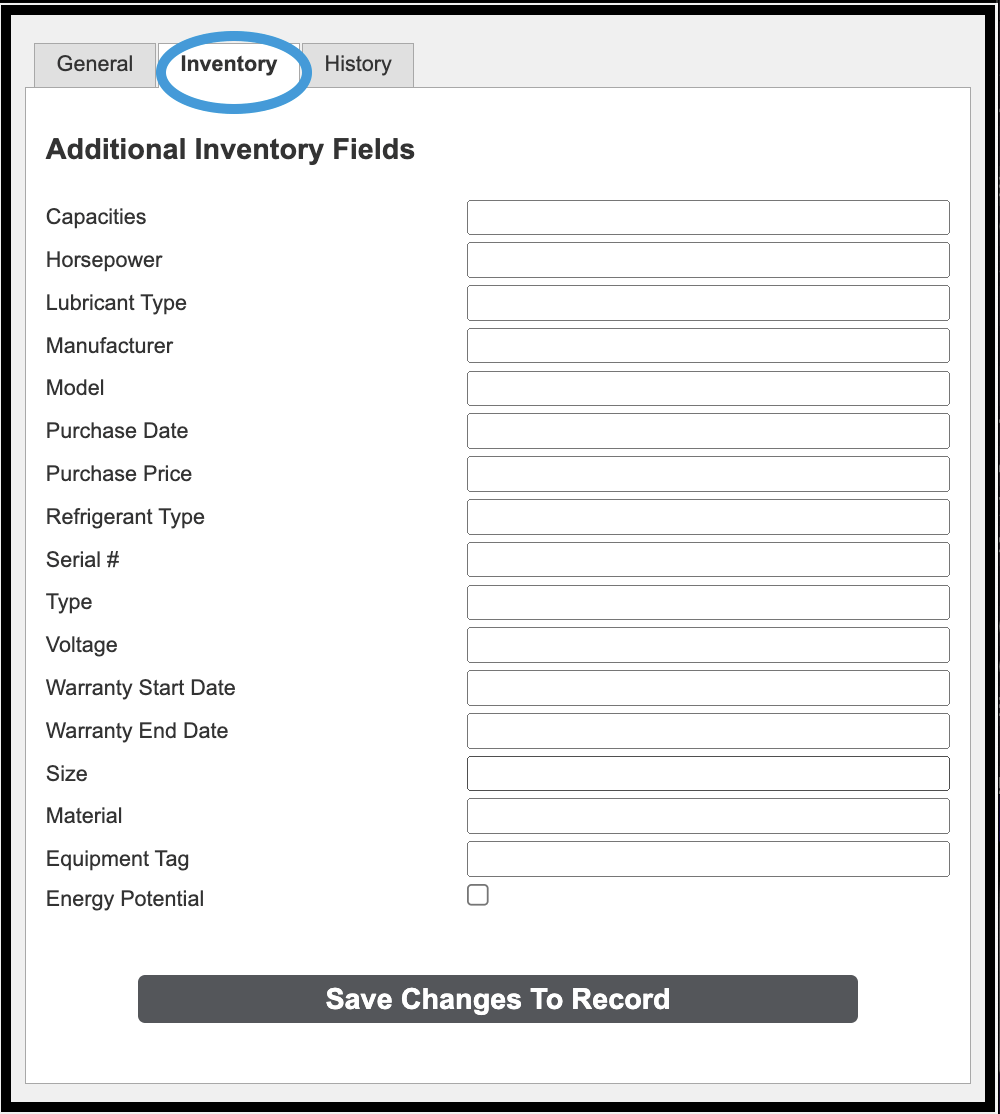
Inventory – Additional Inventory Features #
The Inventory tab contains these editable fields:
- Capacities: Maximum output or rate that systems hold or produce.
- Horsepower: Unit of measurement or power, or the rate at which work is done. The most common use of horsepower is the power or size of a motor.
- Lubricant Type: Substance used to reduce friction, generally oil or petroleum based. Typical types include organic and synthetic motor oil, grease, silicone, and graphite.
- Manufacturer: The builder/constructor of the system or component.
- Model: The make of the system or component.
- Purchase Date: The original date of purchase for the system or component.
- Purchase Price: The price paid for the system or component.
- Refrigerant Type: A fluid that circulates as a gas or liquid through a closed vapor compression system. Common types in use are R-410a, R-22, R-123, and R-143a.
- Serial #: A number showing the position of a system or component in a series, used predominantly for identification of that system or component.
- Type: The category, brand, or style of the system or component.
- Voltage: Electrical unit for measuring current flow or pressure between two or more points.
- Warranty Start Date/End Date: Start date and end date for the guarantee issued by the purchaser of a system or component by its manufacturer.
- Size: The specific size of the system or component.
- Material: The substance or matter of which the system or component is made.
- Equipment Tag: Metal, plastic, etc. tag used for the purpose of inventory control.
- Energy Potential: Amount or force of energy achieved by the system or component.
Client Fields #
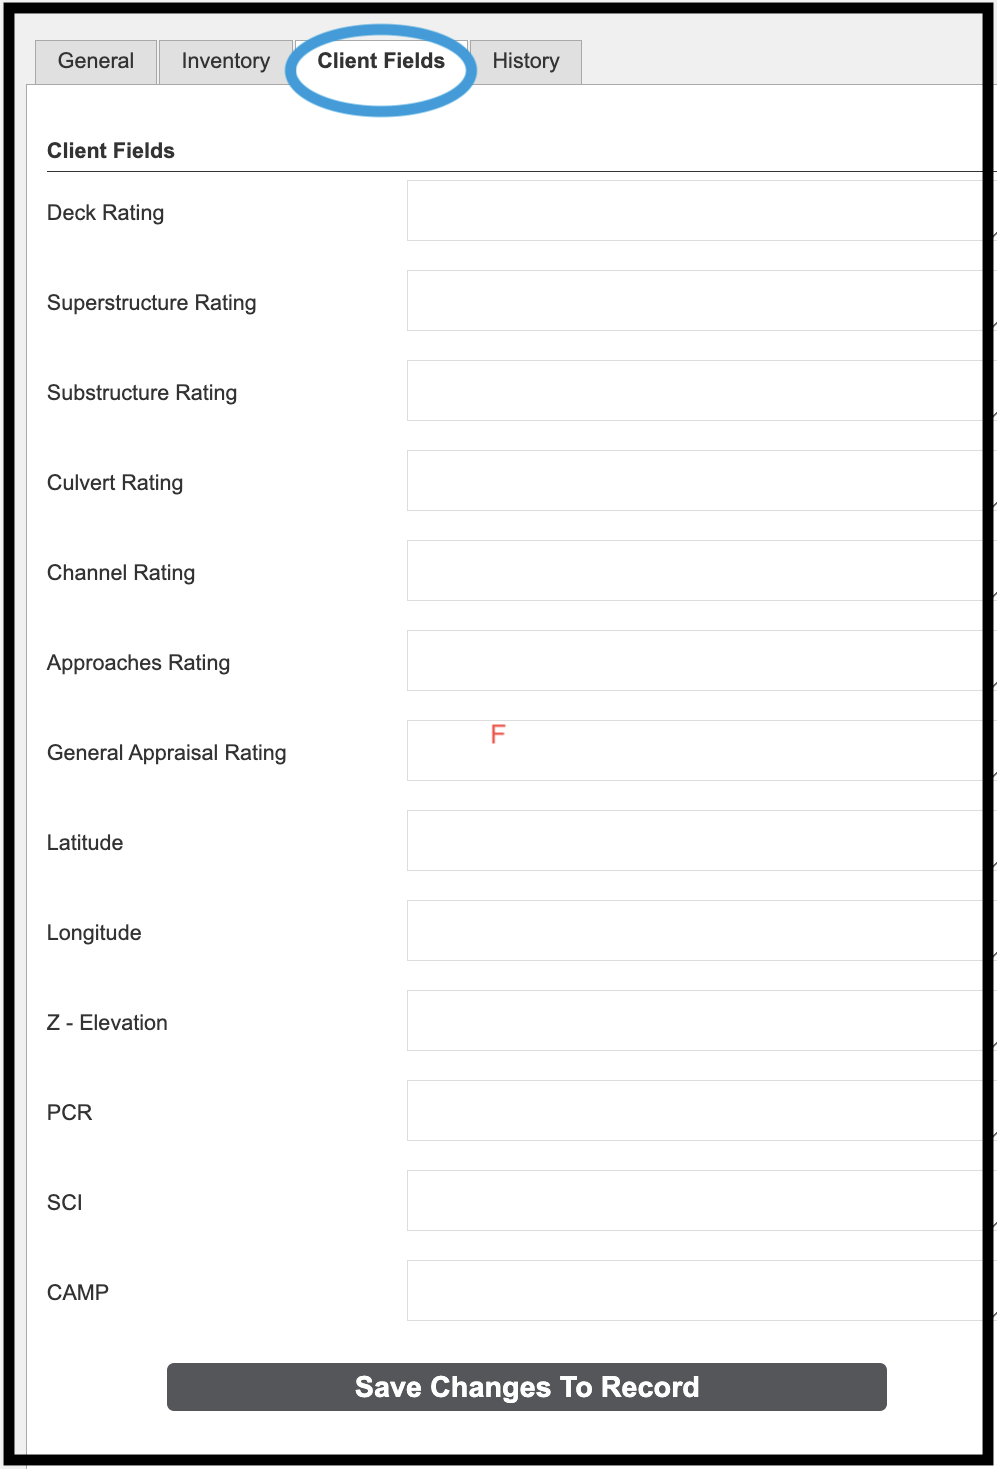
- If an additional field is added for the client (one not currently collected by the software) it will be displayed on this tab.
- Custom reports will be required if client fields are used.
History #
The History tab enables a user to add historical information for an item. Contains these fields:
- Date of Repair: When the repair or replacement was made.
- Percent Complete: The percentage that was repaired/replaced.
- Repair Amount: The cost of the repair/replacement.
- Description: A written narrative of the work performed.
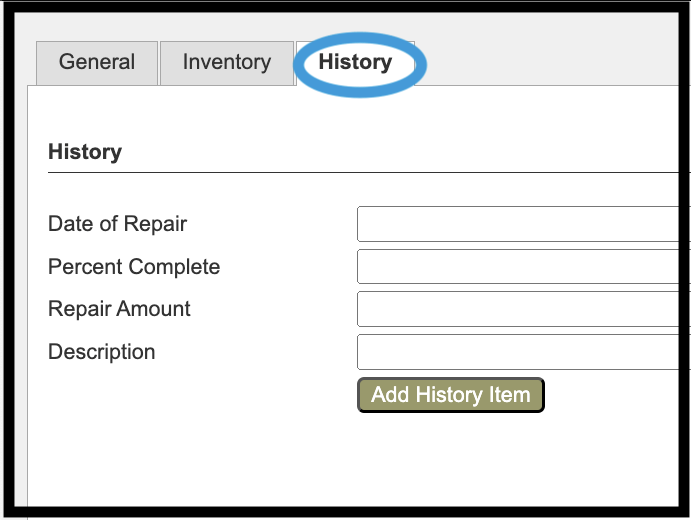
Once the data is entered, click Add History Item. The result is shown below.

You are able to edit and delete the History record.
Assessment Record Actions #
There are five options to navigate back to different sections of the FOScore® software.

- Save Changes to Record
- If any changes or updates are made to the record, this button must be clicked in order to save them.
- It is recommended that you save your work often. Navigating away from the page without saving your information can result in lost data.
- You can use the shortcut Alt+S (PC) to save the record.
- If the save was unsuccessful because of a validation error a description of the error will appear in red.
- If the save was successful, the following message will appear:

-
- To Building
-
- Clicking this button will bring you back to the page that displays all of the disciplines within that building.
-
- To Building
-
- To Discipline
-
- Clicking this button will bring you to a page where you can see all of the assessment items that fall within the discipline.
-
- For example: If you were looking at a building’s exterior, clicking this button will bring you to a page that shows all items in the building or asset for the Architectural discipline.
-
- To Discipline
-
- Copy
-
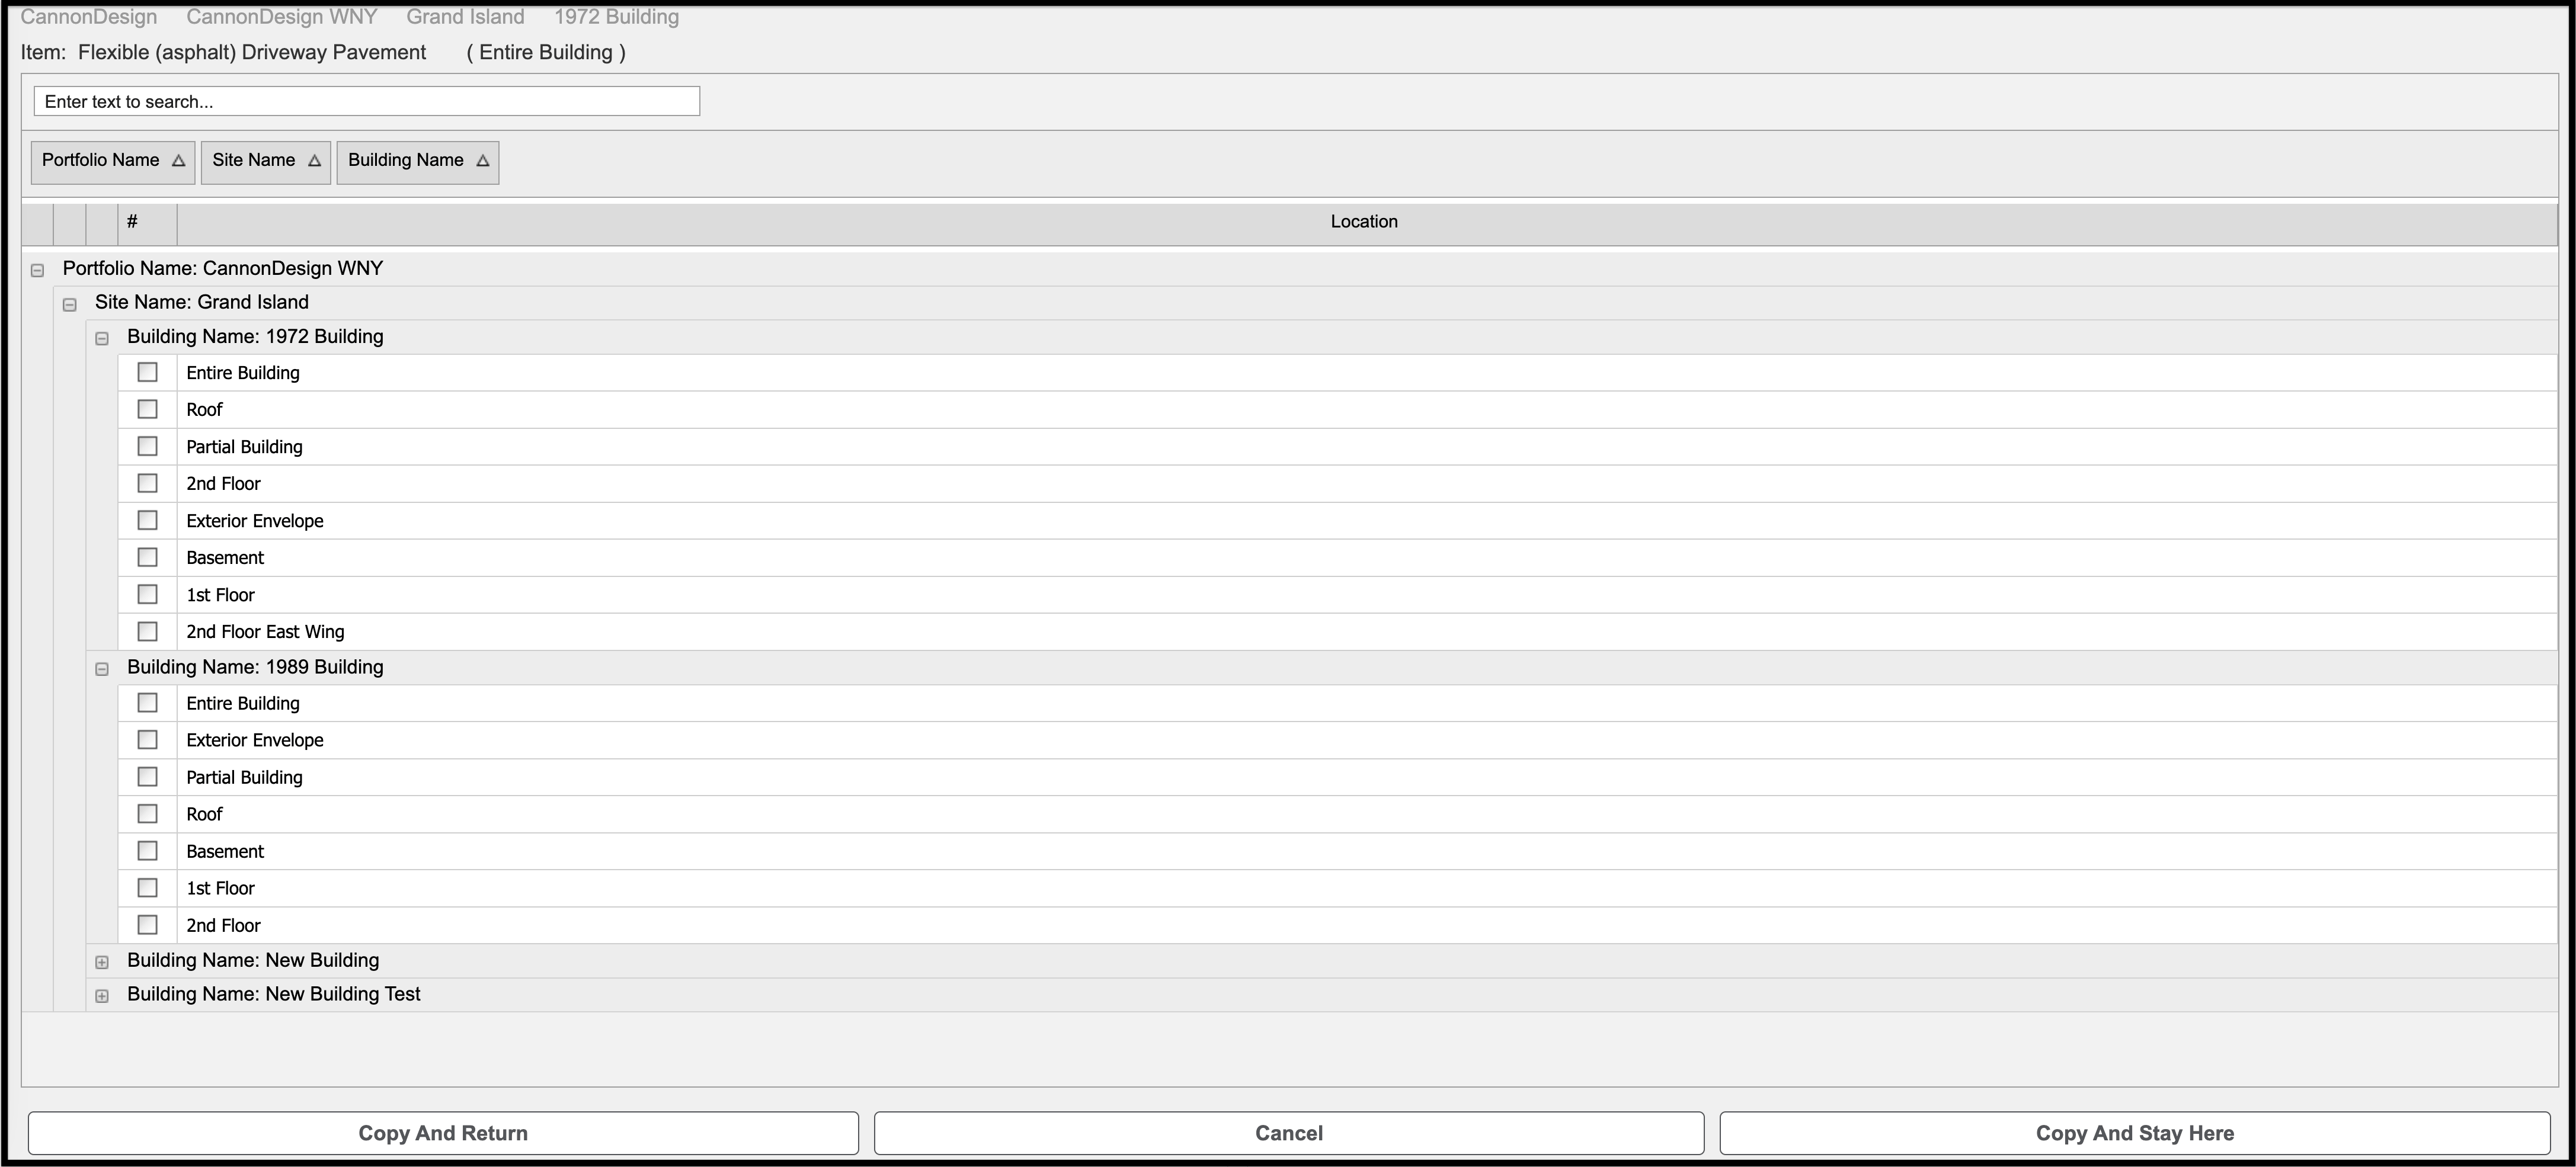
- Clicking this button will allow you to copy a record to other locations within the current building or asset, or to other buildings or assets.
-
- After you click the Copy button, the Copy Building page opens.
-
- Due to the unique nature of each assessment record, all fields will be copied except Observed Remaining Life and any images.
-
- Copy
-
- Next:
-
- Select all of the locations you would like to copy the item to.
-
- To select all of the locations you only need to check the box to the left of the building name.
-
- Click one of the following buttons:
-
- Copy and Return will take you back to the original system or component page.
-
- Cancel will cancel the system or component copy.
-
- Copy and Stay Here will copy the system or component to the selected building but will stay on the Copy page.
-
- Copy and Go to New will copy the items and bring you to the new (copied) assessment item.
-
- Click one of the following buttons:
-
- Next:


-
- Delete Record
-
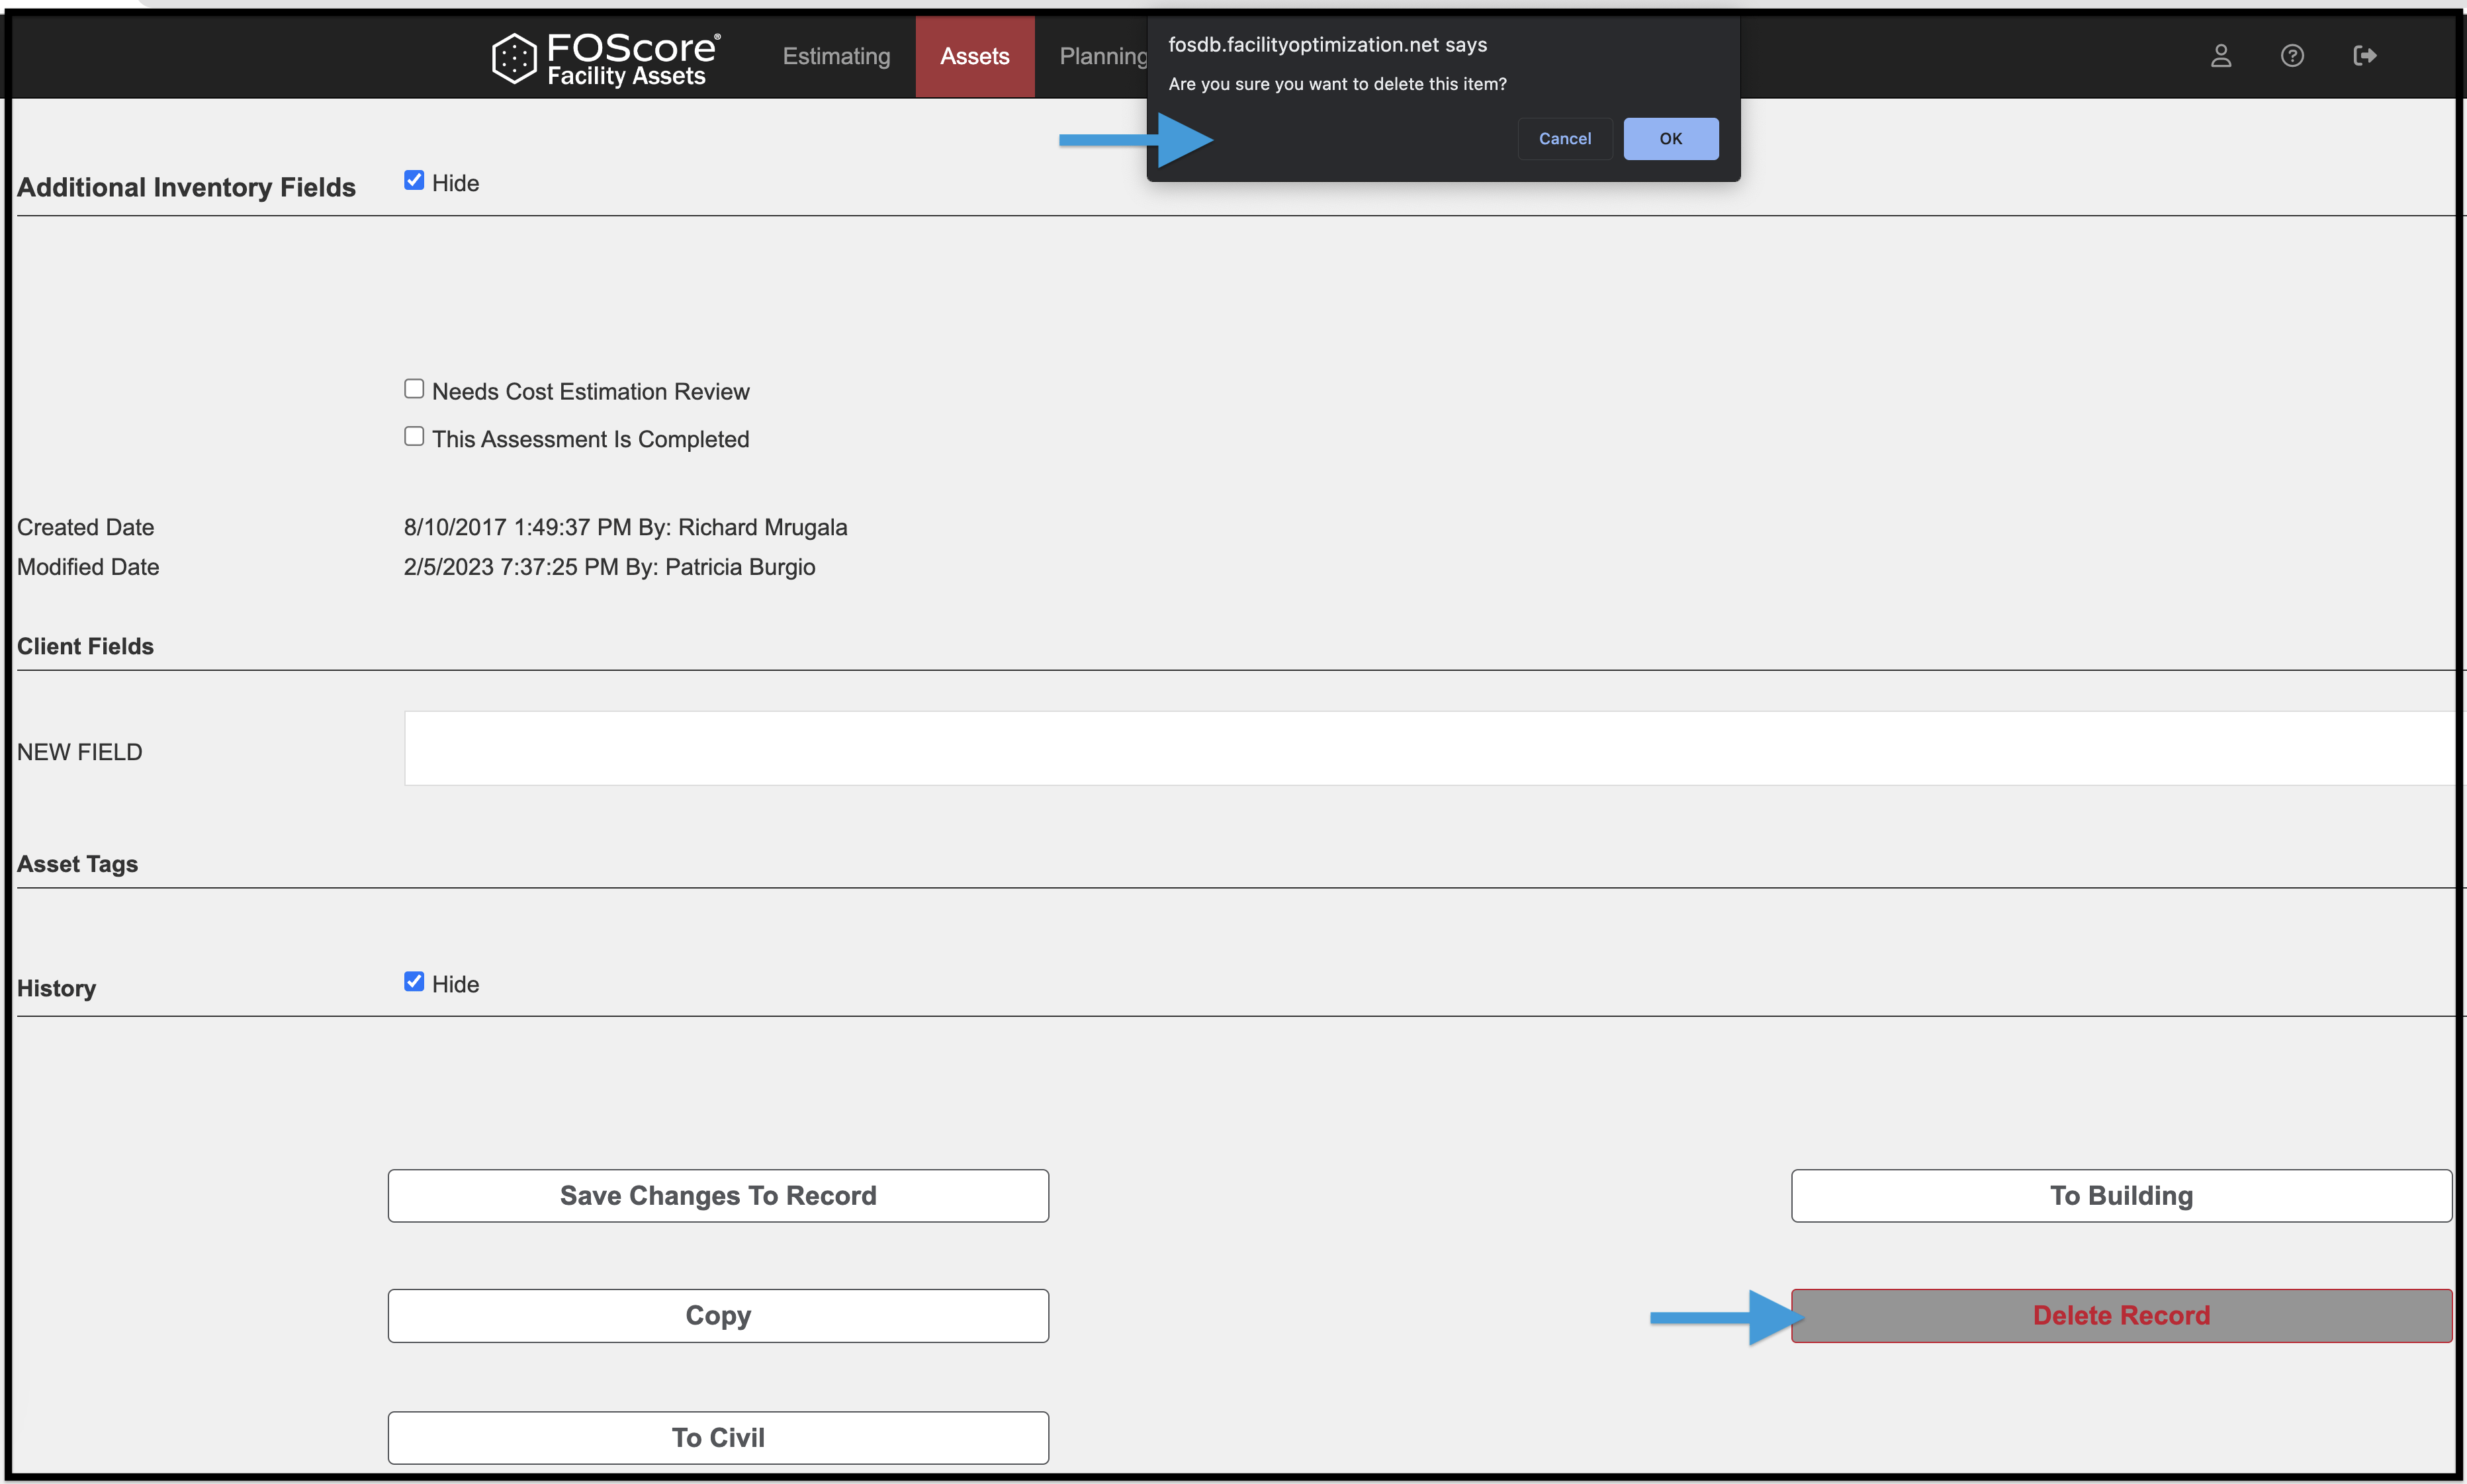
- After you click this button, a pop-up will appear asking for deletion confirmation.
-
- Click OK to permanently delete the record.
-
- Click Cancel to return to the Assessment.
-
- Delete Record
Add a System or Component #

To add a system or component:
-
- Navigate to Discipline on the Building Information page.
-
- Directly above the grid’s Discipline column click Add New Assessment.
-
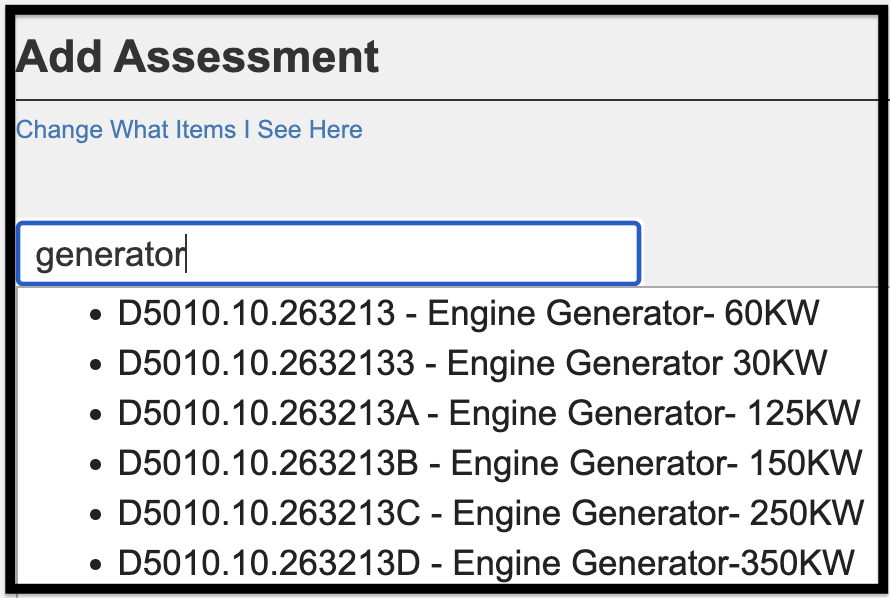
- In the Add Assessment page, there will be a bar to search for the UniFormat name or number.
-
- Type any part of the UniFormat name or number and the list will start to refine the items displayed.

-
- In the Add Assessment screen, enter the UniFormat number, a name, or a keyword in the search box to search for an assessment item.
-
- For example: To search for assessment items related to generators, type ‘generator’ into the search box.
-
- In the Add Assessment screen, enter the UniFormat number, a name, or a keyword in the search box to search for an assessment item.
-
- The results will filter to show any items that include that keyword.
-
- Click the UniFormat item to add it.
-
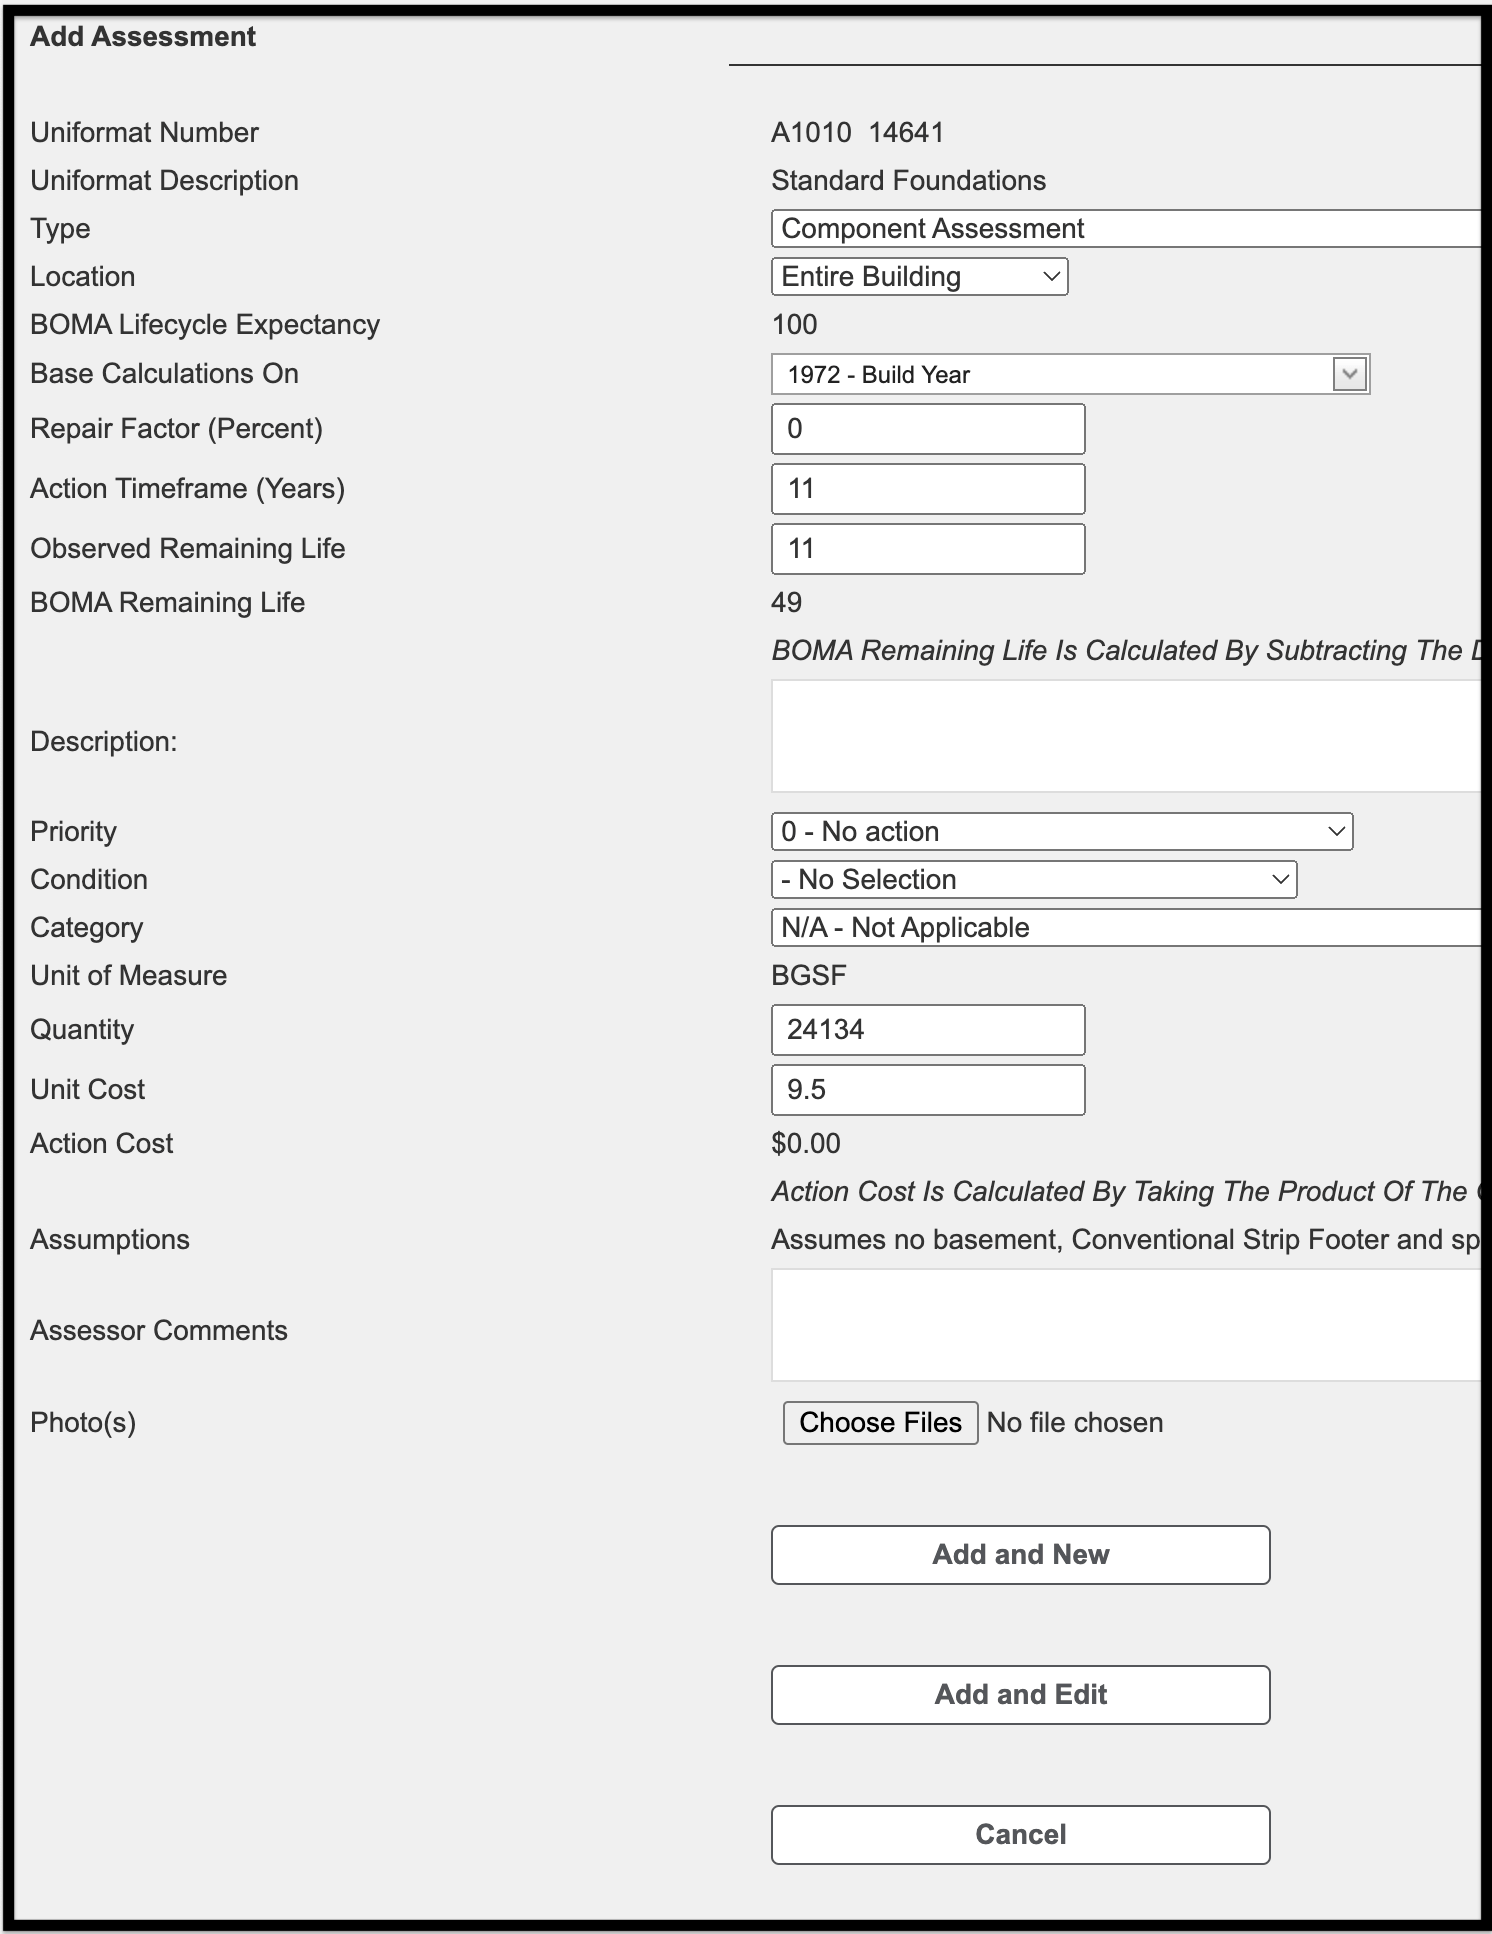
- The Add Assessment page opens.
-
- This page is a condensed version of the Edit page.
-
- The Add Assessment page opens.
The Add Assessment page contains the following fields:
-
- Base Calculations On: You will choose either the year built or the year of renovation if set on the General Info tab; if not, then the year the record was created will be used. This information can be changed on the Edit page.
-
- Repair Factor (Percent): The percent of repair/replacement. If no replacement is needed, the repair factor is 0. If the entire system/component needs to be replaced, the repair factor is 100.
-
- Action Timeframe (Years): The recommended window of time in which to make a repair or replacement. This value sets the priority.
-
- BOMA Remaining Life: The estimated useful life of the system or component based on BOMA standards.
-
- Observed Remaining Life: The life expectancy, in years, of the system or component.
-
- Description: A brief description of the system or component.
-
- Priority: Assignment of a funding amount needed in a given calendar year, or group of years, further defined by a recommended term need, i.e., immediate, short-term, or long-term.
-
- Condition: The current condition of the system or component. It sets the default text for the Discipline, Critical Issues, and Recommendations.
-
- Category: The category deficiency of the assessment item.
-
- Quantity: The count of systems or components needed.
-
- Unit Cost: The cost of each needed system or component.
-
- Action Cost: The total price of a specified quantity of a component, assembly, or system to be repaired or replaced multiplied by the unit cost.
-
- Add and Edit: Clicking this button will open the full Edit Page. This will enable you to edit all the fields.
-
- Add and Picture: Clicking this button will add the item and redirect to a page wherein you can add an image or document.
-
- Photos: Click Choose Files.
-
- Clicking Choose File will open File Explorer. Locate and select your photo. Click Open.
-
- Back in the software, click Upload File.
-
- Photos: Click Choose Files.
-
- Add and New: Clicking this button will add the item and redirect you to the Add Assessment page in order to add a new item.
Change What Items I See Here #
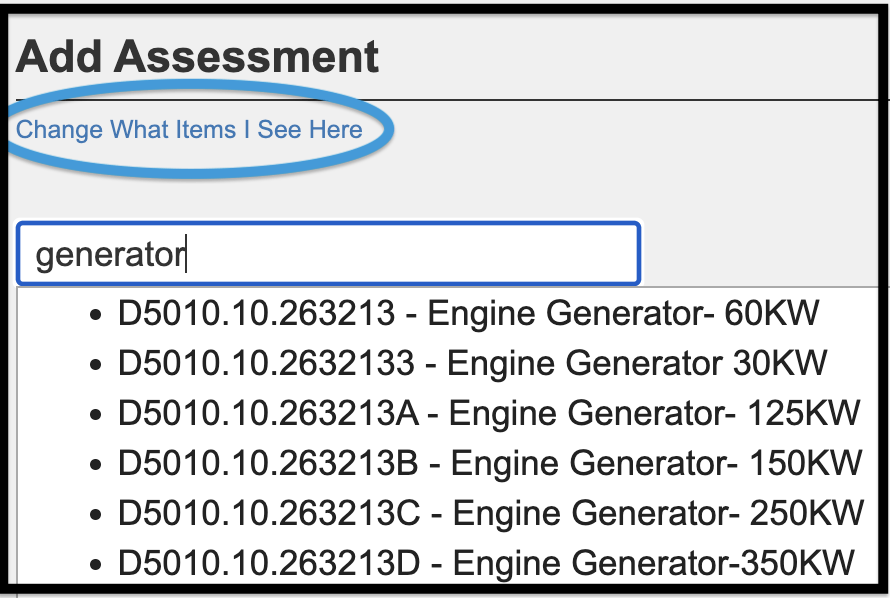
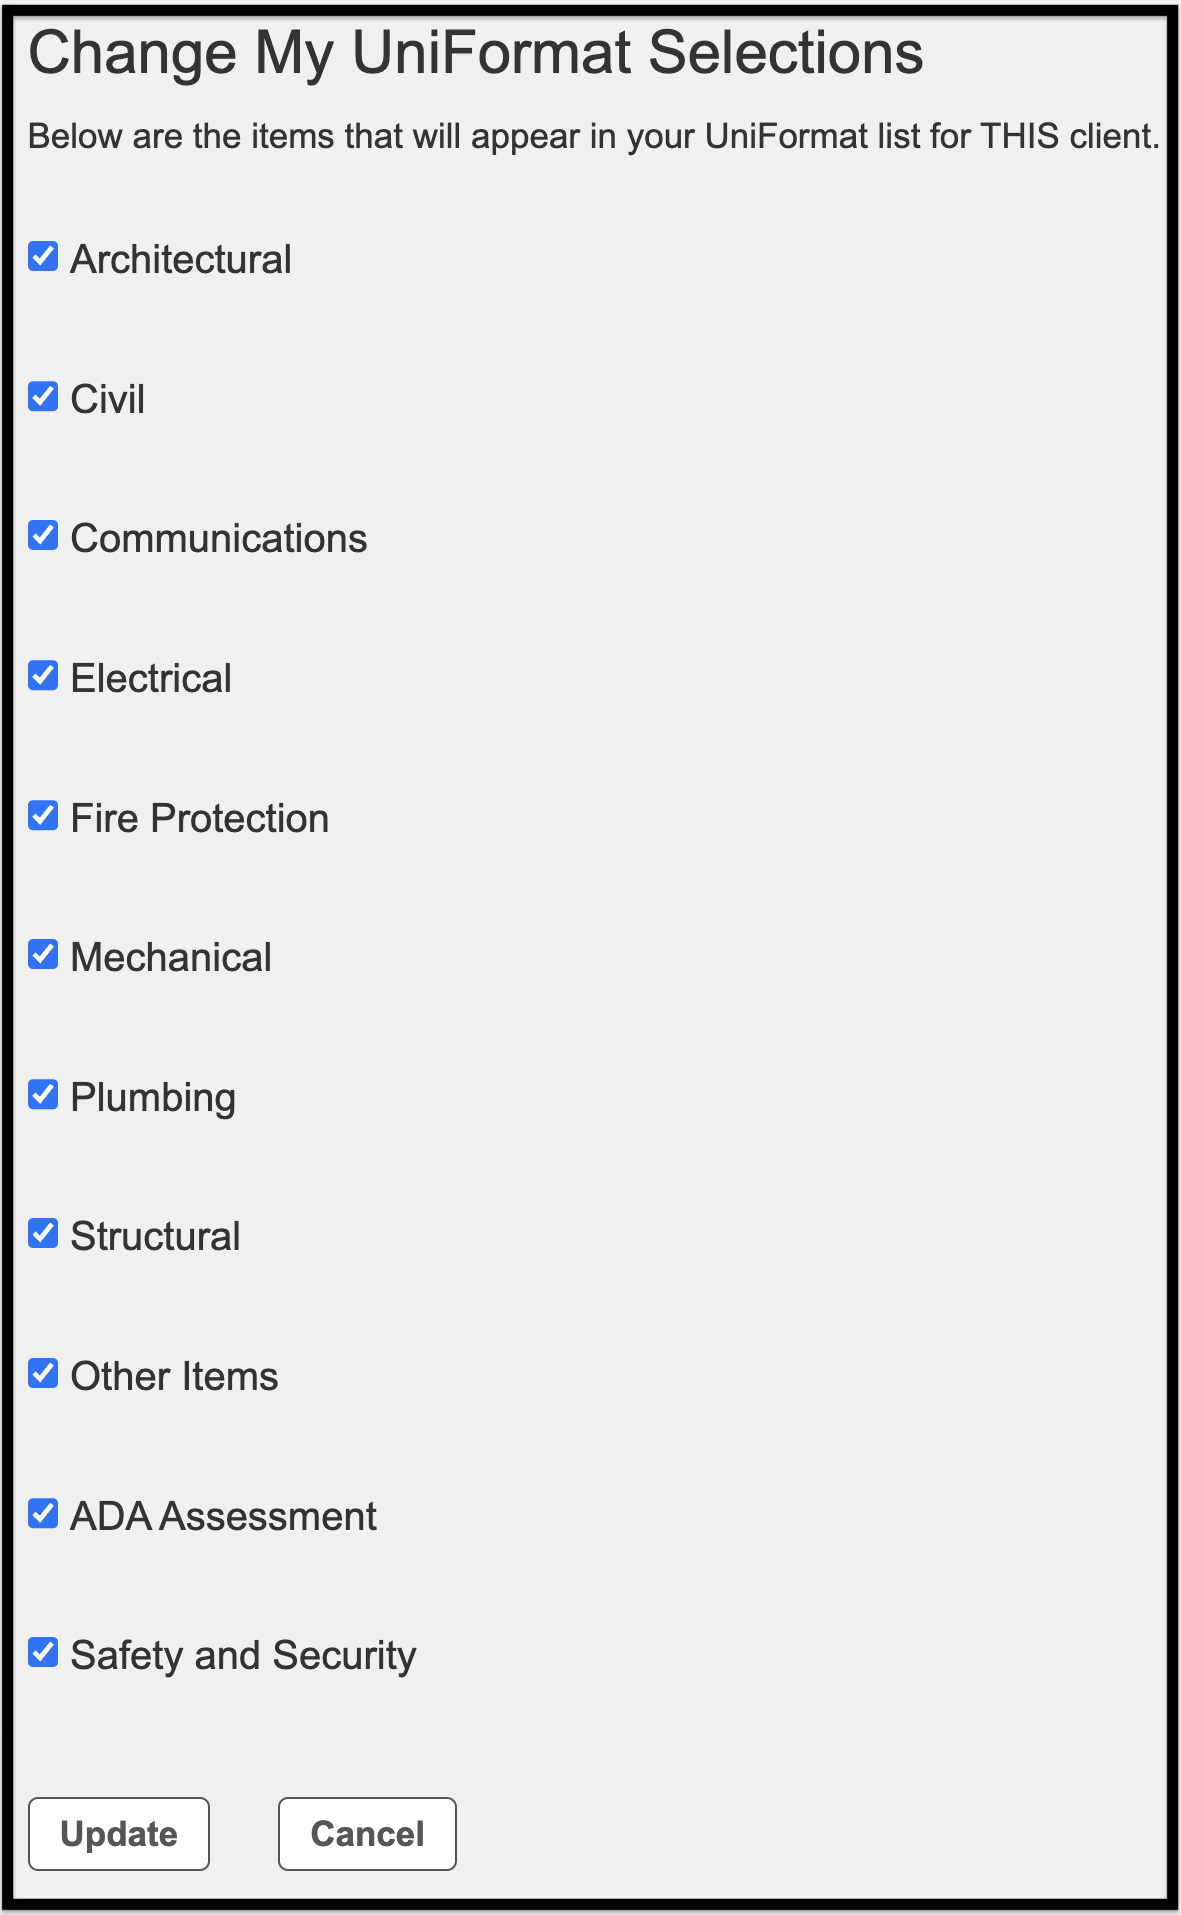
To limit the items shown, click the Change What Items I See Here link.
-
- Uncheck the disciplines that are to be hidden.
-
- It is suggested that the check box to the left of Other Items remain selected as this serves as a placeholder for items that are outside of the UniFormat standard structure.
-
- Click Update to save your changes and return to the Add Assessment page.
-
- Changes will remain even after logging out of the website and logging back in. Therefore, you will have to come back to this location and adjust when needed.
General Info #
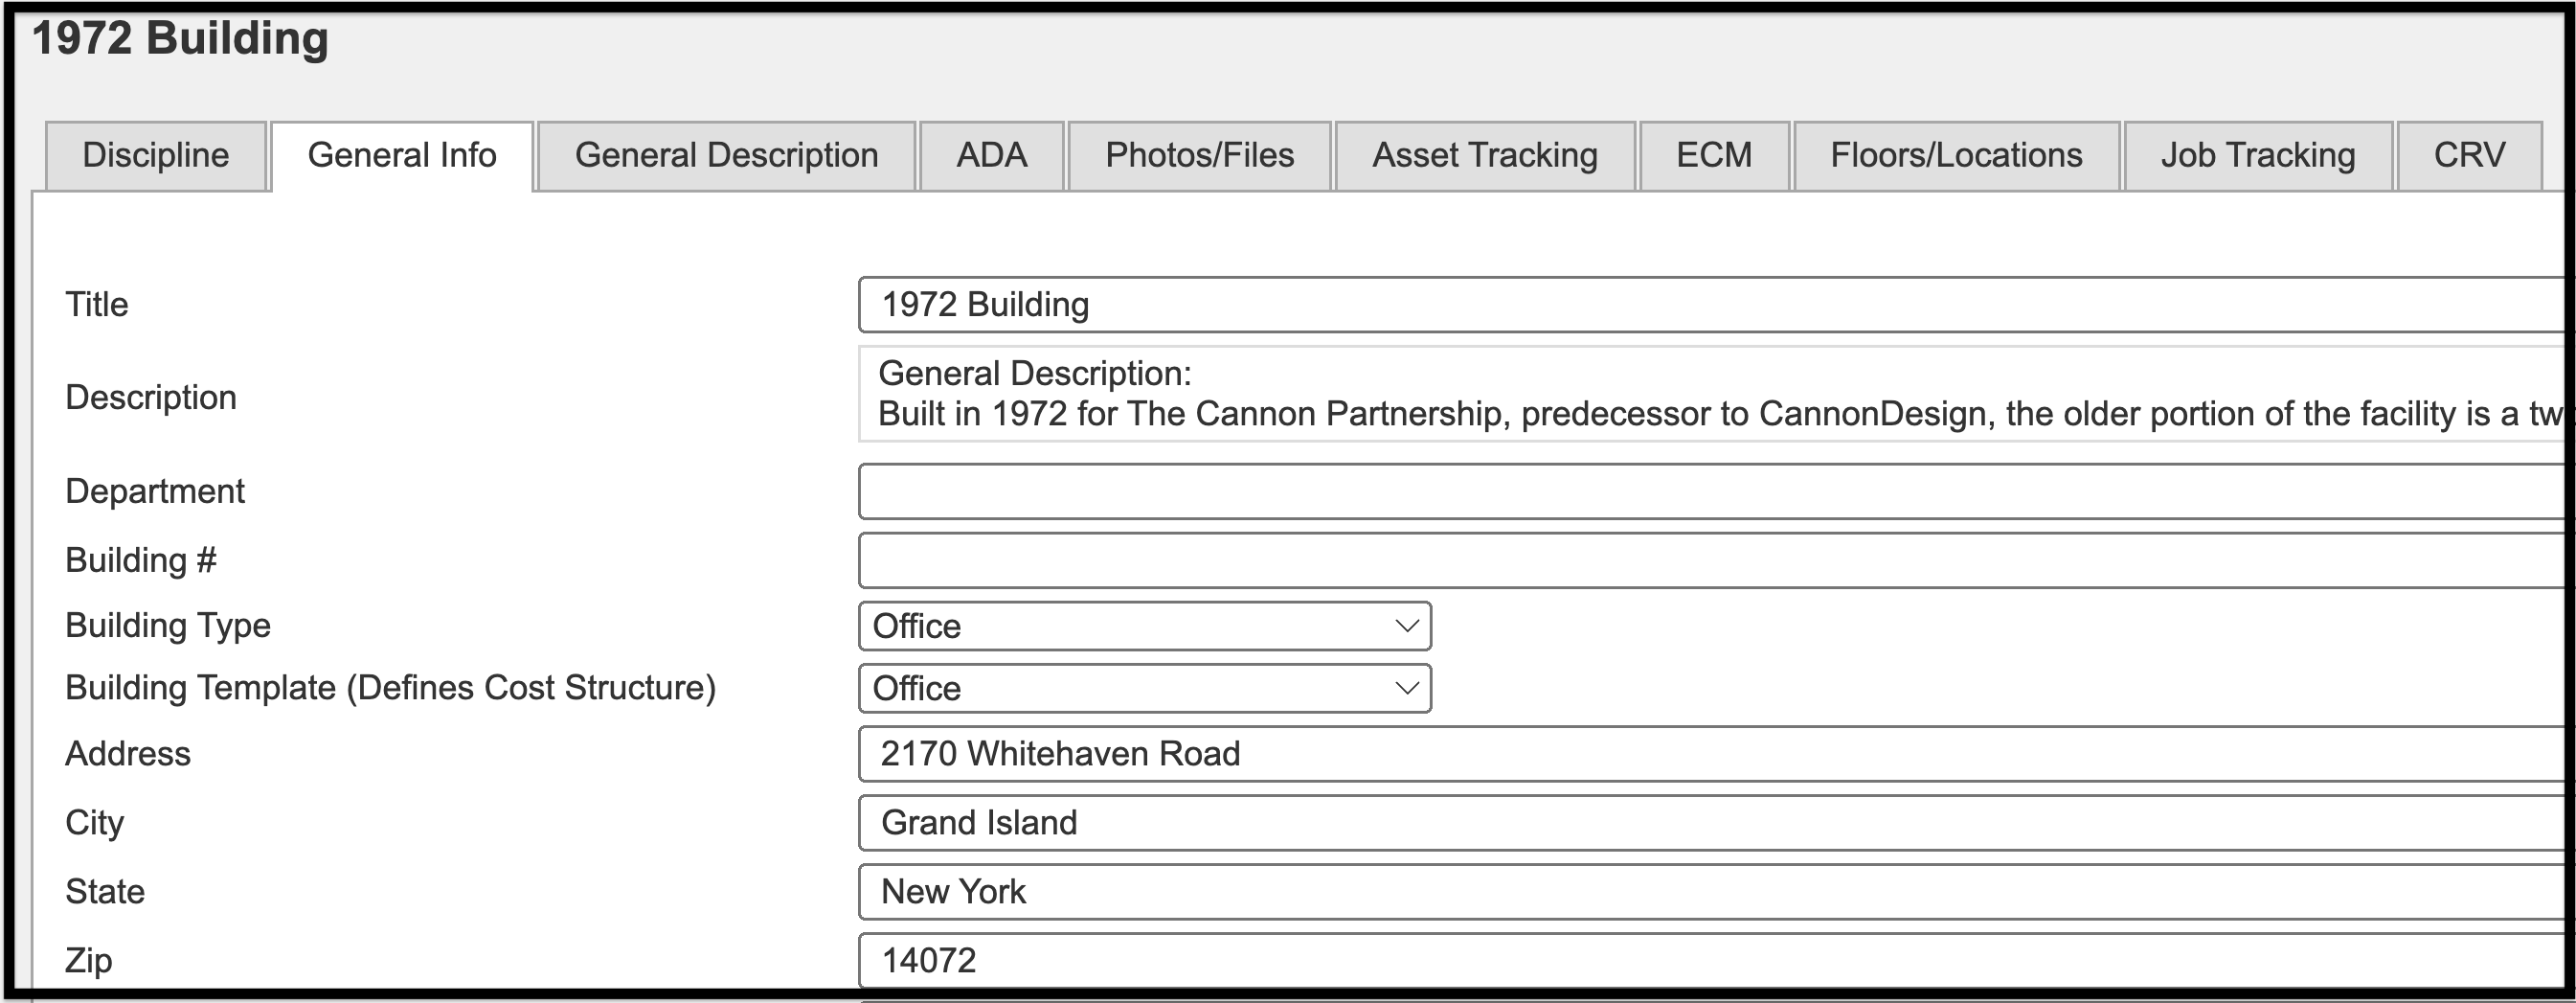
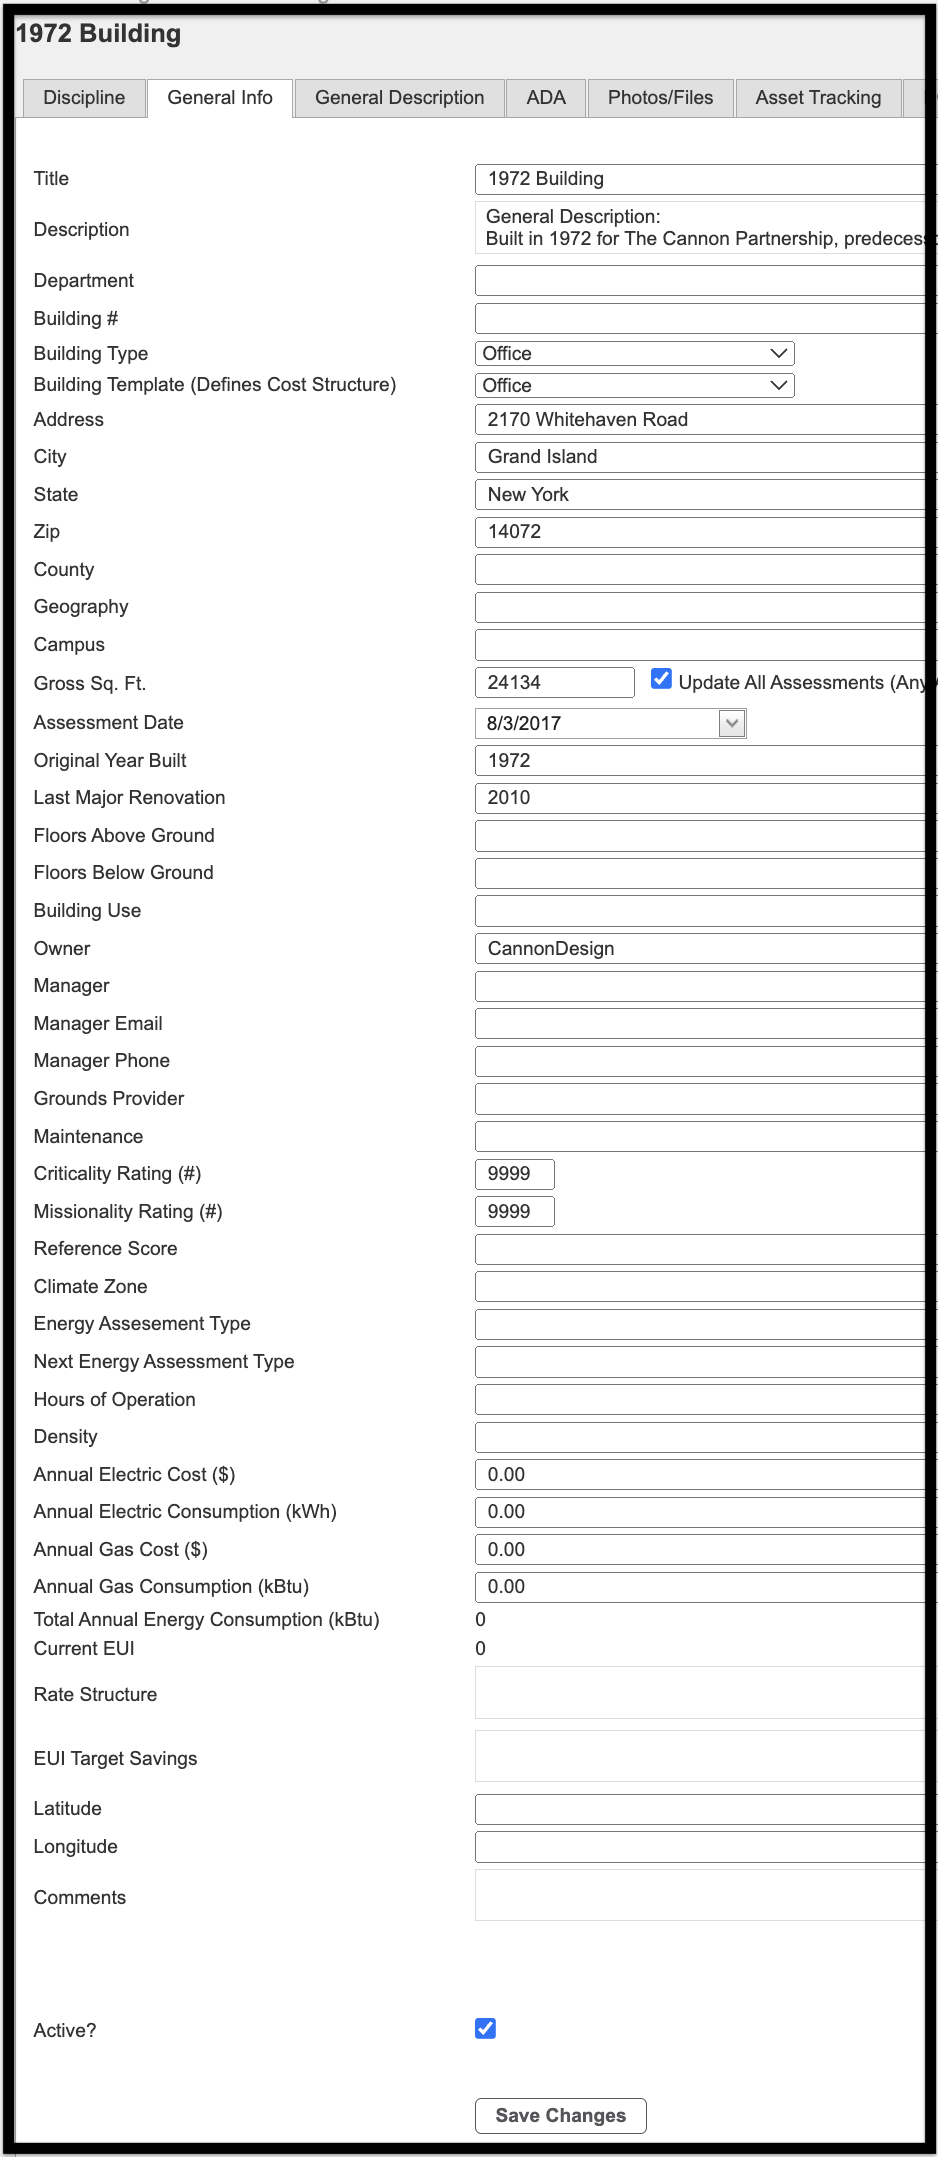
The General Info tab gives you all of the relevant building information. It consists of the following:
-
- Title: The name of the building/asset. This is how the building/asset will be titled on the report.
-
- Description: This is a read-only field. To modify a description, please navigate to the General Description tab.
-
- Department: Client-based classification of the asset, if applicable.
-
- Building #: Client-defined operational numbering system.
-
- Building Type: Refers to the type of the building/asset, i.e., boat launch, conference center, dining hall, greenhouse, etc. If the correct Building Type isn’t available, contact your designated in-house System Administrator in order to have it added.
-
- Building Template (defines cost structure): this is the market sector. The building template defines the cost structure that is applied to the building.
-
- Note: A selection must be made.
-
- Building Template (defines cost structure): this is the market sector. The building template defines the cost structure that is applied to the building.
-
- Address: The address for the building.
-
- City: The city where the building is located.
-
- State: The state where the building is located.
-
- Zip: The zip code where the building is located.
-
- Gross Sq. Ft.: The total building square footage including the thickness of the exterior walls. The number includes all floors, basements, sub-basements, etc. This number drives the CRV.
-
- Assessment Date: The date the field assessment for the building/asset was conducted.
-
- Original Year Built: The year the building was originally built.
-
- Last Major Renovation: The date of the last major construction project including system renovations, additions, etc.
-
- Building Use: Operational function of the building/asset.
-
- Owner: Legal owner of the building/asset.
-
- Manager: The name of the individual who manages the building.
-
- Manager Email: The email address of the individual who manages the building.
-
- Manager Phone: The phone number of the individual who manages the building.
-
- Comments: Text field used for additional, miscellaneous building/asset information.
-
- To ensure consistency across reports, this data must be entered uniformly across all assets.
-
- Comments: Text field used for additional, miscellaneous building/asset information.
Additional fields are available for the purpose of gathering data for reports. For clarification, see Glossary of Terms.
General Info also consists of an Active checkbox and a Save Changes button.
-
- When Active is checked, the building or asset is included in the dataset.
-
- When unchecked, the building or asset is removed from the dataset.
-
- The building or asset can be reactivated and included in the dataset by checking the Active box at a later date.
-
- When unchecked, the building or asset is removed from the dataset.
-
- The Save Changes button must be clicked if any information is added.

General Description #
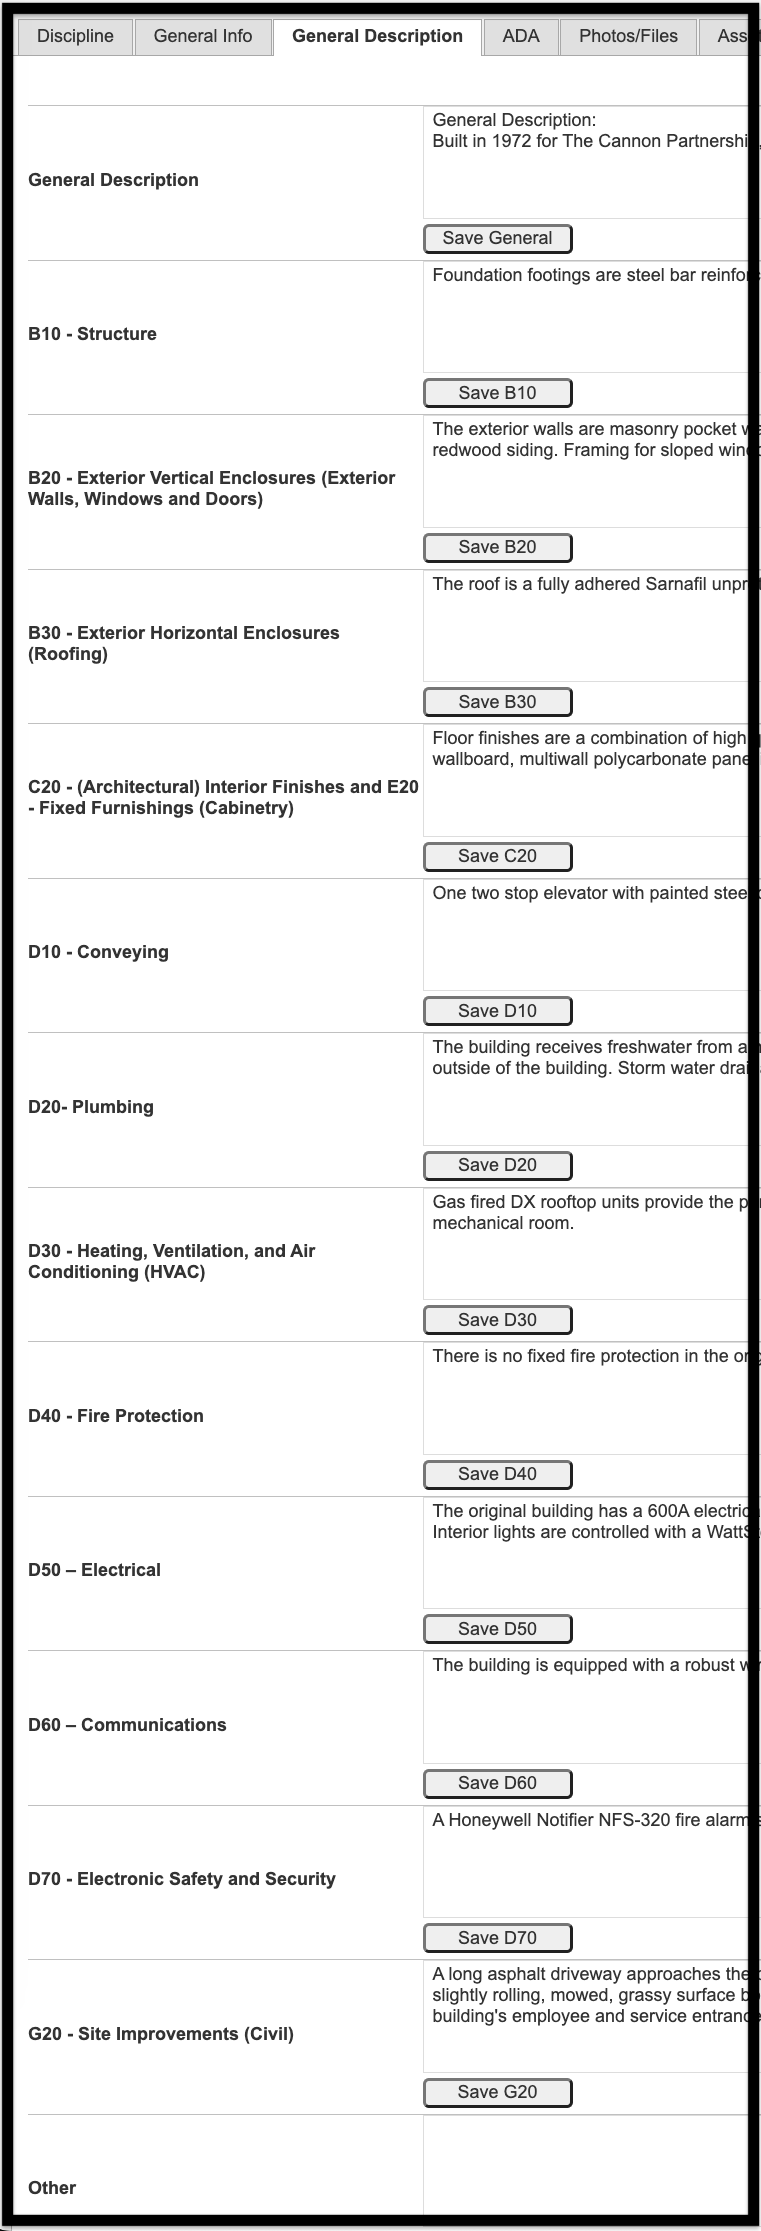
General Description gives descriptions of different disciplines of the building, based on Uniformat Level 2.
-
- To add or edit a description, type the new description in the box to the right of the disciplines.
-
- Descriptions should consist of materials, functions (as in the case of mechanical), capacities, etc., and should NOT include observations regarding condition, risk, or replacement recommendations.
-
- Example of a B10 Structure Description: Reinforced cast-in-place concrete foundation, floor slabs, and superstructure frame with masonry walls.
-
- Descriptions should consist of materials, functions (as in the case of mechanical), capacities, etc., and should NOT include observations regarding condition, risk, or replacement recommendations.
-
- To save, click Save.
Additional fields are available for inclusion in various reports. For clarification, see Glossary of Terms.

ADA #
The ADA tab is where the building’s Americans With Disabilities Act assessment is scored.
The scores range from 1-5 and are located to the right of the access areas; 1 is the lowest rating and 5 is the best.
-
- The ADA section is where the building’s Americans with Disabilities Act general observations are scored.
-
- The ADA observations are reflected in the deliverable report if included in the scope of work.
-
- If these fields are populated, it does not indicate that a full ADA/Accessibility Assessment was performed. This allows us to provide a resource to clients to determine whether an ADA/Accessibility Study should be done.
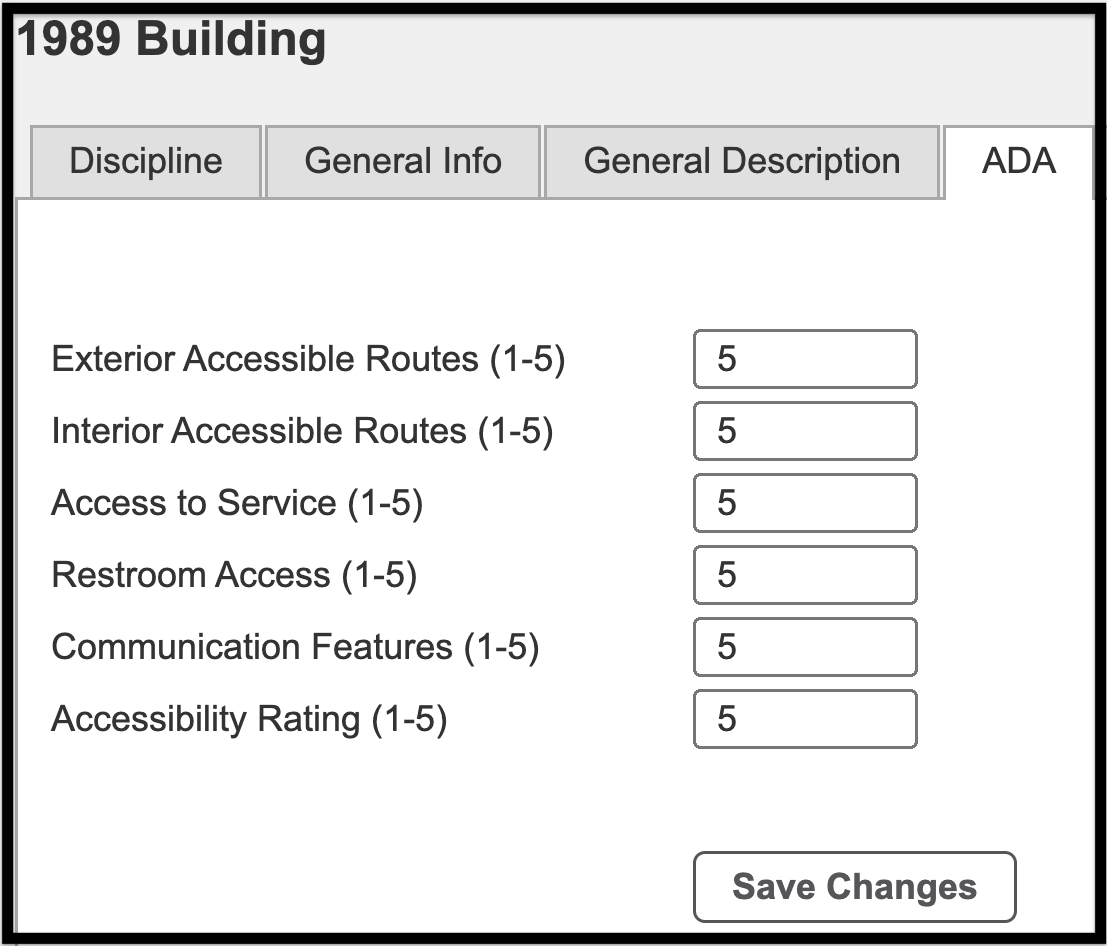
To update a building’s ADA scores:
-
- Type the new score in the box next to the access area.
-
- To save, select Save Changes.
Photos/Files #
This area is designed to be the central repository for your building images and documents. Here, you can upload any type of file, i.e., .doc, .gif, .jpeg, .png, .ppt, .xslx.
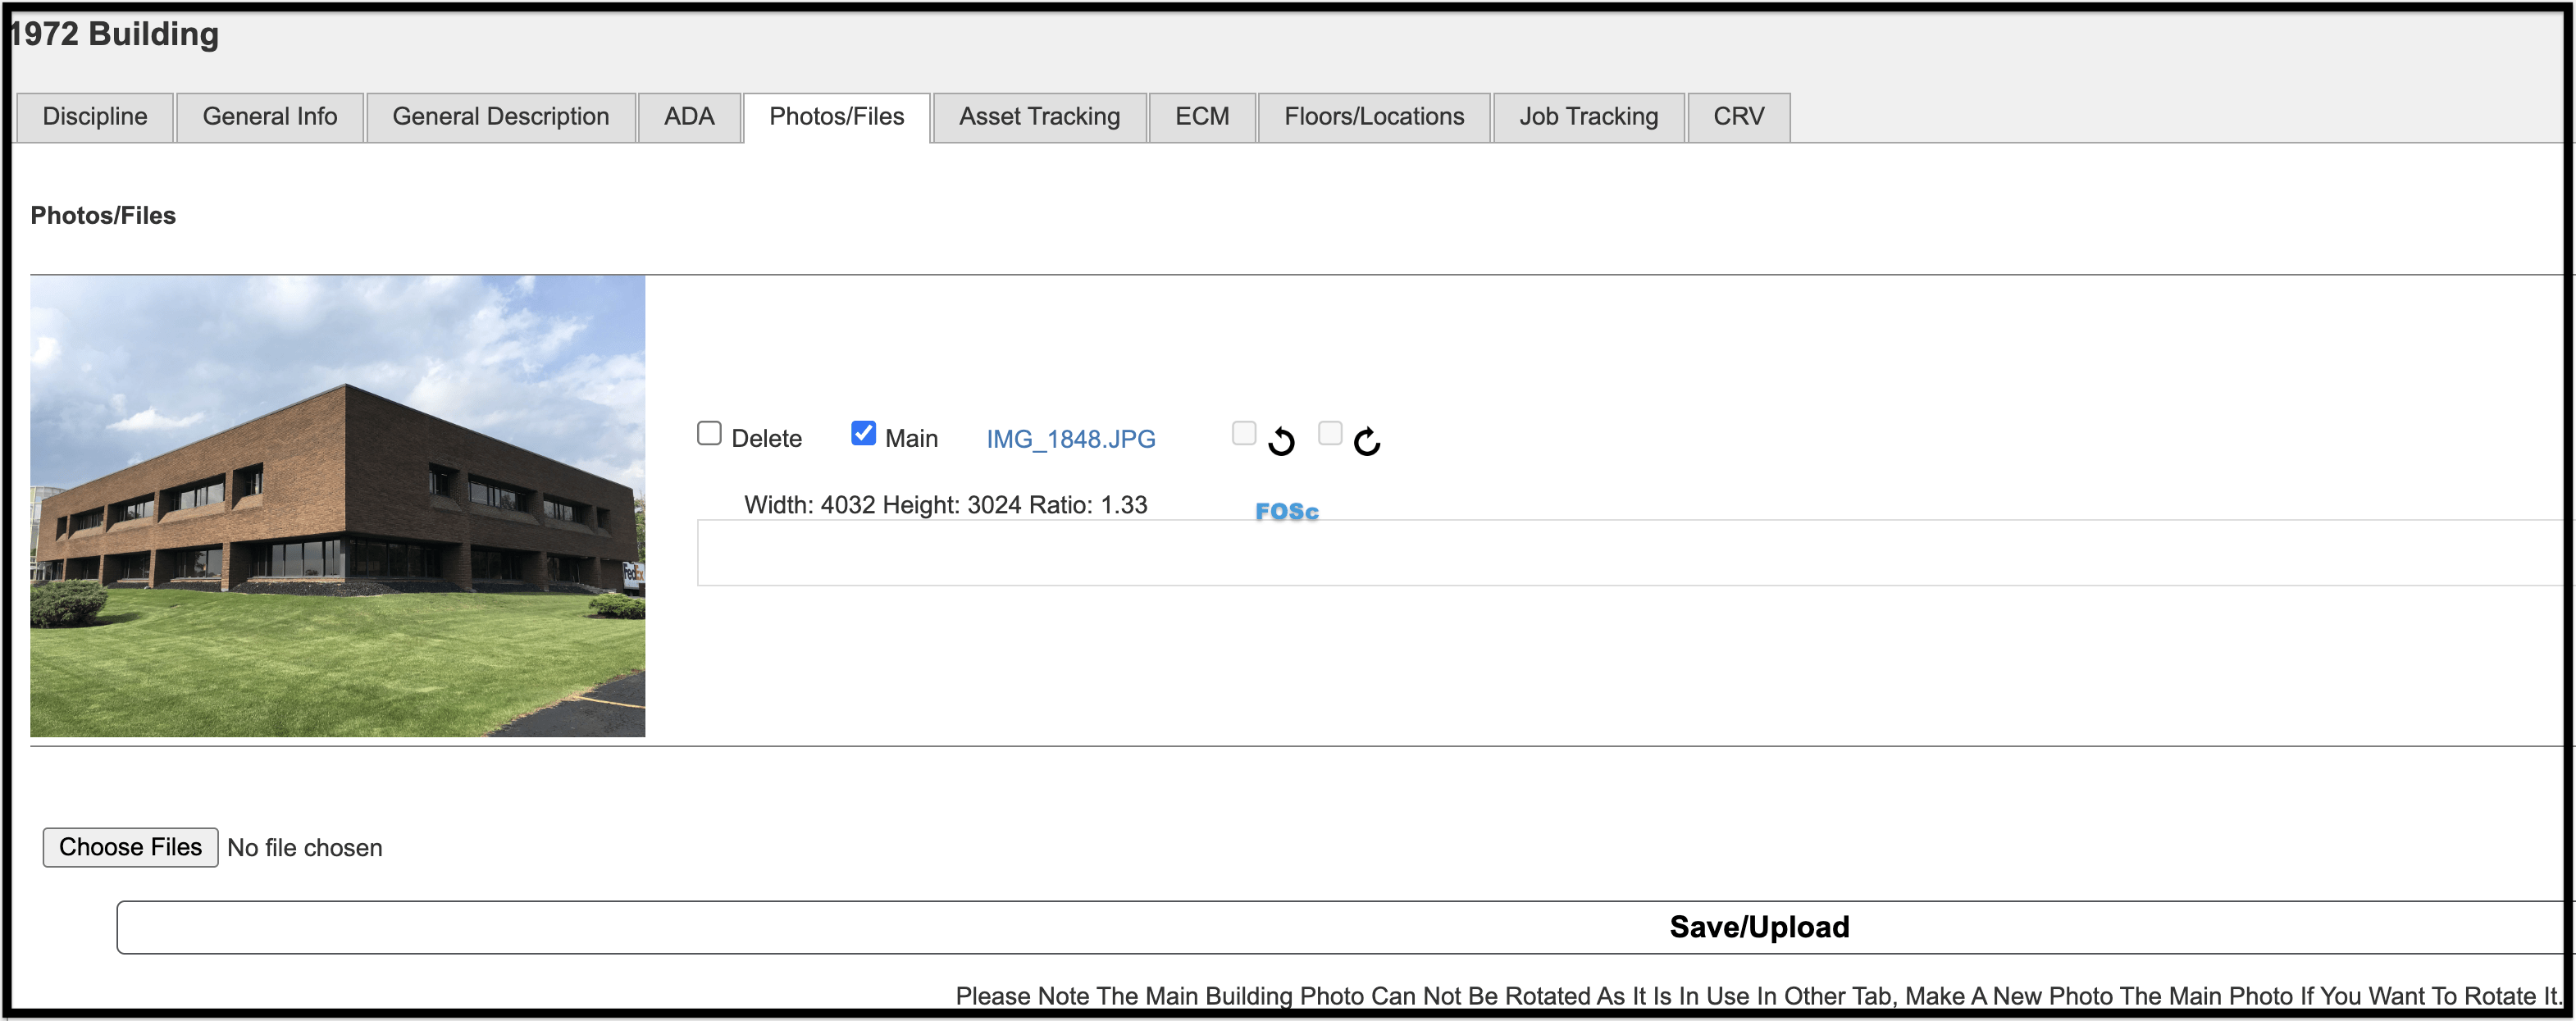
To choose a file to upload:
-
- Click Choose File.
-
- In the file explorer window, locate and select your file. Click Open.
-
- Click Save/Upload to attach the image or document to the record.
-
- Each building must have a primary image that is used for reporting.
-
- To make an image the primary photo for the building or asset, check the box next to Main. This is the photo that will show up on the cover page of a building’s deliverable report.
-
- Use the Delete checkbox located to the right of the image thumbnail to remove any images that you don’t want to be stored in the software.
-
- Use the arrow buttons to rotate the image 90 degrees clockwise or counterclockwise.
Asset Tracking #
It is in this tab that you will add asset tags, print asset tags, and/or download an Excel file listing all asset tags used (by building or by portfolio). To add an asset tag:
-
- Click Add an Asset (or Tag#).
-
- The Edit Asset window appears.

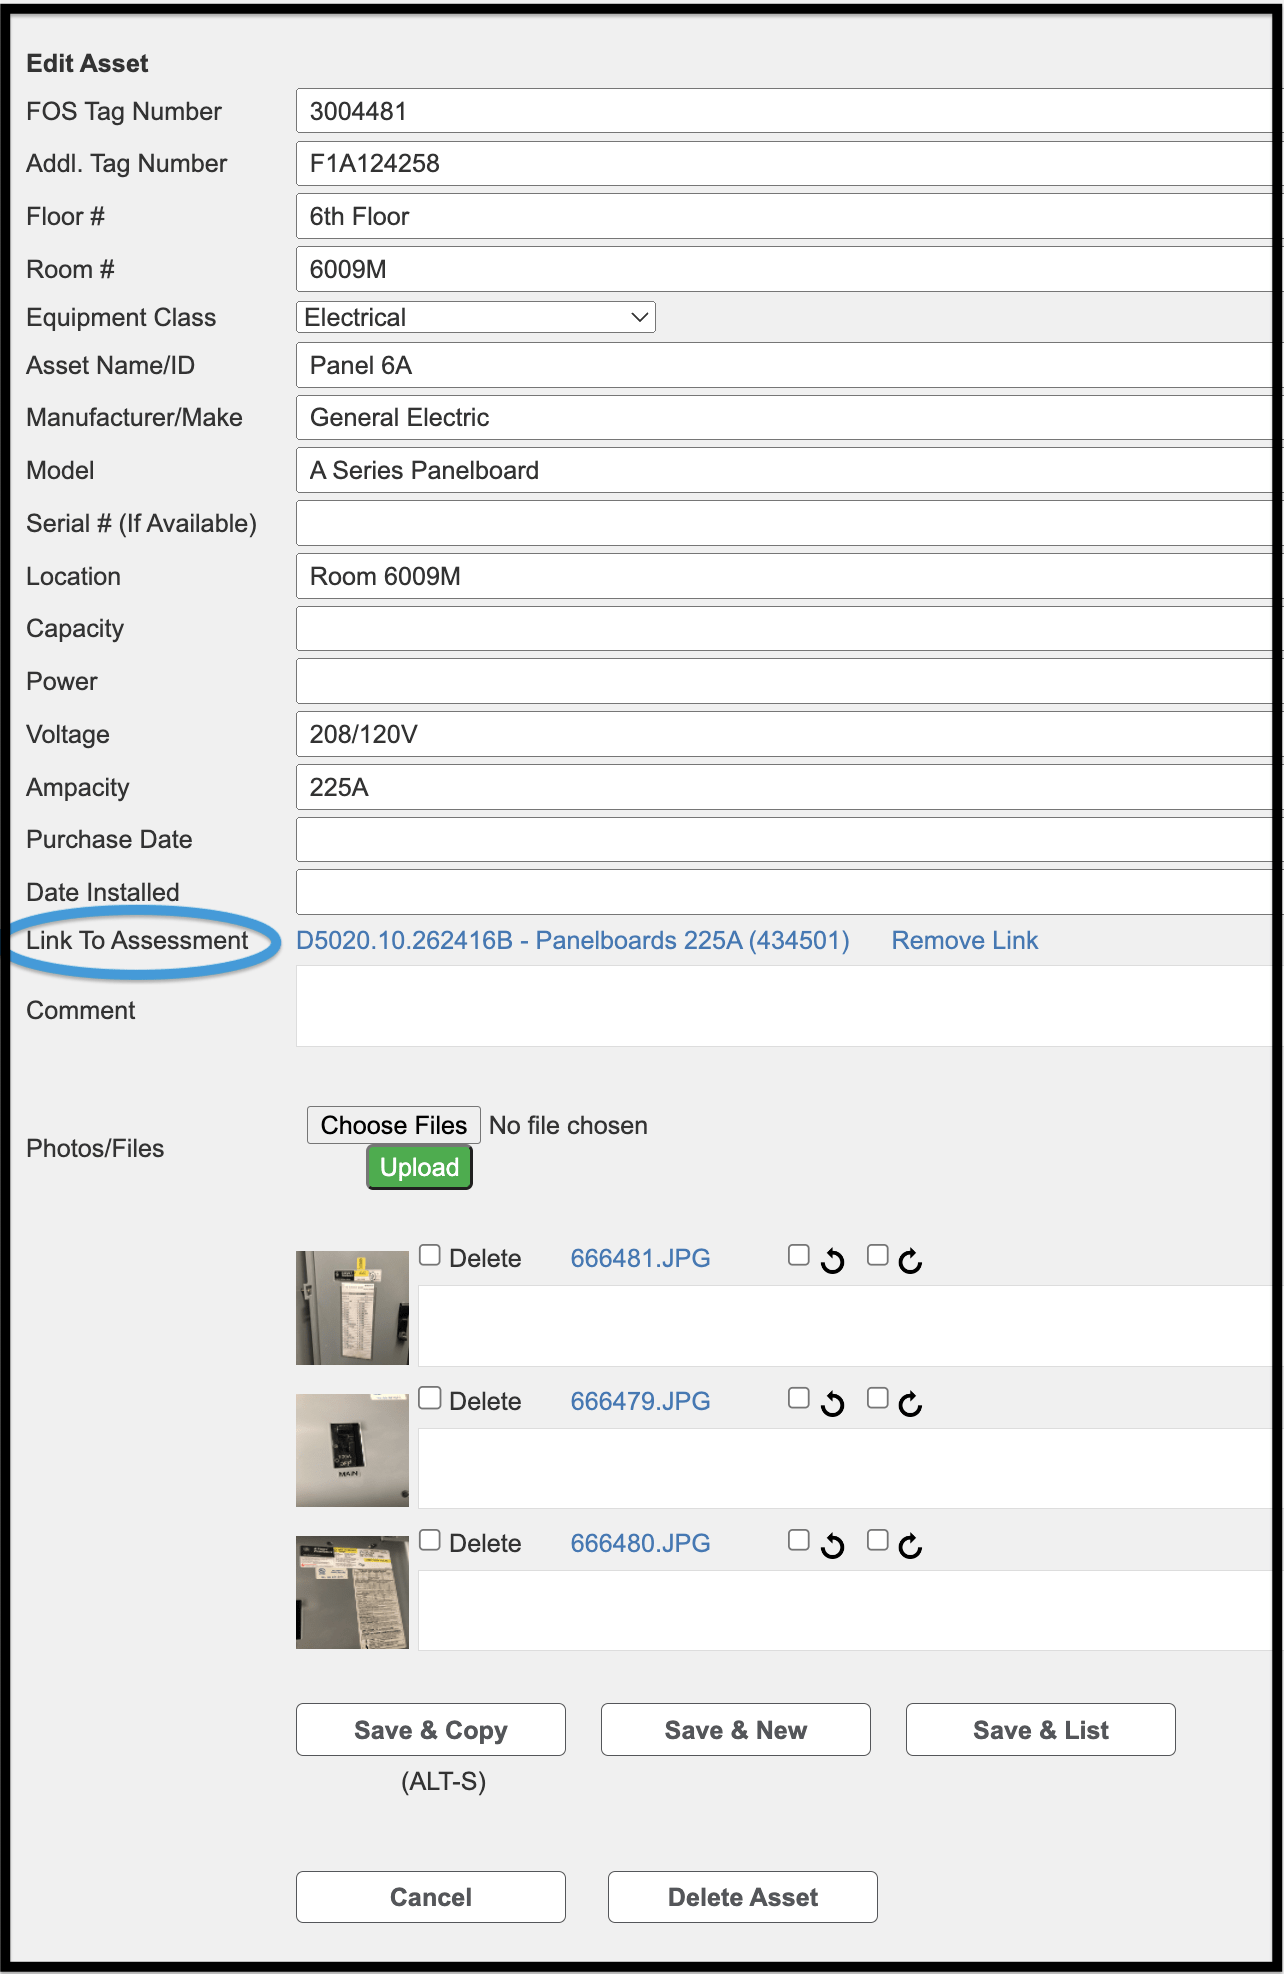
-
- Enter the information of the tag that was placed on the system/component, in addition to any other pertinent information, i.e., floor number, room number, equipment class, etc. (See Glossary of Terms if you need clarification about the fields.)
-
- To link this asset tag to an assessment record, click Link to Assessment.
-
- The Link Asset to Assessment Item window appears.
-
- Click the drop-down arrow to the right of the assessment item to view the records for the building.
-
- Select the record that corresponds to the asset tag and click Link & Save.
-
- The Edit Asset window appears.
-
- To upload a photo, click Choose Files.
-
- Locate and select the image.
-
- Click Upload.
-
- The photo will appear.
-
- You are now able to add more photos, delete the photo, or add a caption to the photo.
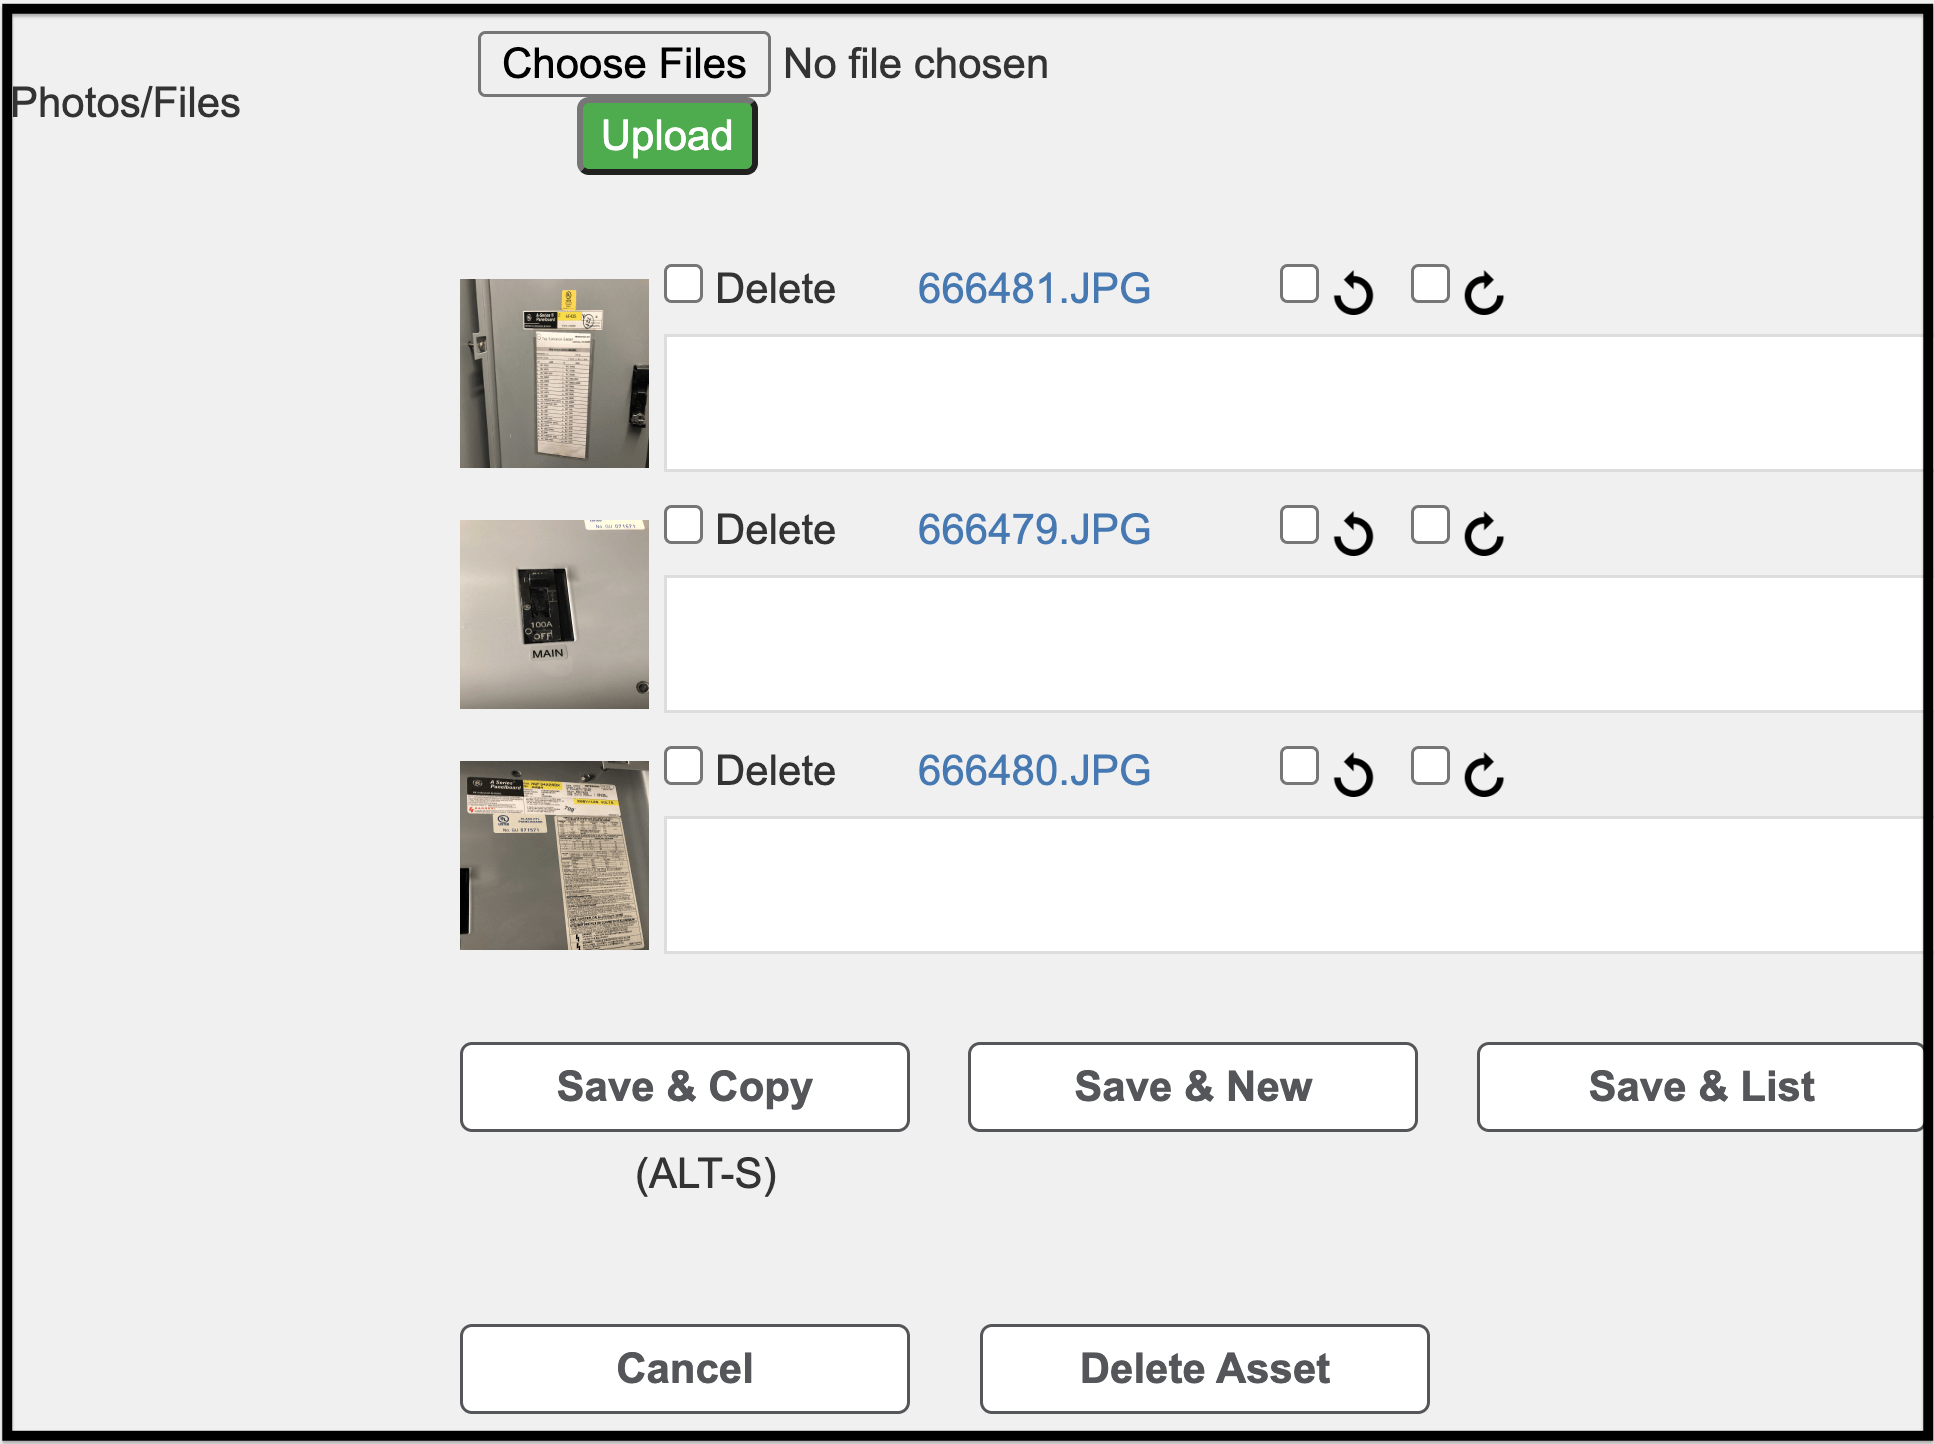
-
- You can also choose one of the options at the bottom of the page: Save & Copy, Save & New, Save & List, Cancel, or Delete Asset.
- Save & Copy: Saves the current asset tag, copies its information without copying the photo(s), creates a new asset tag, increments the tag number by one, and copies all the information to it. The incrementation will only happen if you are using numeric tag IDs.
-
- Save & New: Saves the current asset tag and creates a new asset tag with clear fields.
-
- Save & List: Saves the current asset tag and lists all of the asset tags currently in the building.
-
- Cancel: Cancels the process of adding the asset tag.
-
- Delete Asset: Deletes the current asset tag.
- You can also choose one of the options at the bottom of the page: Save & Copy, Save & New, Save & List, Cancel, or Delete Asset.
Back on the main Asset Tracking page, to print asset tags, click Print Asset Tags.

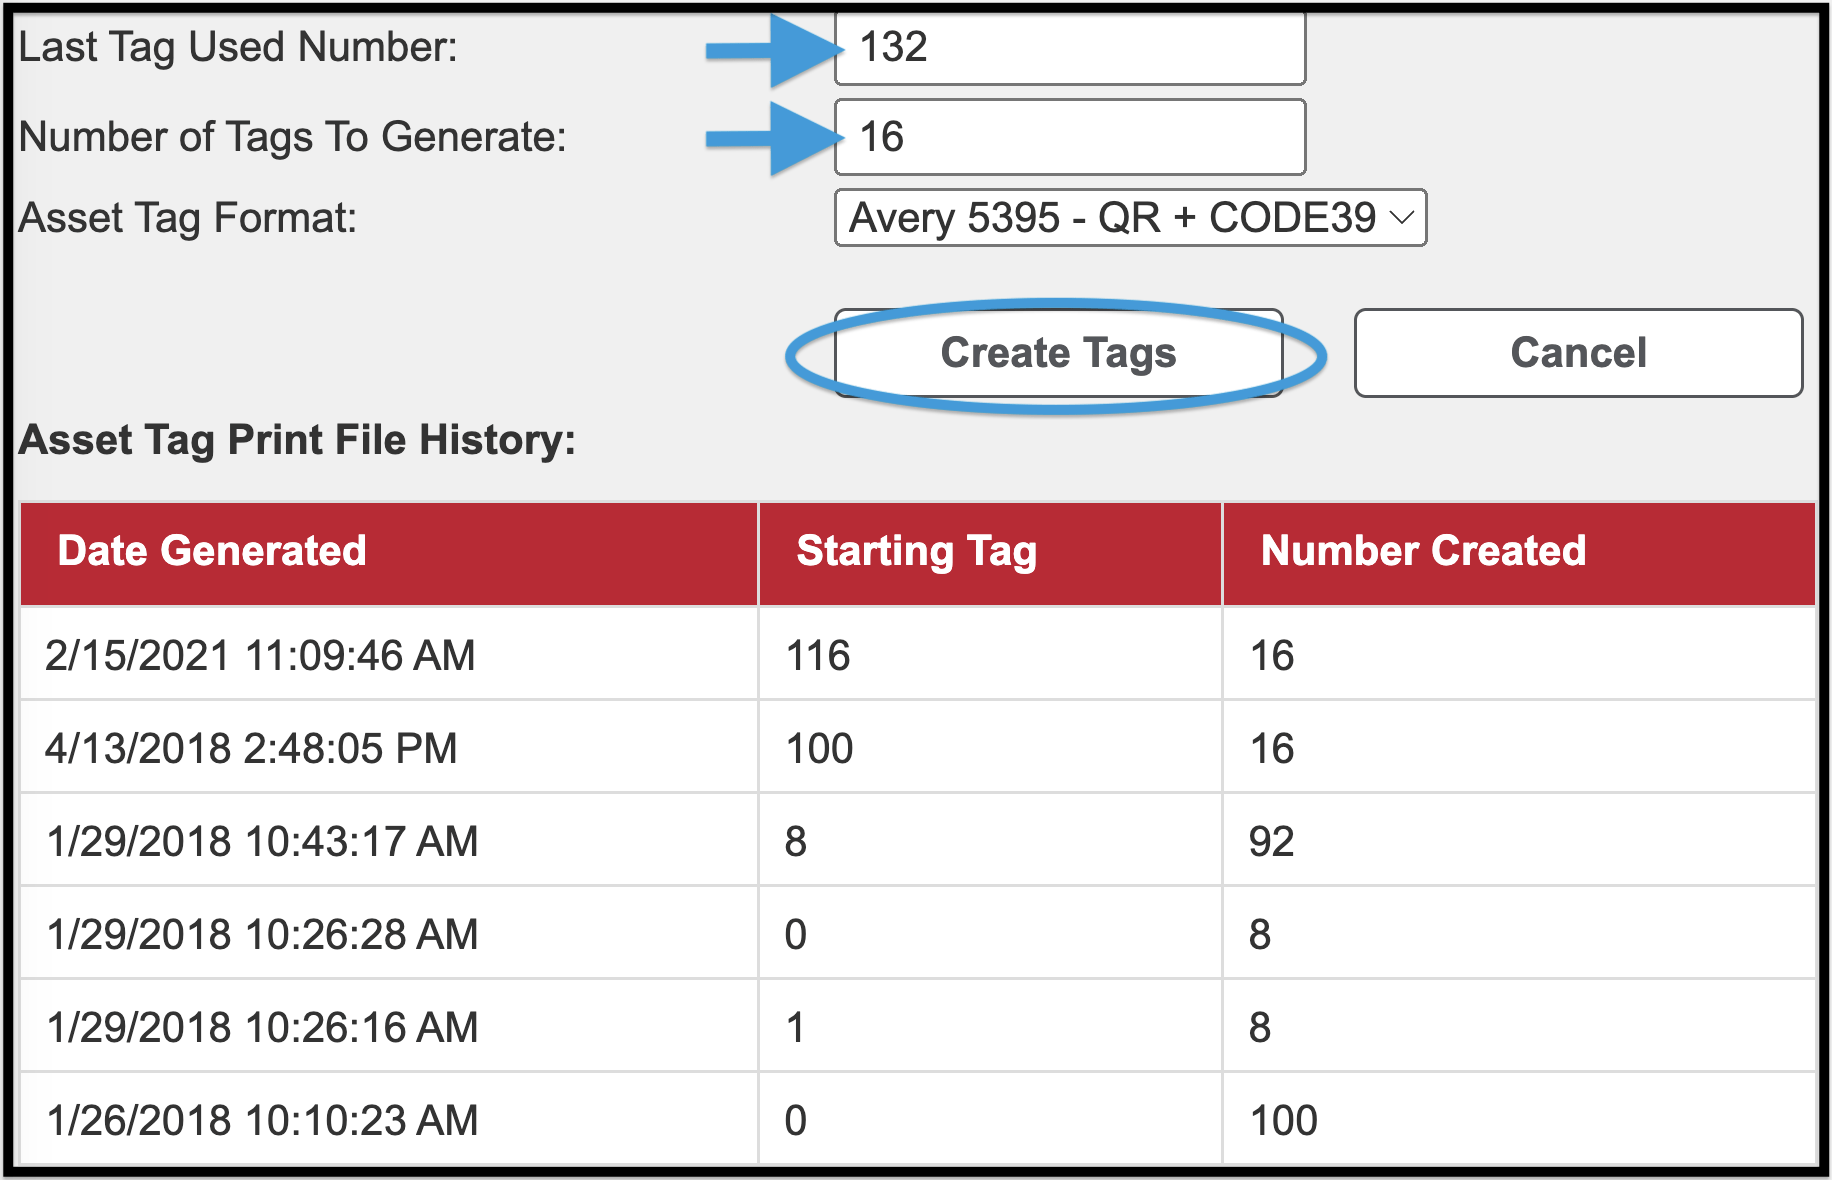
Once the print option has been selected, the following steps are required:
-
- Input the number of the last asset tag that was used.
-
- Input the number of asset tags you want to generate.
-
- Click Create Tags.
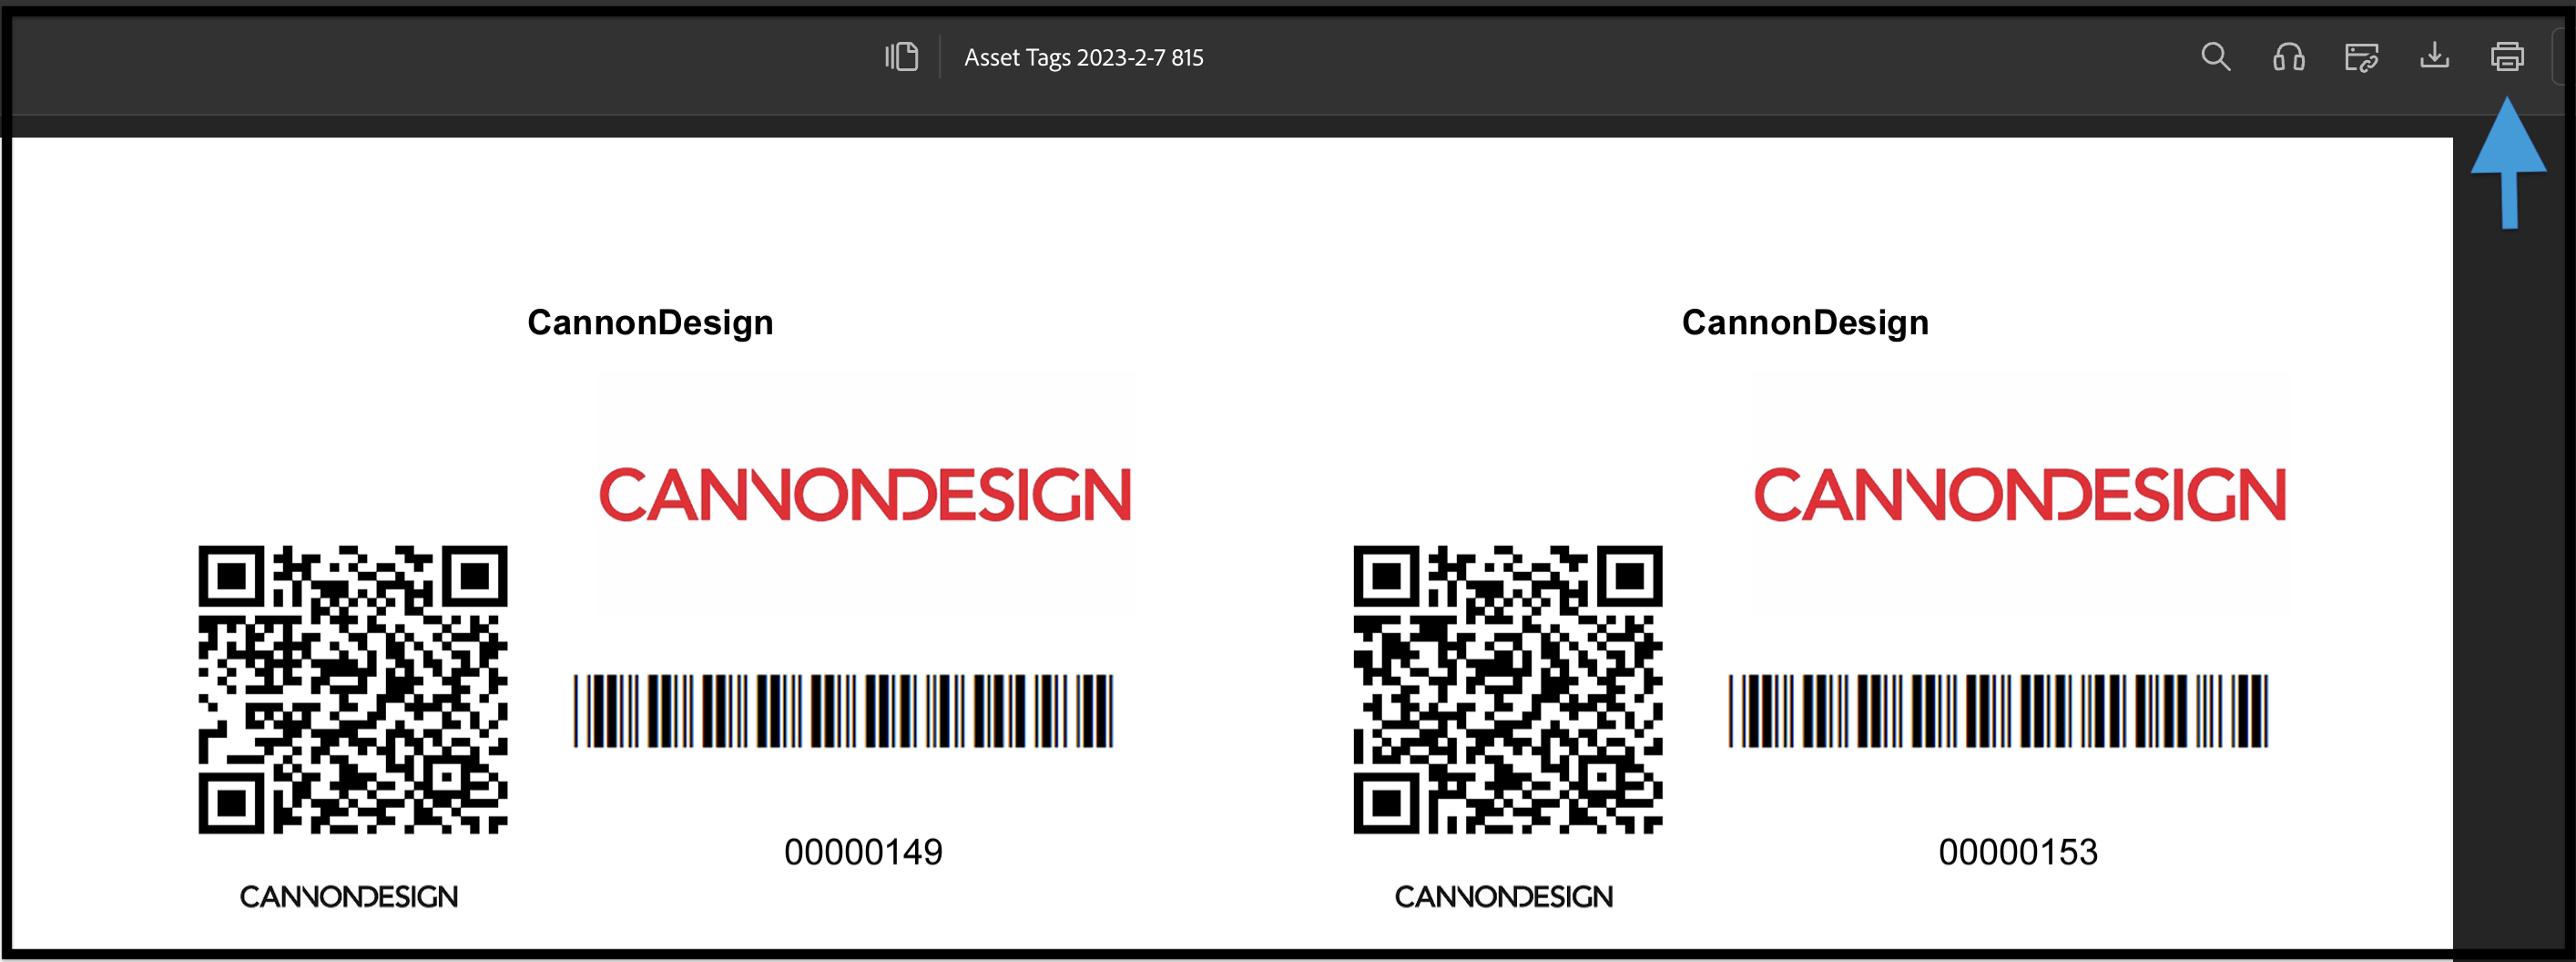
The asset tags will appear in the current window.
-
- Click the download button to download the asset tags to a .pdf file.
-
- Click the printer icon to print the asset tags.
-
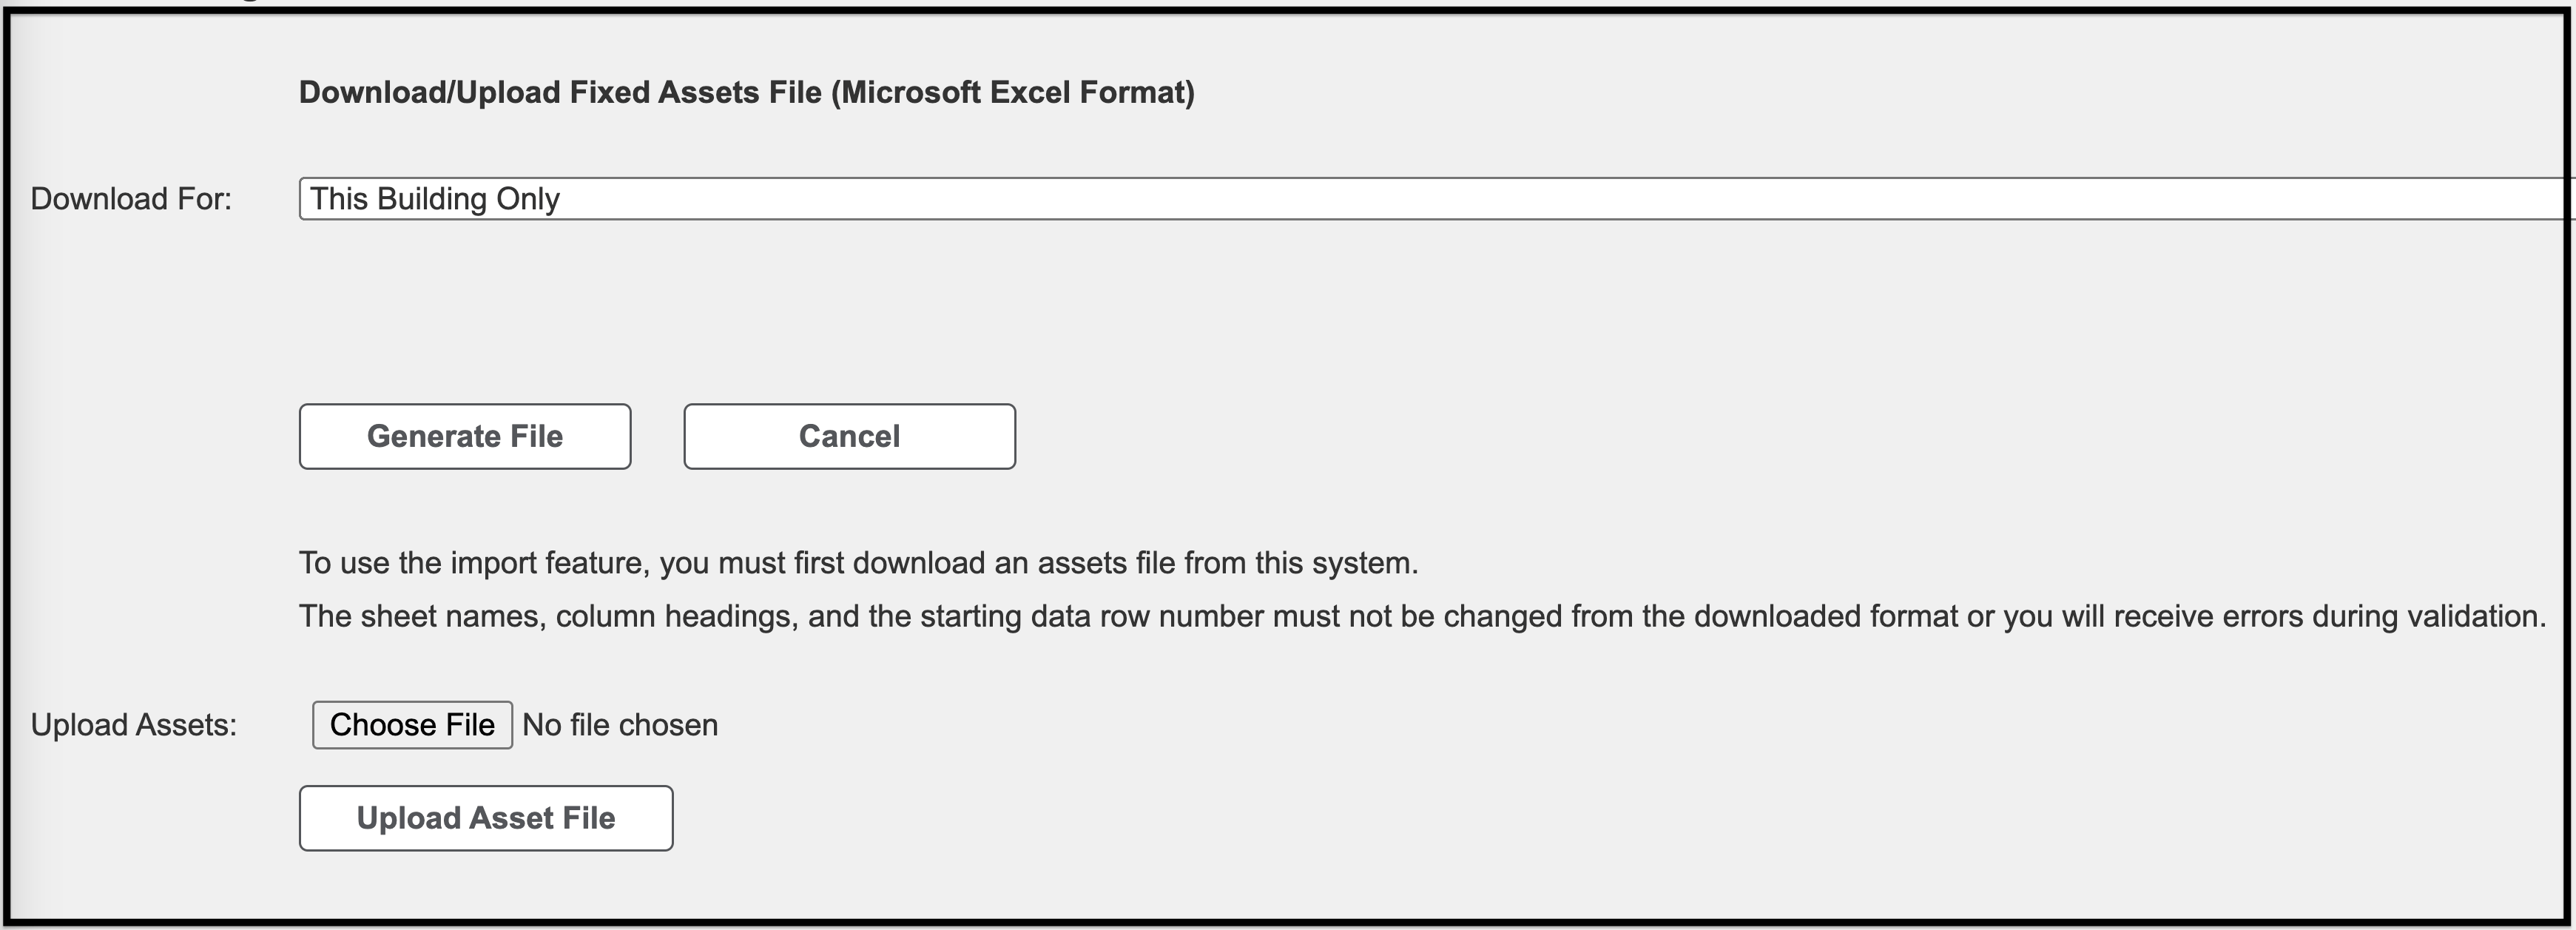
- To download an Excel file that lists all of the asset tags (by building or by portfolio) click Download to Excel.
-
- Click the drop-down arrow to the right of the Download For field to choose to download asset tags for the building or portfolio.
-
- Click Generate File.
-
- If you need a more customized asset tag, please reach out to your FOScore® representative.

The benefit of a QR code is that software subscribers and assessors would be able to pull up information about an asset on their mobile device while out in the field. For example, the install date, operation manual, manufacturer, warranty information, and any other information that was input into the system would be accessible on a mobile device when the QR code is scanned.
Floors/Location #
It is in this tab that you will add the locations and floors to assign systems and components. By default, the title ‘Entire Building’ has been created.
To add a floor:

-
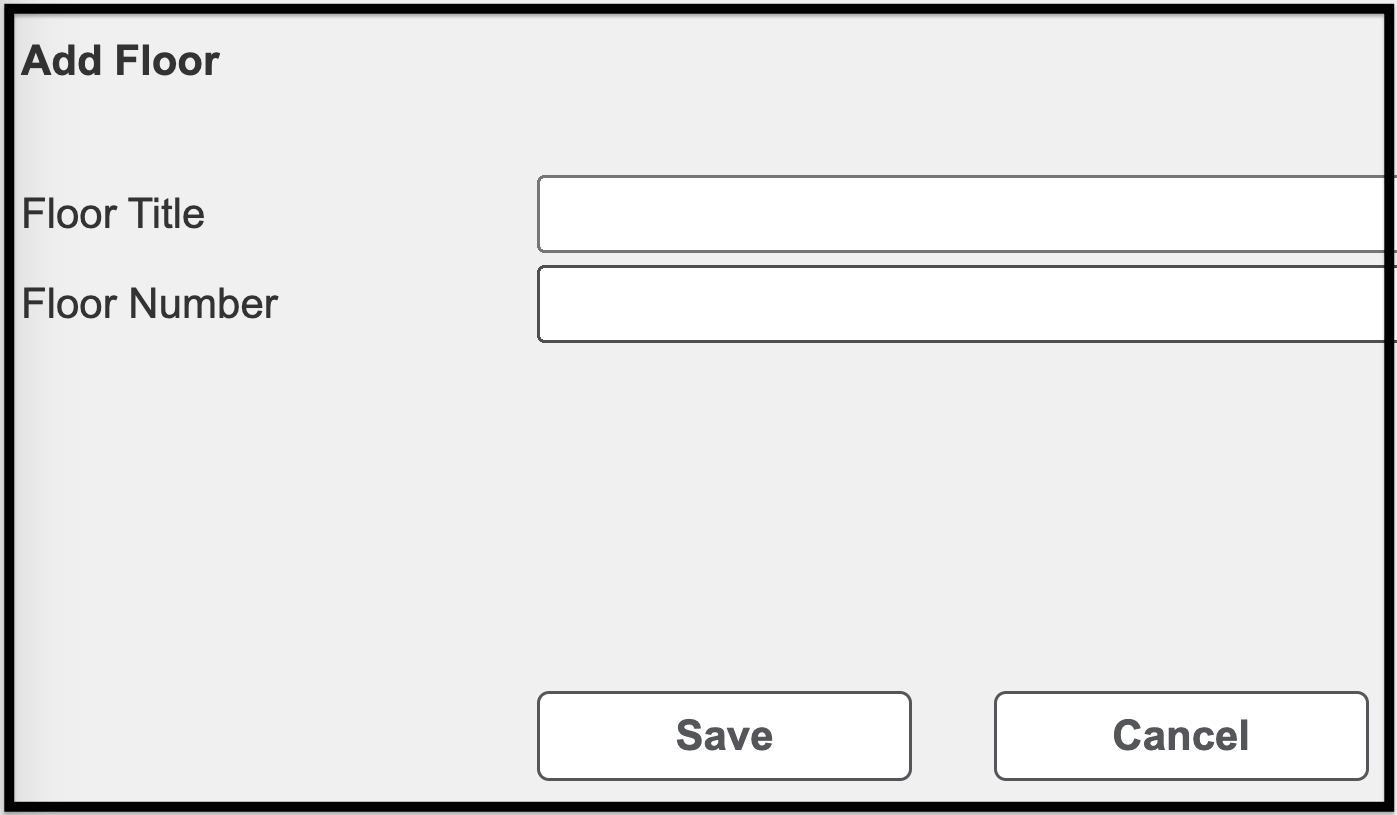
- Click Add Floor.
-
- The Edit Floor window appears.
-
- Enter a title and number for the floor.
-
- Click Save.
To delete a floor:
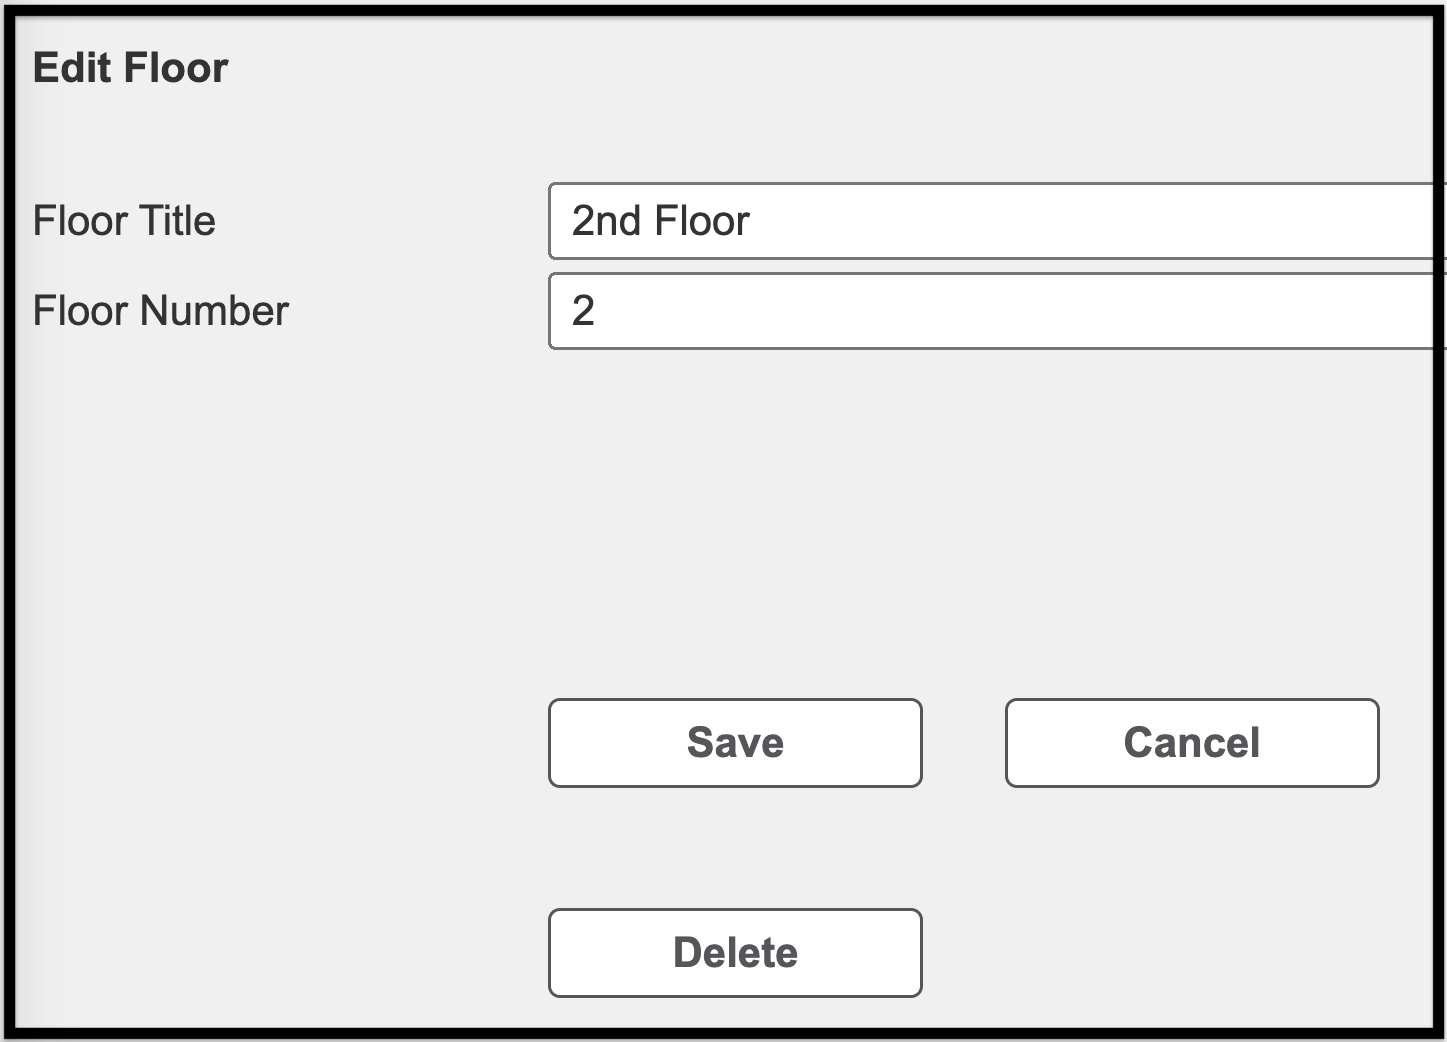
-
- Click Edit to the right of the floor’s title.
-
- Click Delete.
To add a location to a floor:

-
- Click Add Location to the right of the Floor# column.
-
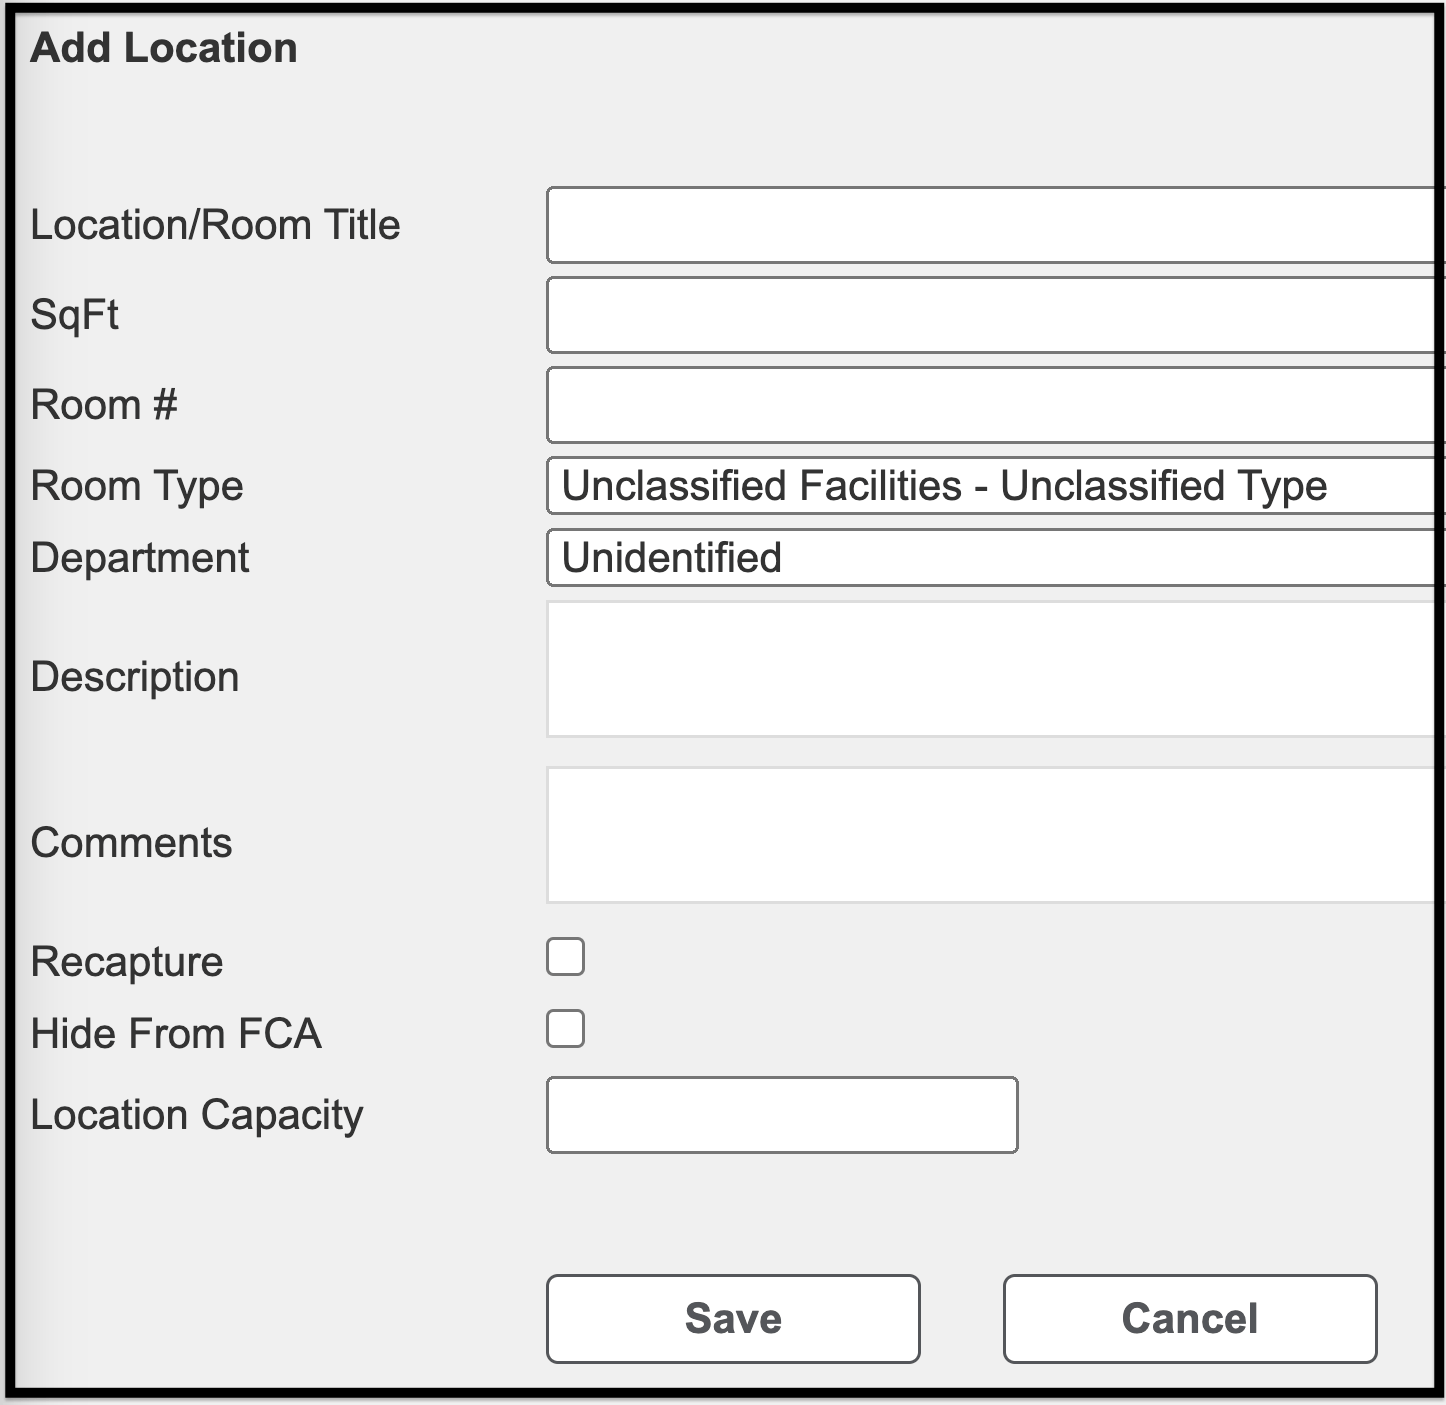
- The Add Location window appears.
-
- Add the following information:
- Location/Room Title
-
- SqFt: the interior square footage of the buildings/asset.
-
- This does not affect the calculations of the building/asset.
-
- SqFt: the interior square footage of the buildings/asset.
-
- Room #
-
- Description: Text field for inputting miscellaneous information about the location. It is non-reportable.
-
- Comments: Text field for inputting miscellaneous information. It is non-reportable.
-
- The floor is already provided and cannot be edited in this window.
-
- Comments: Text field for inputting miscellaneous information. It is non-reportable.
- Add the following information:
-
- When all of the information has been input, click Save.
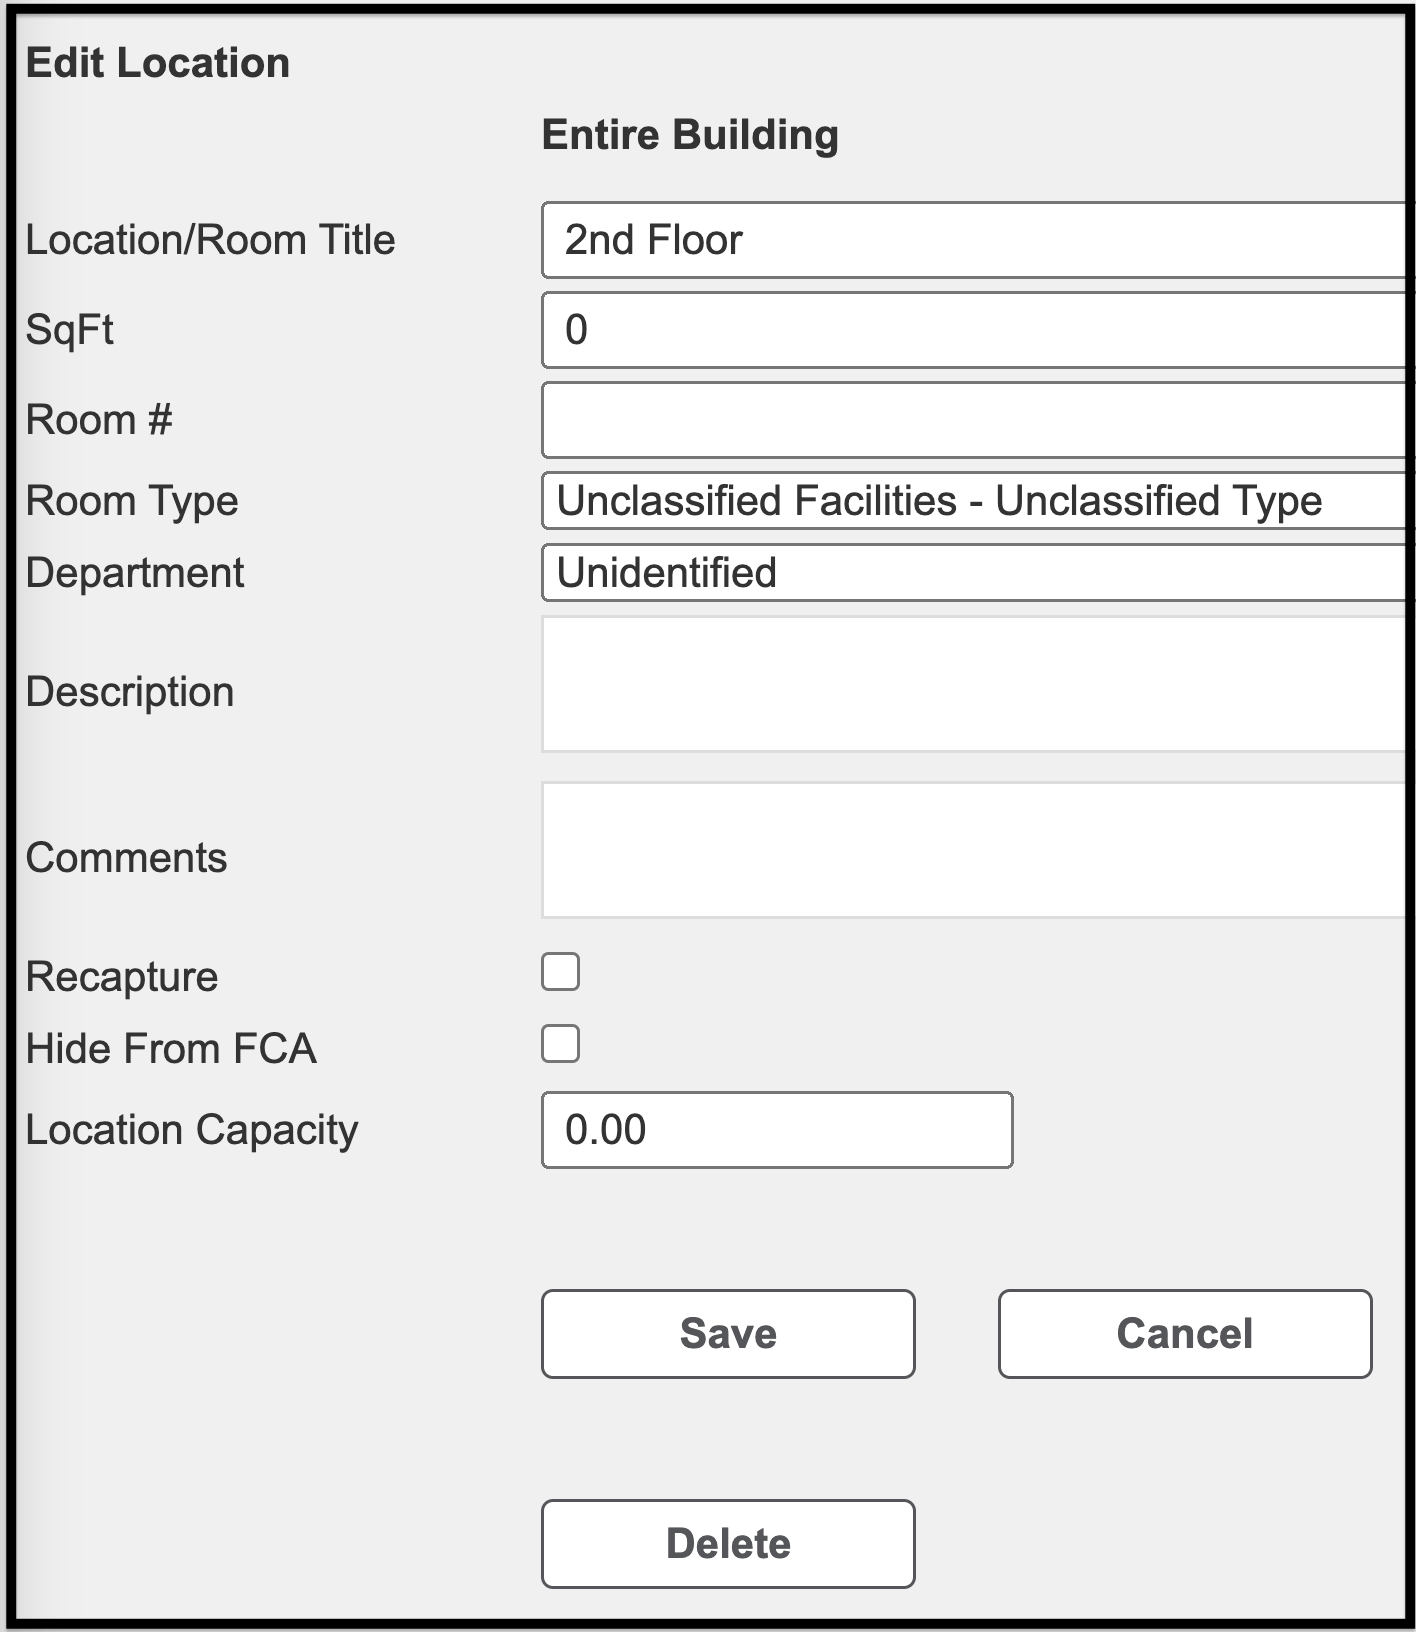
To edit a location:

-
- Click Edit to the right of the location’s name.
-
- Edit the information and click Save.
-
- Click Delete and Save to delete the location.
Job Tracking #
The purpose of the Job Tracking tab is to ensure work is being completed and progress is being tracked.
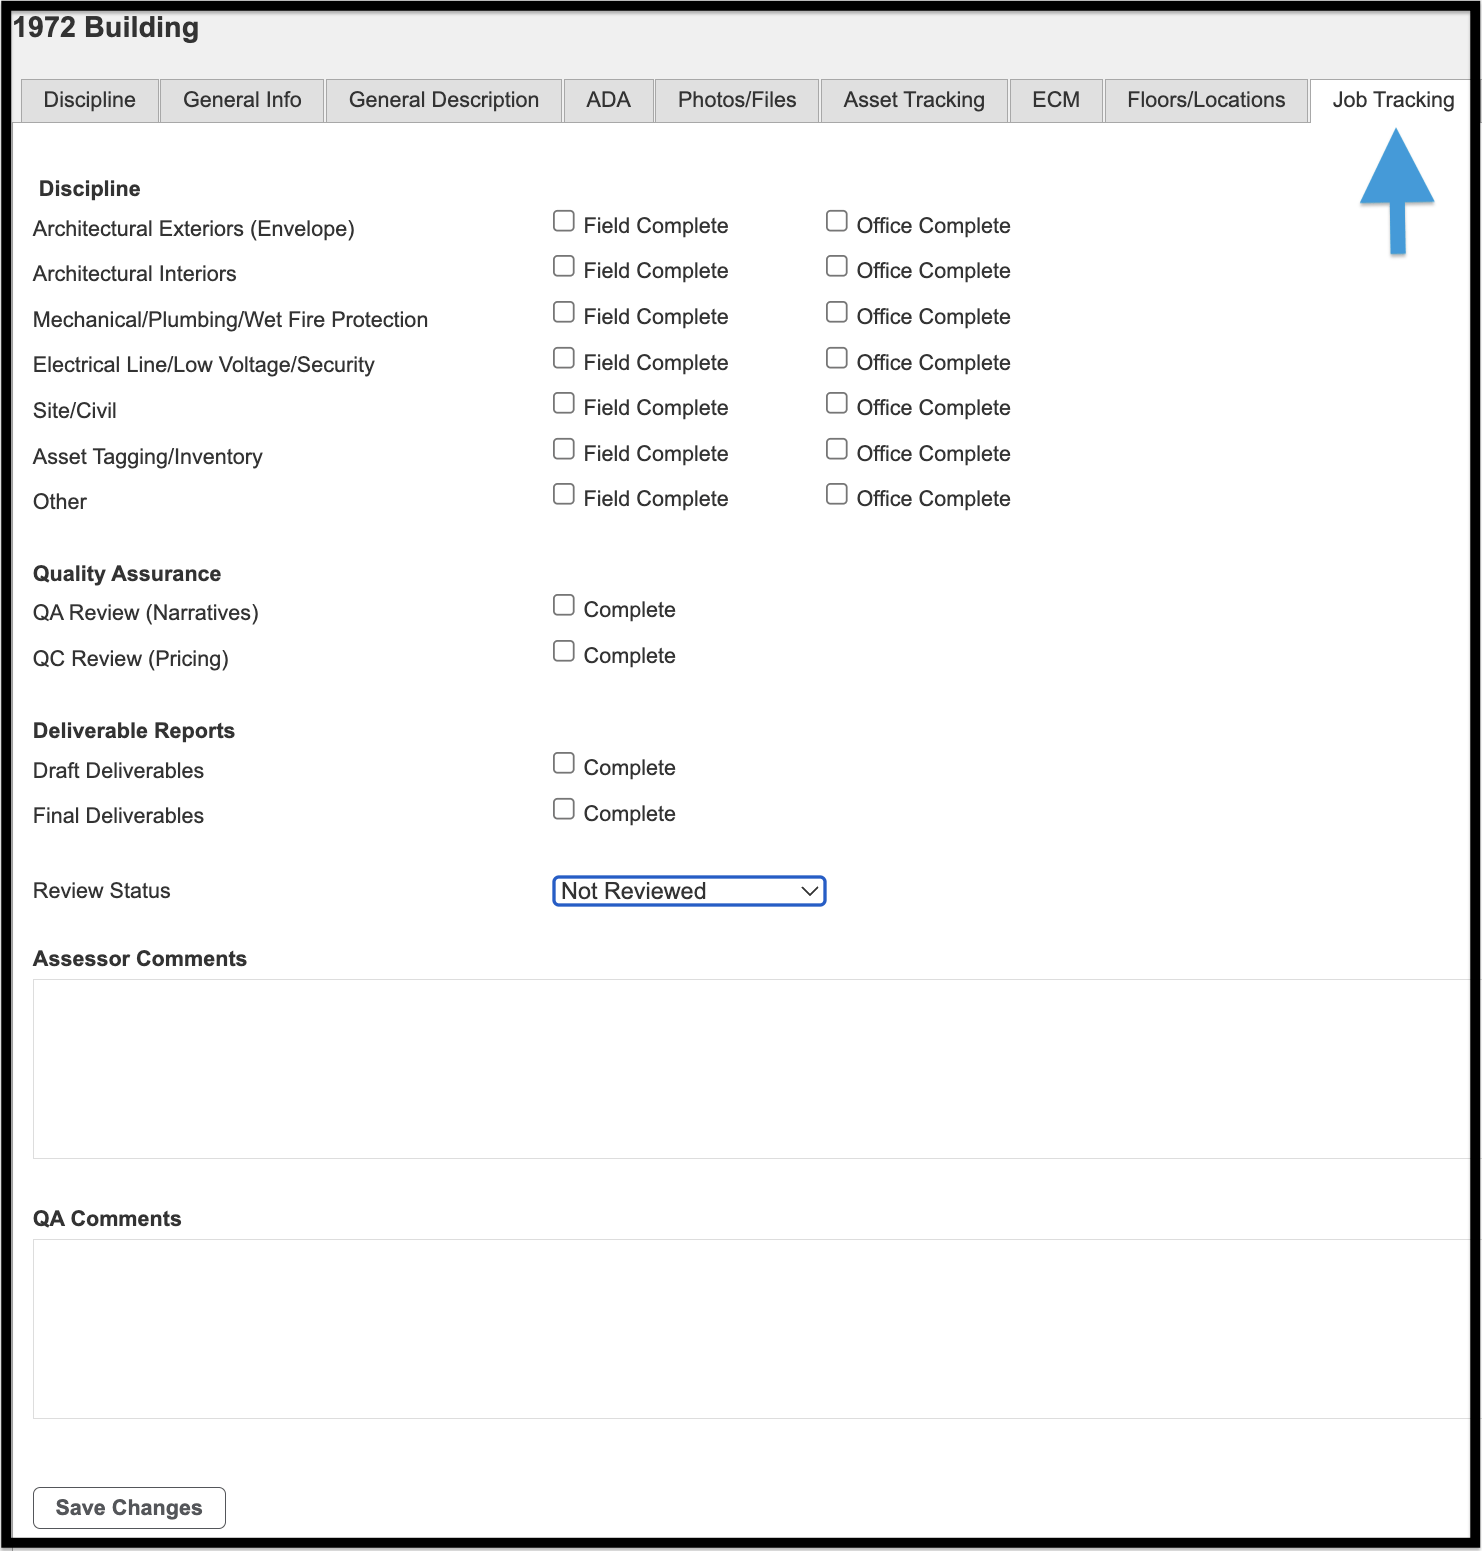
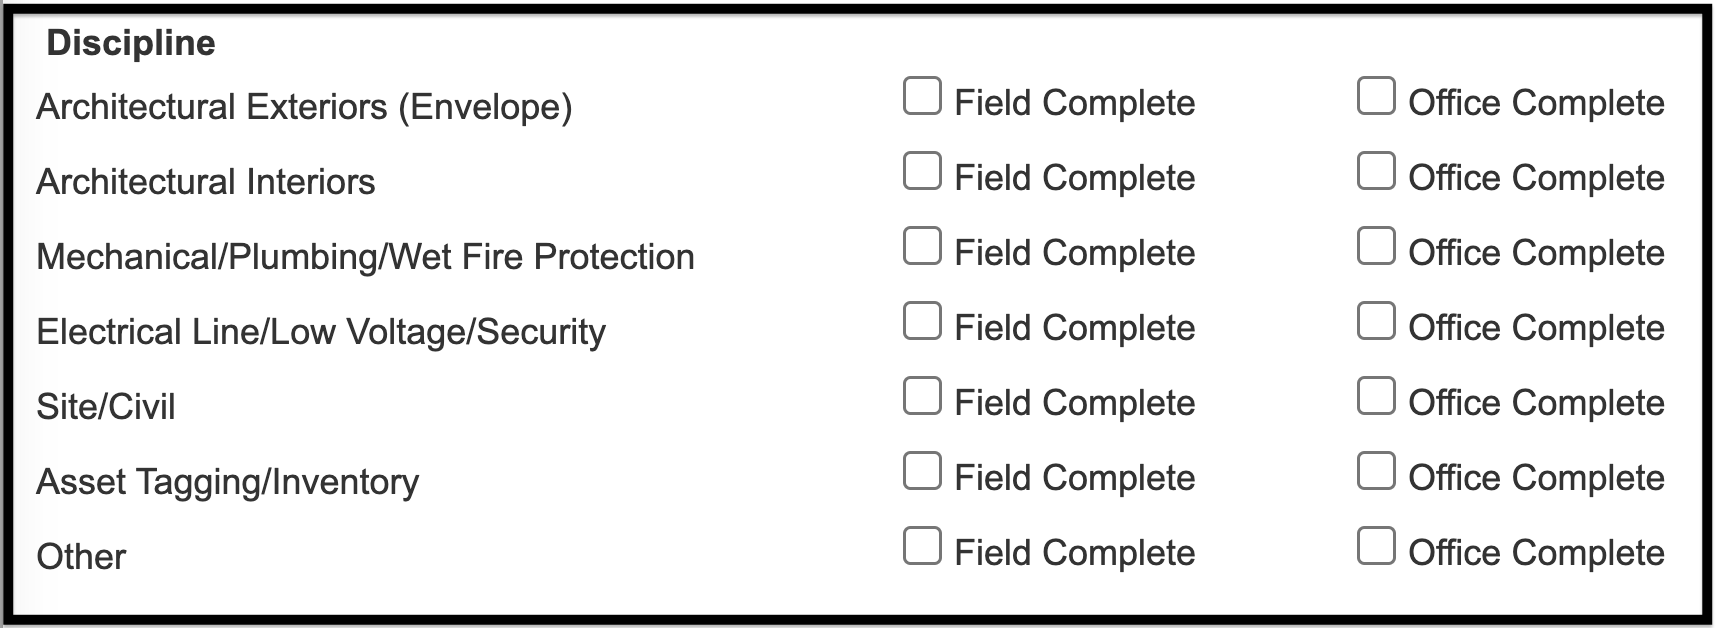
Next to each Discipline is a place to check if the fieldwork is complete and the office work is complete.
Next to each Quality Assurance Report, there is a place to check if the report is complete.
Next to each Deliverable Report is a place to check if the report is complete.
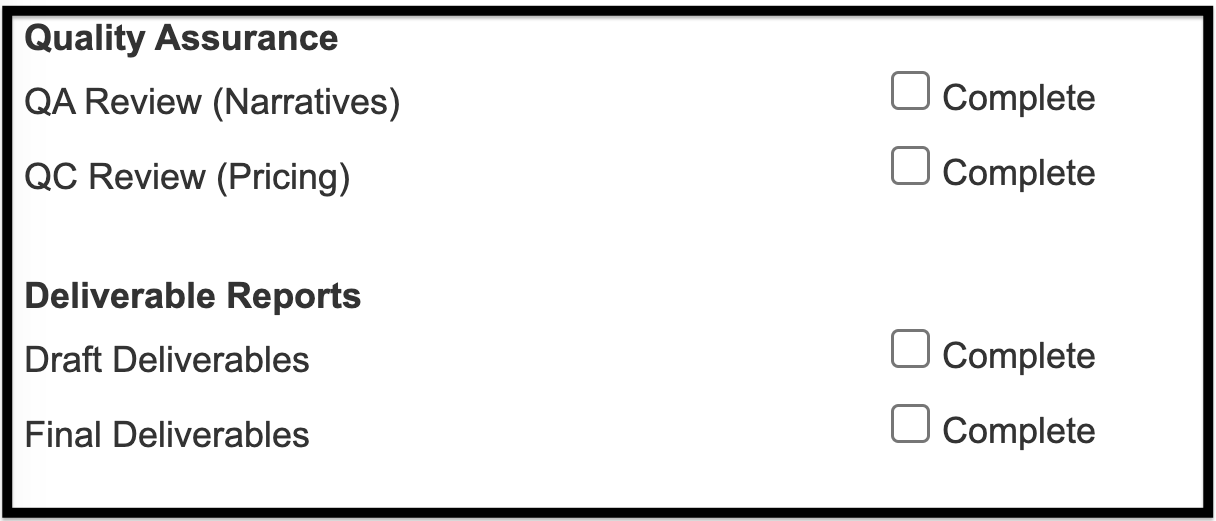
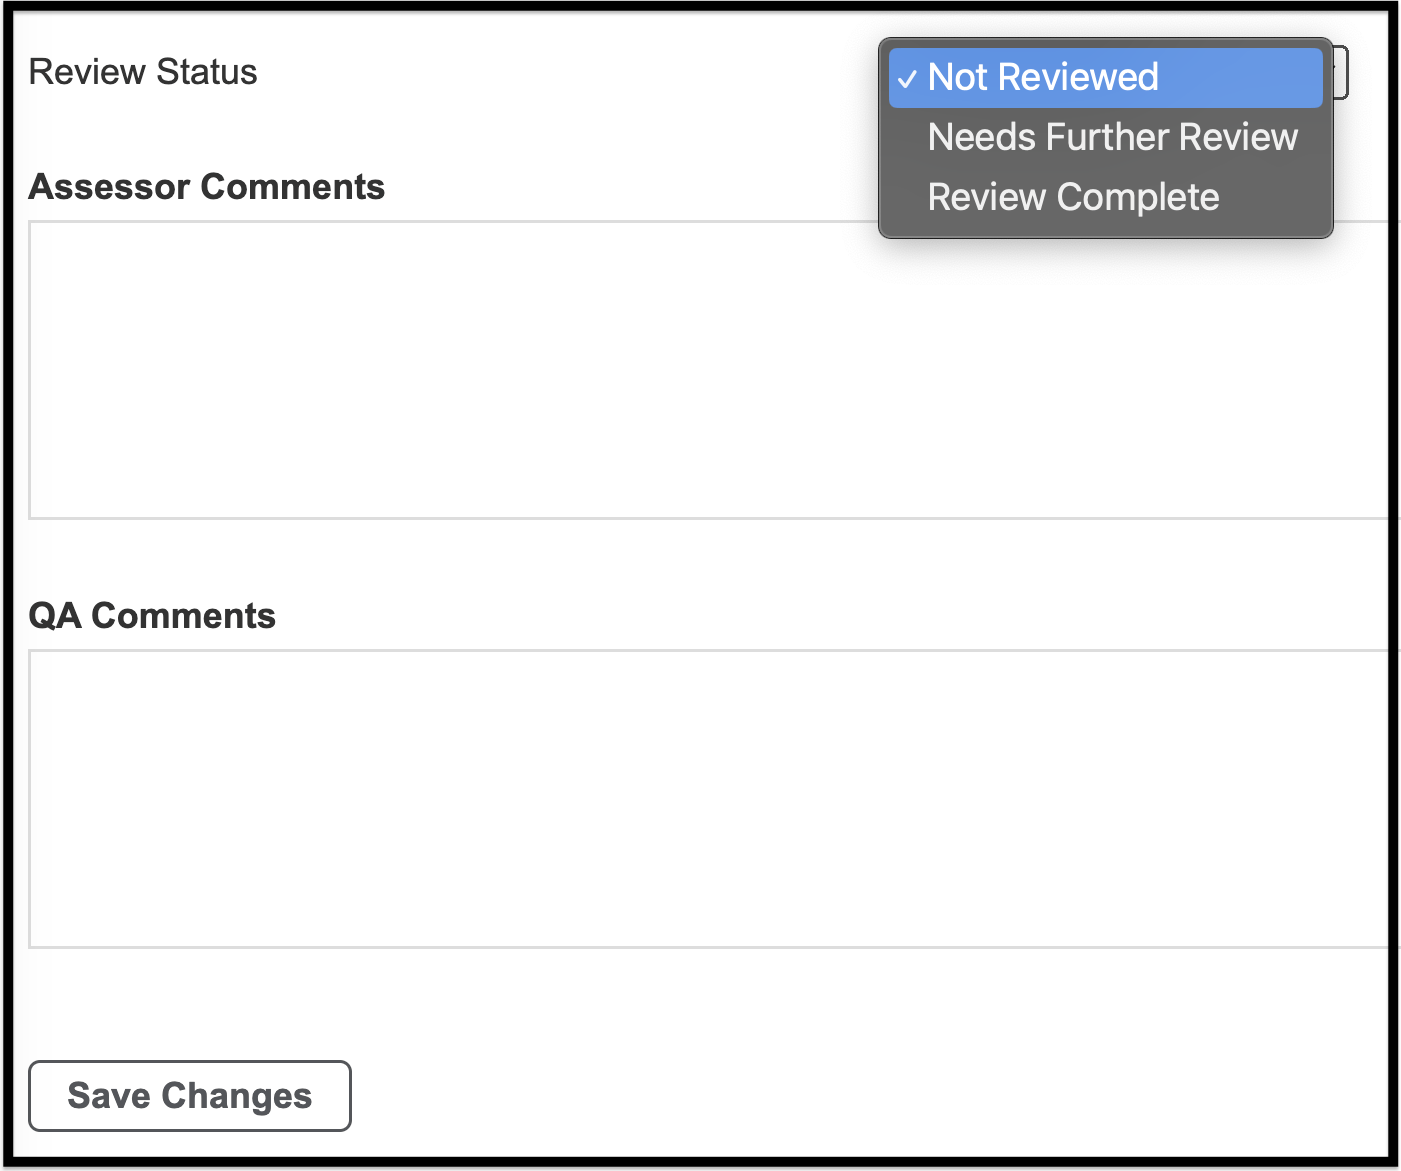
Below the checkboxes, there is a dropdown menu to update the review status and assessors and QAs can make comments about the job.
CRV #
Current Replacement Value Adjustment by Discipline
A simple CRV tool is included in this module to help assessors and end users establish CRVs without the need to build modeled aggregate records or navigate the modeled aggregate tool.
The CRV tab includes one modeled aggregate for each discipline. The modeled aggregates help keep a CRV constant. The benefit of using this tool is that the Facility Condition Index (FCI) and replacement values remain accurate when other items are changed.
To use this tool, navigate to a building and click on the CRV tab.
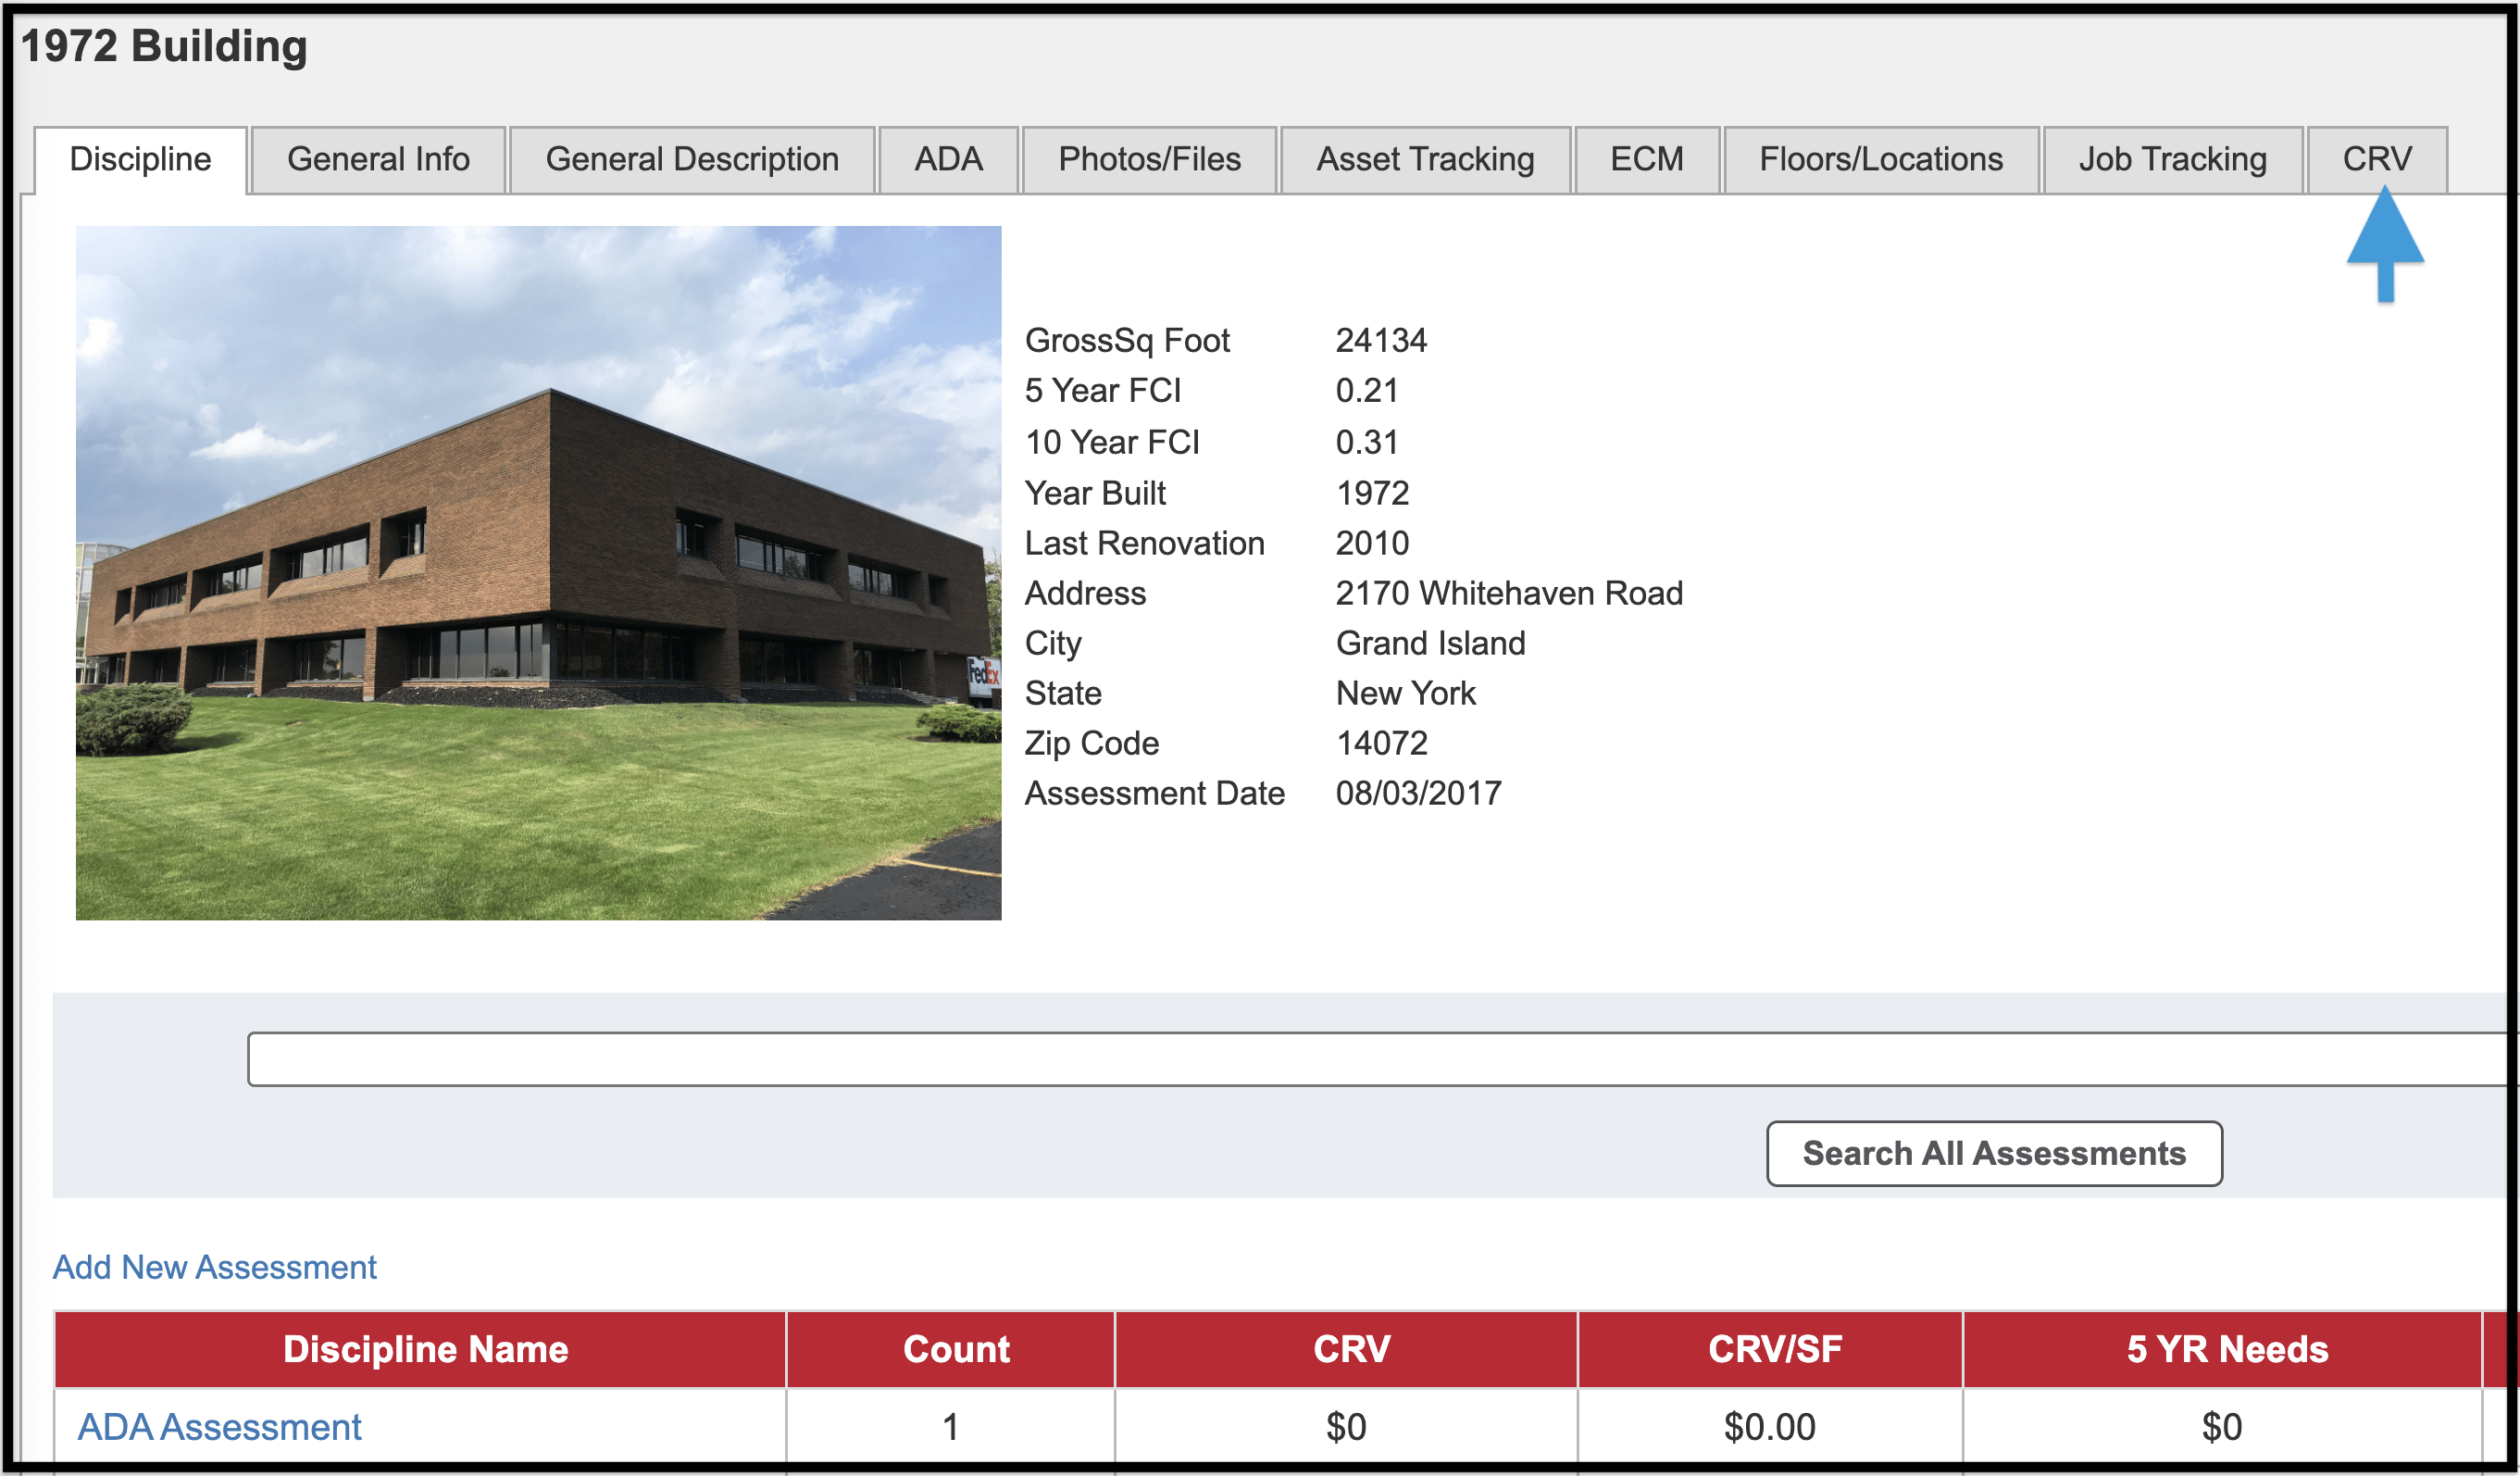
-
- You then have the option of setting CRV using a flat CRV or CRV/SF
-
- Enter values and choose the appropriate button.
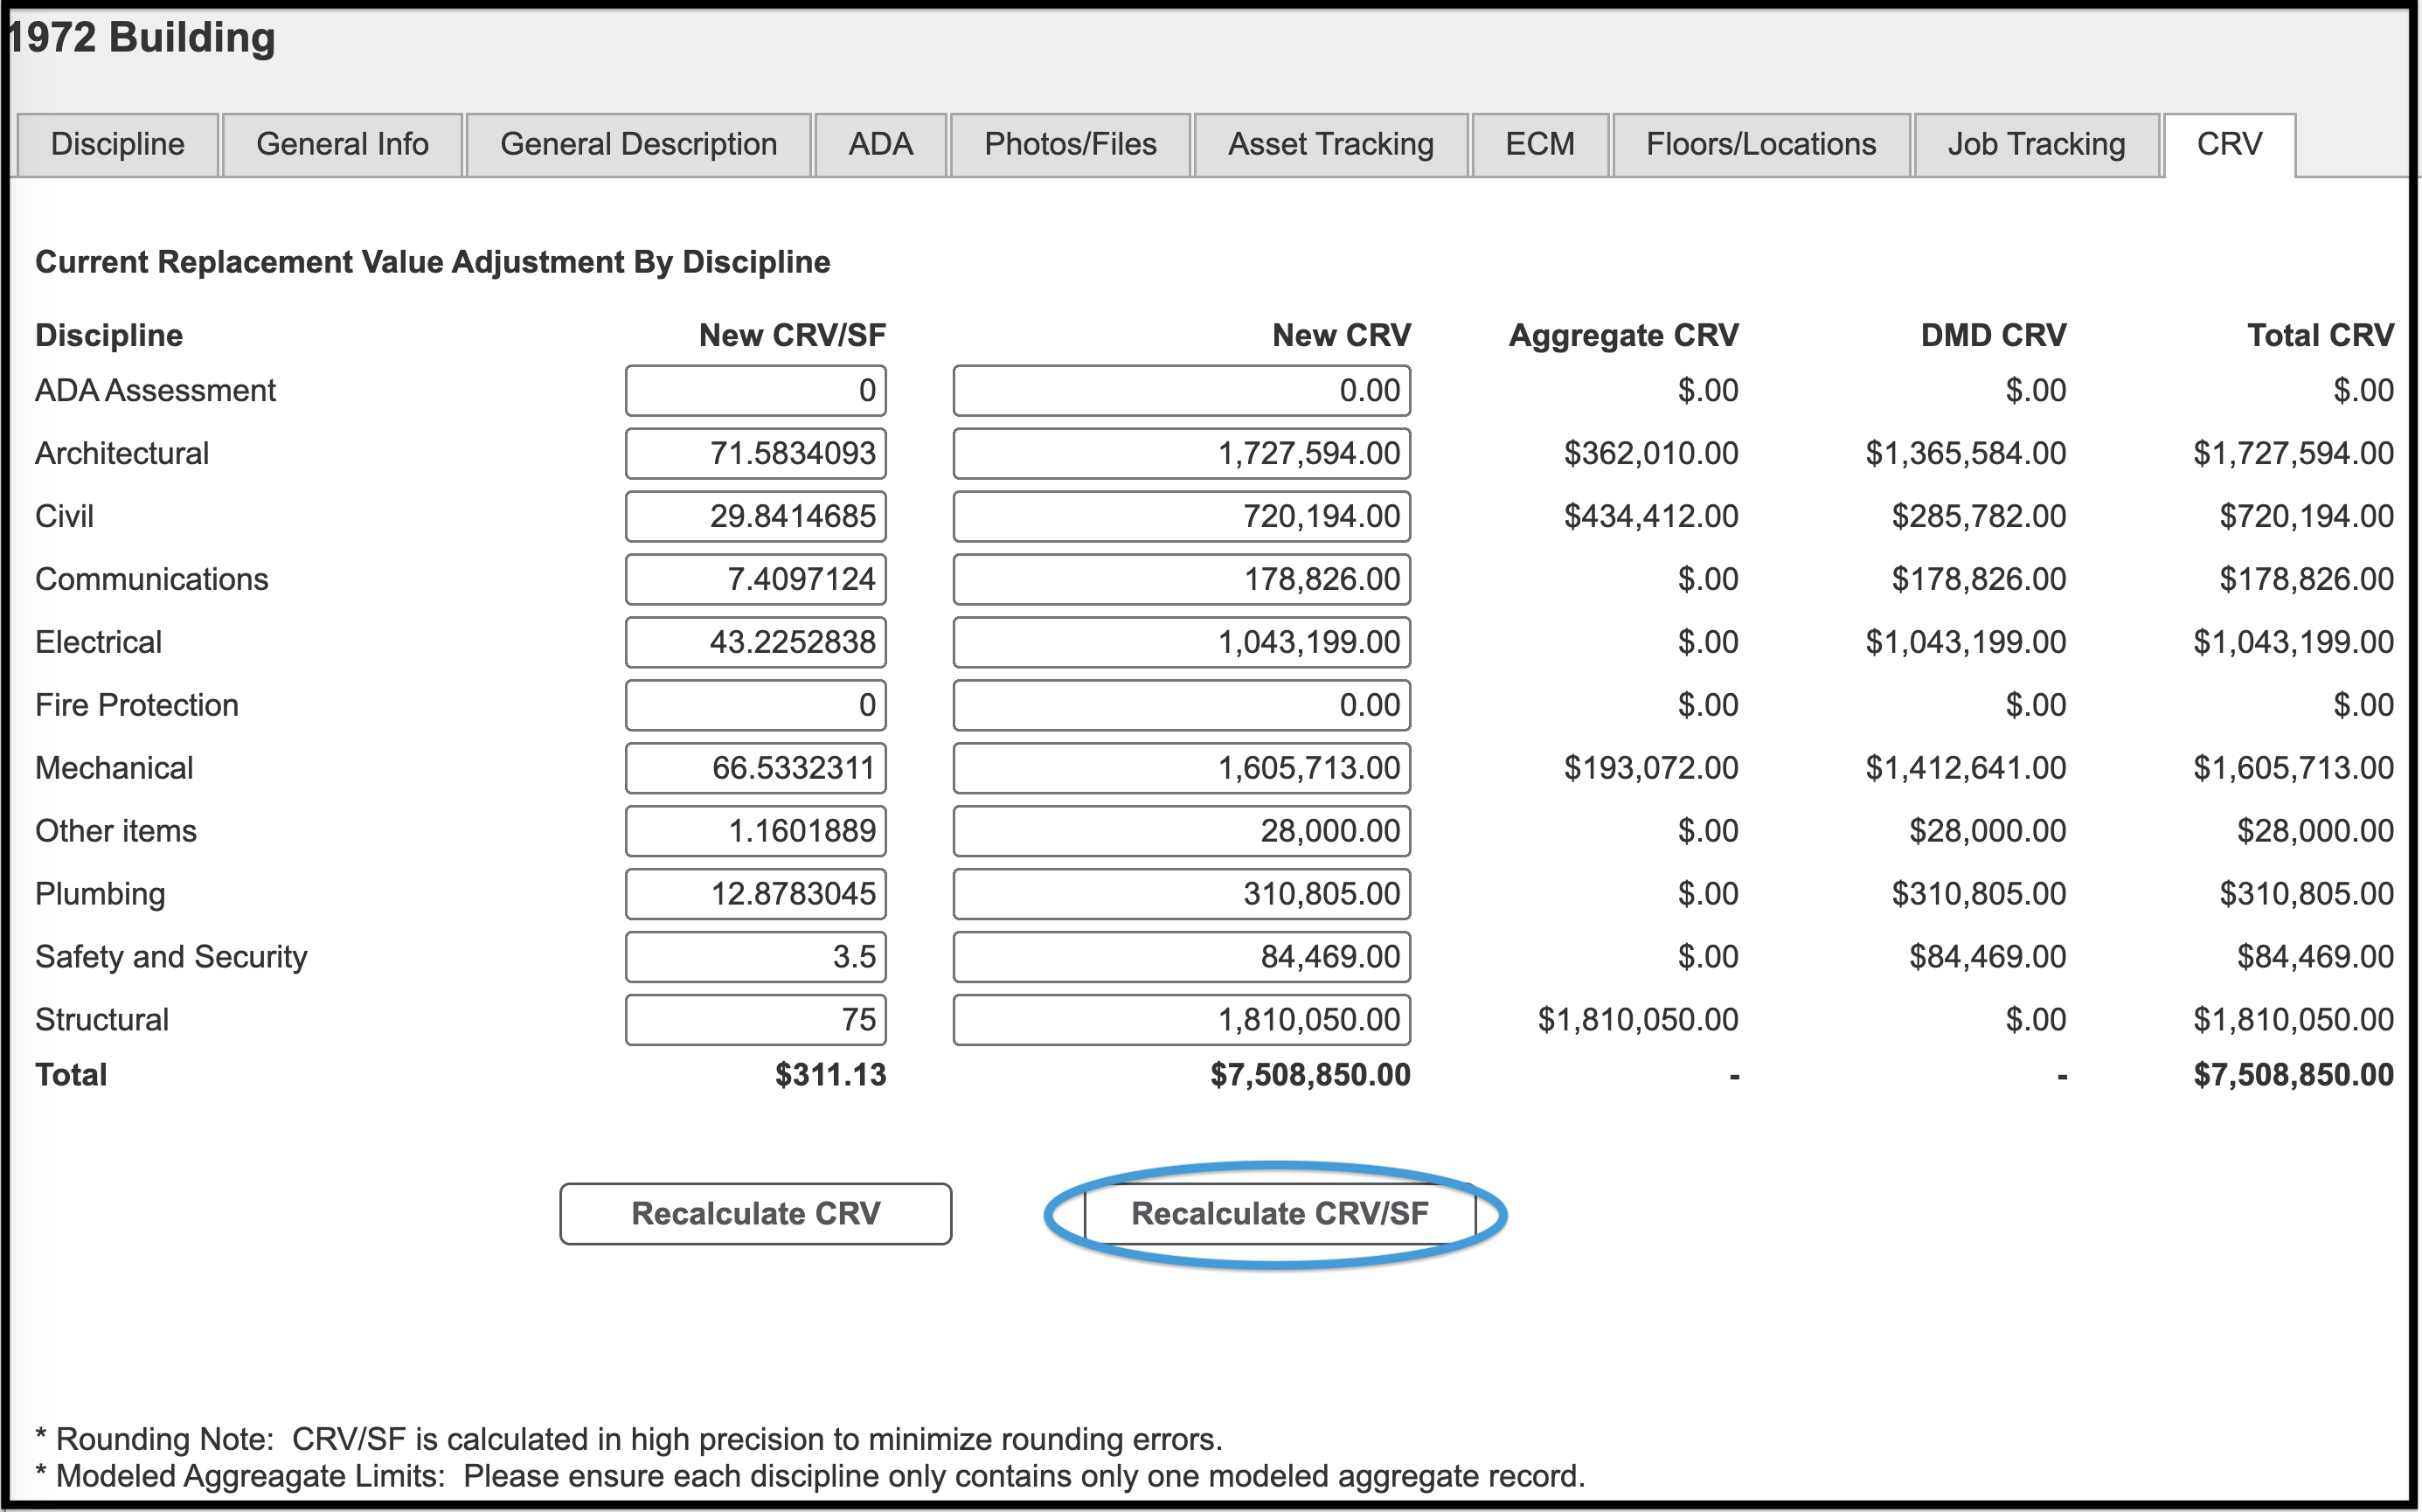
-
- New values and totals will then be calculated (the original values will be retained on the right for comparison).
-
- The tool is aware of the region factor and will multiply new values by the reciprocal of the region factor.
-
- The modeled aggregates will automatically adjust their unit costs so the discipline CRV will always be what is in the New CRV column.
-
- If an addition or renovation is done, you should enter new CRVs here to ensure FCI scores are correct.
-
- The modeled aggregates will automatically adjust their unit costs so the discipline CRV will always be what is in the New CRV column.
ECM (Energy Conservation Measurement) #
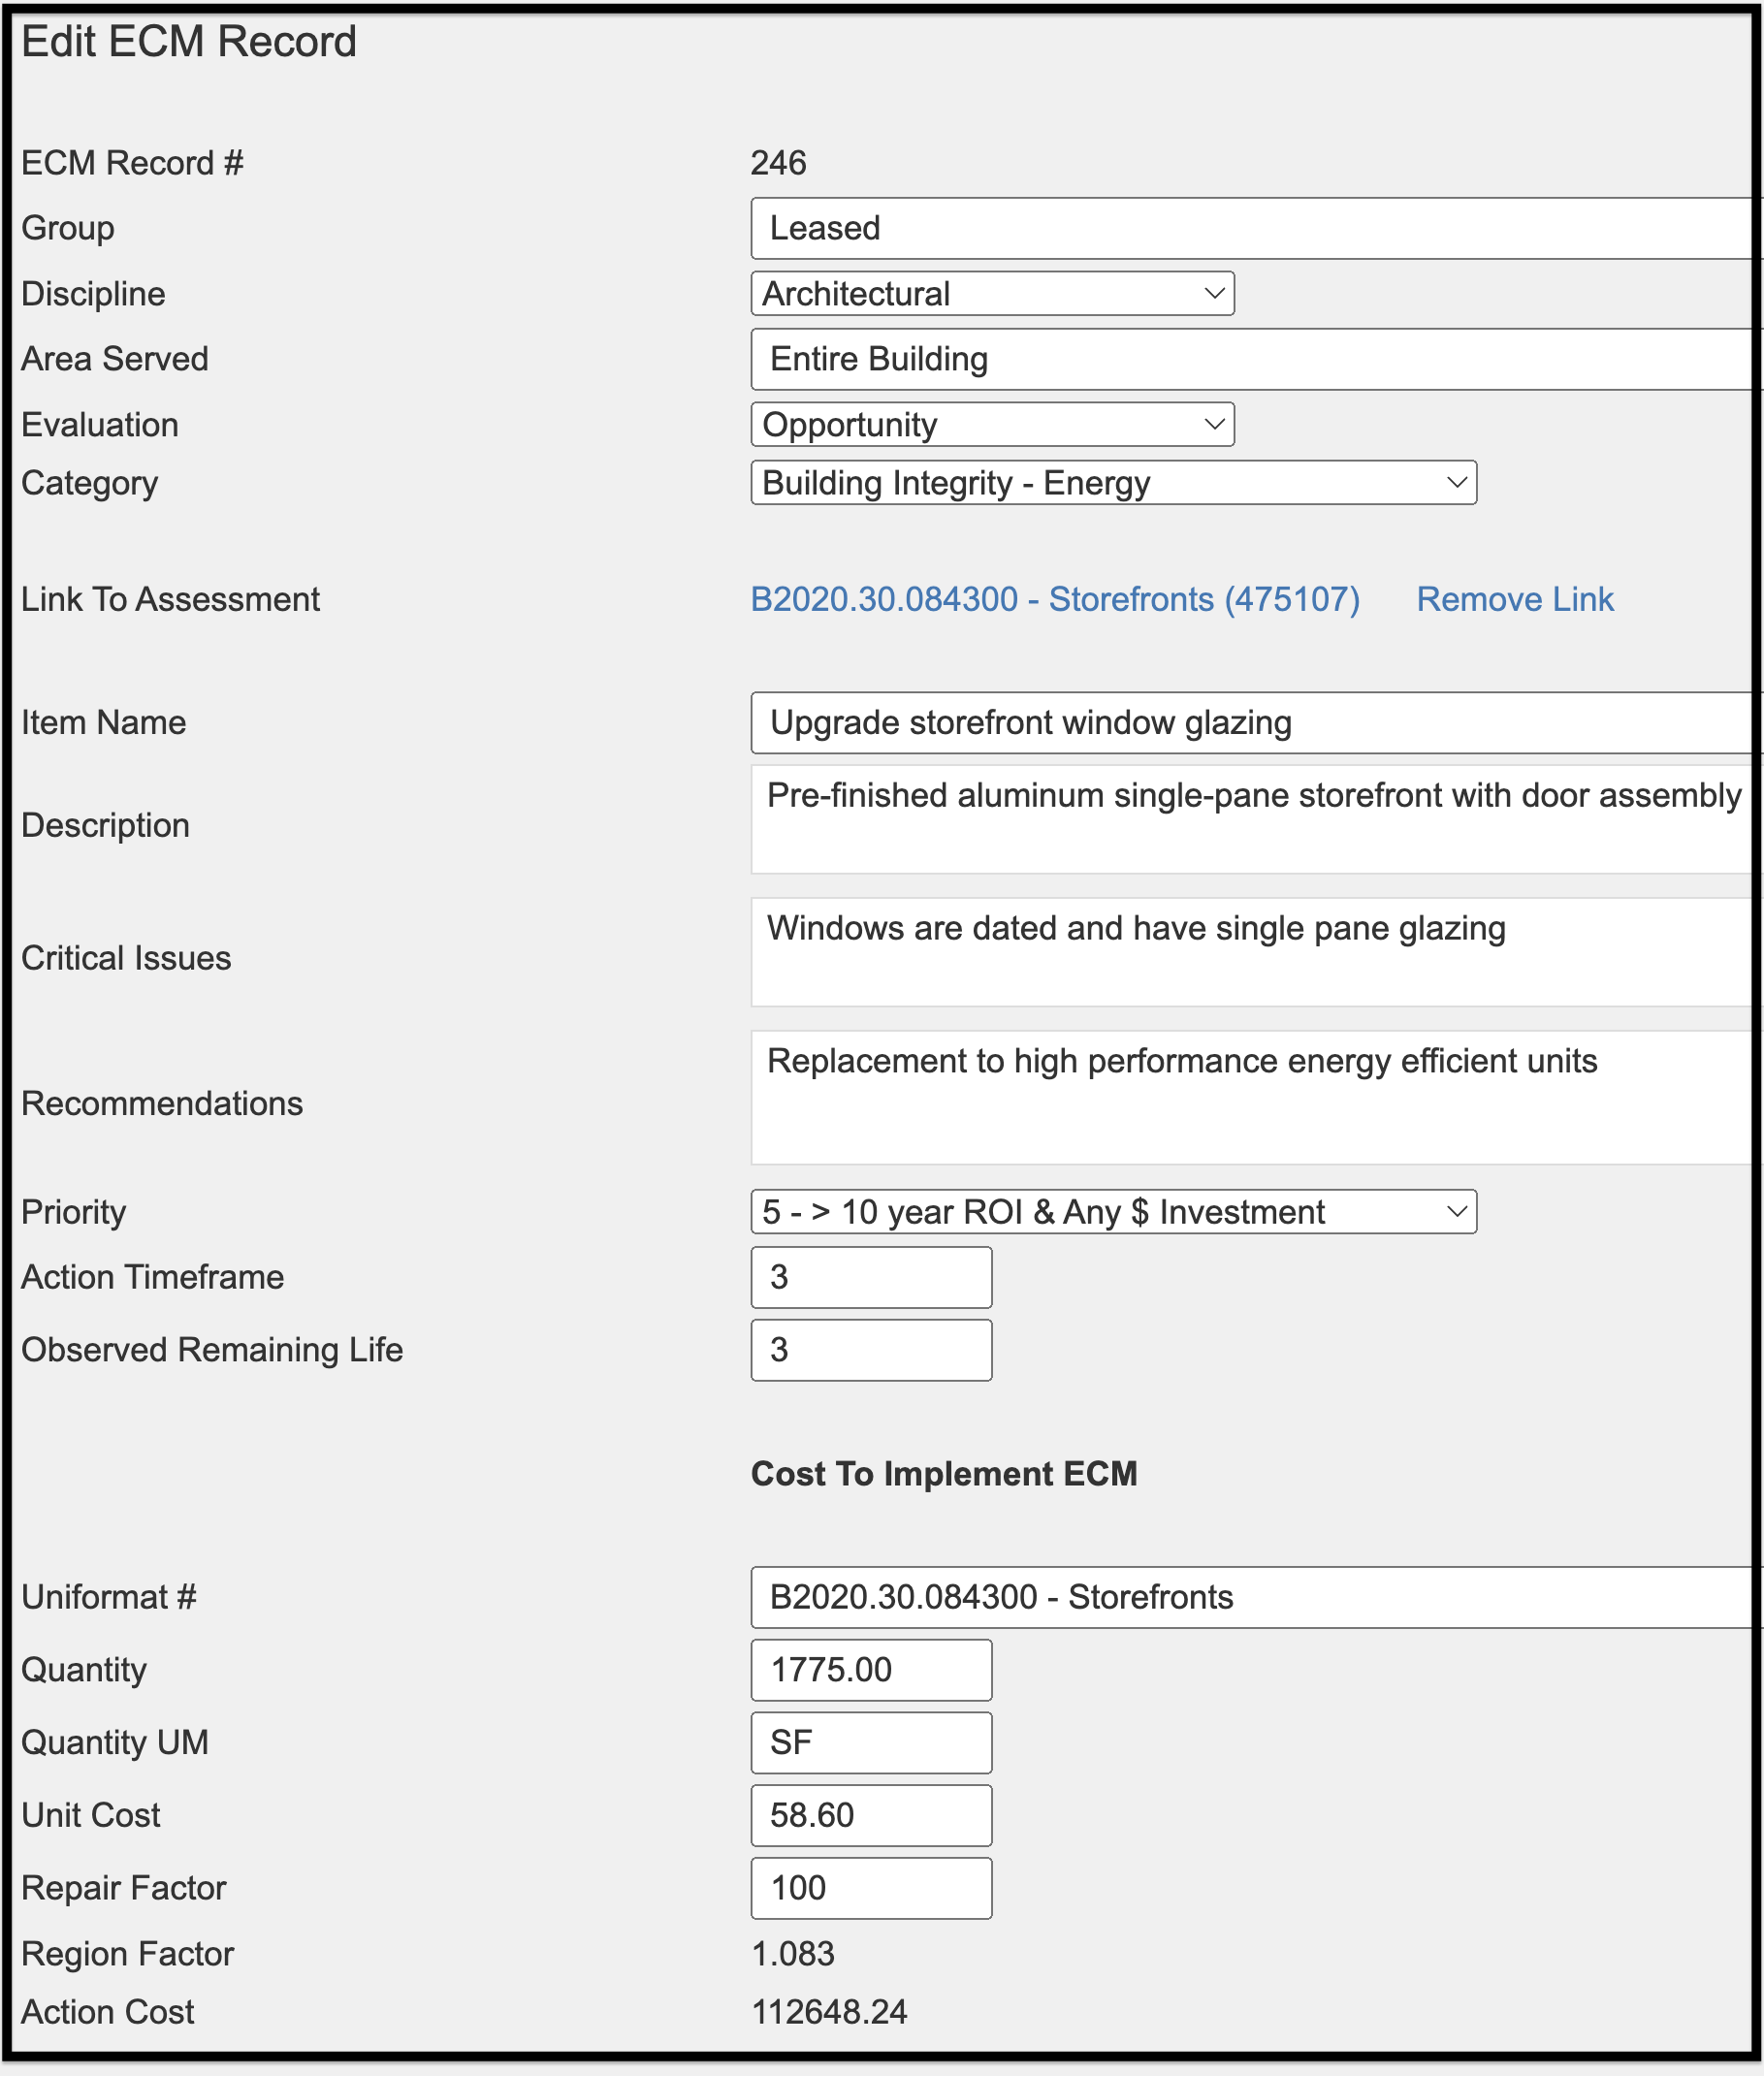
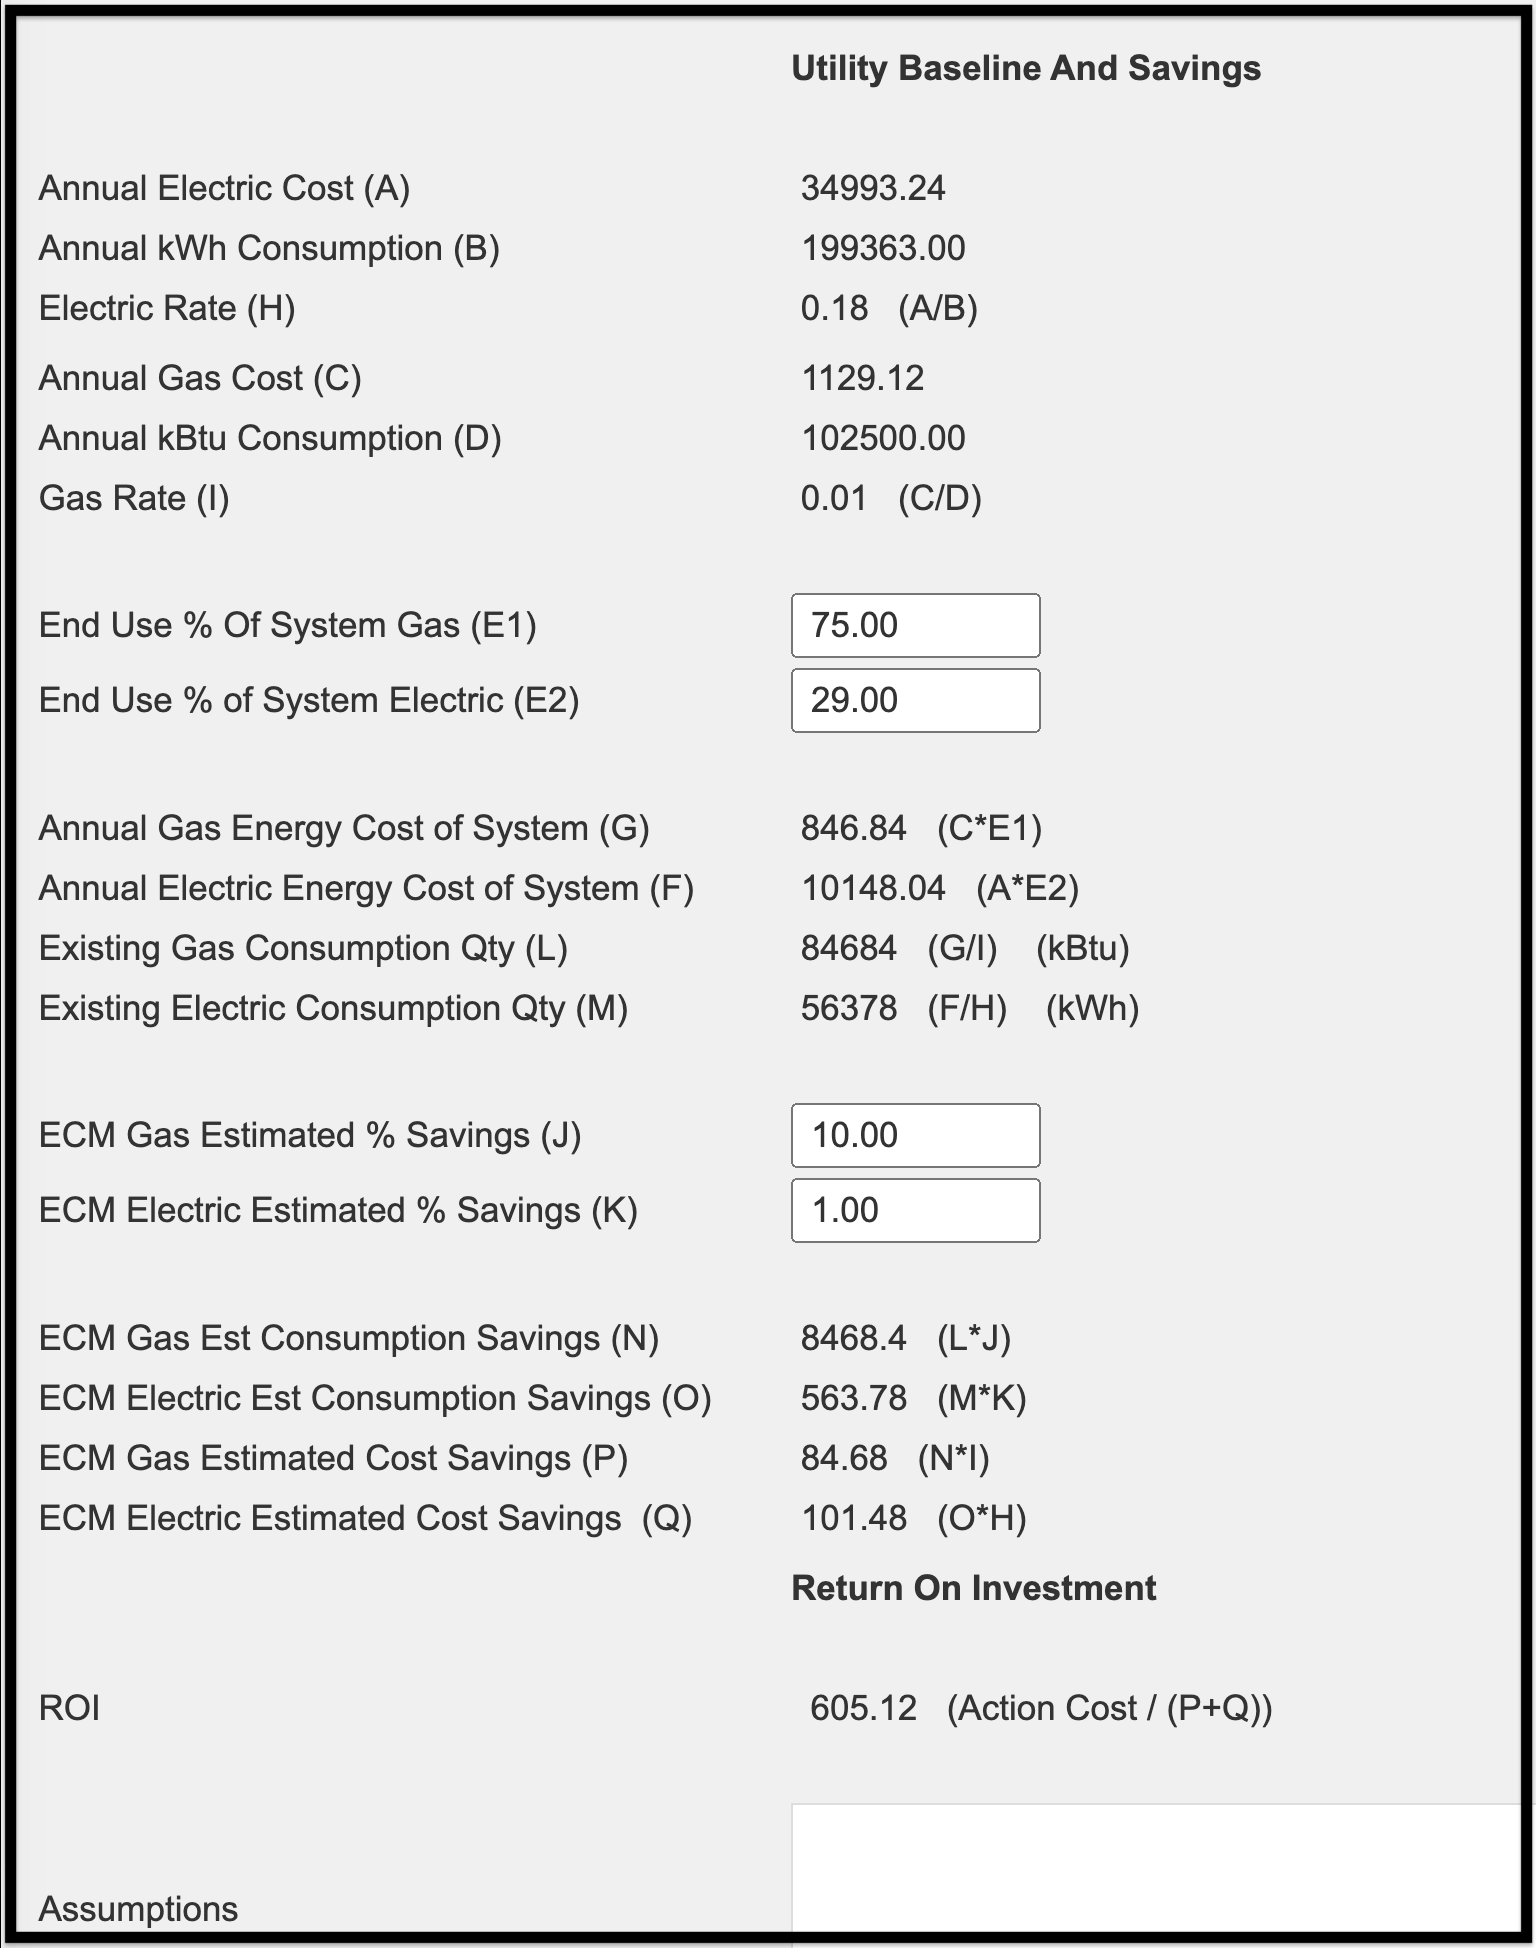
In the next two tabs you will find the Energy Conservation Measurement data collection and records.
To add an ECM item:
-
- Click Add an ECM item.
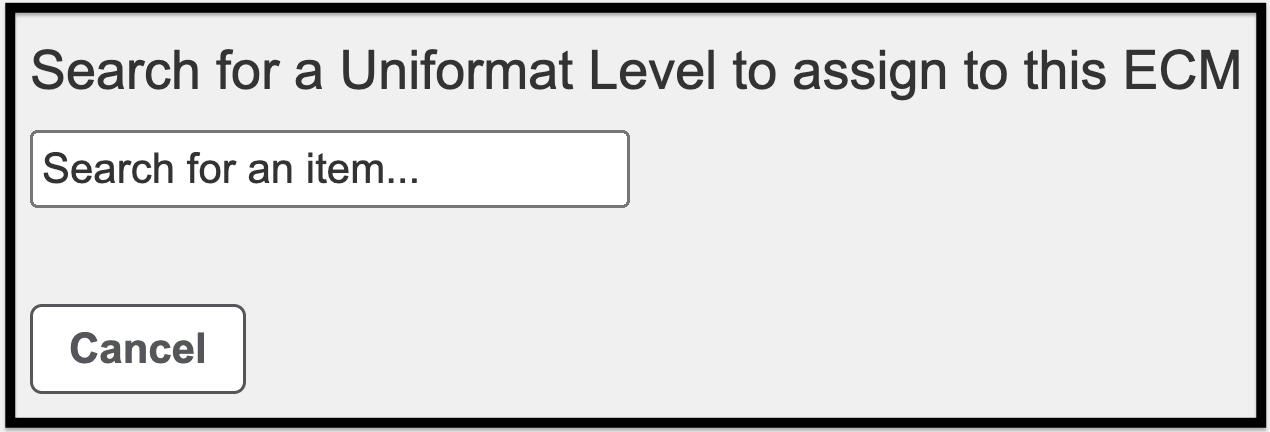
-
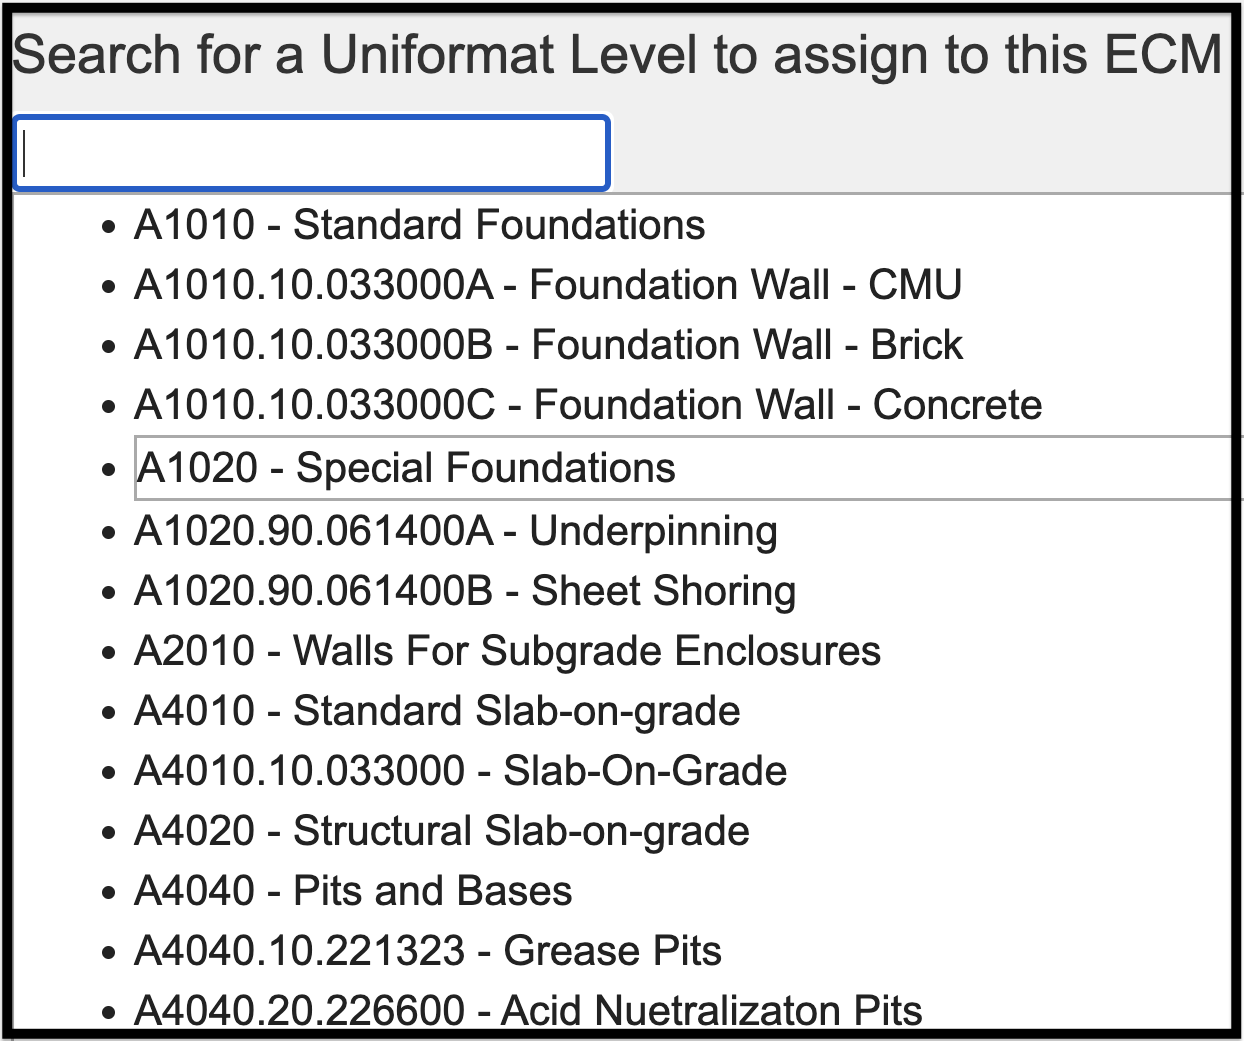
- This will direct you to a page to search for the UniFormat number you would like to attach the ECM item to.
-
- Click inside the search bar for all of the choices to appear.
-
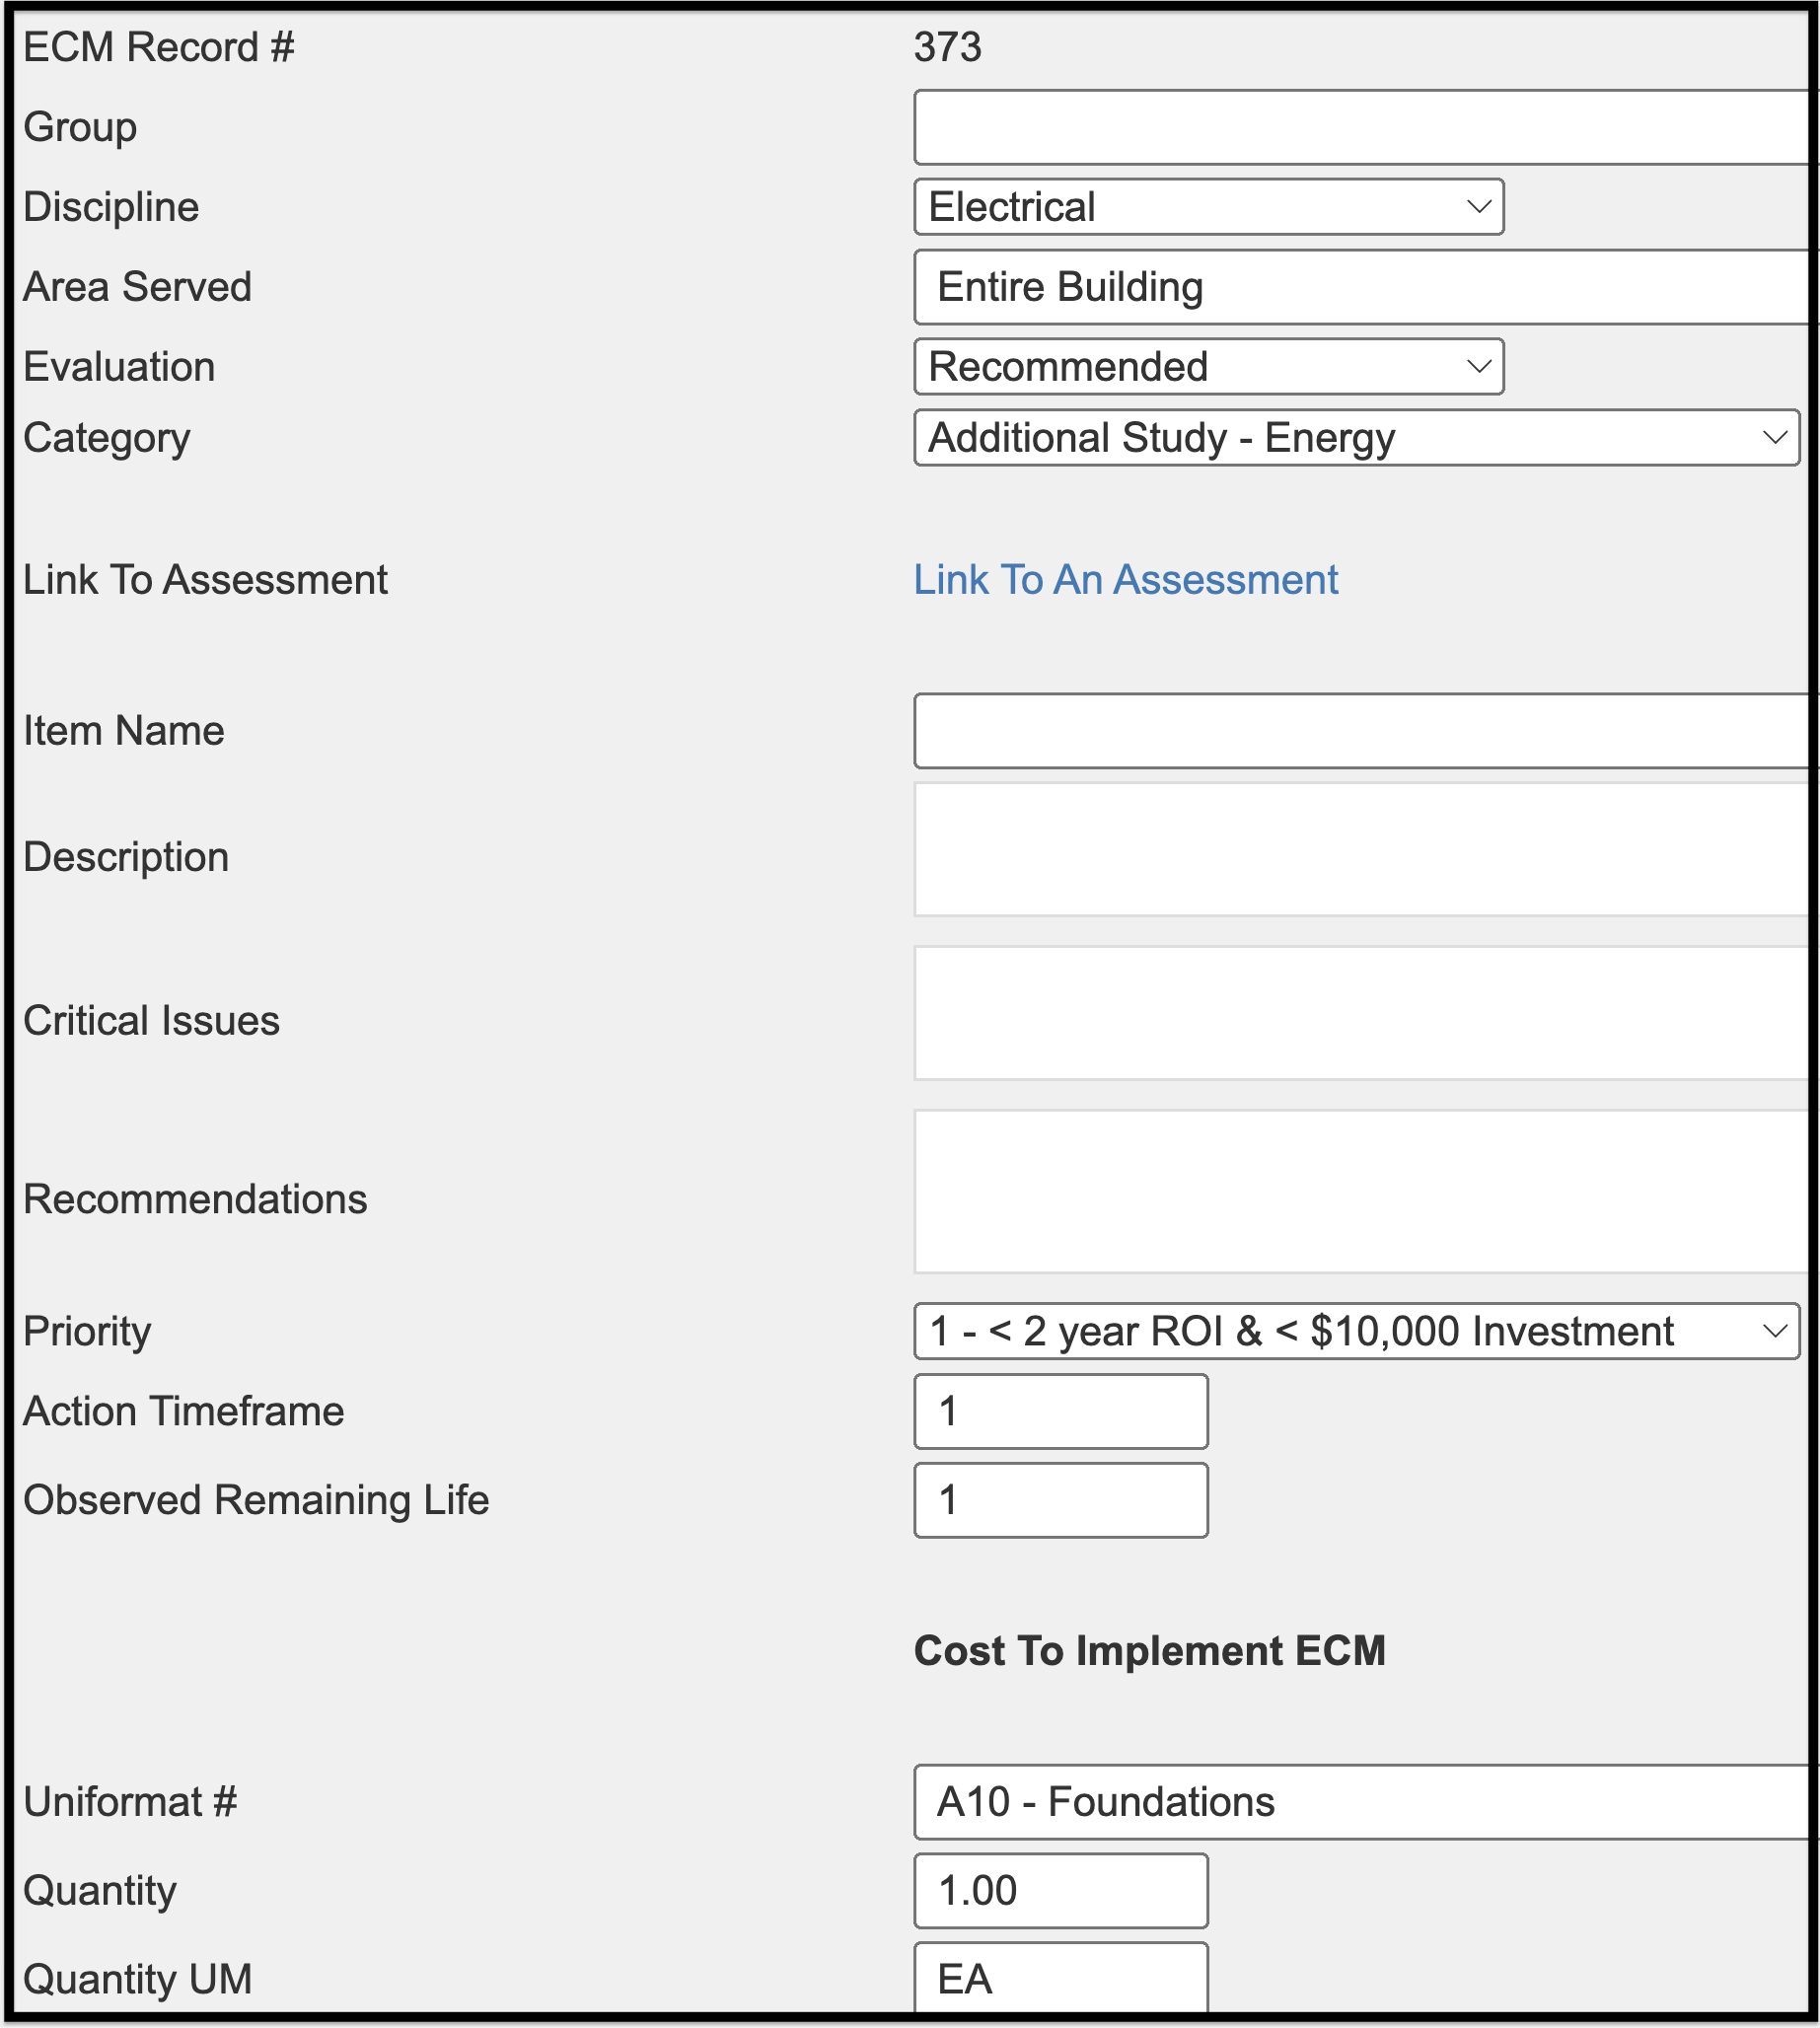
- Select the UniFormat number you need, and the Edit ECM Record page will open.
-
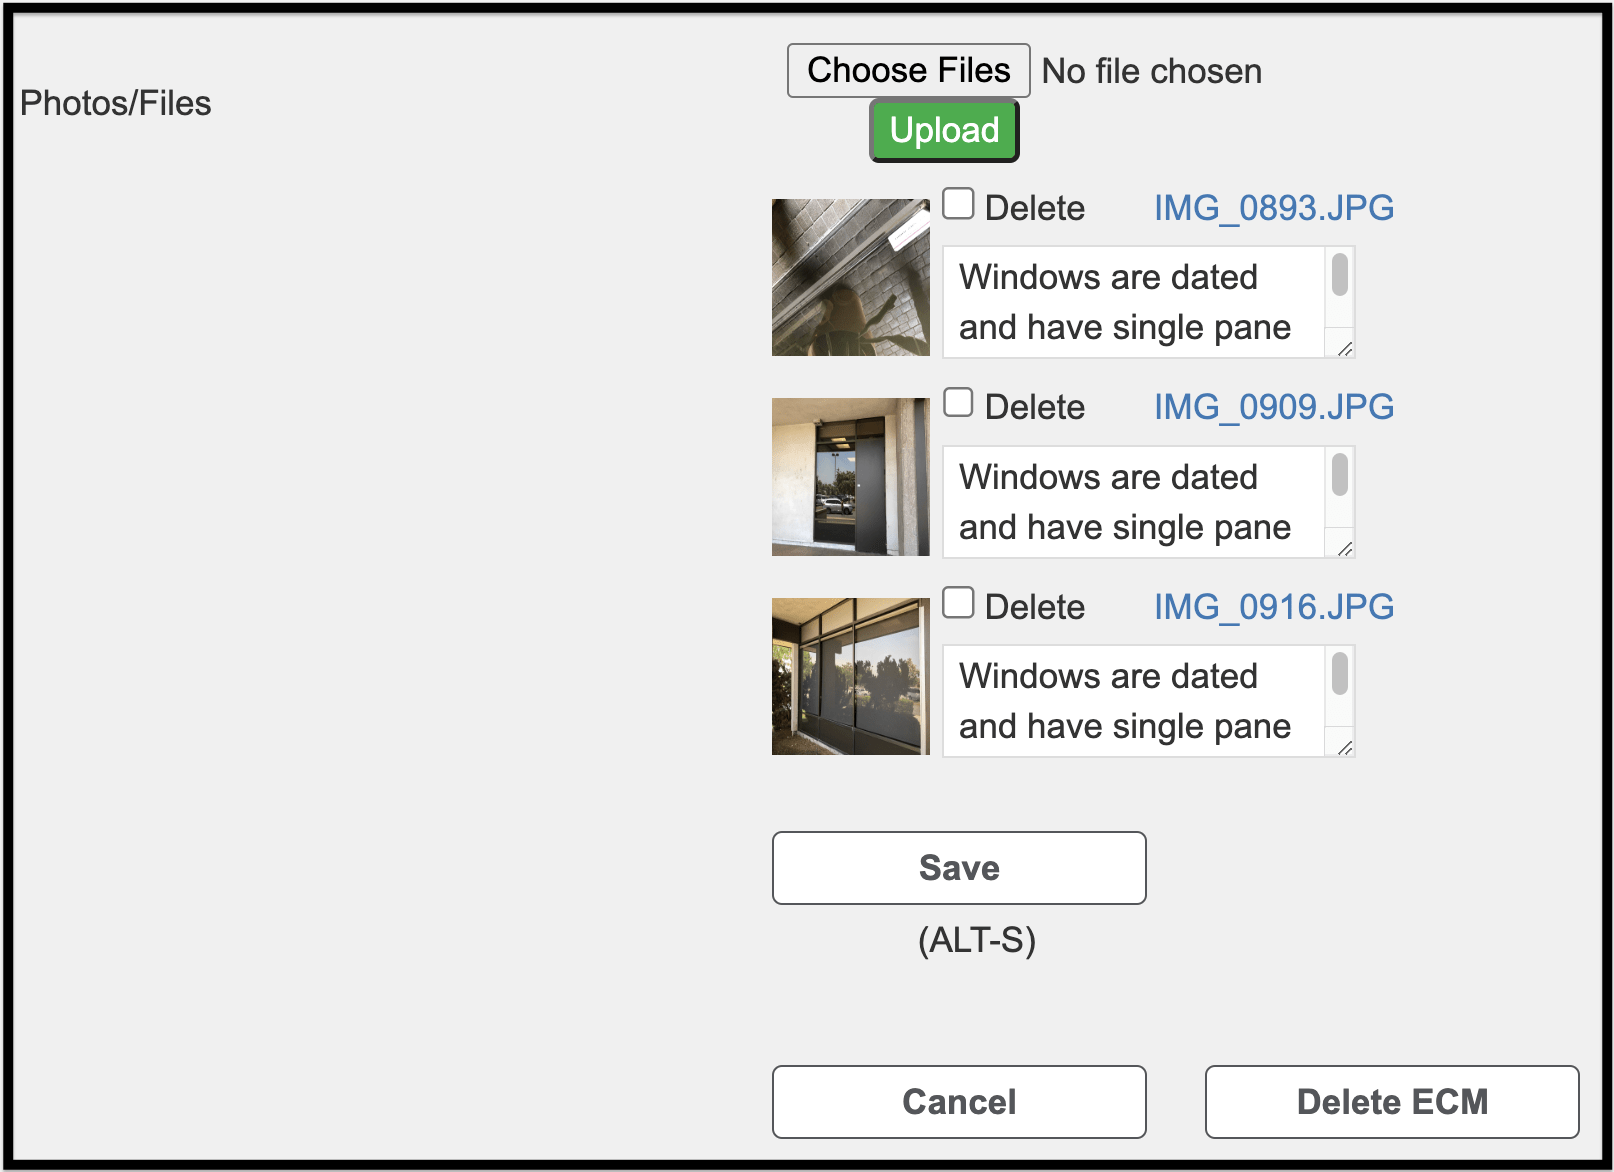
- Enter all necessary information for your ECM record and select Save.
-
- To cancel, select Cancel.
-
- To delete ECM, select Delete ECM.
-
- After selecting Save, Cancel or Delete ECM, you are redirected back to the ECM tab.
-
- If saved, the new ECM Report will be listed in the tab.
-
- Some of the calculation values are based on fields that are found in the Building General Info tab.
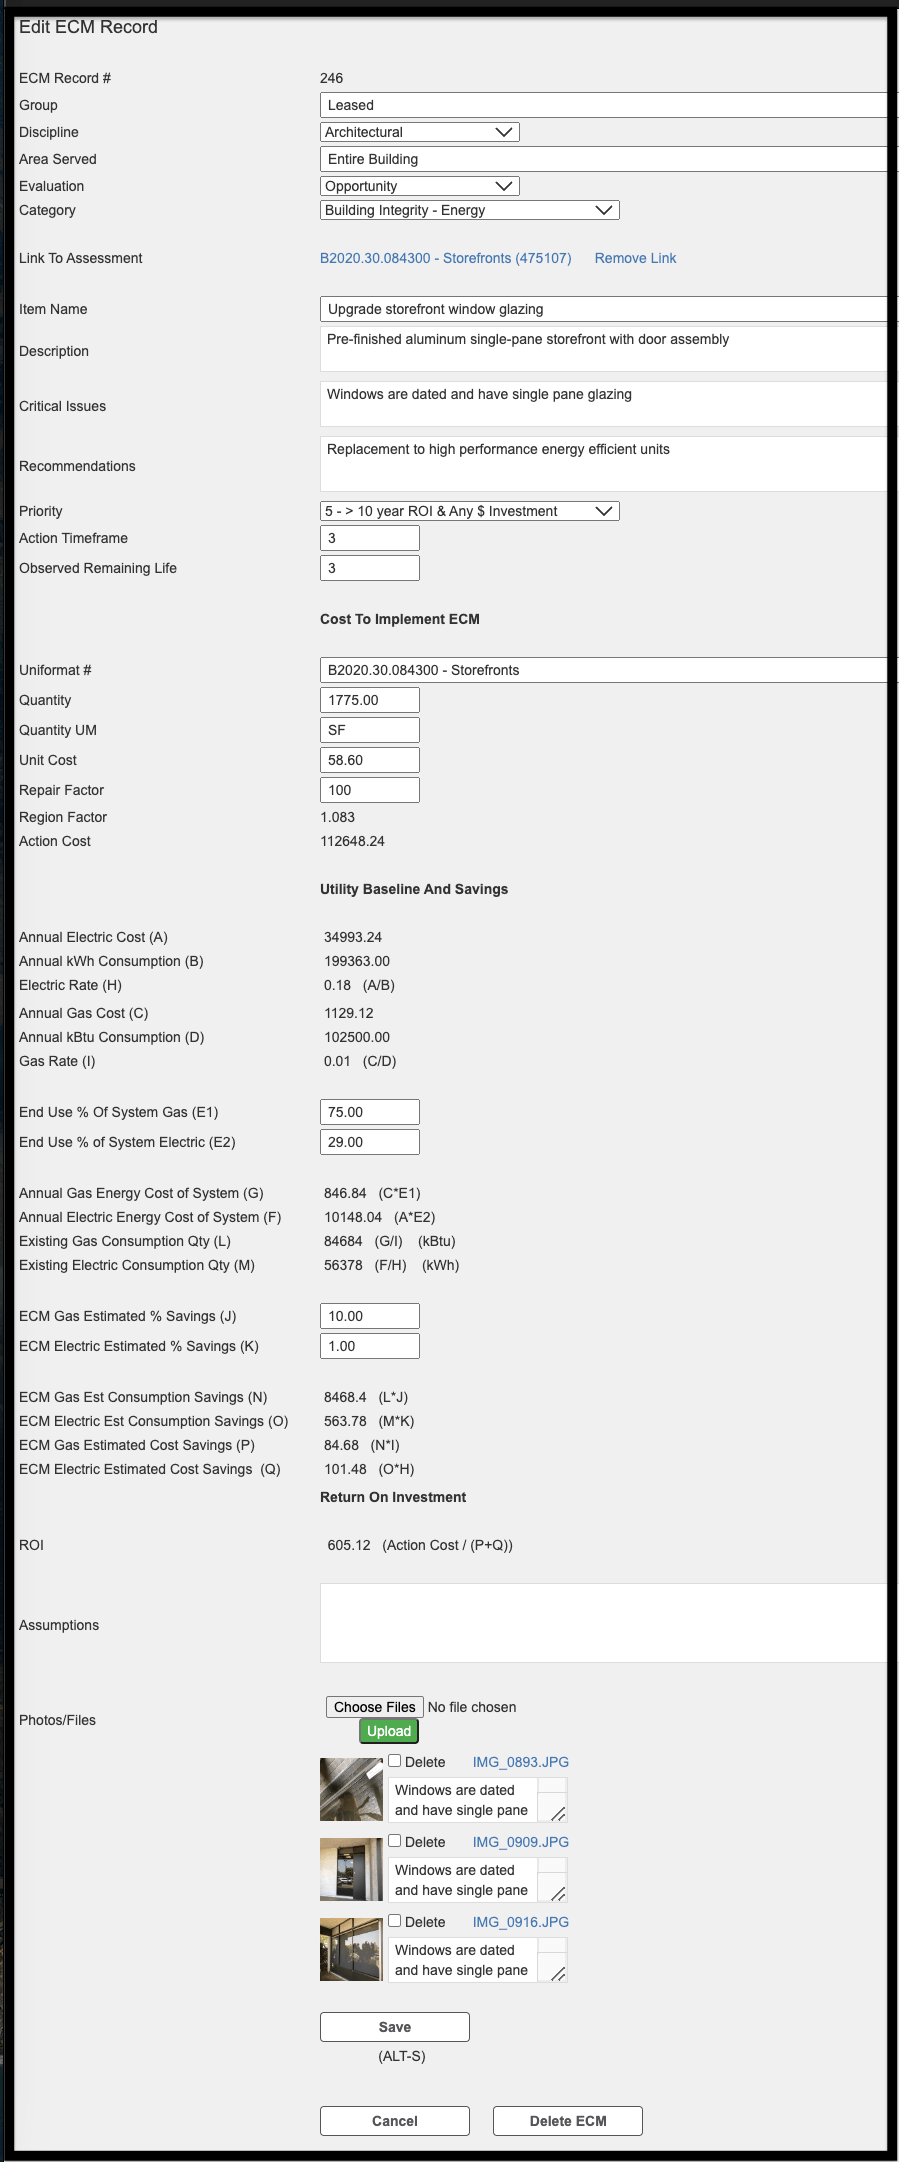
To edit an ECM record for a specific building, you would follow the path outlined below.


TCO Data #

For more information on the functionality of this tab, please refer to the TCO Module section of this guide.

Building Visualization #
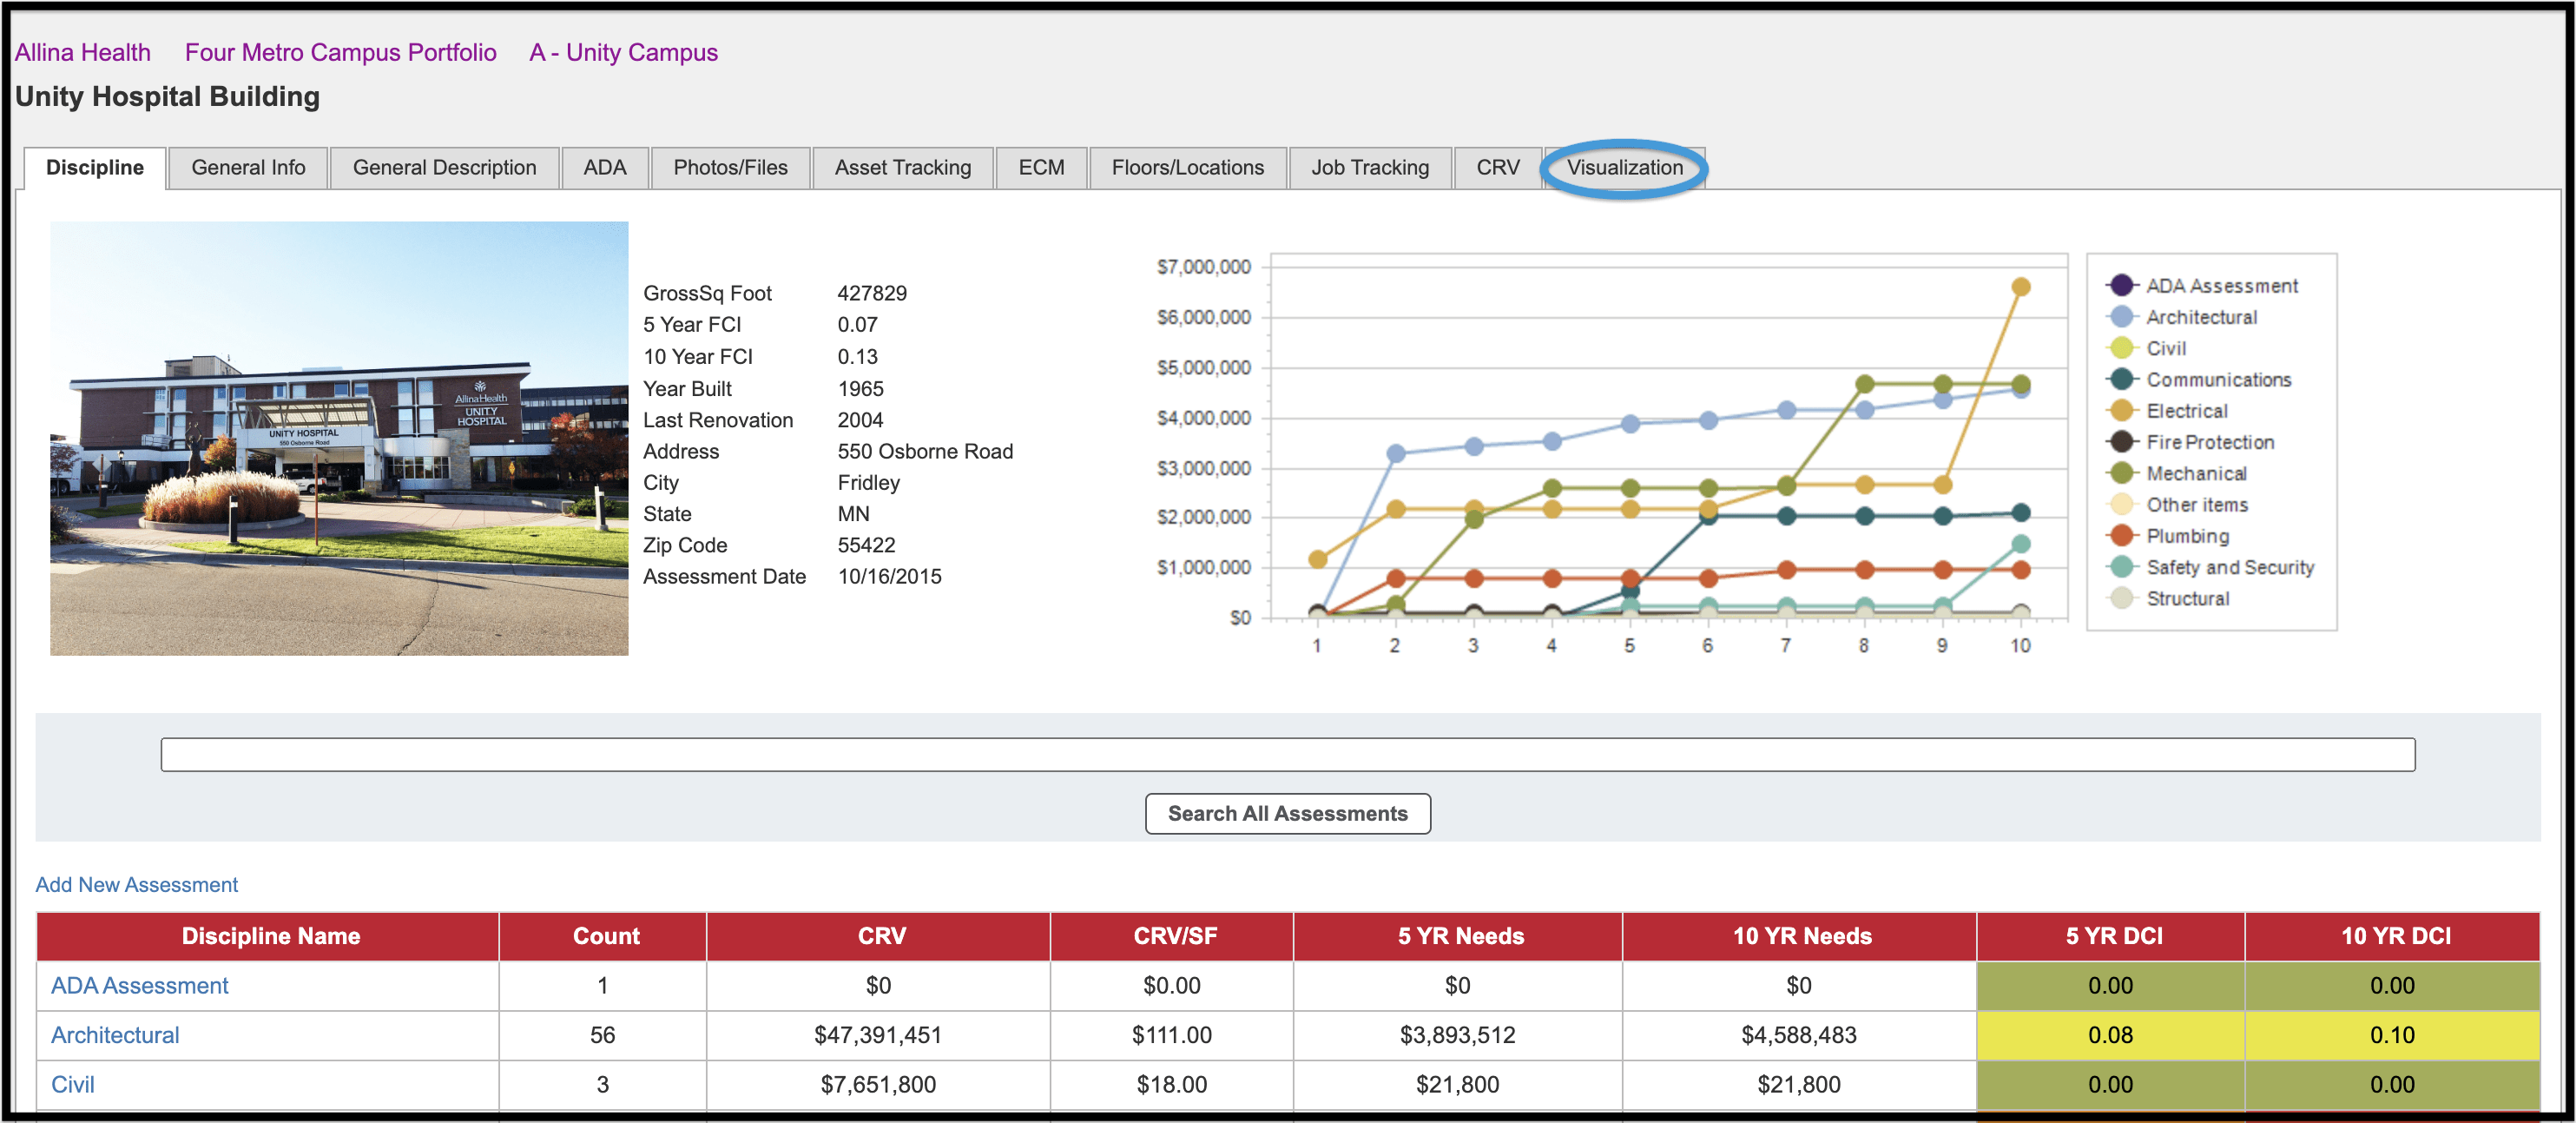
At the Building level, click on the Visualization tab and the graphic data illustrated below will be shown:
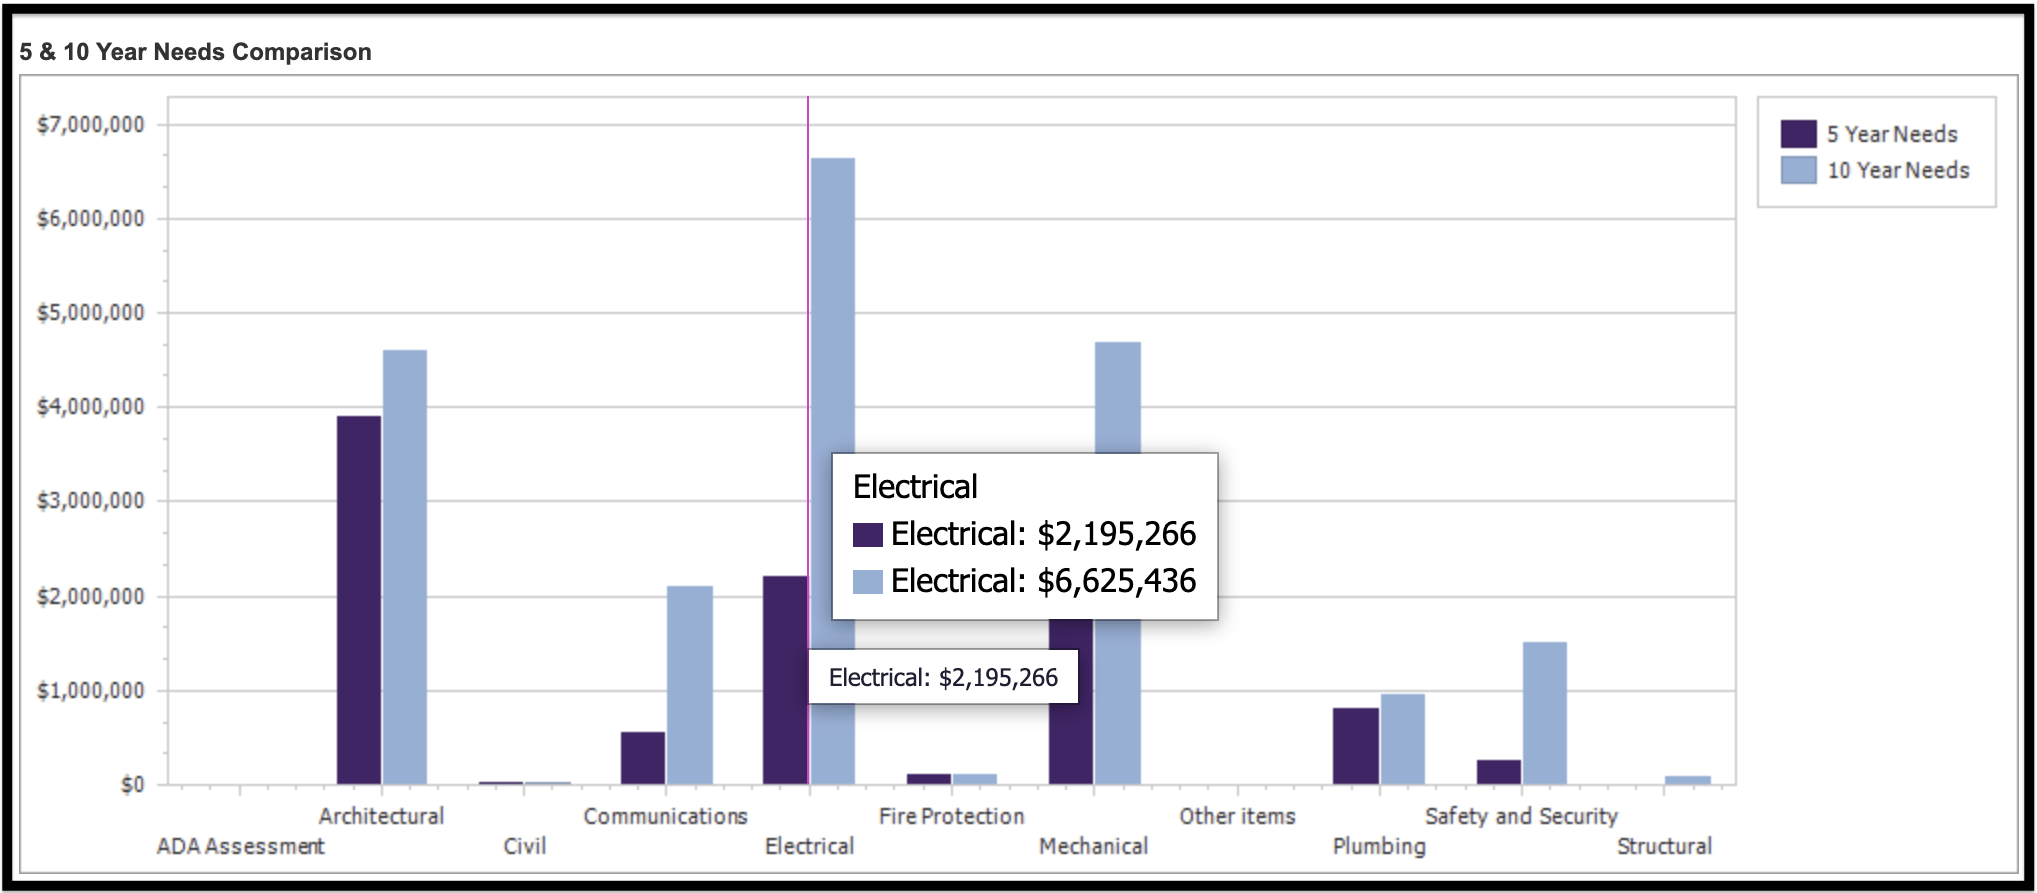
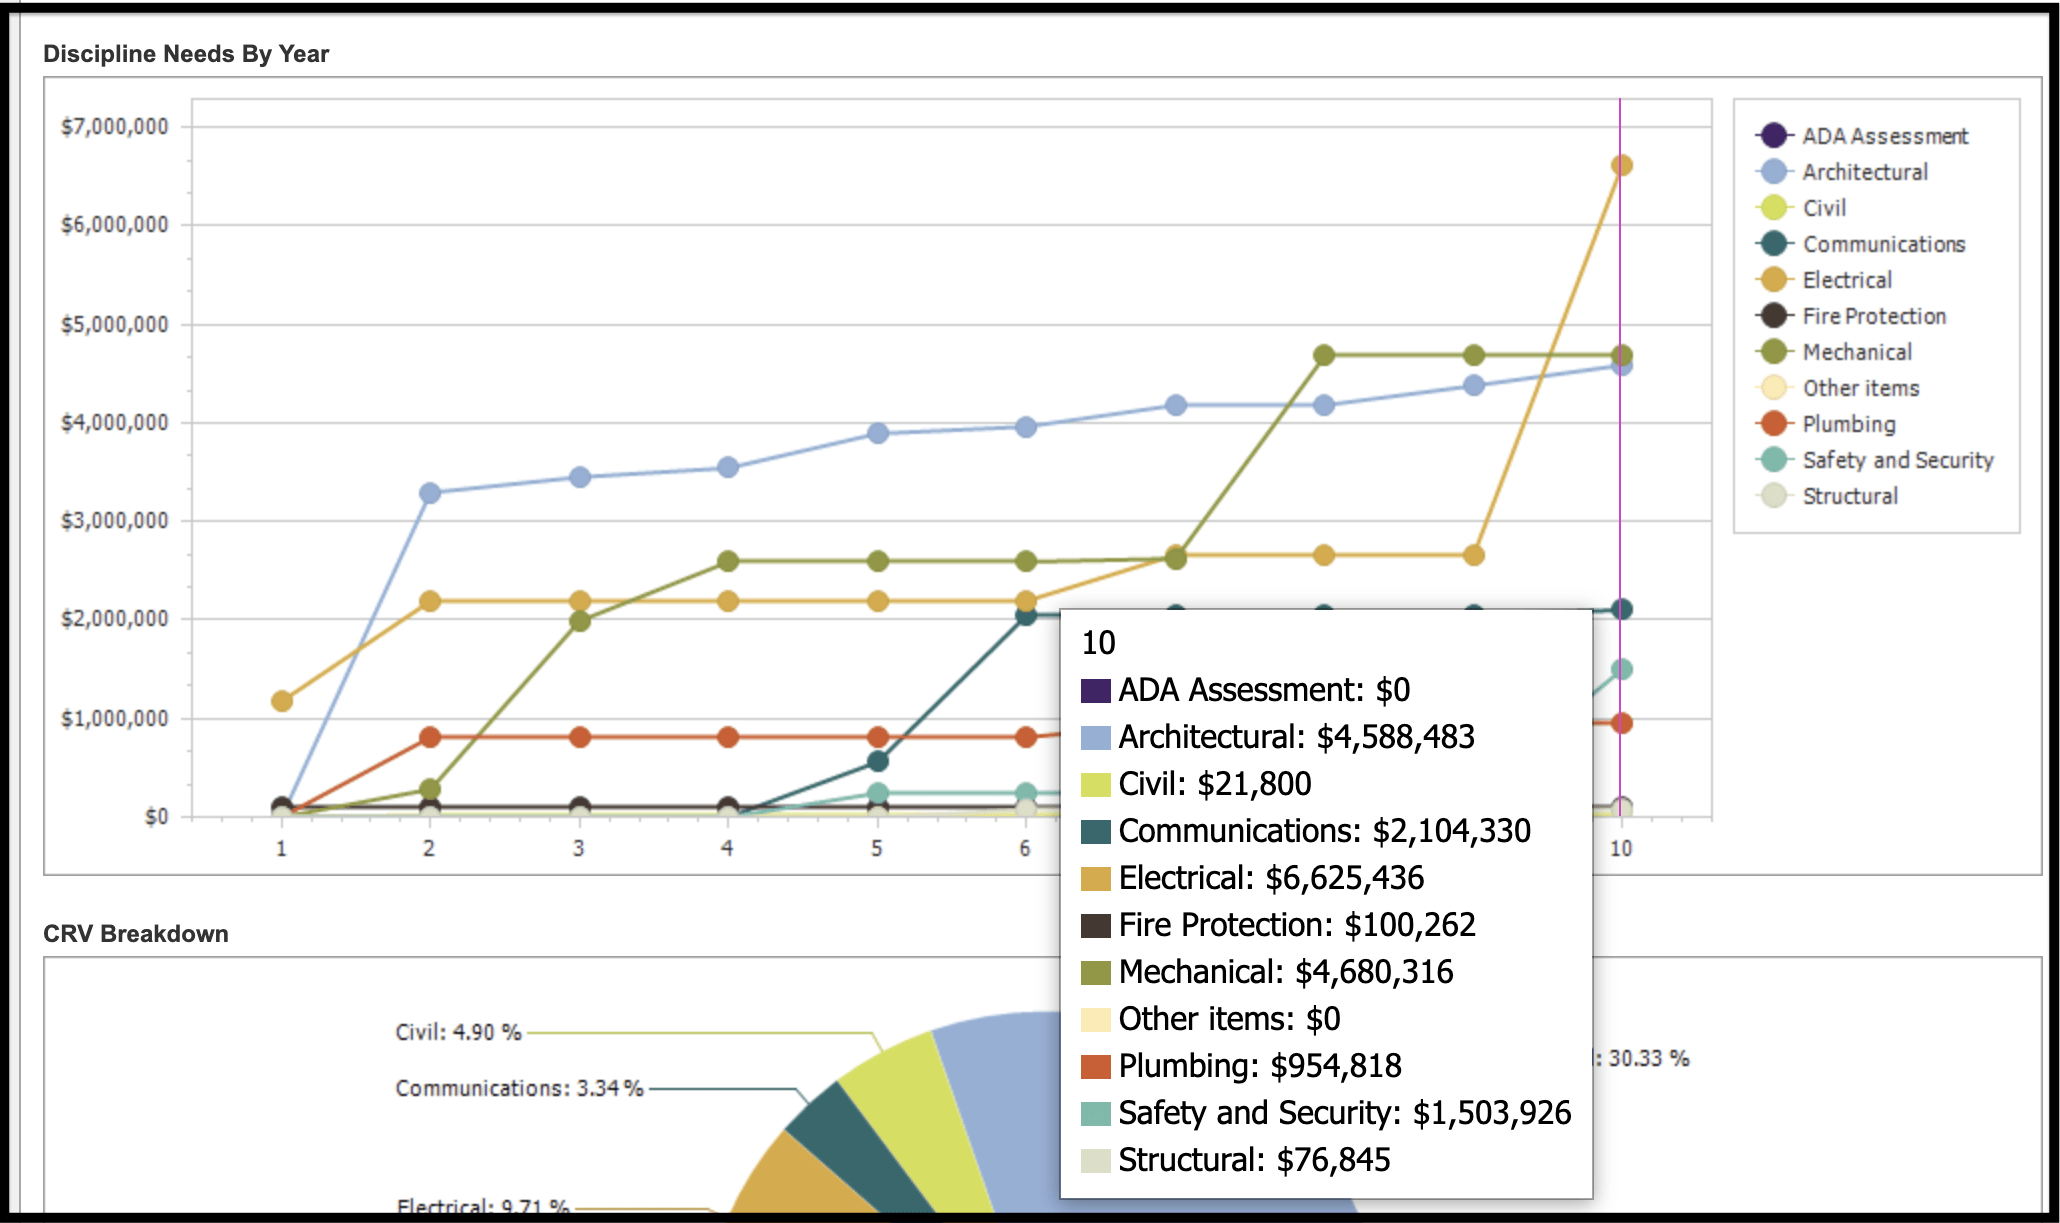
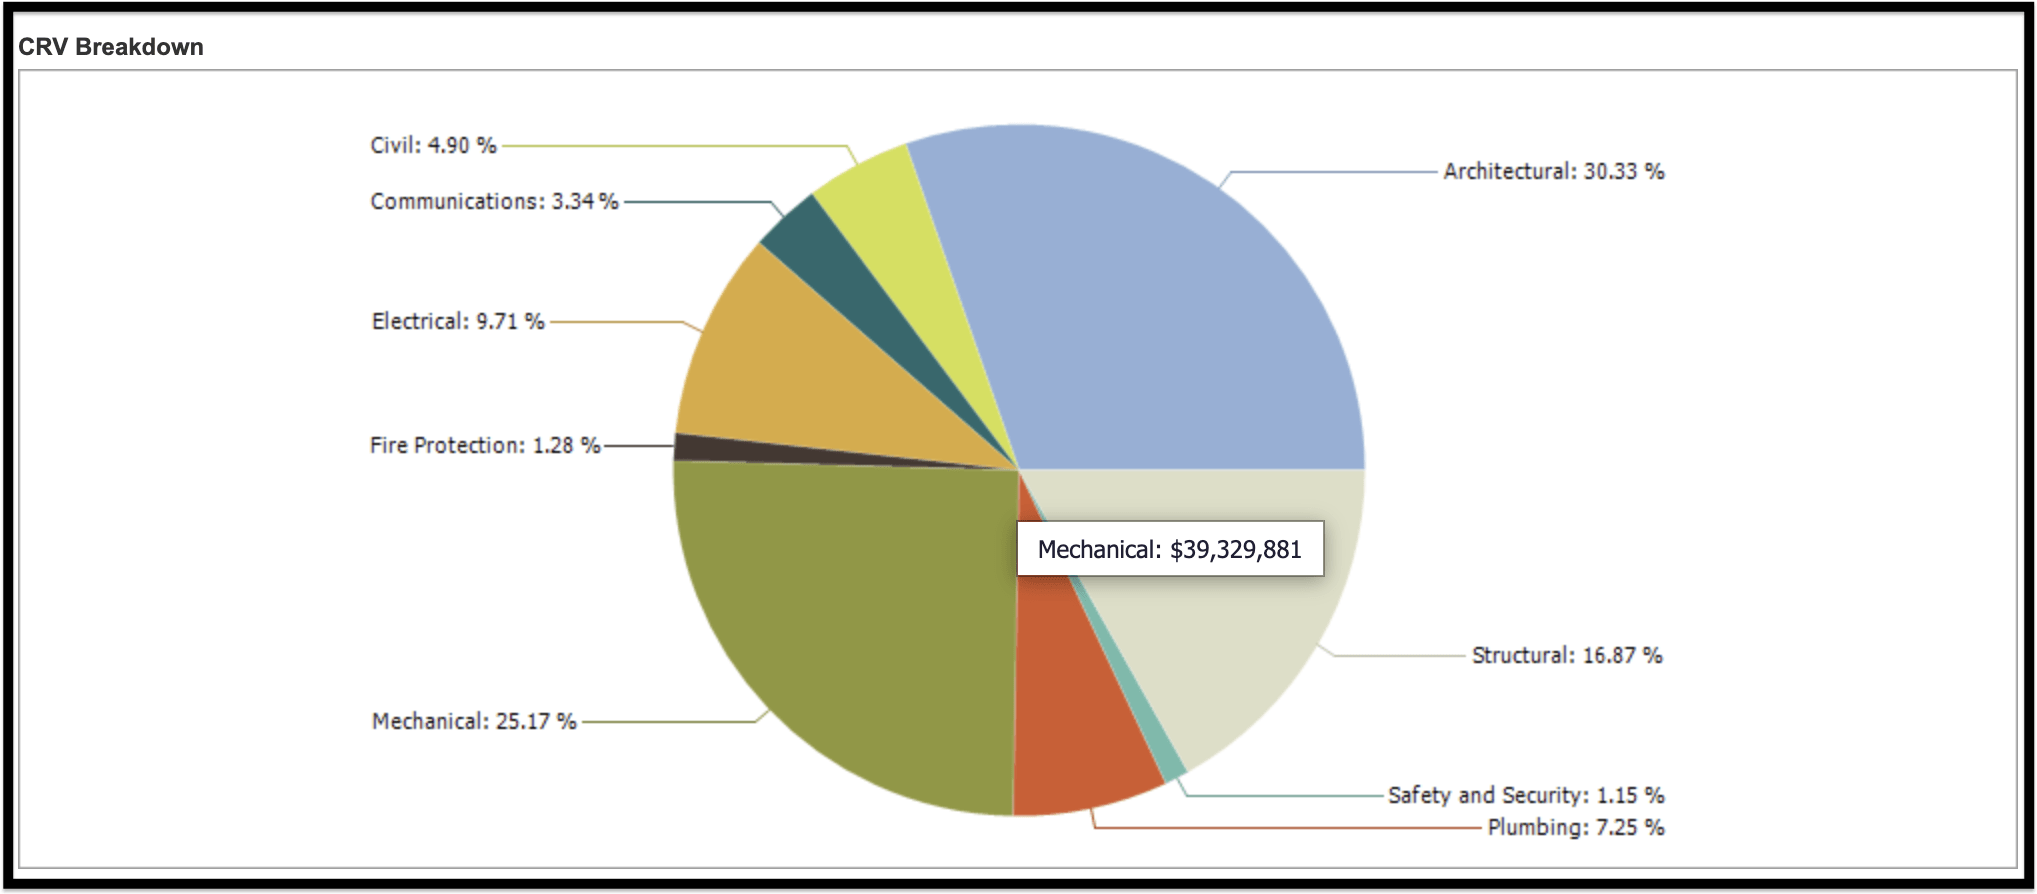

It is recommended that you save your work often. Navigating away from the page without saving your work can result in lost data.
© Copyright 2024, FOS of CannonDesign – All Rights Reserved – Confidential and Proprietary