

Estimating #
In This Section #
- Introduction
- Common Cost Data
- Estimating Library
- Data Management
- Search
- Groups
- Filters
- Export
- Customize Layout
- Data Management
- Create Project
- Project Information
- Project Setup
- Project Attachments
- Project Library
- Reports
- Create Estimate
- Estimate Information
- Target Value Design
- Estimate Clarifications
- Estimate WBS
- Estimate Contents
- Estimate Markups and Totals
- Estimate Attachments
- Estimate Reports
- Create External Cost
- Cost Information
- Target Value Design
- Cost Clarifications
- Cost WBS
- Cost Contents
- Cost Markups and Totals
- Cost Attachments
- Cost Reports
- Create Analysis
- Analysis Information
- Analysis Table
- Analysis Graph
- Admin
- Estimating Client Admin Options
- Application Customization
- Team Directory Maintenance
- Classification Maintenance
- Unit of Measure Maintenance
- Database Maintenance
- Resources
- Crews
- Rate Tables
- Items
- MF/UF Descriptions
- Item Group Links
- Linked PDF Files (Global)
- Markups
- Escalation Maintenance
- Item Adjustments
- SimpleBudget Adjustments
- Calculators
- Manage Variables
- Reference Estimate Types/Defaults
- Manage Calculators
- Estimating Client Admin Options
Introduction #
A centralized cost data approach is the foundation of the FOScore® Estimating module. The features described below include importing and editing costs; creating, copying and comparing estimates; analyzing data; and generating reports. The data grids of the module provide an organized format and structure that function much like a spreadsheet with rows and columns but avoids the challenge of formula errors and inconsistent or outdated pricing.
Common Cost Data #
As with other modules in the FOScore® suite, the underlying common cost data that informs the Estimating module is the Item Catalog, as shown below:
- FOScore®
- Assets module
- Assessment Action Items–comprised of catalog items from the FOScore® database
- Estimating module
- Estimate Contents
- Assessment Action Items*
- SimpleBudget–comprised of catalog items from the FOScore® database (not including demolition)
- Item Catalog
- Cost Database Viewers
- Simplebid®
- SimpleBudget
- Estimate Contents
- Assets module
The Item Catalog is a 17,000+ item database based on labor rates, labor productivity, and materials. The FOS estimating team maintains and adjusts this data set as market factors fluctuate. When labor rates and material costs are updated, Item Catalog-dependent costs are adjusted.
Example: An increase in carpenter labor rates would result in result in an adjustment in the following:
- Assessment Action Item
- Acoustic Tile Ceiling – ACT 2 x 2
- SimpleBudget
- Exterior Utility Double Door, Frame and Hardware
- Simplebid®
- 2 x 10 Blocking
The system makes use of both MasterFormat and UniFormat classifications.
*With the Estimating module, FOScore® subscribers can bring deferred maintenance deficiency (DMD) records from a Facility Condition Assessment into an actual construction estimate.
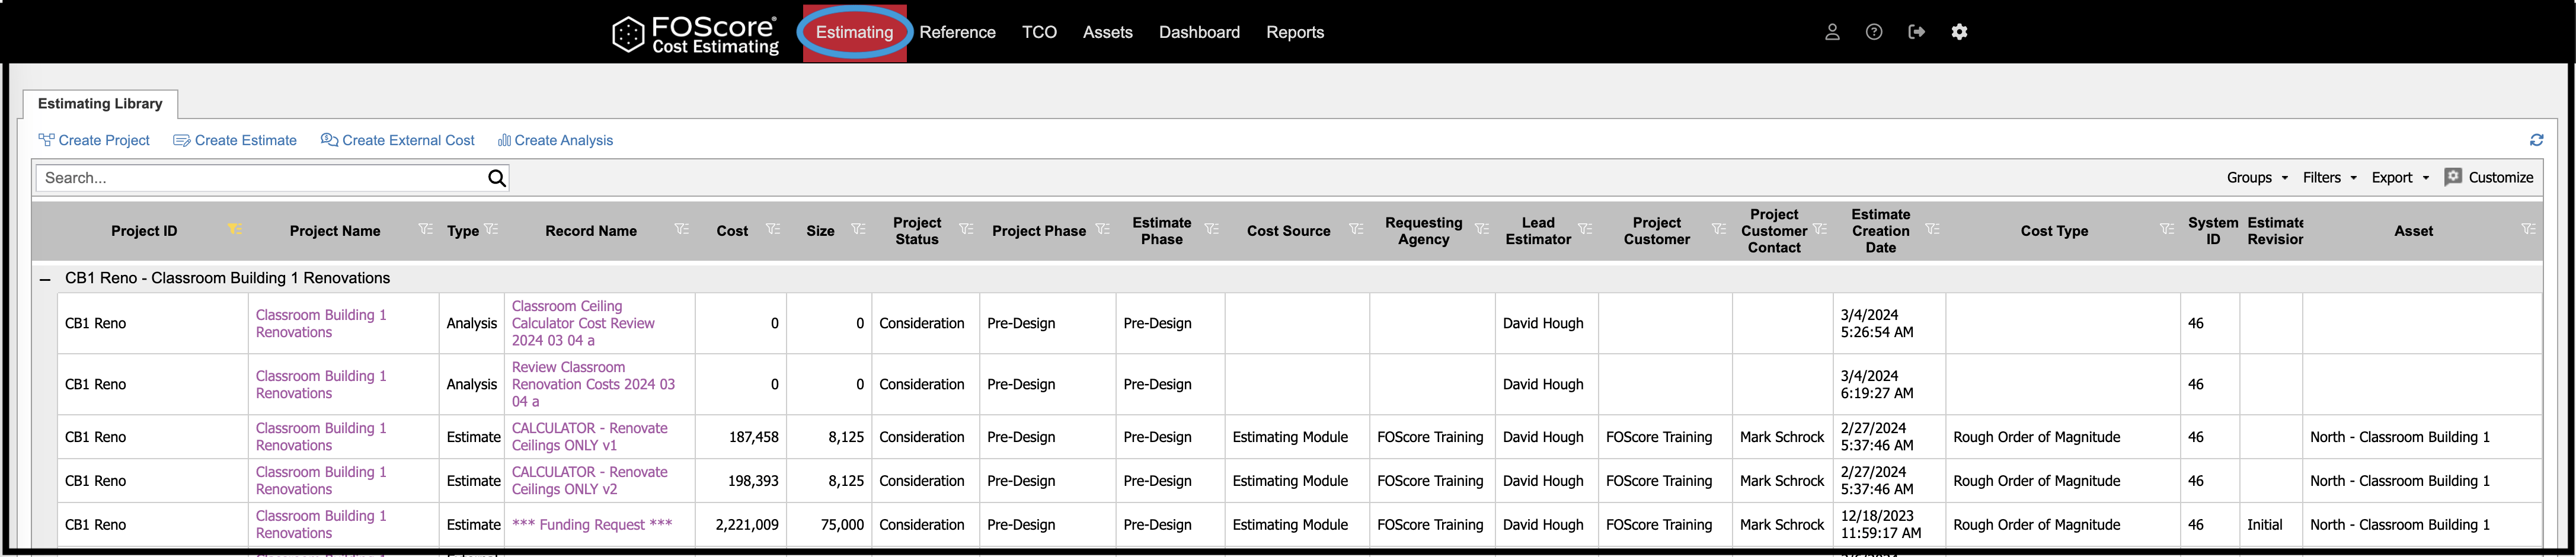
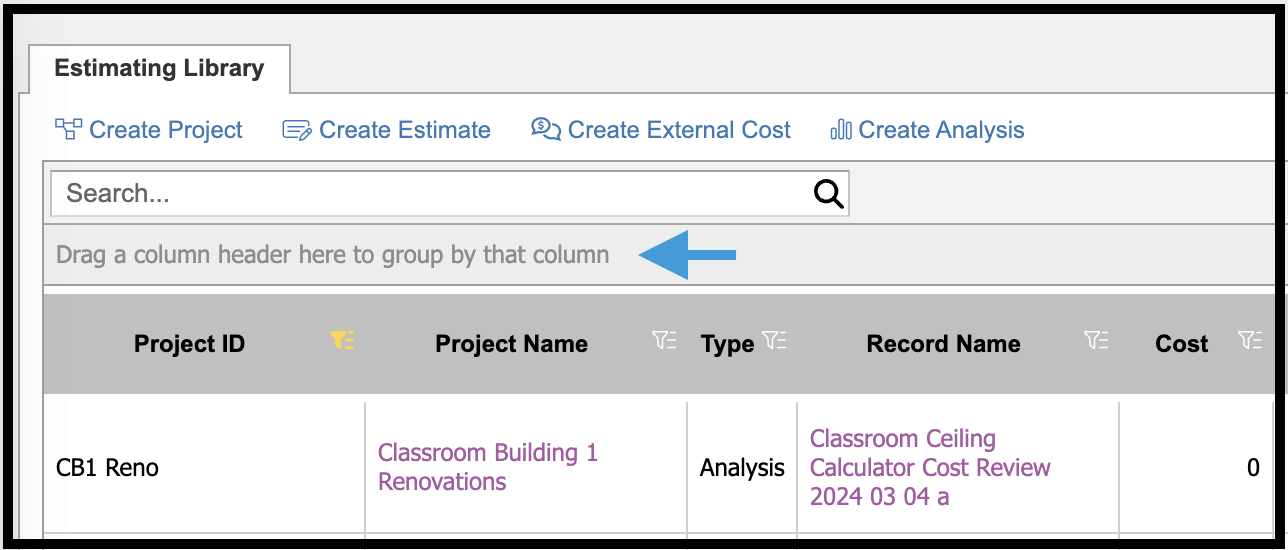
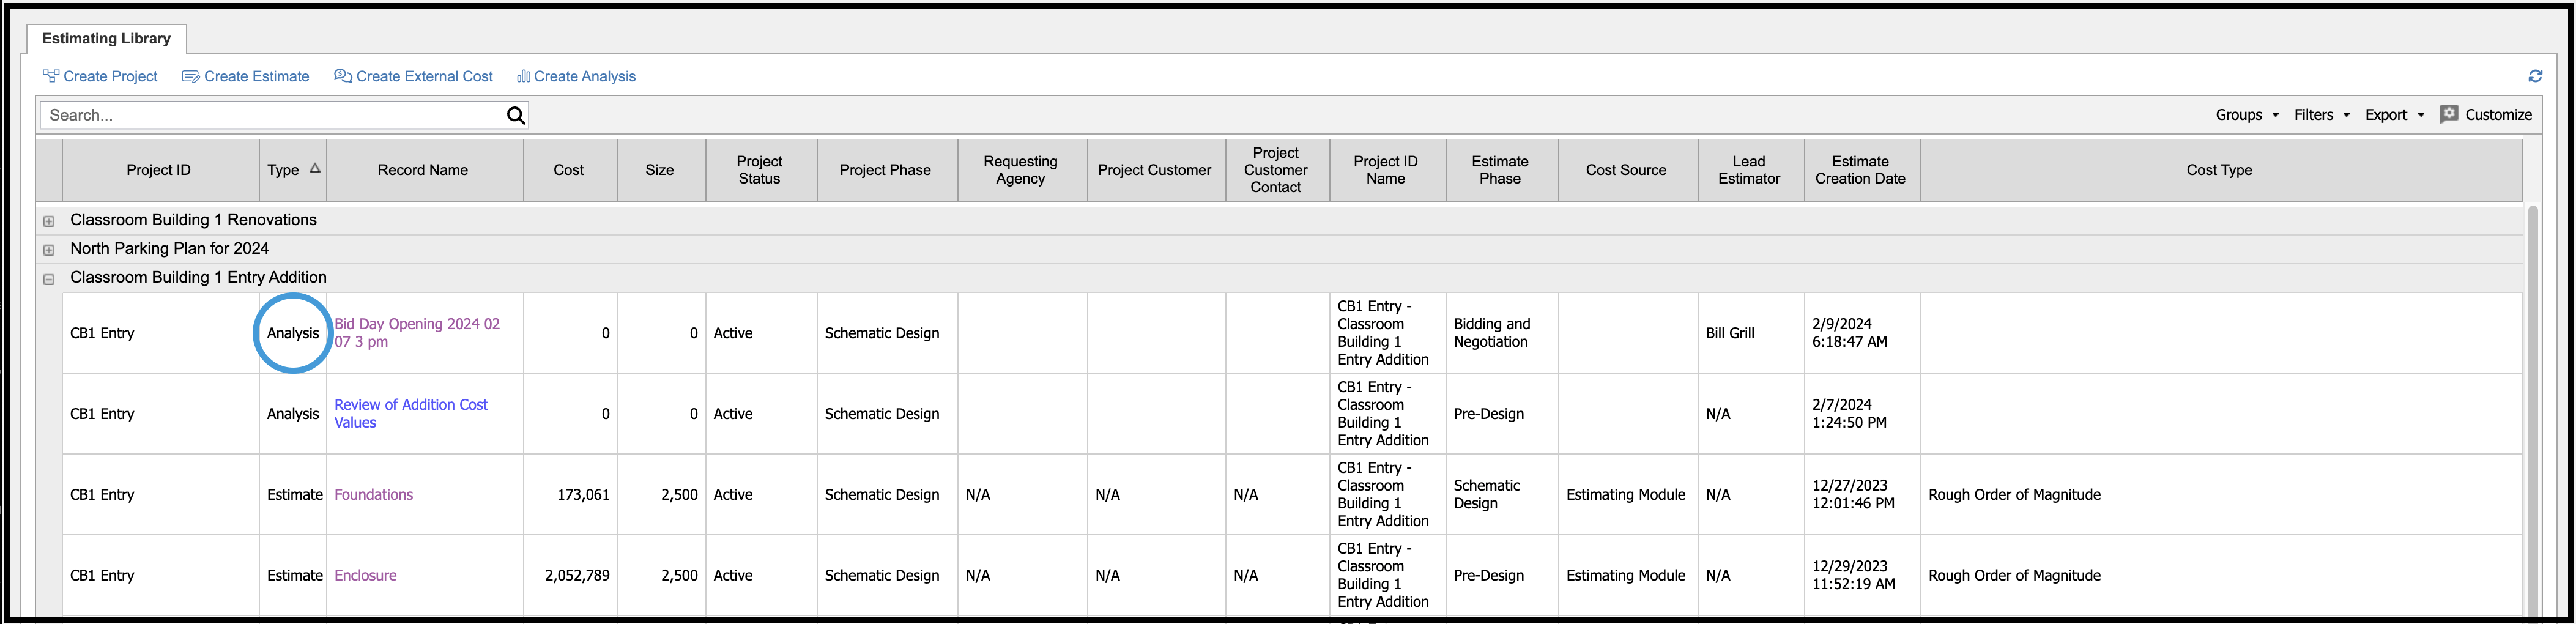
Estimating Library #
The Estimating Library is the main landing page of the Estimating module. It serves as the gateway to all projects, project estimates, external costs, and analyses.

Within the Estimating Library grid, the following information can be found:
| Project ID | Project Name | Type |
| Record Name | Cost | Size |
| Project Status | Project Phase | Requesting Agency |
| Project Customer | Project Customer Contact | System ID |
| Estimate Revision | Estimate Phase | Cost Source |
| Lead Estimator |
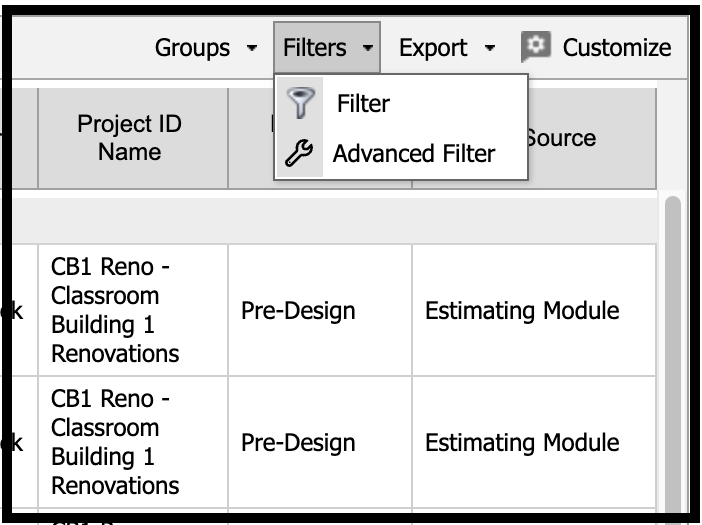
Advanced Grid Controls #
In the upper right area of the grid, several data management features are available to create a user-friendly operating experience while honing in on the specific details you need to have at your fingertips when creating projects, estimates, and reports. The features, also present in other areas throughout the software, are described below.
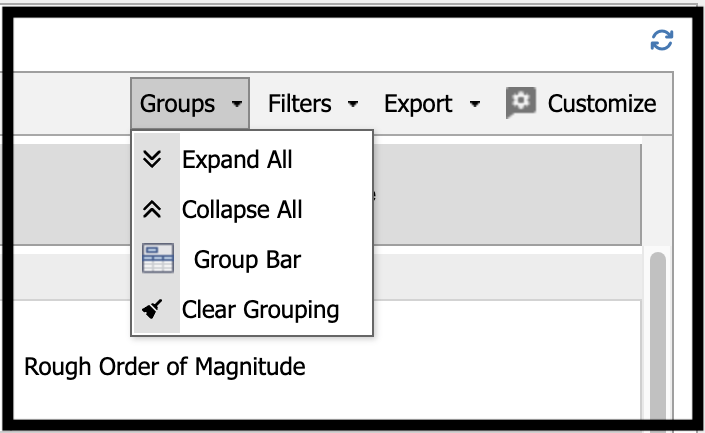
Groups #
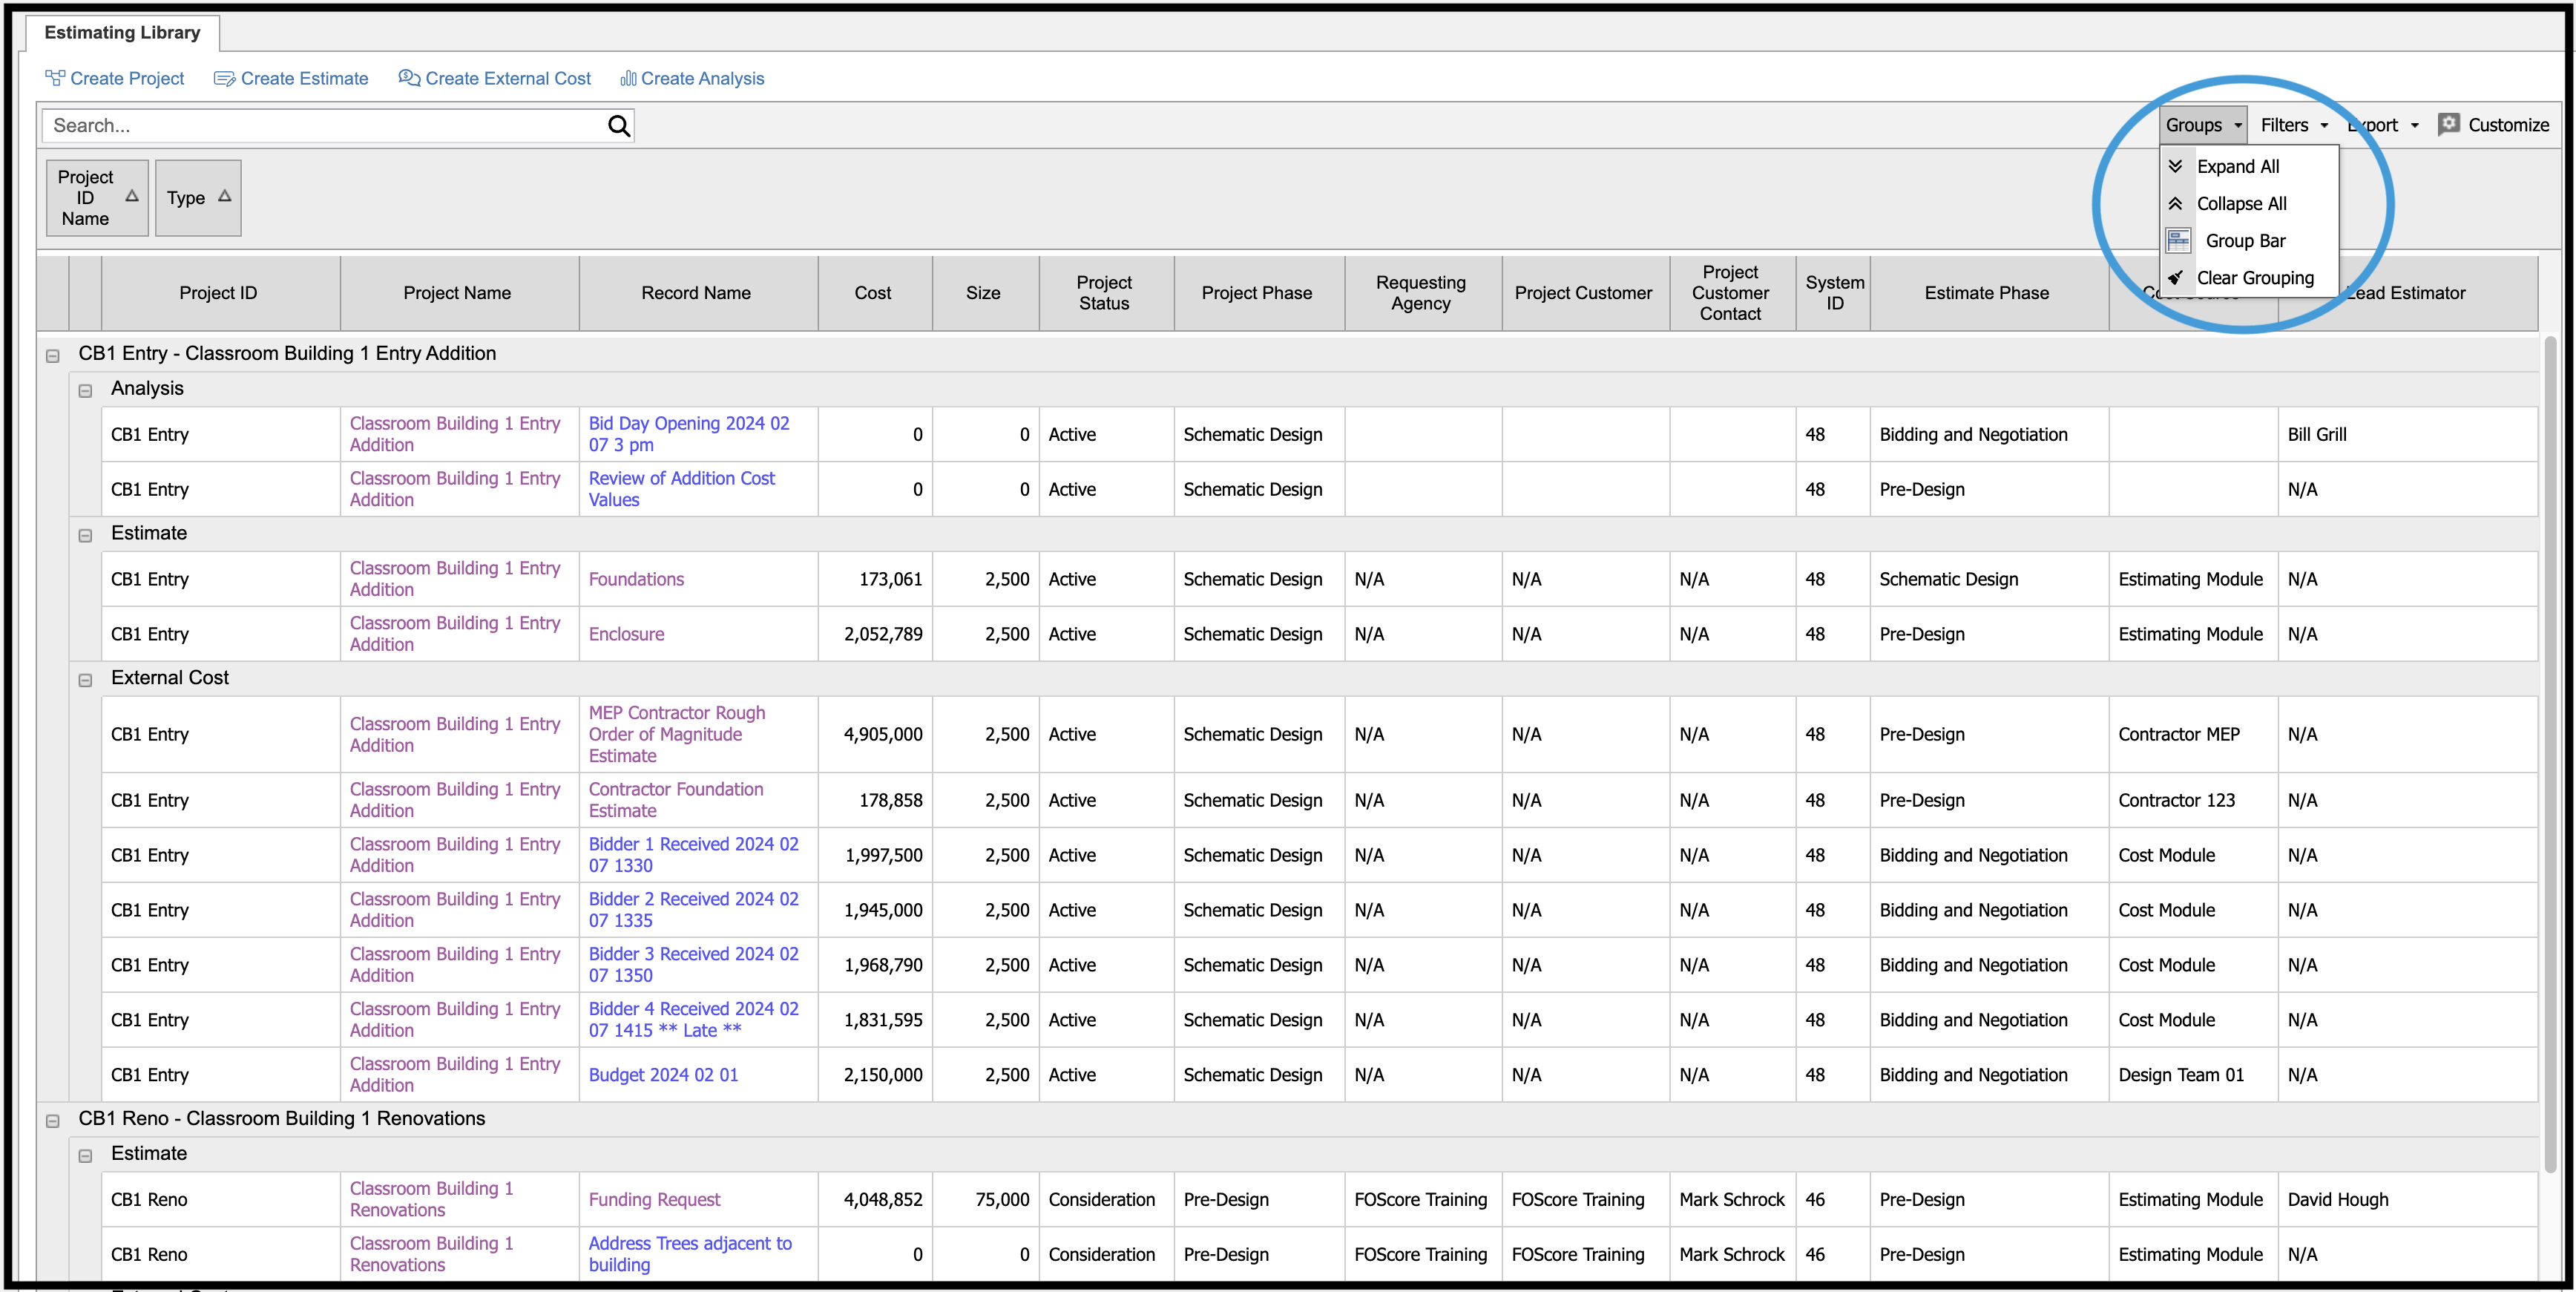
The image below shows the Estimating Library grid using the Type, Project ID, and Project Name fields to create data groups.
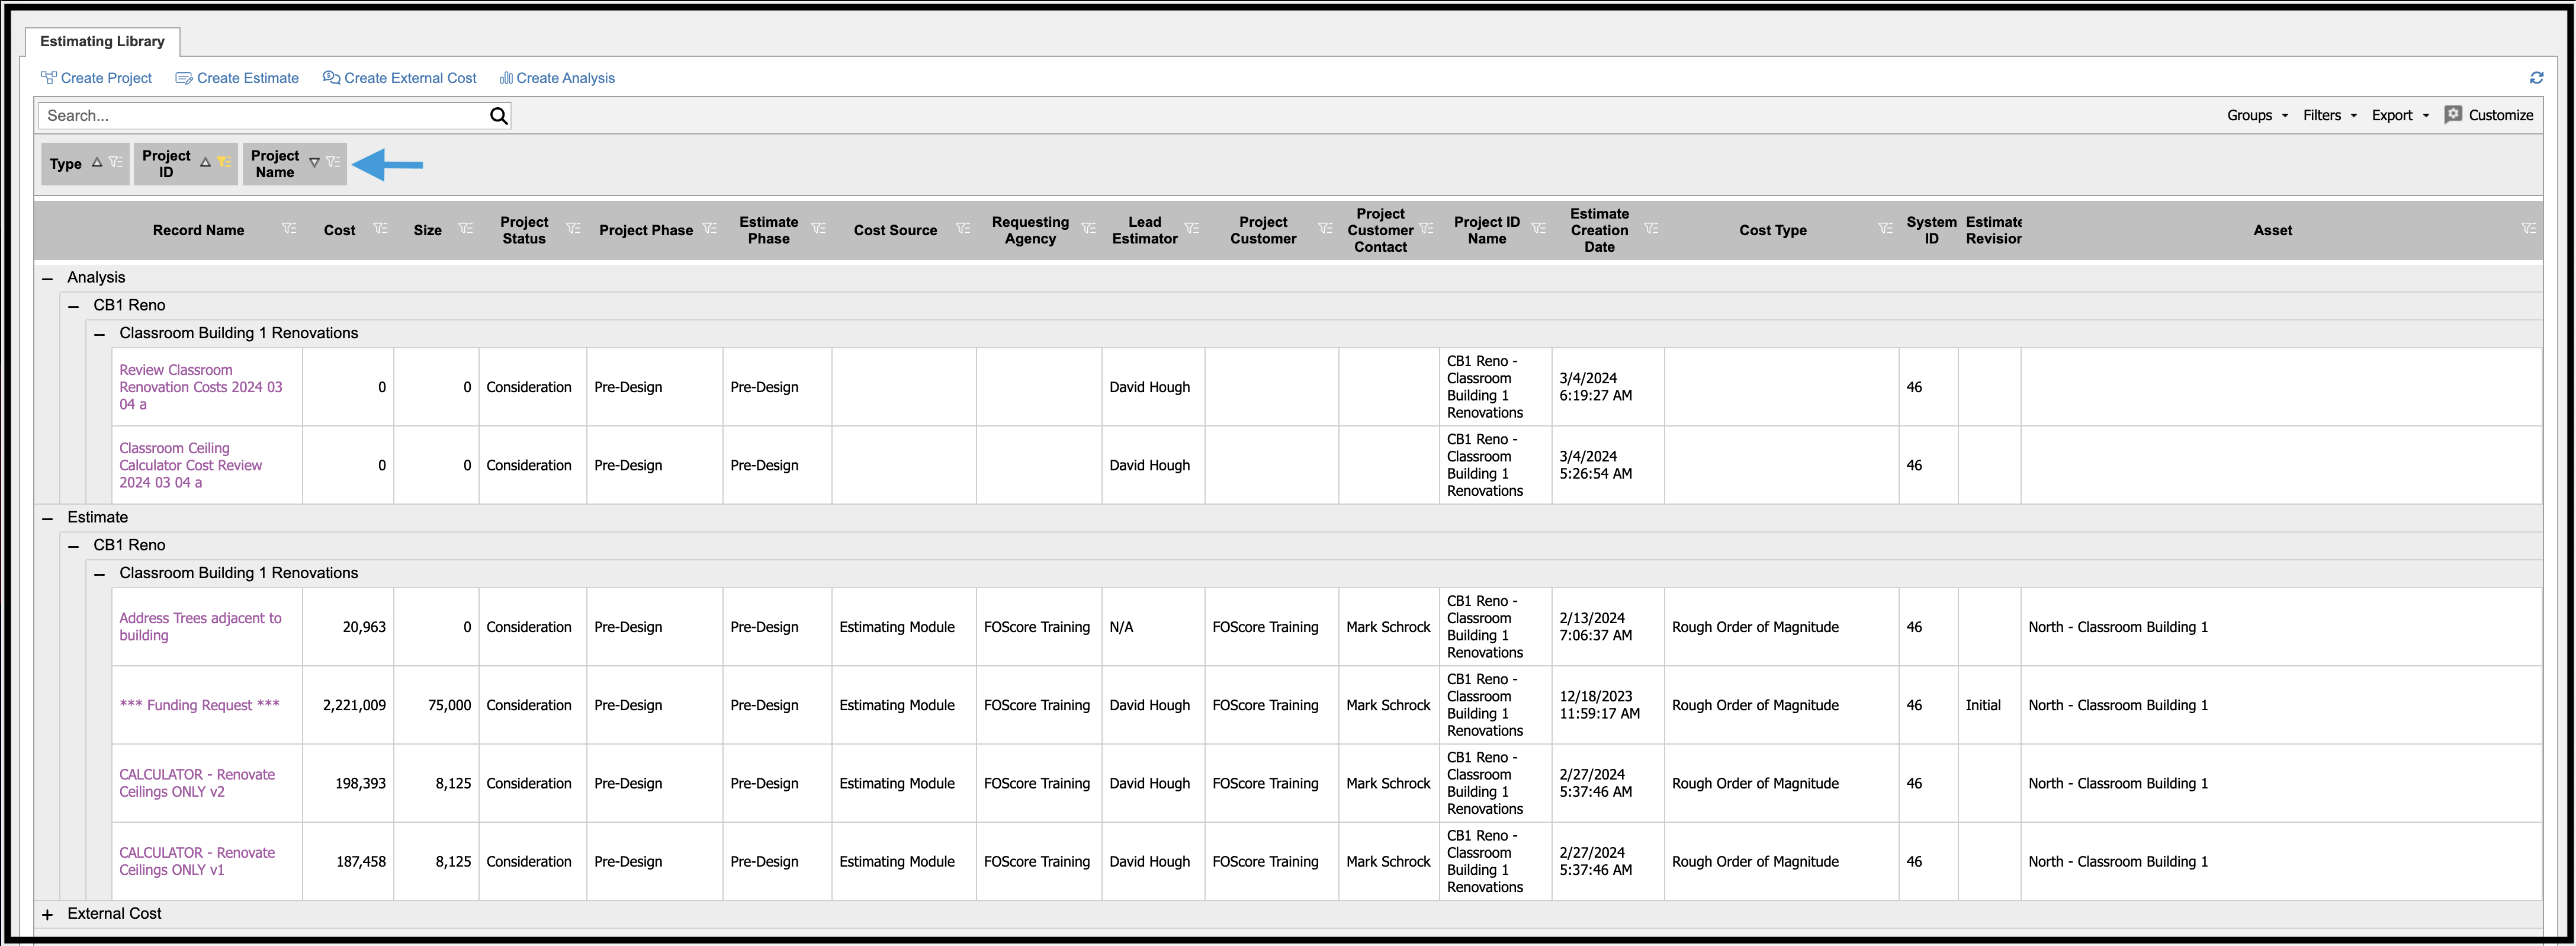
Grouping can also be achieved by dragging column headers into the grouping bar, as shown below.
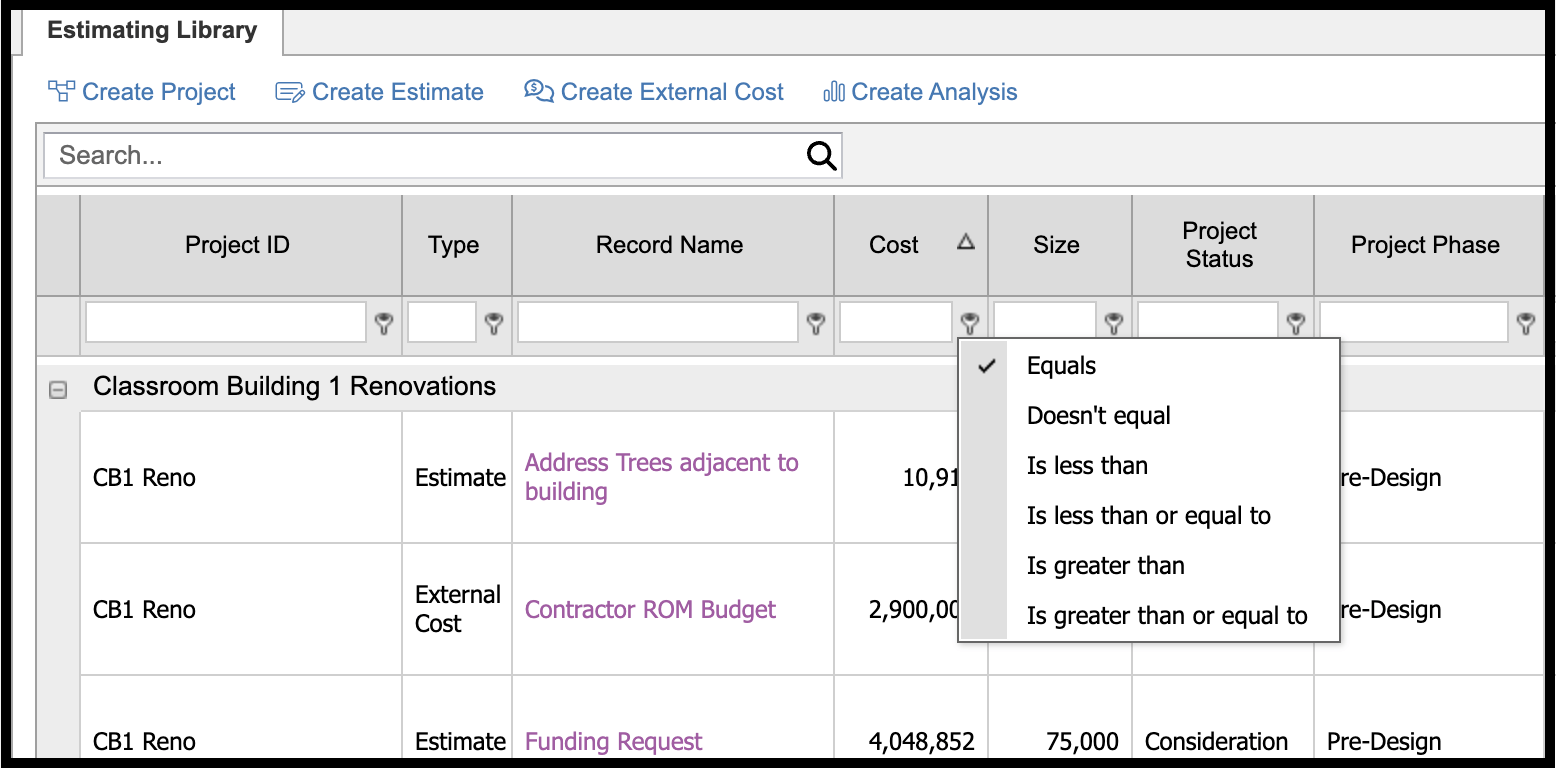
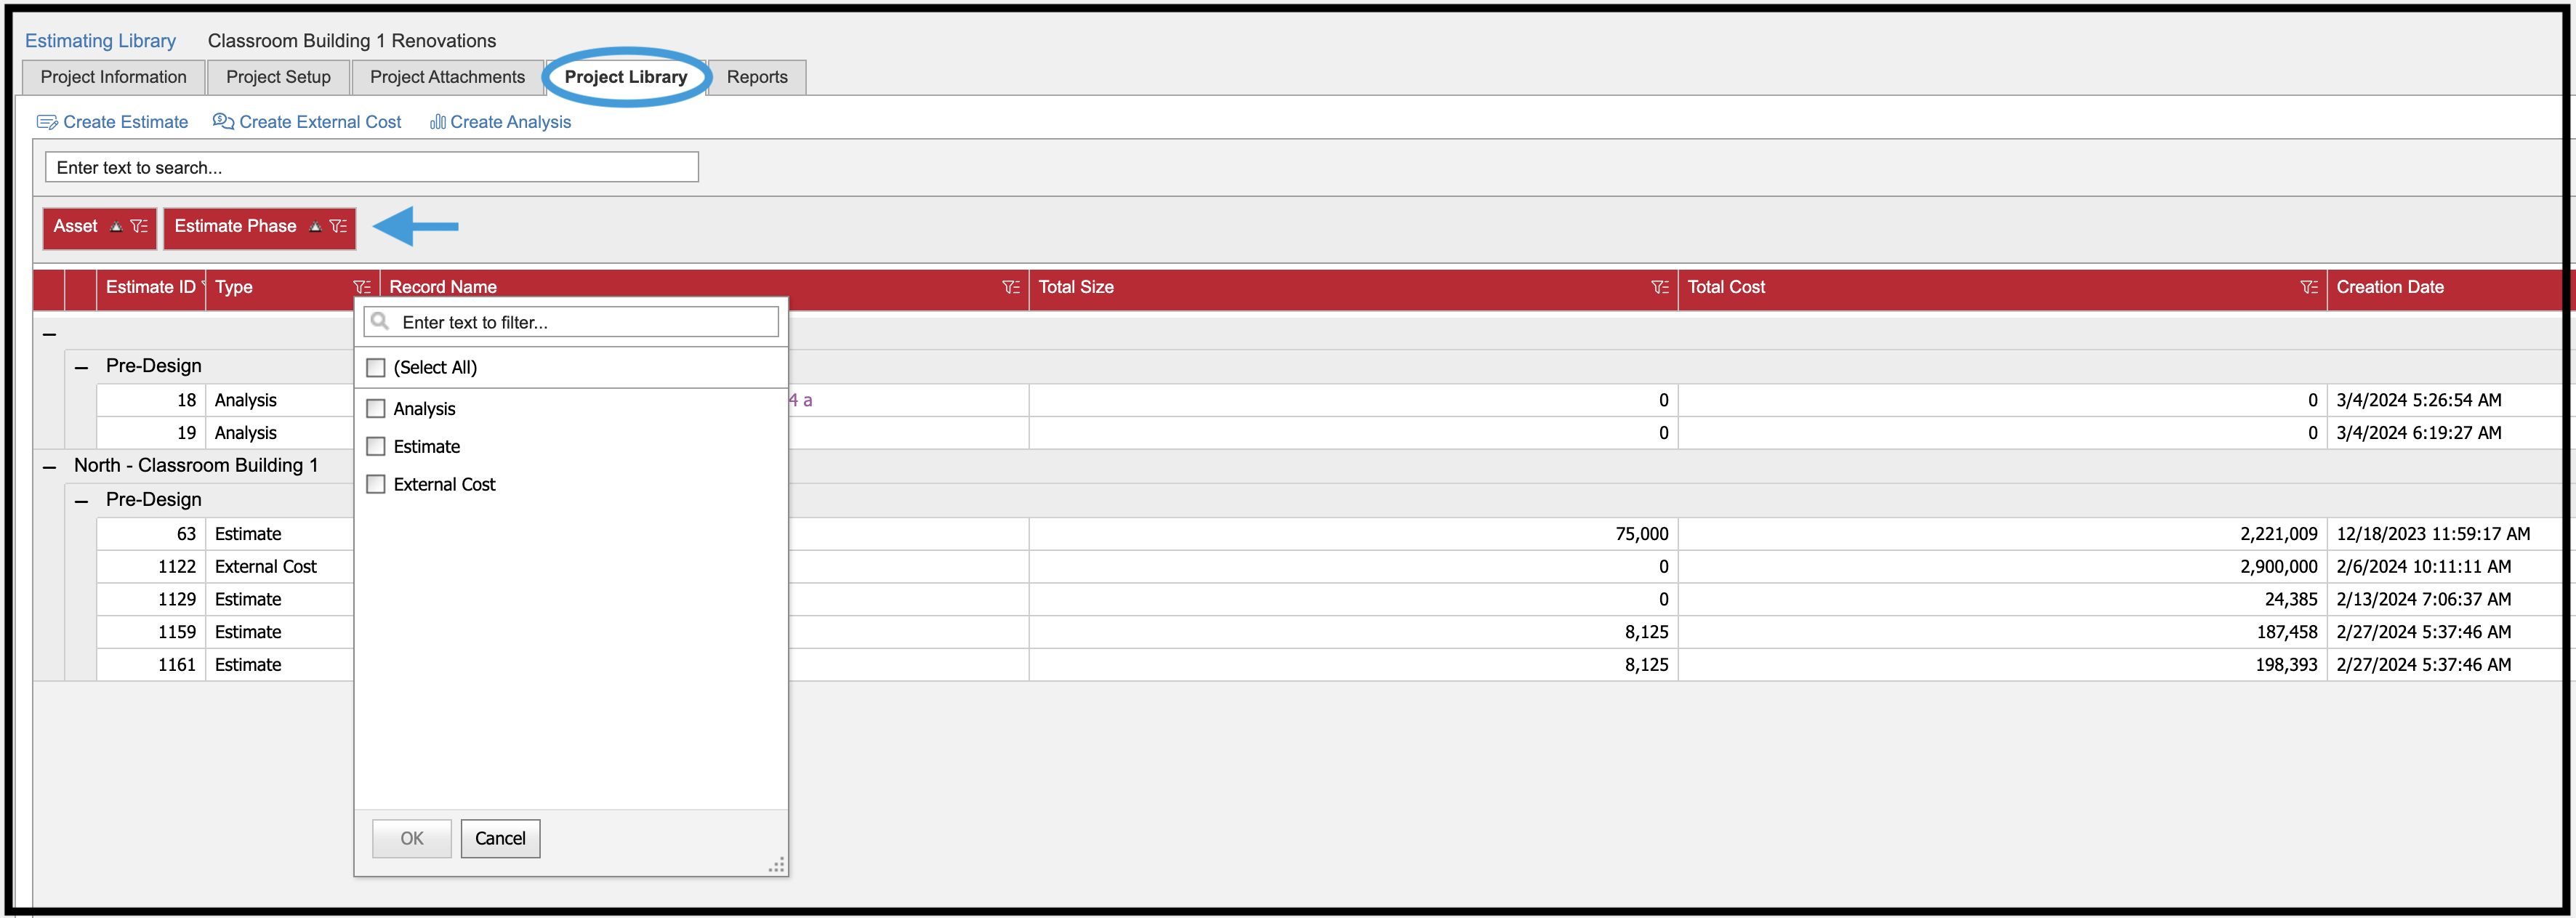
Filters #
Customize Layout #

The Customize Layout feature lets you create and save layouts by user or type. Click this option to modify the look of data grids by changing what items you see and how they are grouped or sorted, among other options. Options can be used independently or together to provide a more granular data view.
Sorting enables you to view records by prioritized fields with ascending and descending options. Once you have made your selections, click the checkmark in the upper right of the screen.
To use Grouping, click the circles next to the field names you want to group by. Set priorities by grabbing the three bars to the left of the field name and dragging the field to the top of the list, above the Columns to Group heading. Once you have made your selections, click the checkmark in the upper right of the screen to save and return to the data grid.
The Filtering tab offers an intuitive workspace for building filters to help you better manage your data. Click on the down arrow next to a field name to view and apply filter options for that field. Once you have made your selections, click the checkmark in the upper right of the screen to save and return to the data grid.
Click the eyeball to the right of a field name to use the Column Chooser to select or deselect columns you would like to appear in your data grid. Use your cursor to grab the three bars to the left of the field name and drag fields into the order you would like them to appear in your layout, left to right (your first choice would be furthest left in the grid). Once you have made your selections, click the checkmark in the upper right of the screen to save and return to the data grid.
Your grid will continue to be configured with these choices unless you go into Customize Layout again and make changes.
Search #
Type a keyword or number into the Search bar, and all matching records will be highlighted in yellow.
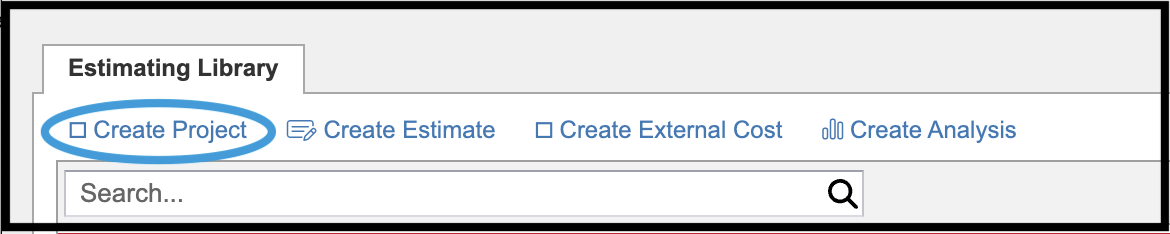
Create Project #
Within the Estimating module, the Project area functions like a folder* for organizing all of the records related to a project, including estimates and analyses. You may have numerous projects occurring simultaneously throughout your organization, with multiple estimates being created within a project. To access a project, click on the Project Name in the Estimating Library grid.
Project Information #
The main landing page of the Project section is the Project Information tab.
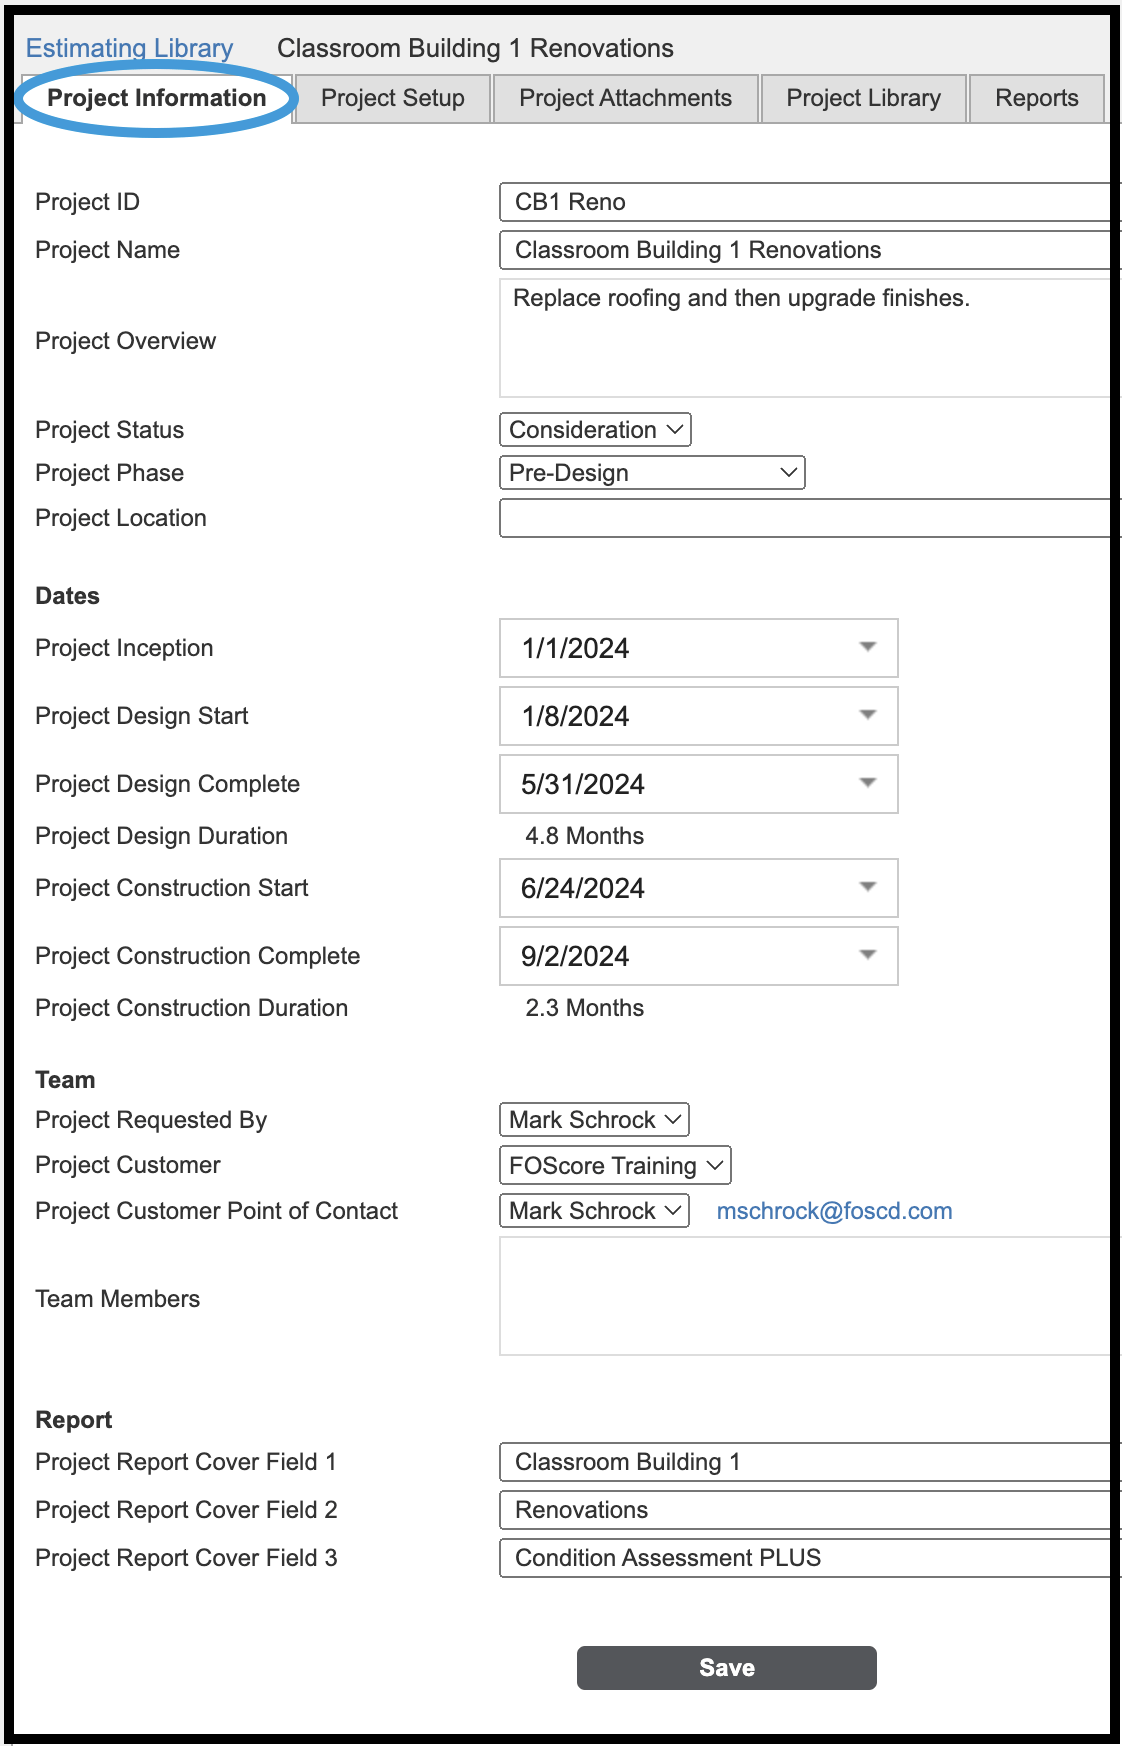
The following information is gathered on this tab:
| Project ID* | Project Name* | Project Overview |
| Project Status | Project Phase | Project Location |
| Various Project Dates | Project Team Information | Project Report Fields |
Many fields within the Project Information tab are customizable and will be determined by the client administrator during client setup or with assistance from the FOS team. (See the Estimating Admin section for more information.)
*Like setting up a file folder, the only information required to create a project is the Project ID and Project Name. Project ID is an alpha-numeric unique identifier you create and assign to a project. Any additional fields completed on the Project Information tab, while not required, will appear in the Project Library grid.
Text that appears in the dropdown menus of the Project and Estimate Information screens (like Project Status shown below) is created and edited in the Application Customization area of the Estimating Admin module.

At the bottom of the Project Information screen, you will be asked to Save, Cancel, or Delete the entered information. When selecting Delete (on a pre-existing project), you will be prompted to confirm the action. Note: Deleting a Project will result in all records within the Project being deleted.

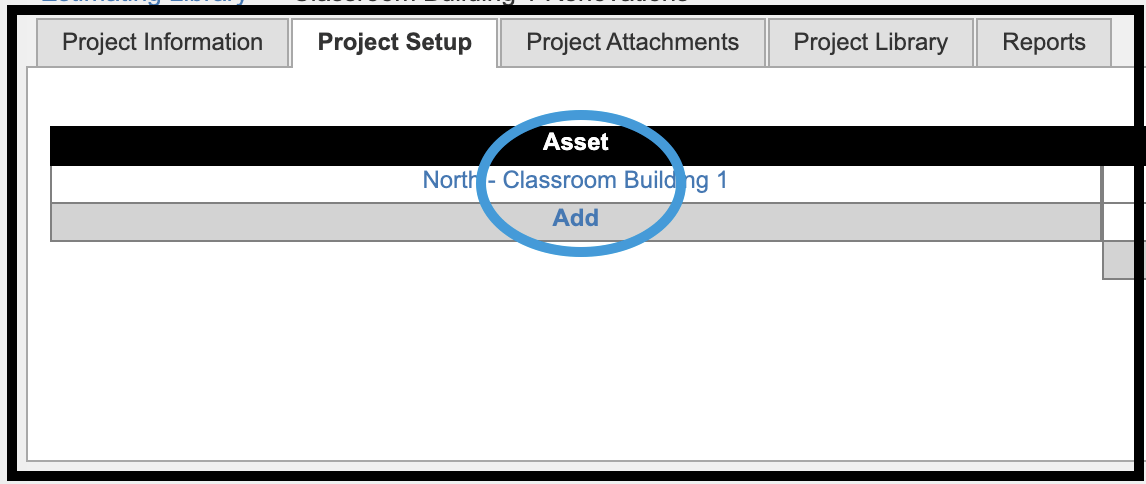
Project Setup #
The Project Setup tab is where you will define terms and categories for breakouts within an estimate. For example, in a renovation project, you could select and add an asset from the Assets module and define the project scope and WBS (work breakdown structures).

On the Project Setup tab, the following information is gathered; none is required:
- Asset (select or add)
- Scope (select or add)
- Add WBS
- Change WBS Labels
WBS Level Editor #
Asset #
Click on an Asset name to bring up a dropdown menu of available assets; change the order of appearance if needed; click Save or Cancel. Click Delete to remove an asset from the Project Setup grid. On the main Project Setup tab, click Add to select another asset and its order of appearance for addition to the grid.

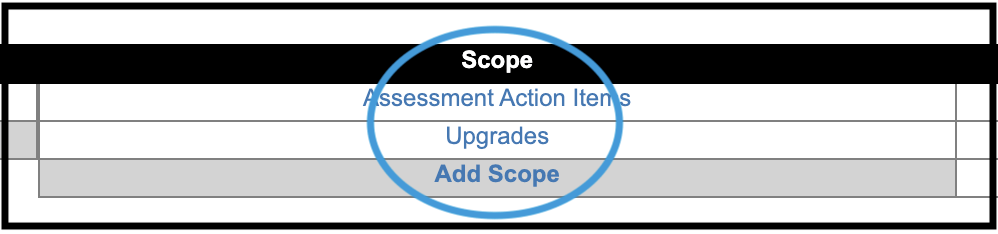
Scope #
Within the system, there are several ways to develop scope, such as calculators, templates, items, single user-defined elements, individual DMDs, or groups of DMDs.
Click on a Scope name to bring up a dropdown menu of available options; change the order of appearance and description if needed; click Save or Cancel. Click Delete to remove a scope from the Project Setup grid. On the main Project Setup tab, click Add Scope to add another scope, its order of appearance, and description to the grid.
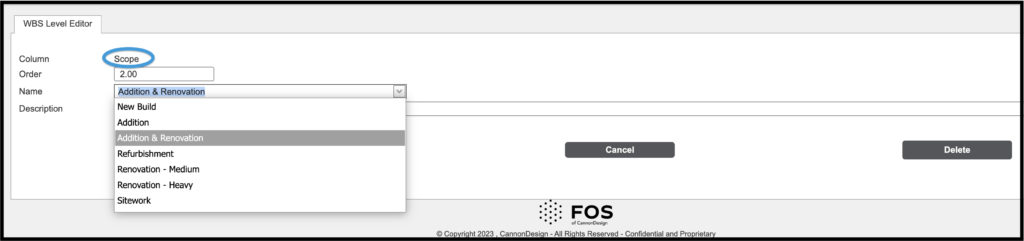
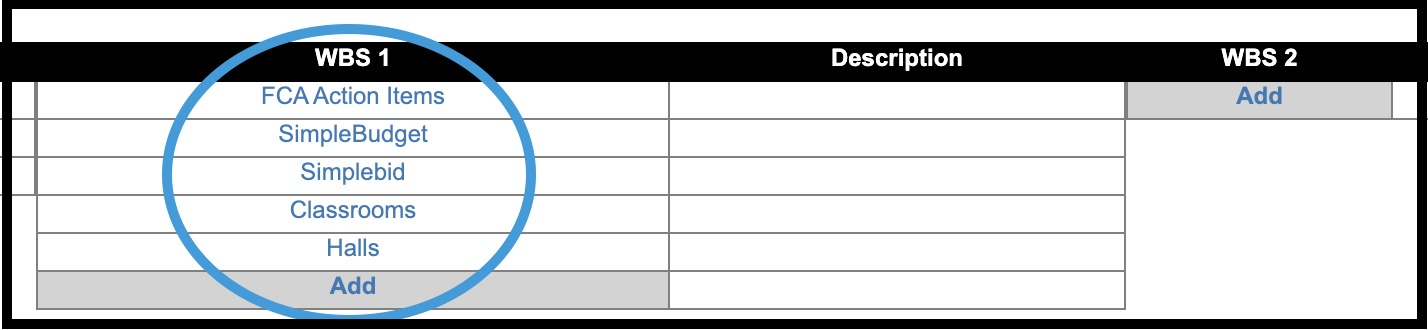
WBS #
Click on a WBS name to change or edit the order of appearance, WBS name, or description if needed; click Save or Cancel. Click Delete to remove a WBS from the Project Setup grid. On the main Project Setup tab, click Add to add another WBS, its order of appearance, and description to the grid. Pre-determining labels helps to keep the information consistent within a project.
WBS Label Editor #
Click on the Change WBS Labels link on the right of the screen to edit or delete the labels used in the WBS columns of the Project Setup grid.
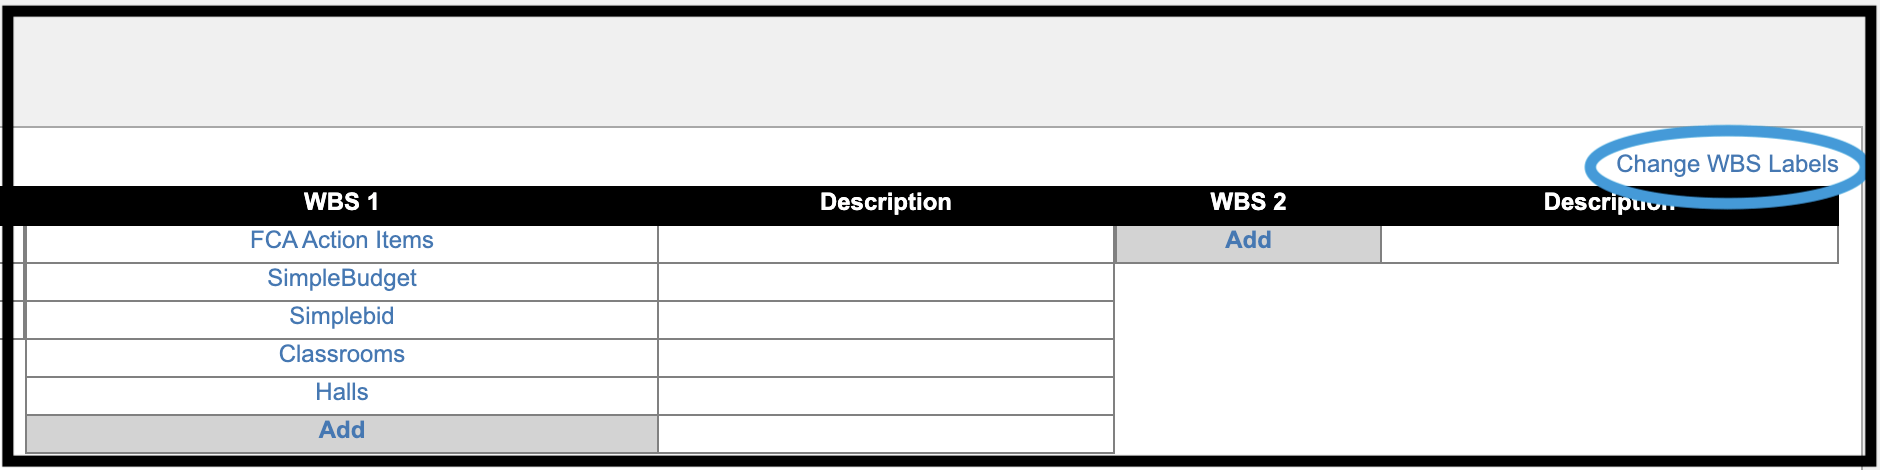


To add or change items within a column, click on Add at the bottom of the column list.
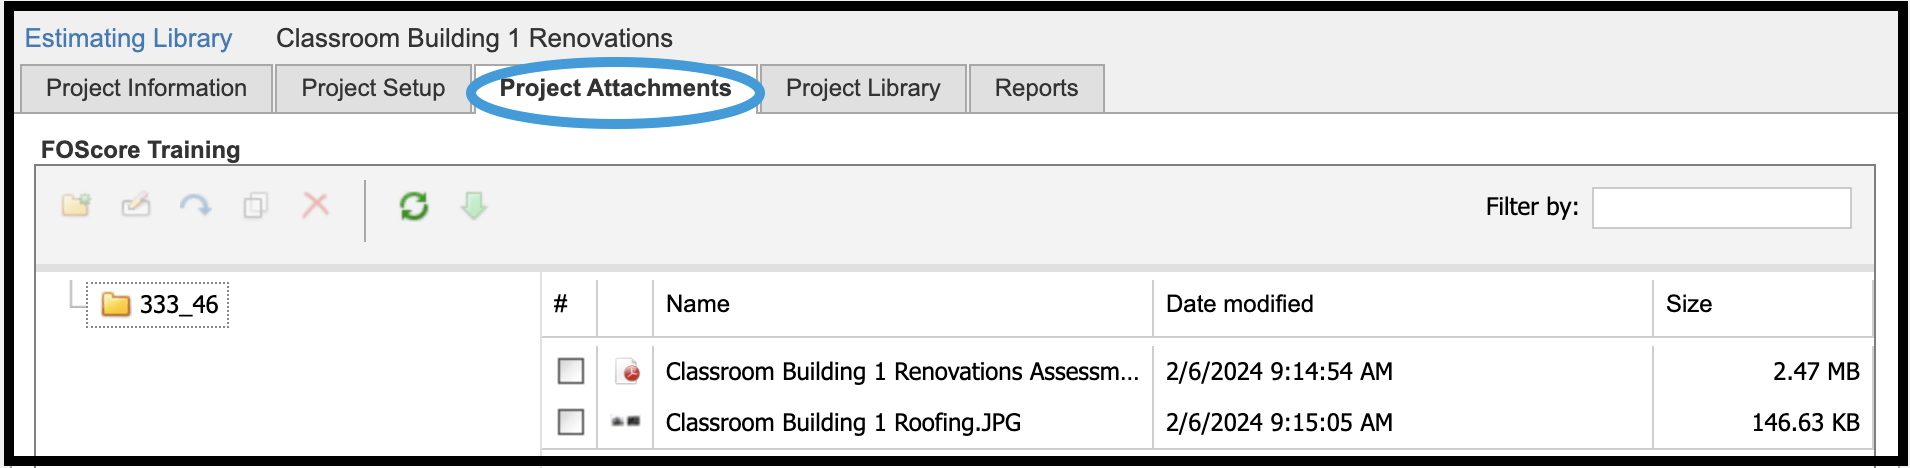
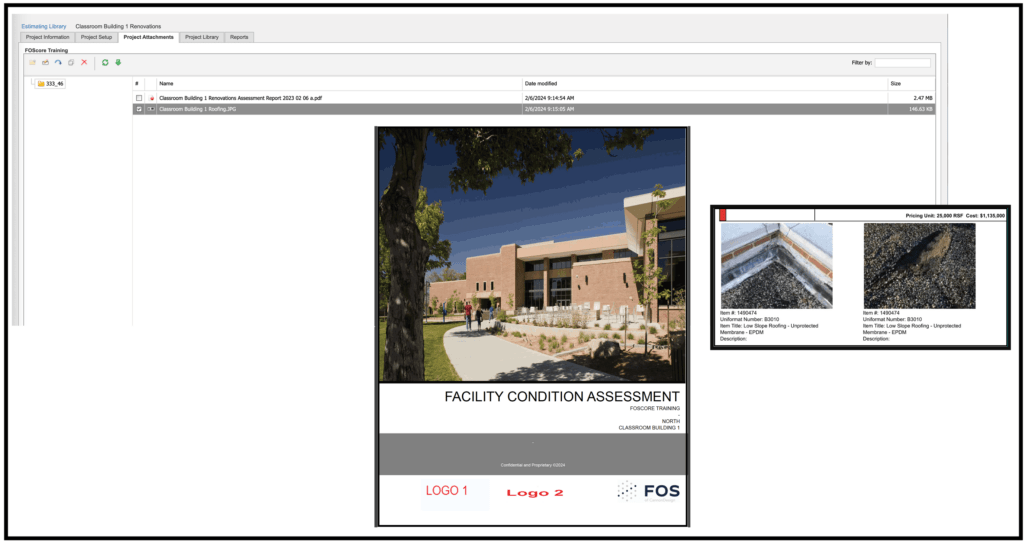
Project Attachments #
Click on the Browse button at the bottom of this screen to find documents on your desktop you would like to attach to your project. Helpful documents to include are pdfs and jpegs that illustrate the scope of work.
Project Library #
The Project Library is a subset of the Estimating Library containing all estimates, external costs, and analyses related to a project in one grid. Grouping and Filtering features are available at this level.
Within the Project Library grid, the following information can be found:
| Estimate ID | Type | Asset |
| Record Name | Estimate Phase | Total Size |
| Total Cost | Creation Date |
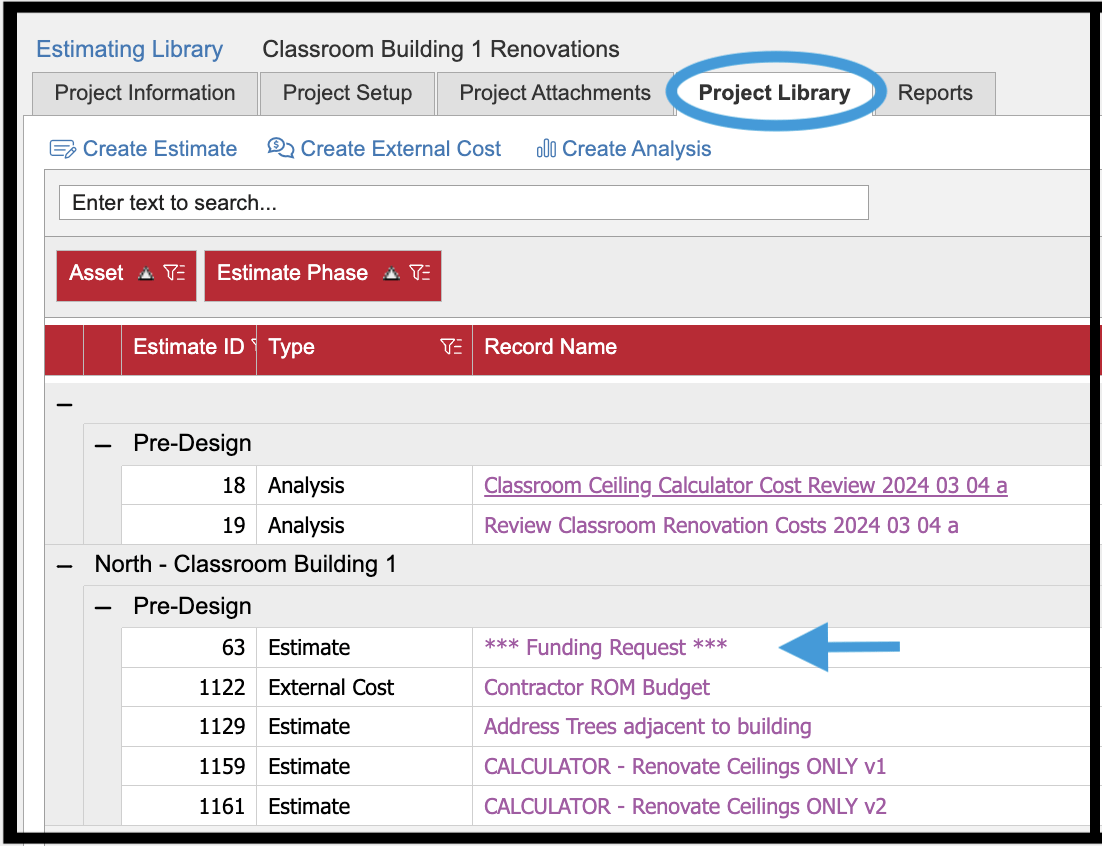
Click the Record Name link to launch the estimate, external cost, or analysis.
Reports #
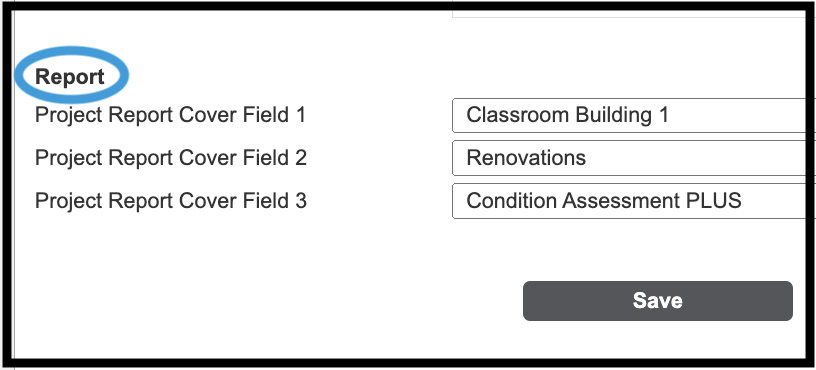
On this tab, you can generate project-related reports your FOS representative created for you. Use the dropdown menu to select which estimates you want to include in the report, and click Update and Generate Report. A pdf will be delivered to your computer; click View Report to launch it.

The details you added in the Report section of the Project Information tab will be used to generate text for the report’s cover.
Create Estimate #
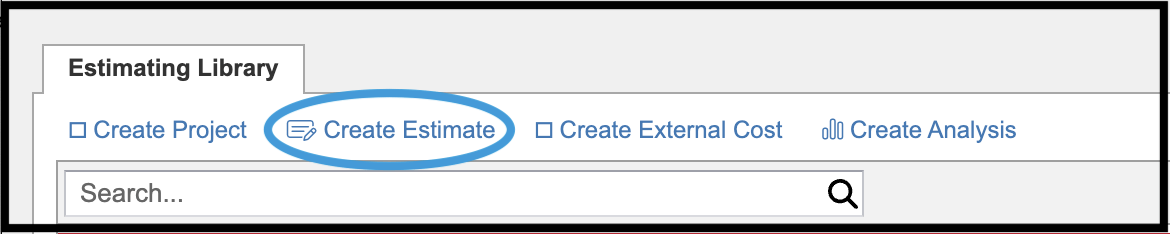
The Estimate area within the module is where you will define details, including cost source, scope of work, line items, and markups. To create a new estimate, click on the link as shown above; to access an existing estimate, click on the Record Name in the Estimating Library grid.
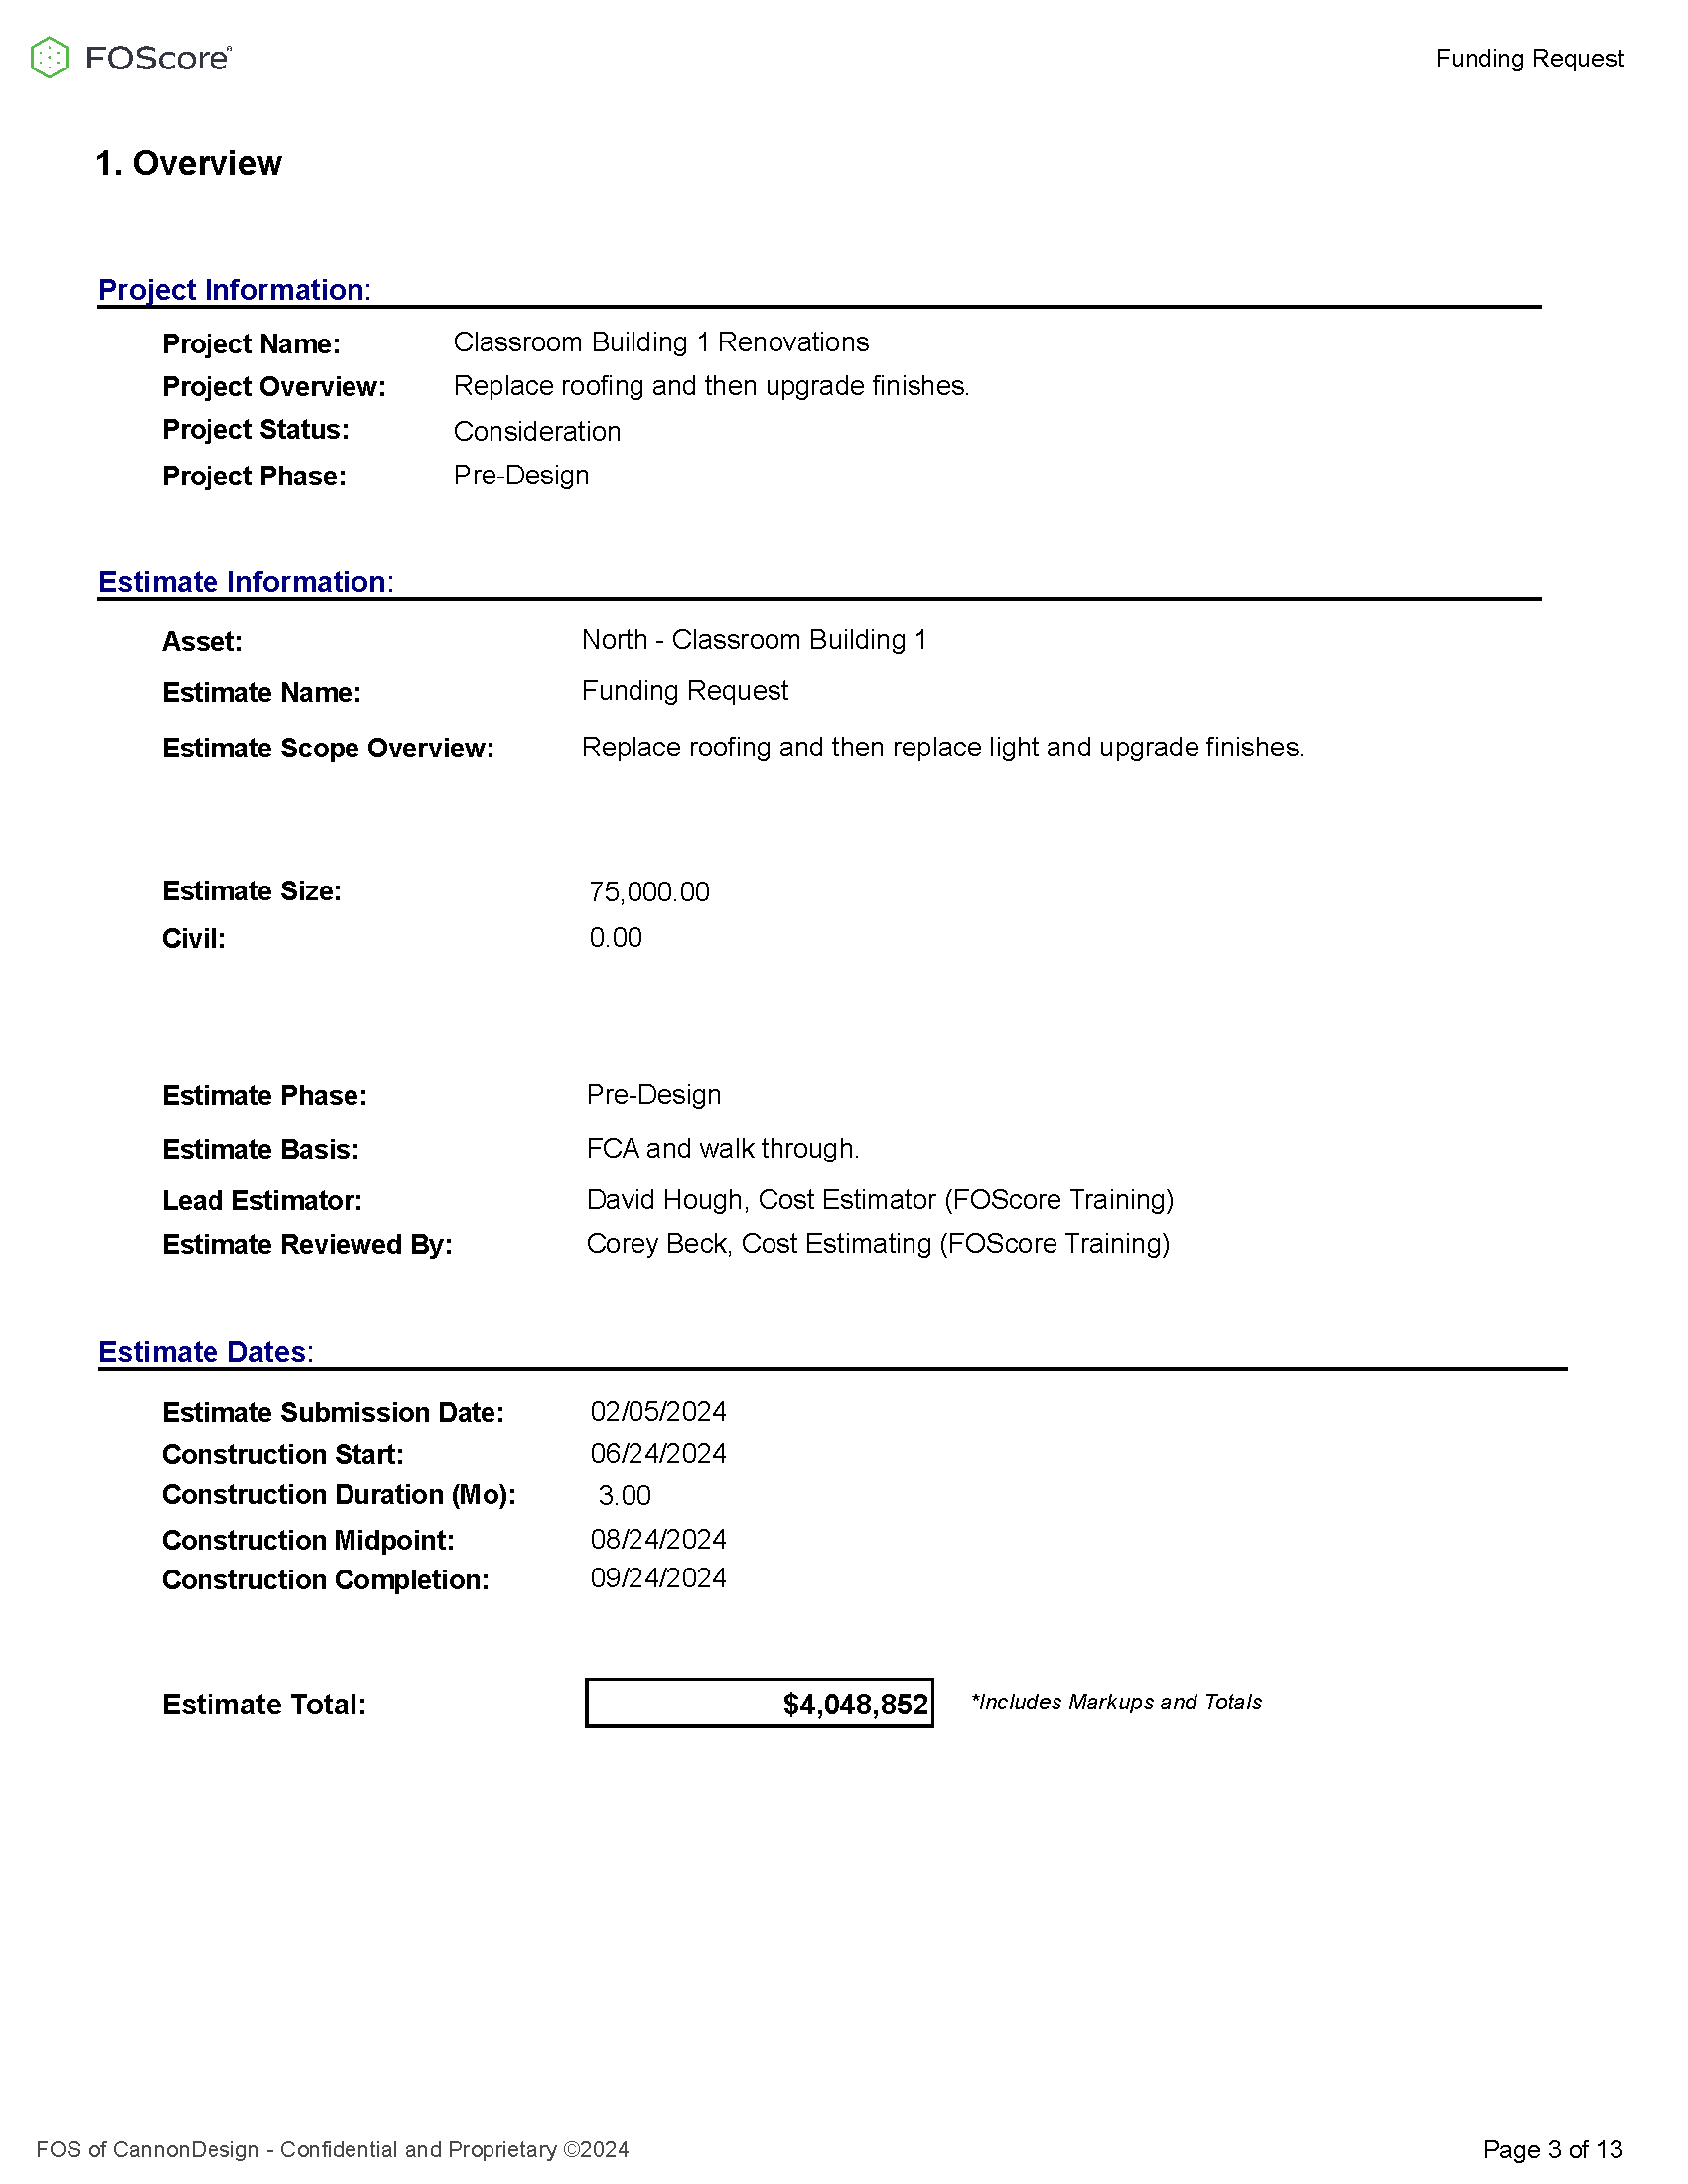
Estimate Information #
The Estimate Information tab is the main landing page of the Estimate section. In the sample shown below, the breadcrumbs in the upper left show that this Funding Request is an estimate for the Classroom Building 1 Renovations project stored in the Estimating Library.
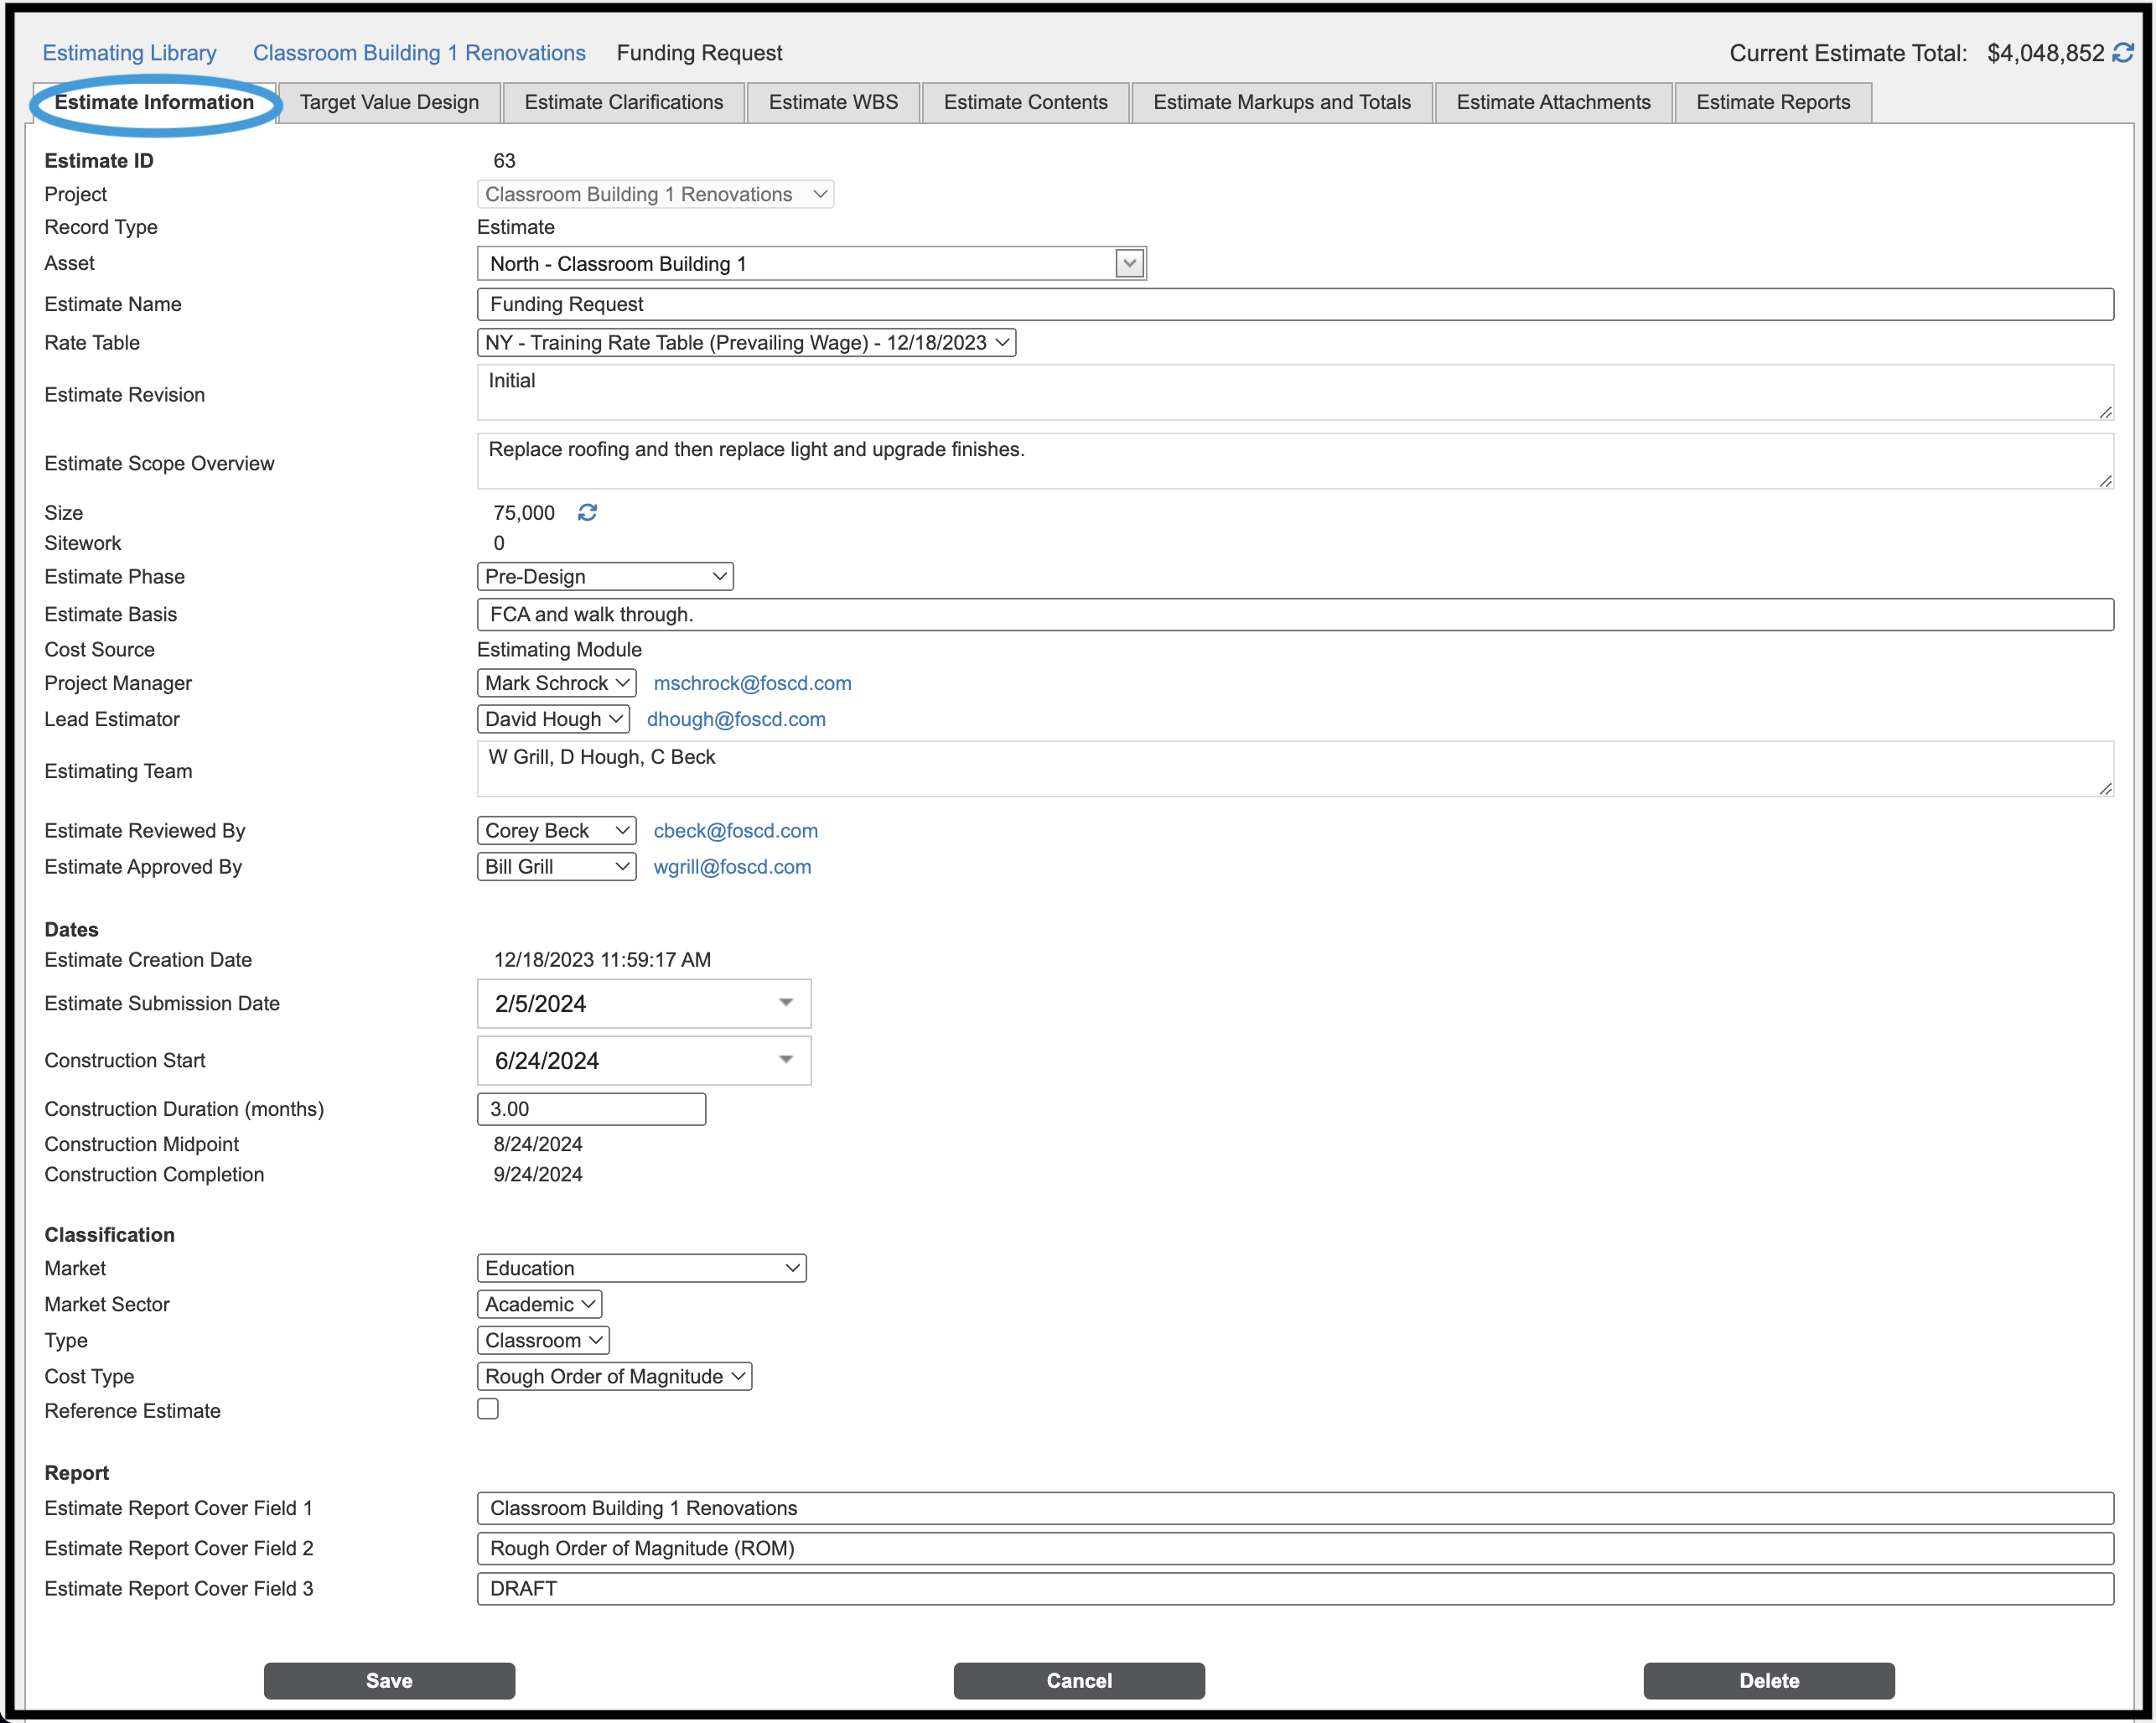
On the Estimate Information tab, you will input some of the data, while the system will pre-populate other fields based on information you provided during the onboarding process.
| Estimate ID | Project | Record Type |
| Asset | Estimate Name | Rate Table |
| Estimate Revision | Estimate Scope Overview | Size |
| Sitework | Estimate Phase | Estimate Basis |
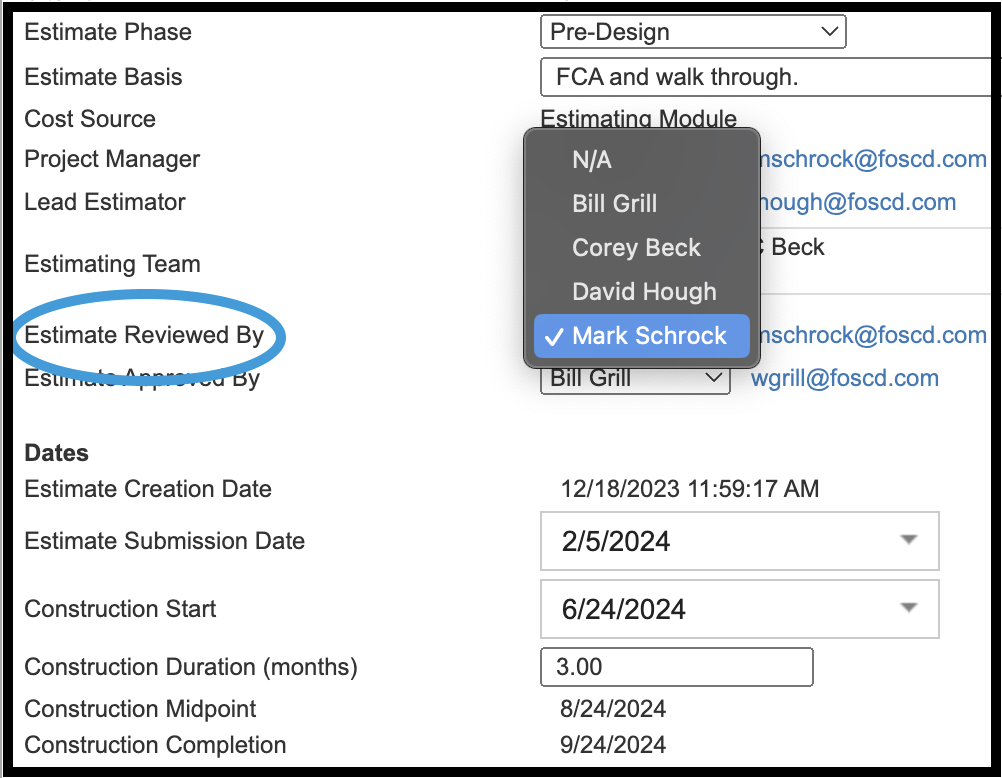
| Cost Source | Project Manager | Lead Estimator |
| Estimating Team | Estimate Reviewed By | Estimate Approved By |
| Dates (multiple entries) | Market | Market Sector |
| Type | Cost Type | Reference Estimate |
| Report Fields |
Many fields on the Estimate Information tab are pre-populated with the information you have already entered into the system. Dropdown menus will reflect values established by your organization during system set-up and maintained in the Admin module. Open-ended text boxes allow you to provide specific labels and descriptions that will appear on estimates and in reports.
The system automatically generates Construction Midpoint and Construction Completion dates by choosing a date on the Construction Start interactive calendar and entering a Construction Duration (months). Using the midpoint, the Reference module could calculate an escalation percentage.
The Classification dropdown menus help organize your estimates by type. Classifications can be added or modified in the Classification Maintenance area of Admin, described below.
Use the Reference Estimate checkbox to designate go-by estimates for use in an Estimating Calculator (described below).
Copy #
Use the Copy button in the lower right of the Estimate Information screen to duplicate and save an estimate for modification while keeping the original intact.
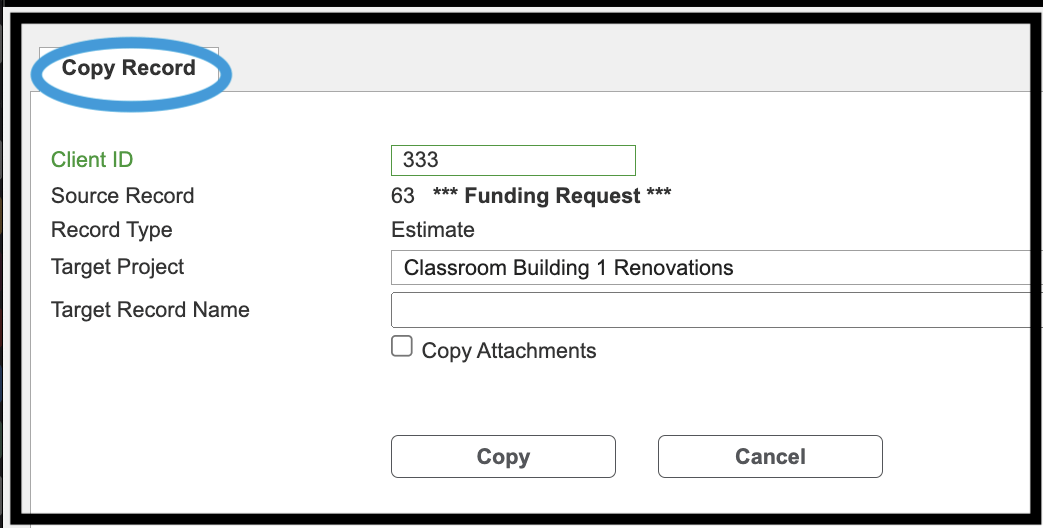
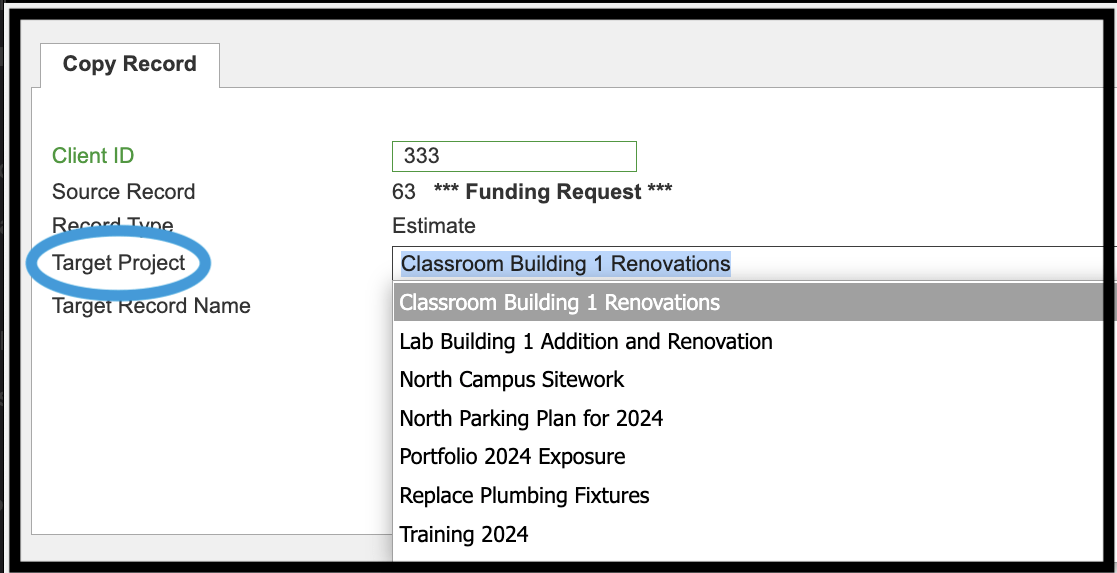
The Target Project dropdown menu allows you to designate the project to store the duplicate.
Target Value Design #
Incorporate Target Value Design into your estimate by adding and modifying target status, values, related MasterFormat and UniFormat items, and notes.
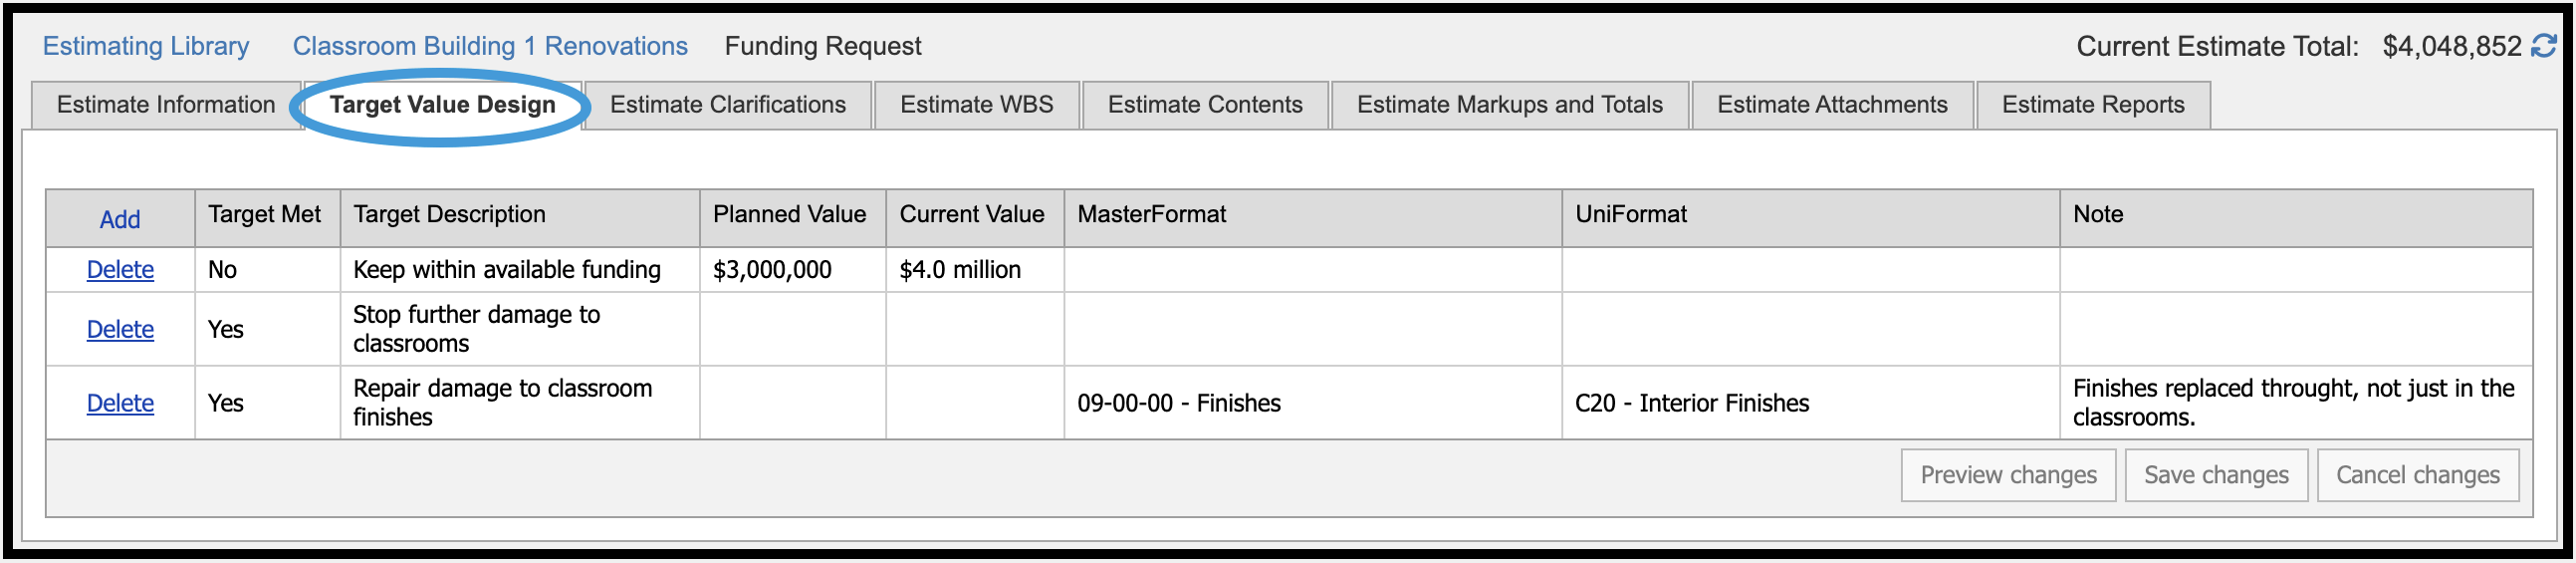
Click on Add in the left column to input additional targets. Include as much information as needed regarding values, items, and notes.

On an individual line, click on the MasterFormat or UniFormat box to access a dropdown menu for selecting main categories that further clarify the purpose of the target. Add notes as needed.
Once complete, click Preview Changes to see a highlight of the additional target; click Save or Cancel.

To remove a target, click Delete in the left column on the main screen. The system will then ask you to confirm the deletion.
Estimate Clarifications #
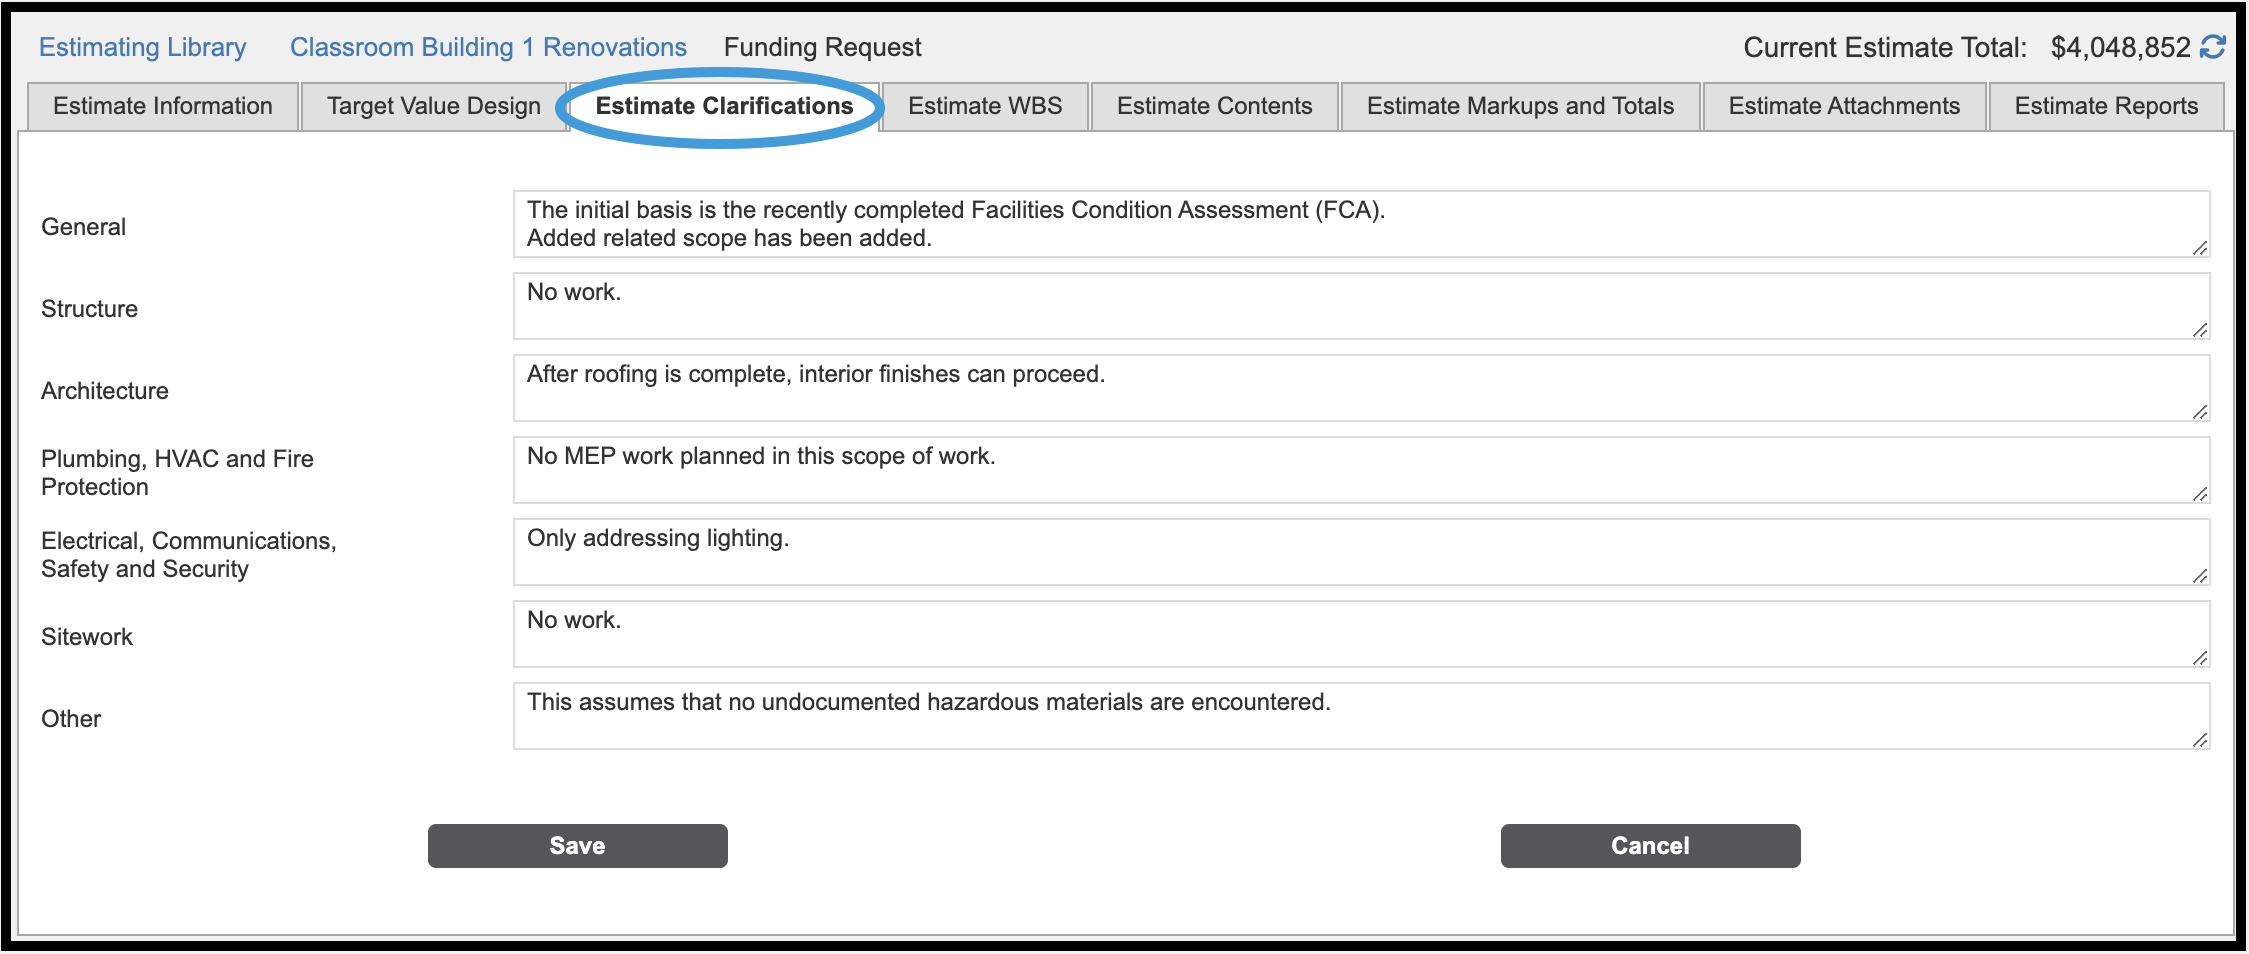
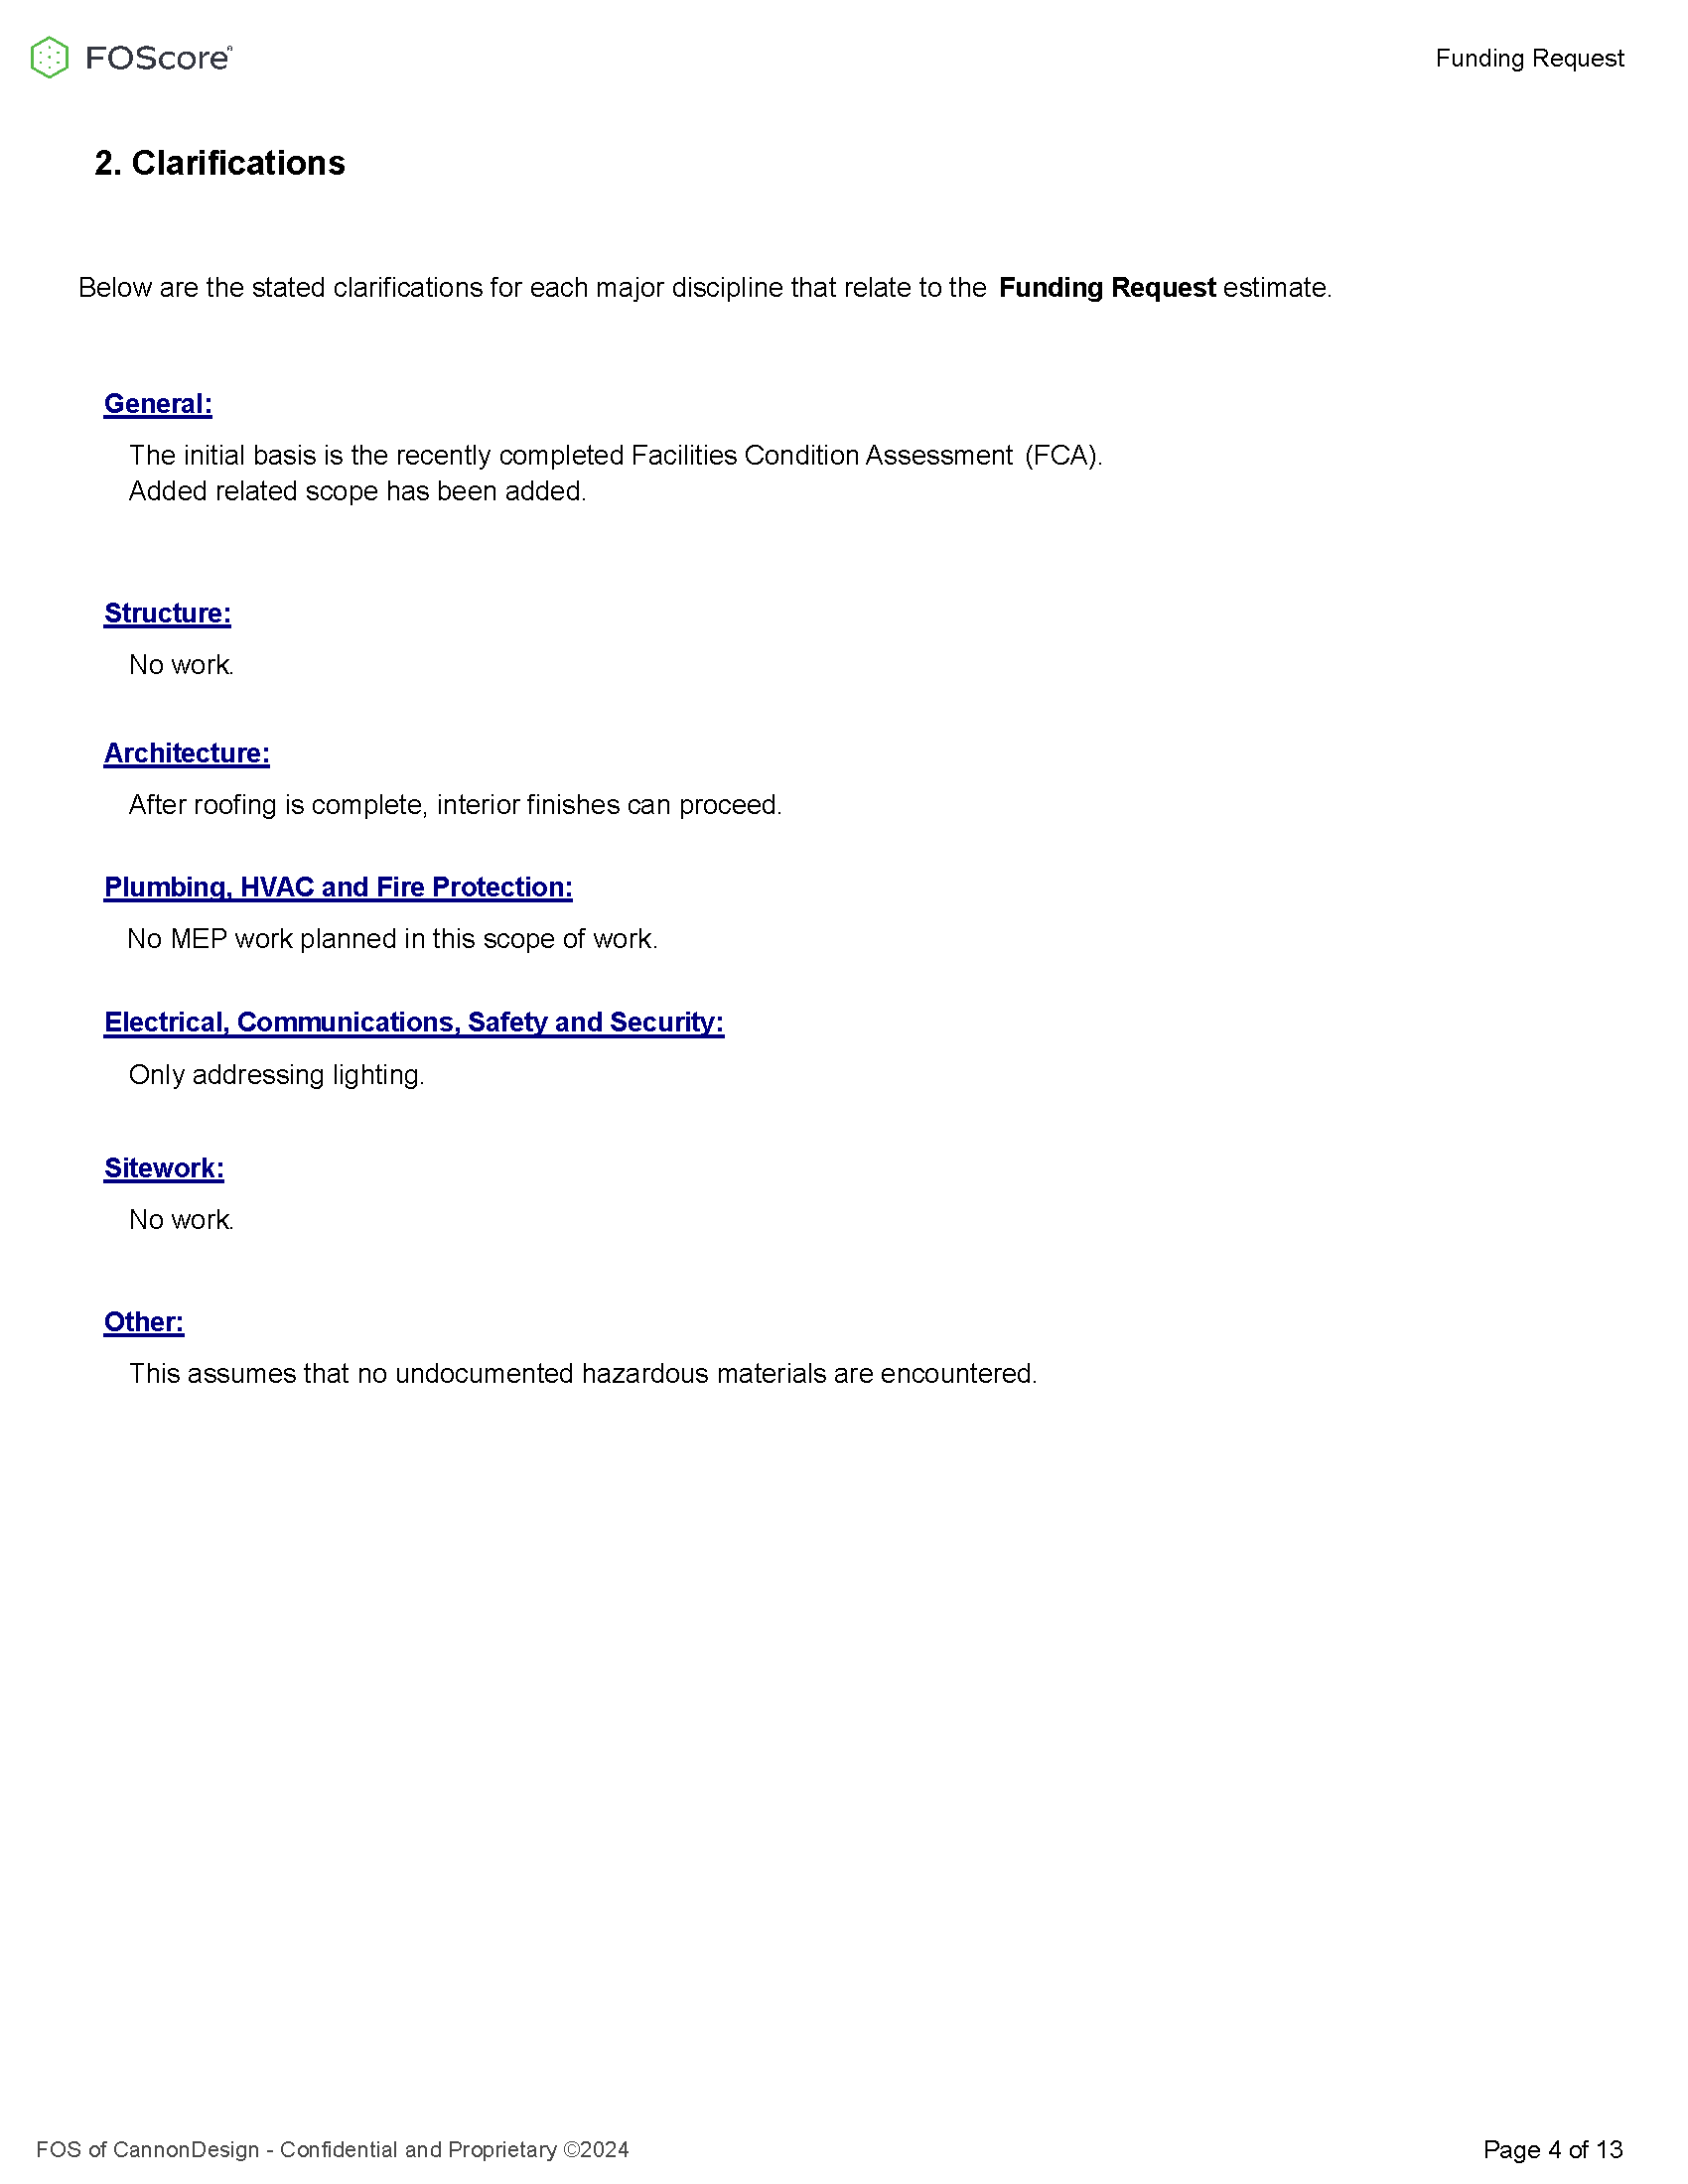
The Estimate Clarifications screen has the following fields for detailed notes: General; Structure; Architecture; Plumbing, HVAC, and Fire Protection; Electrical, Communications, Safety, and Security; Sitework; and Other. Clarifications are not required but will appear on an estimate report.
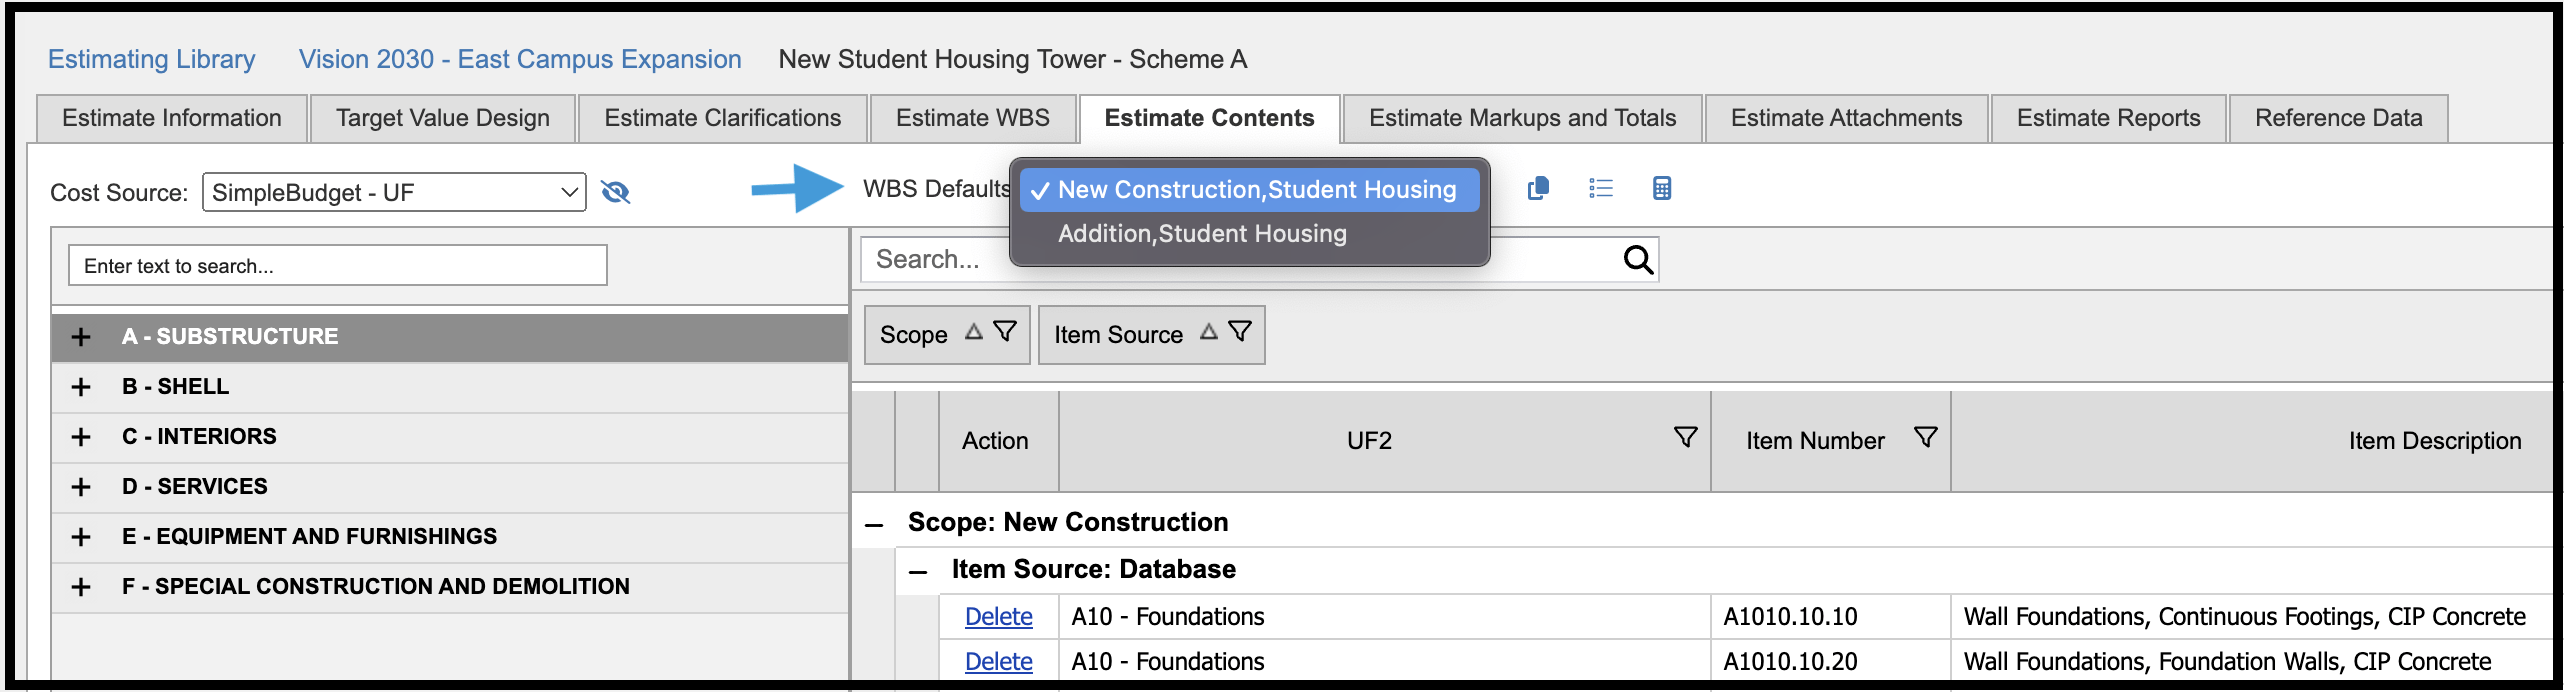
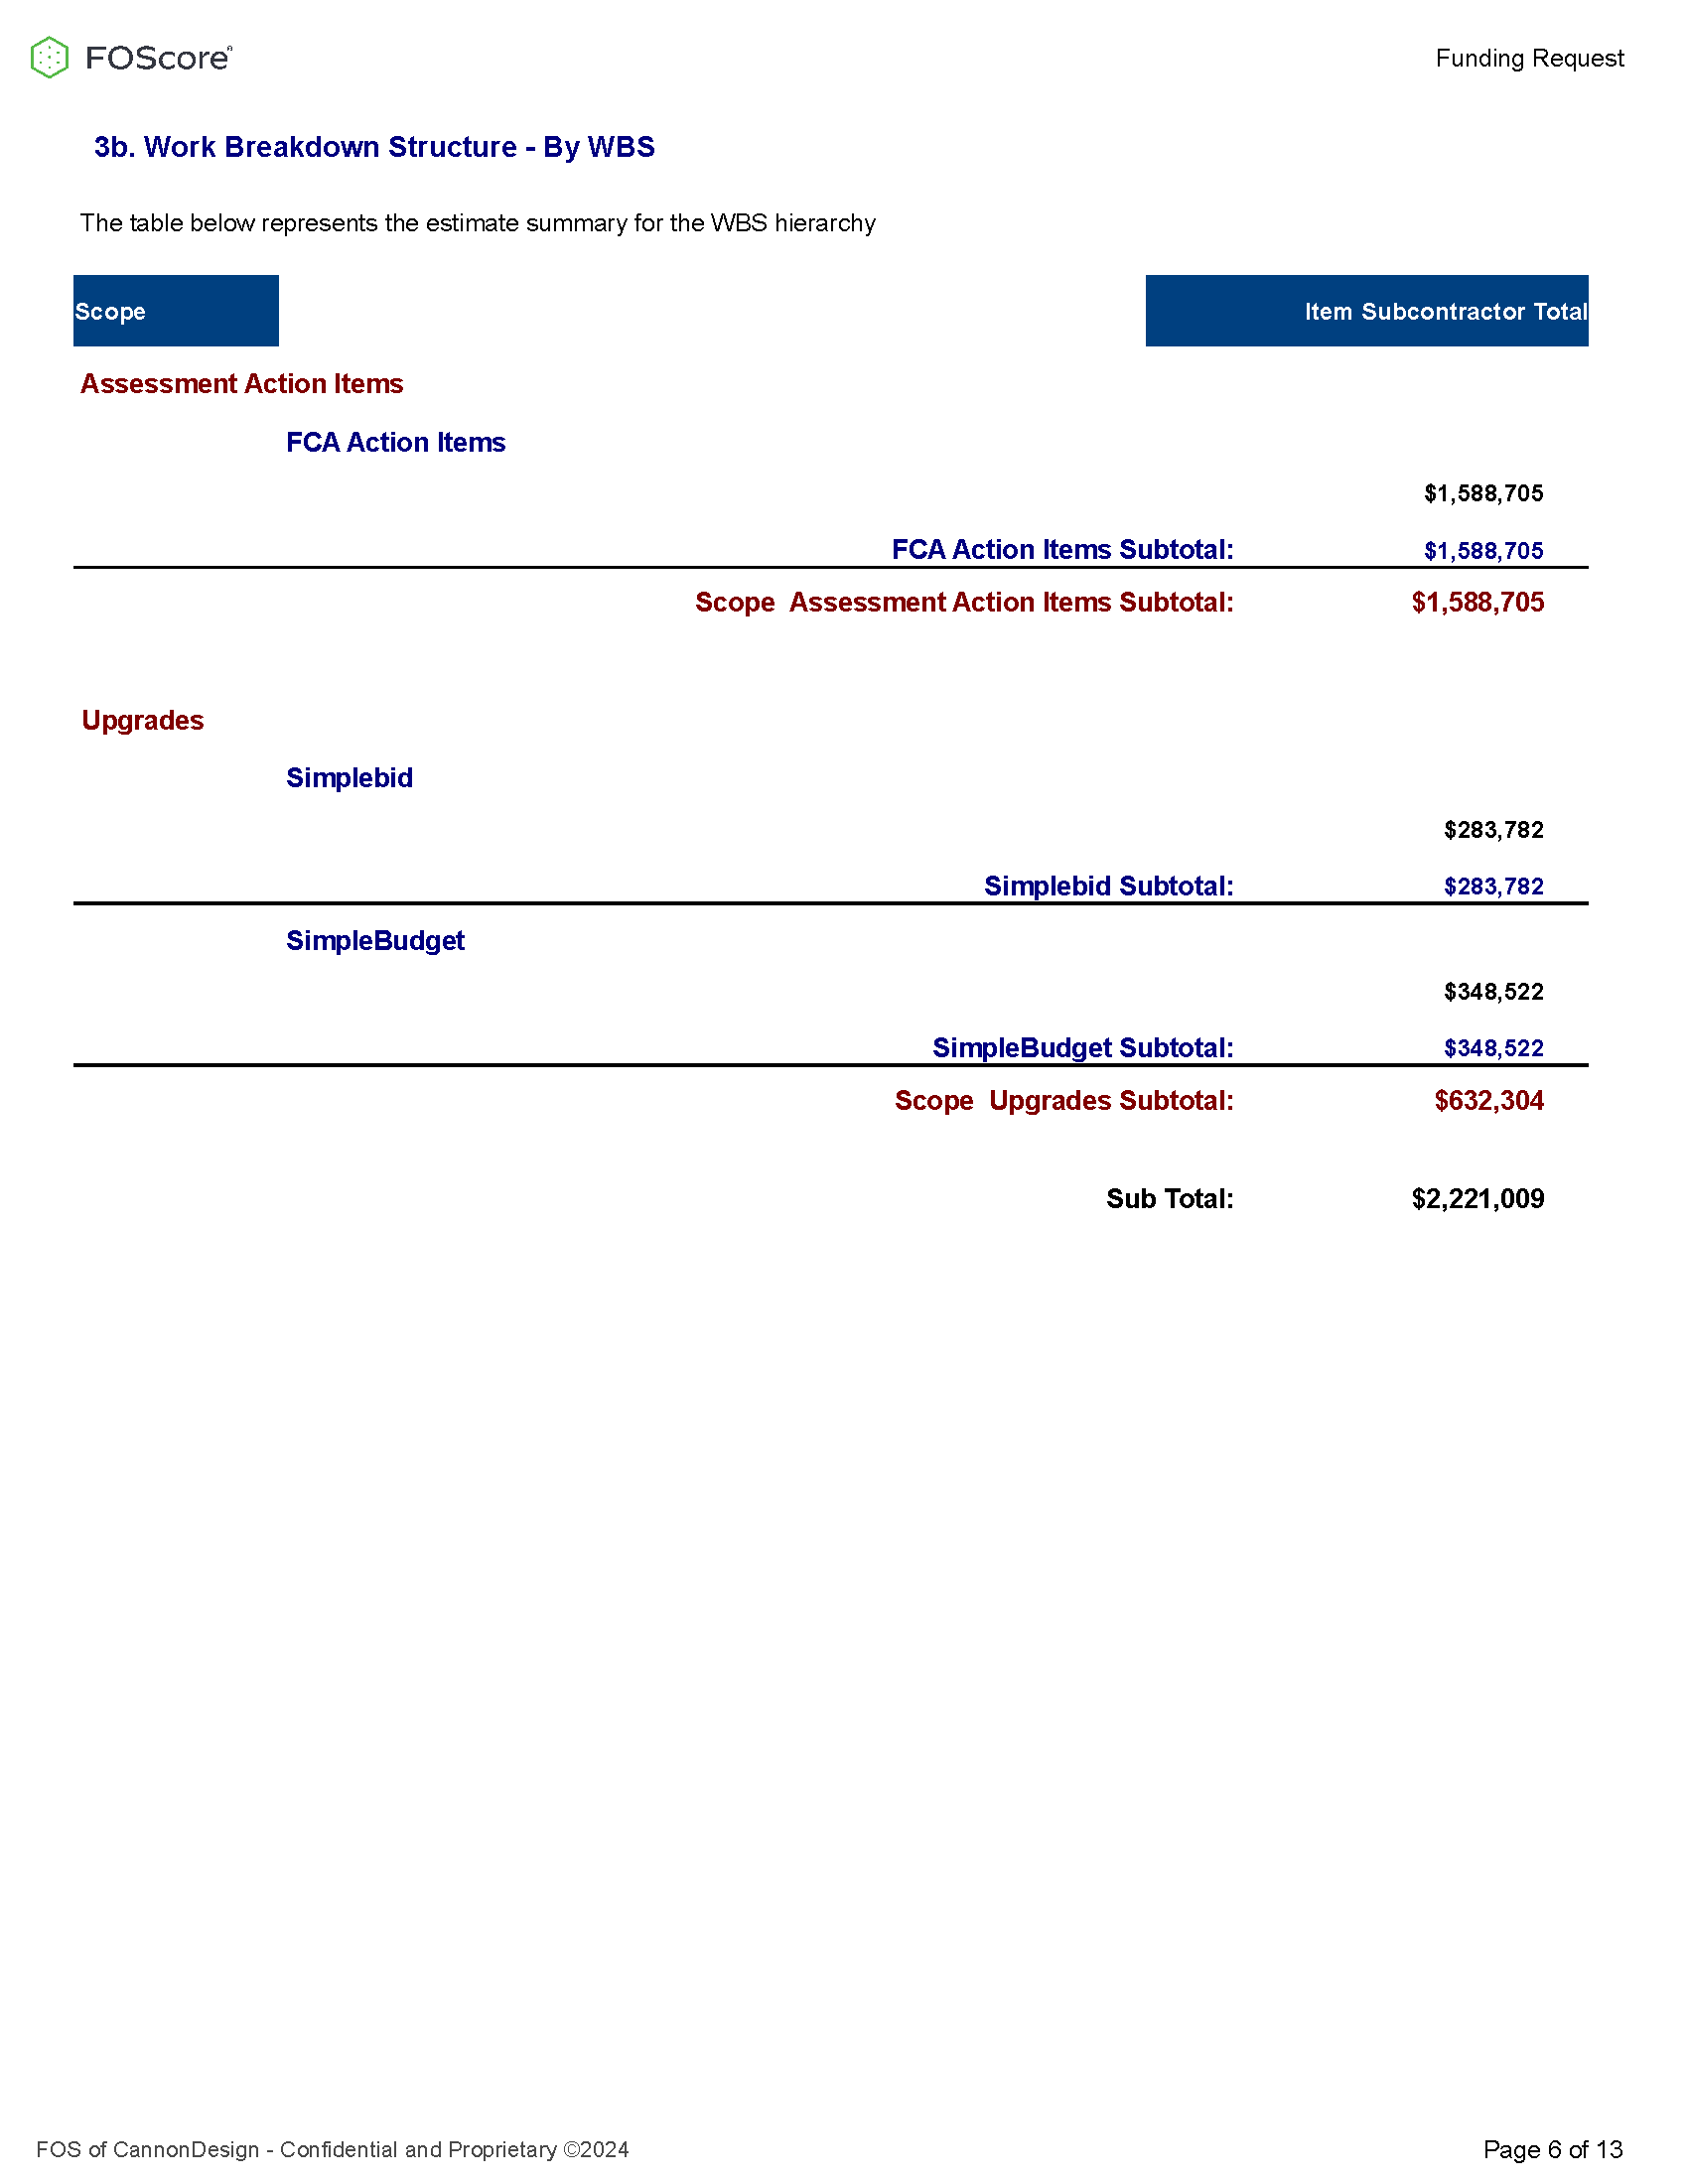
Estimate WBS #
On this tab, you can enter Work Breakout Structures (breakouts) and alternates for the estimate. Pre-populated WBS Scope entries are being pulled from the Project Setup tab.
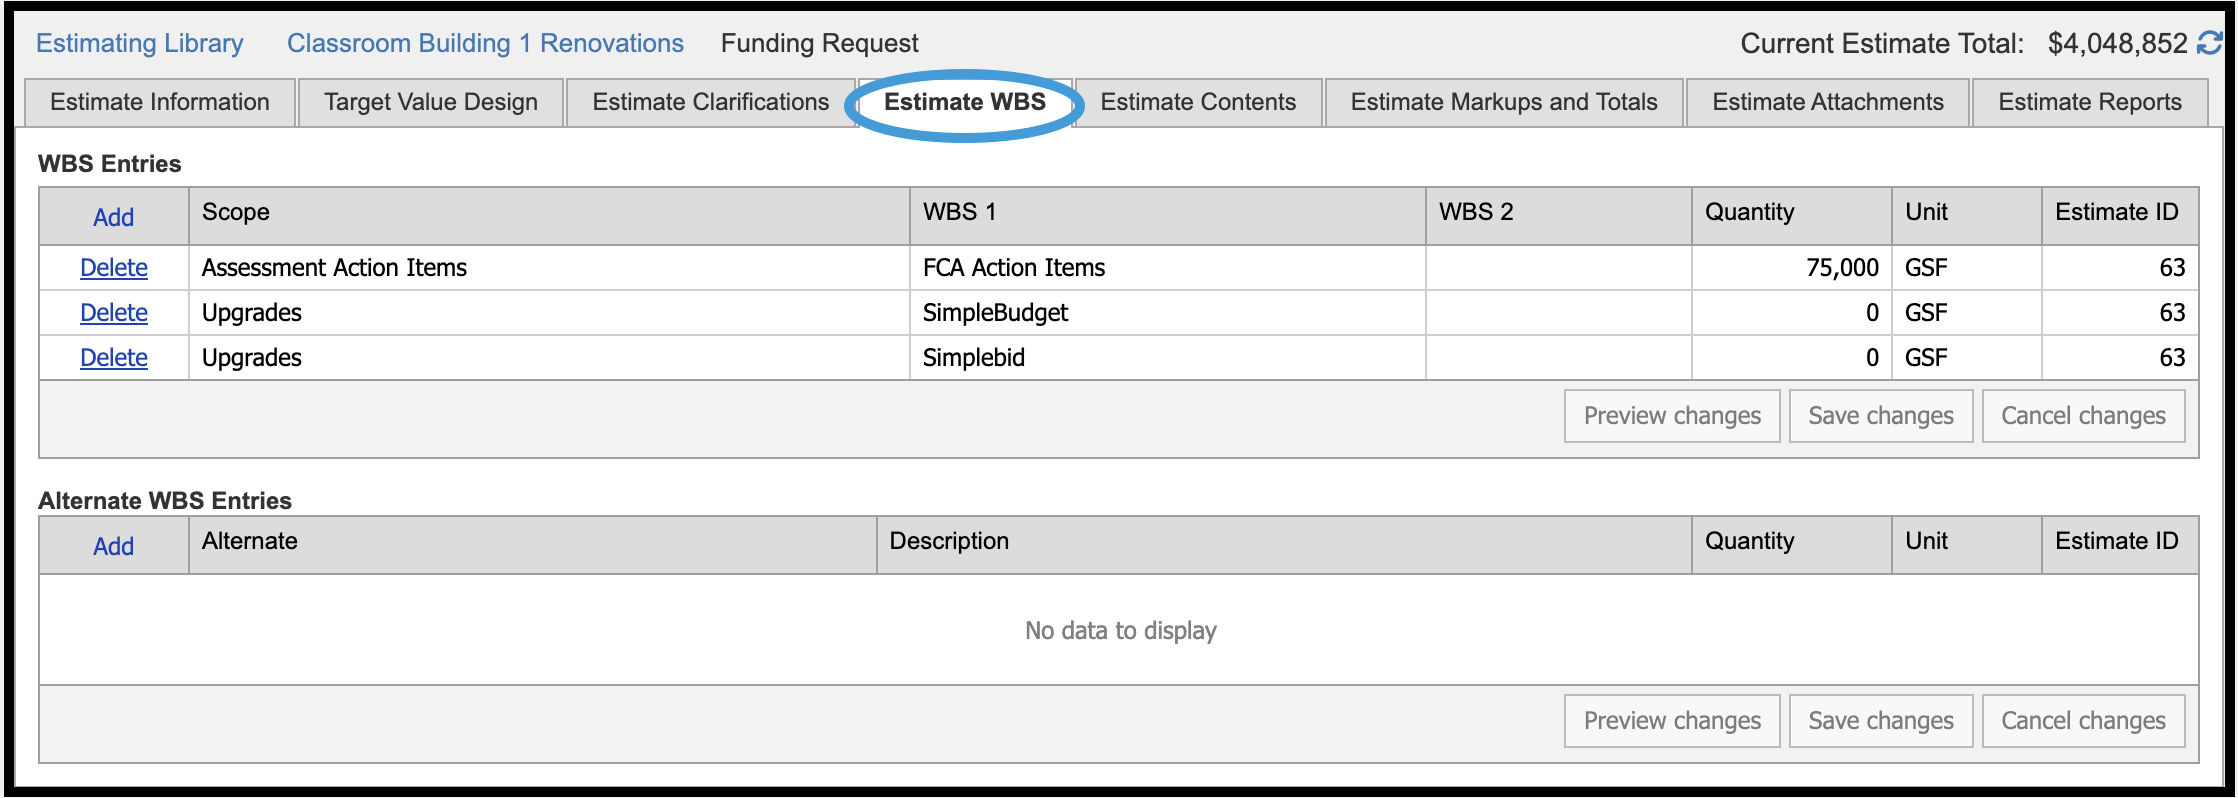
Within the Estimate WBS grid, the following information is found:
| WBS Entries | ||
| Scope | WBS 1 | WBS 2 |
| Quantity | Unit | Estimate ID |
| Alternate WBS Entries | ||
| Alternate | Description | Quantity |
| Unit | Estimate ID |
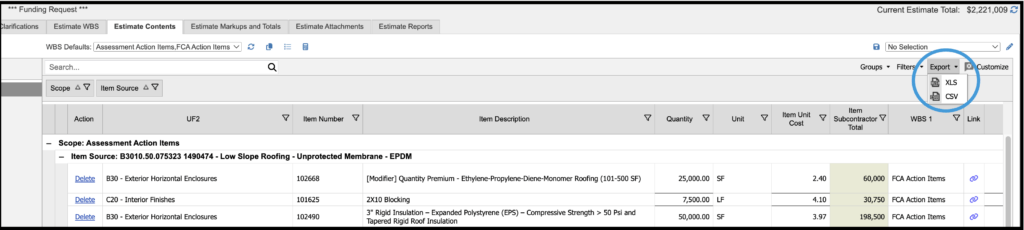
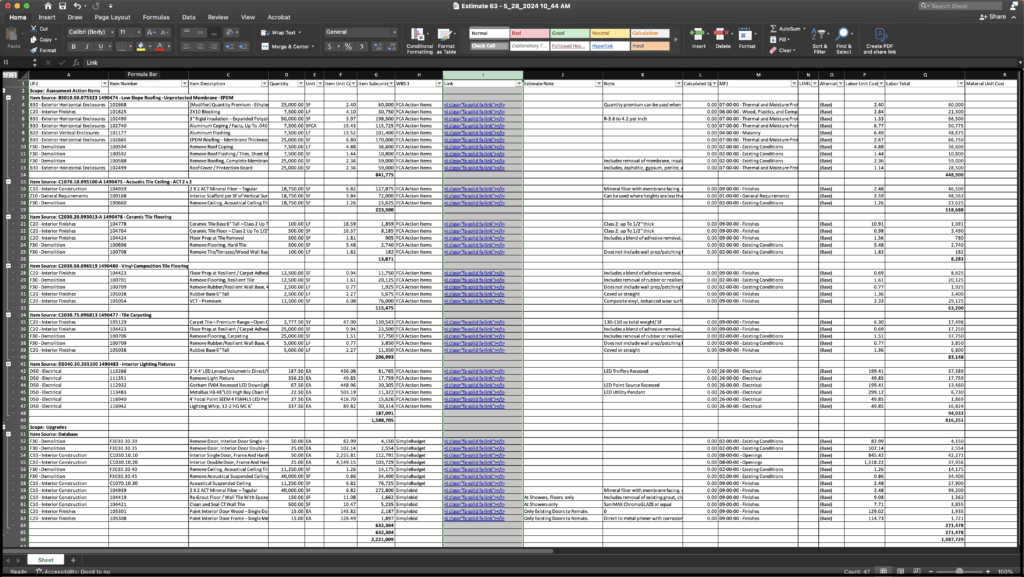
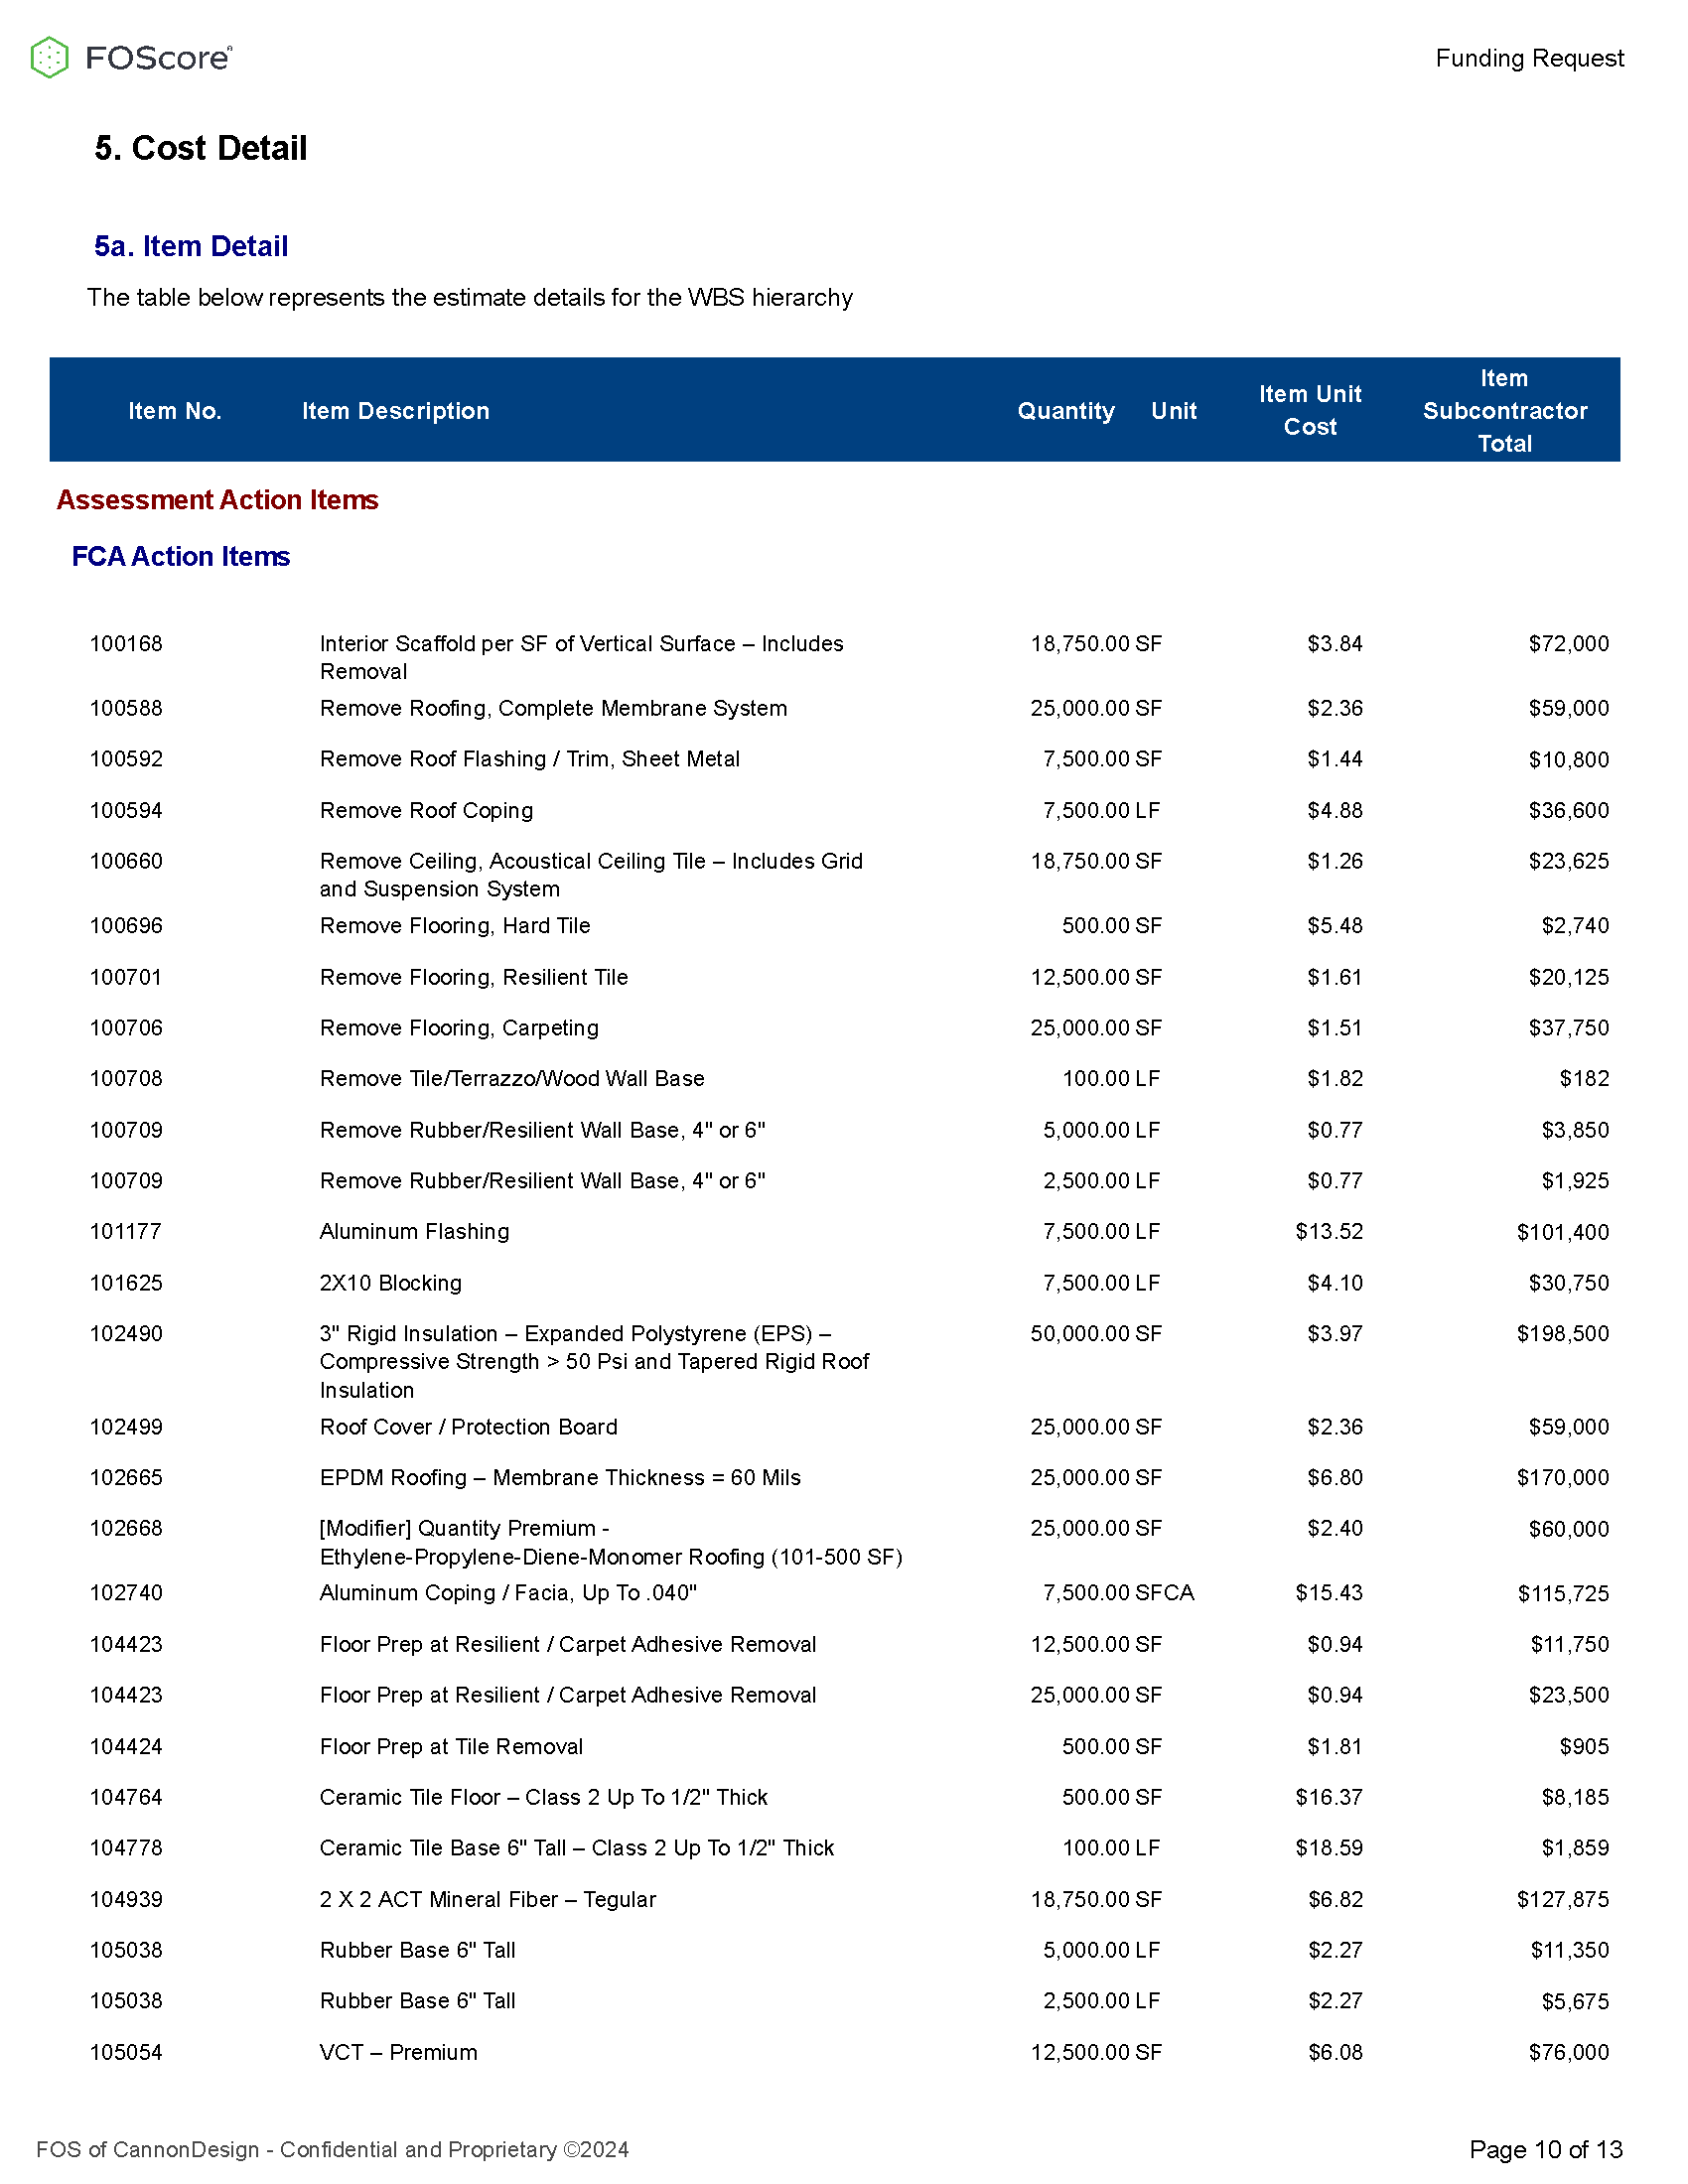
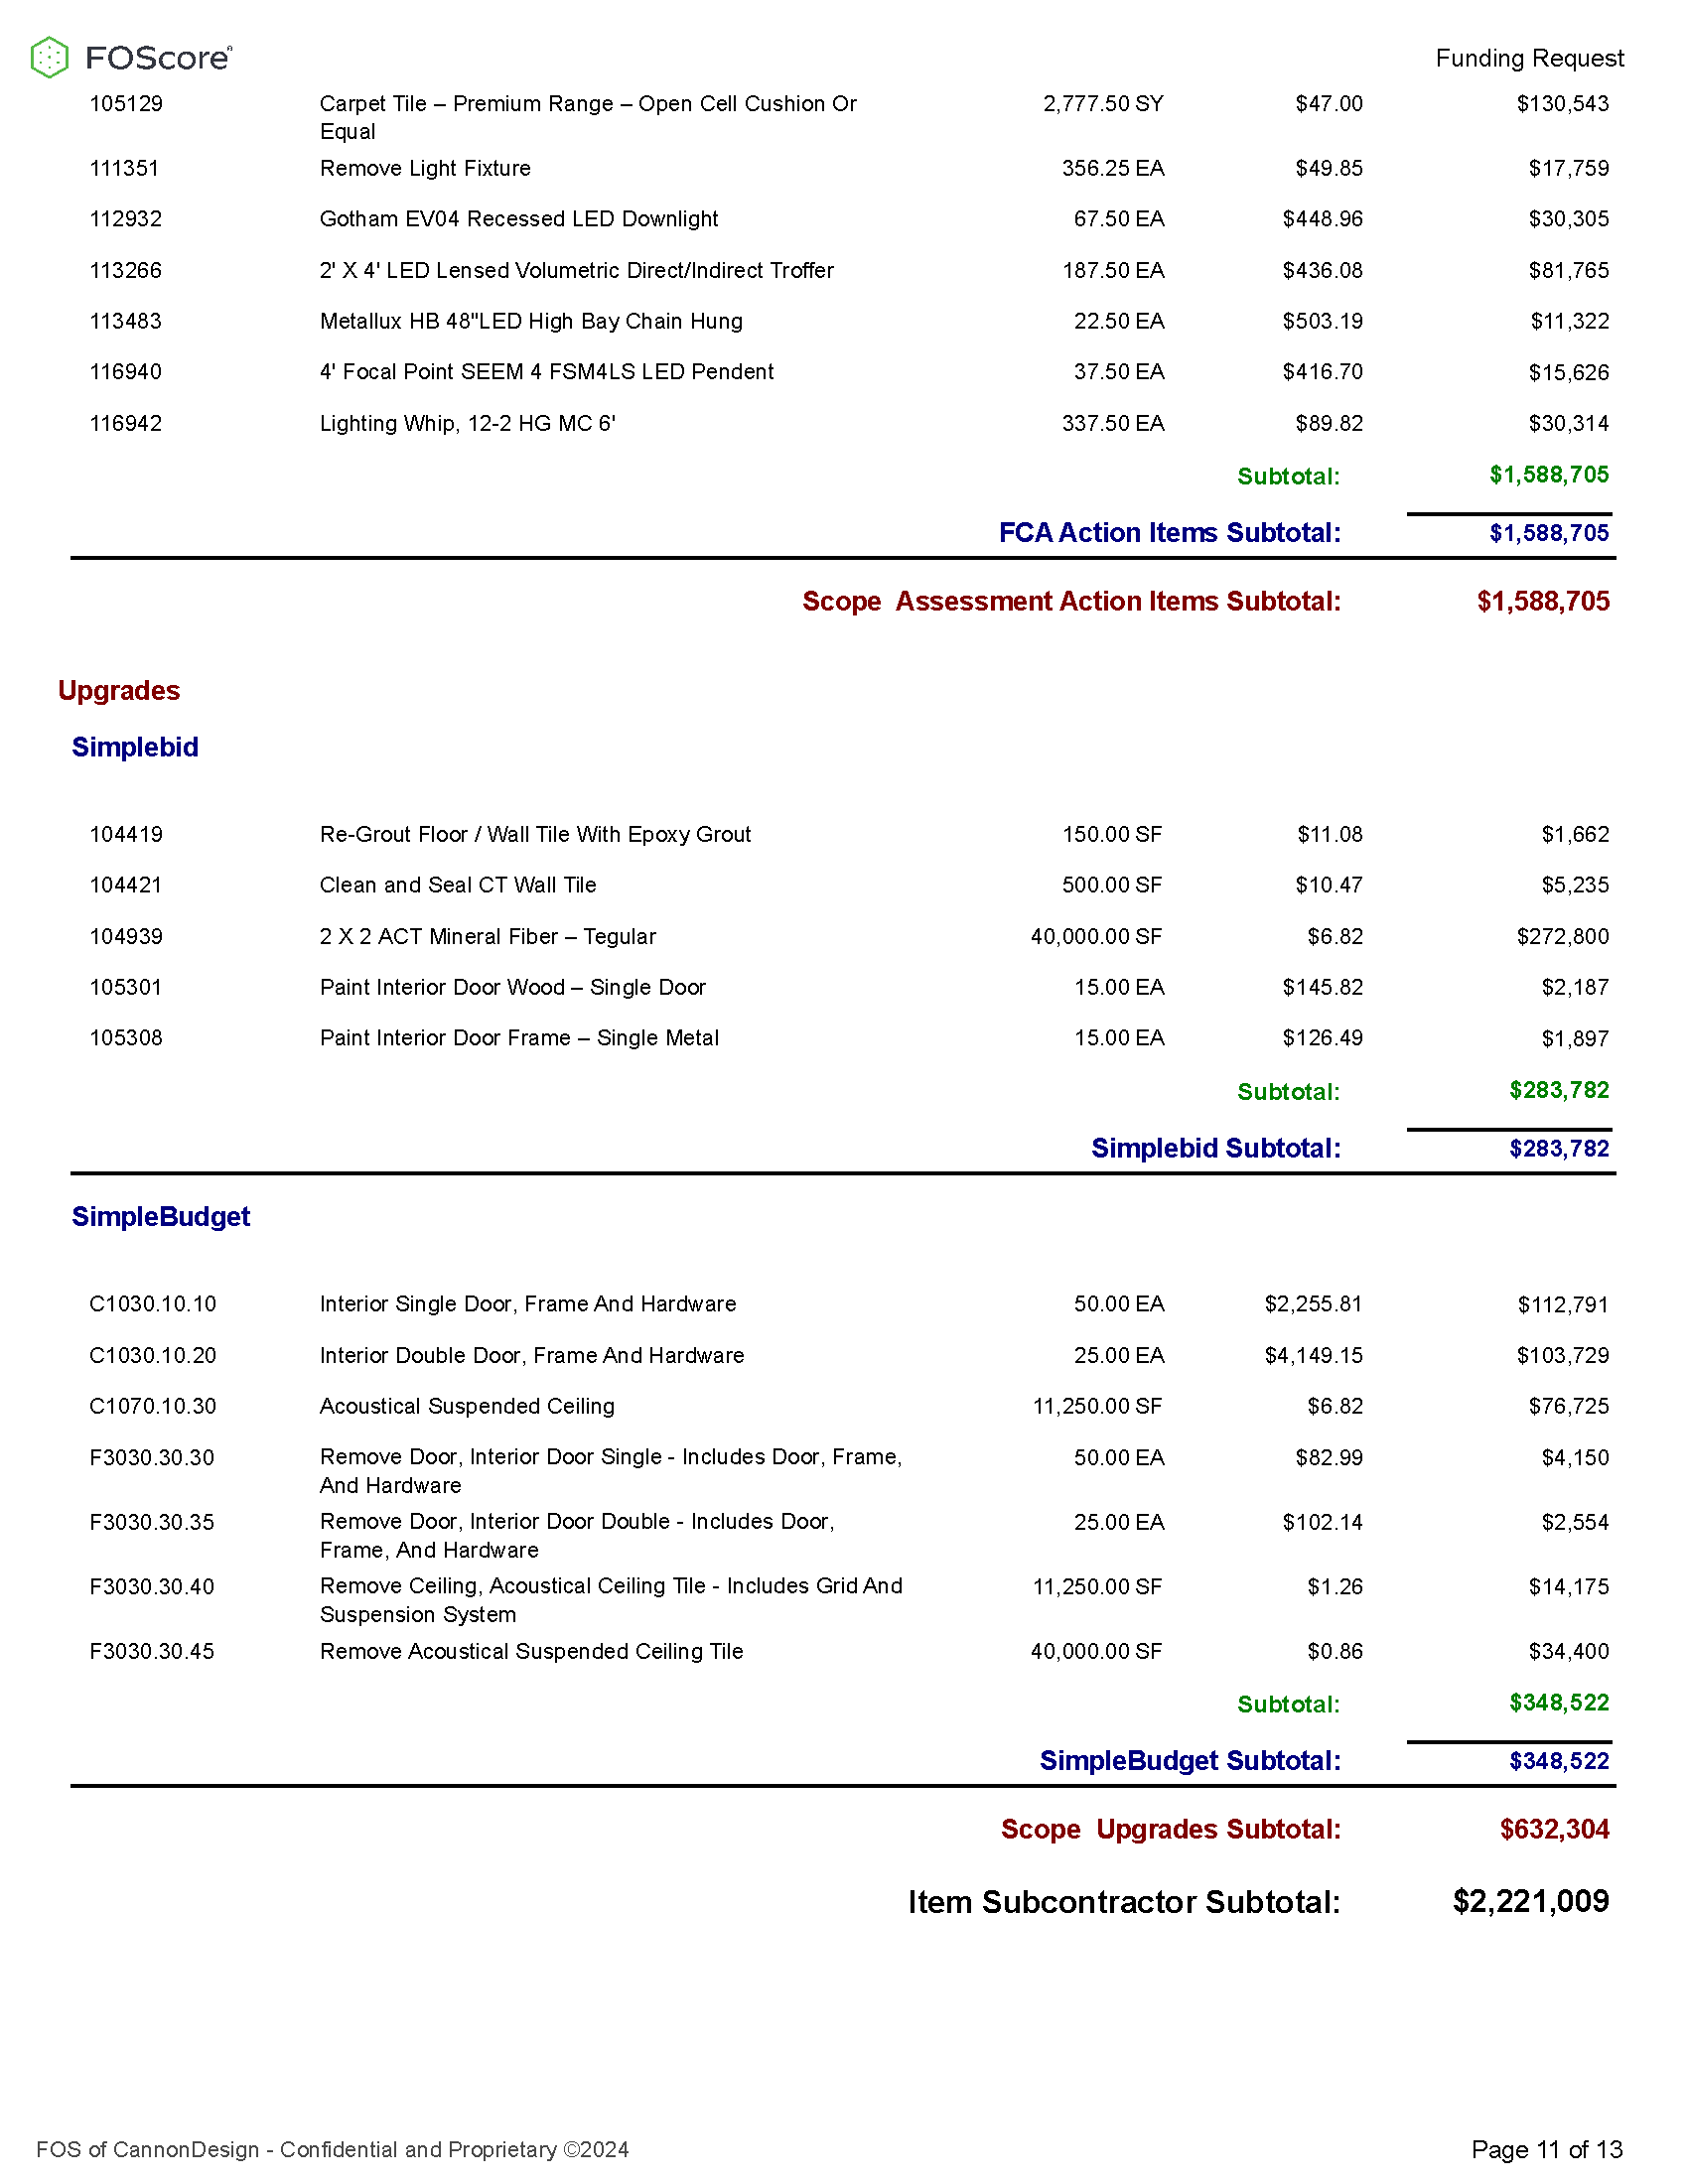
Estimate Contents #
The estimate’s line item details are stored in the Estimate Contents grid. Estimate contents can be added individually, by entering values in an Estimating Calculator, and/or by importing external costs.
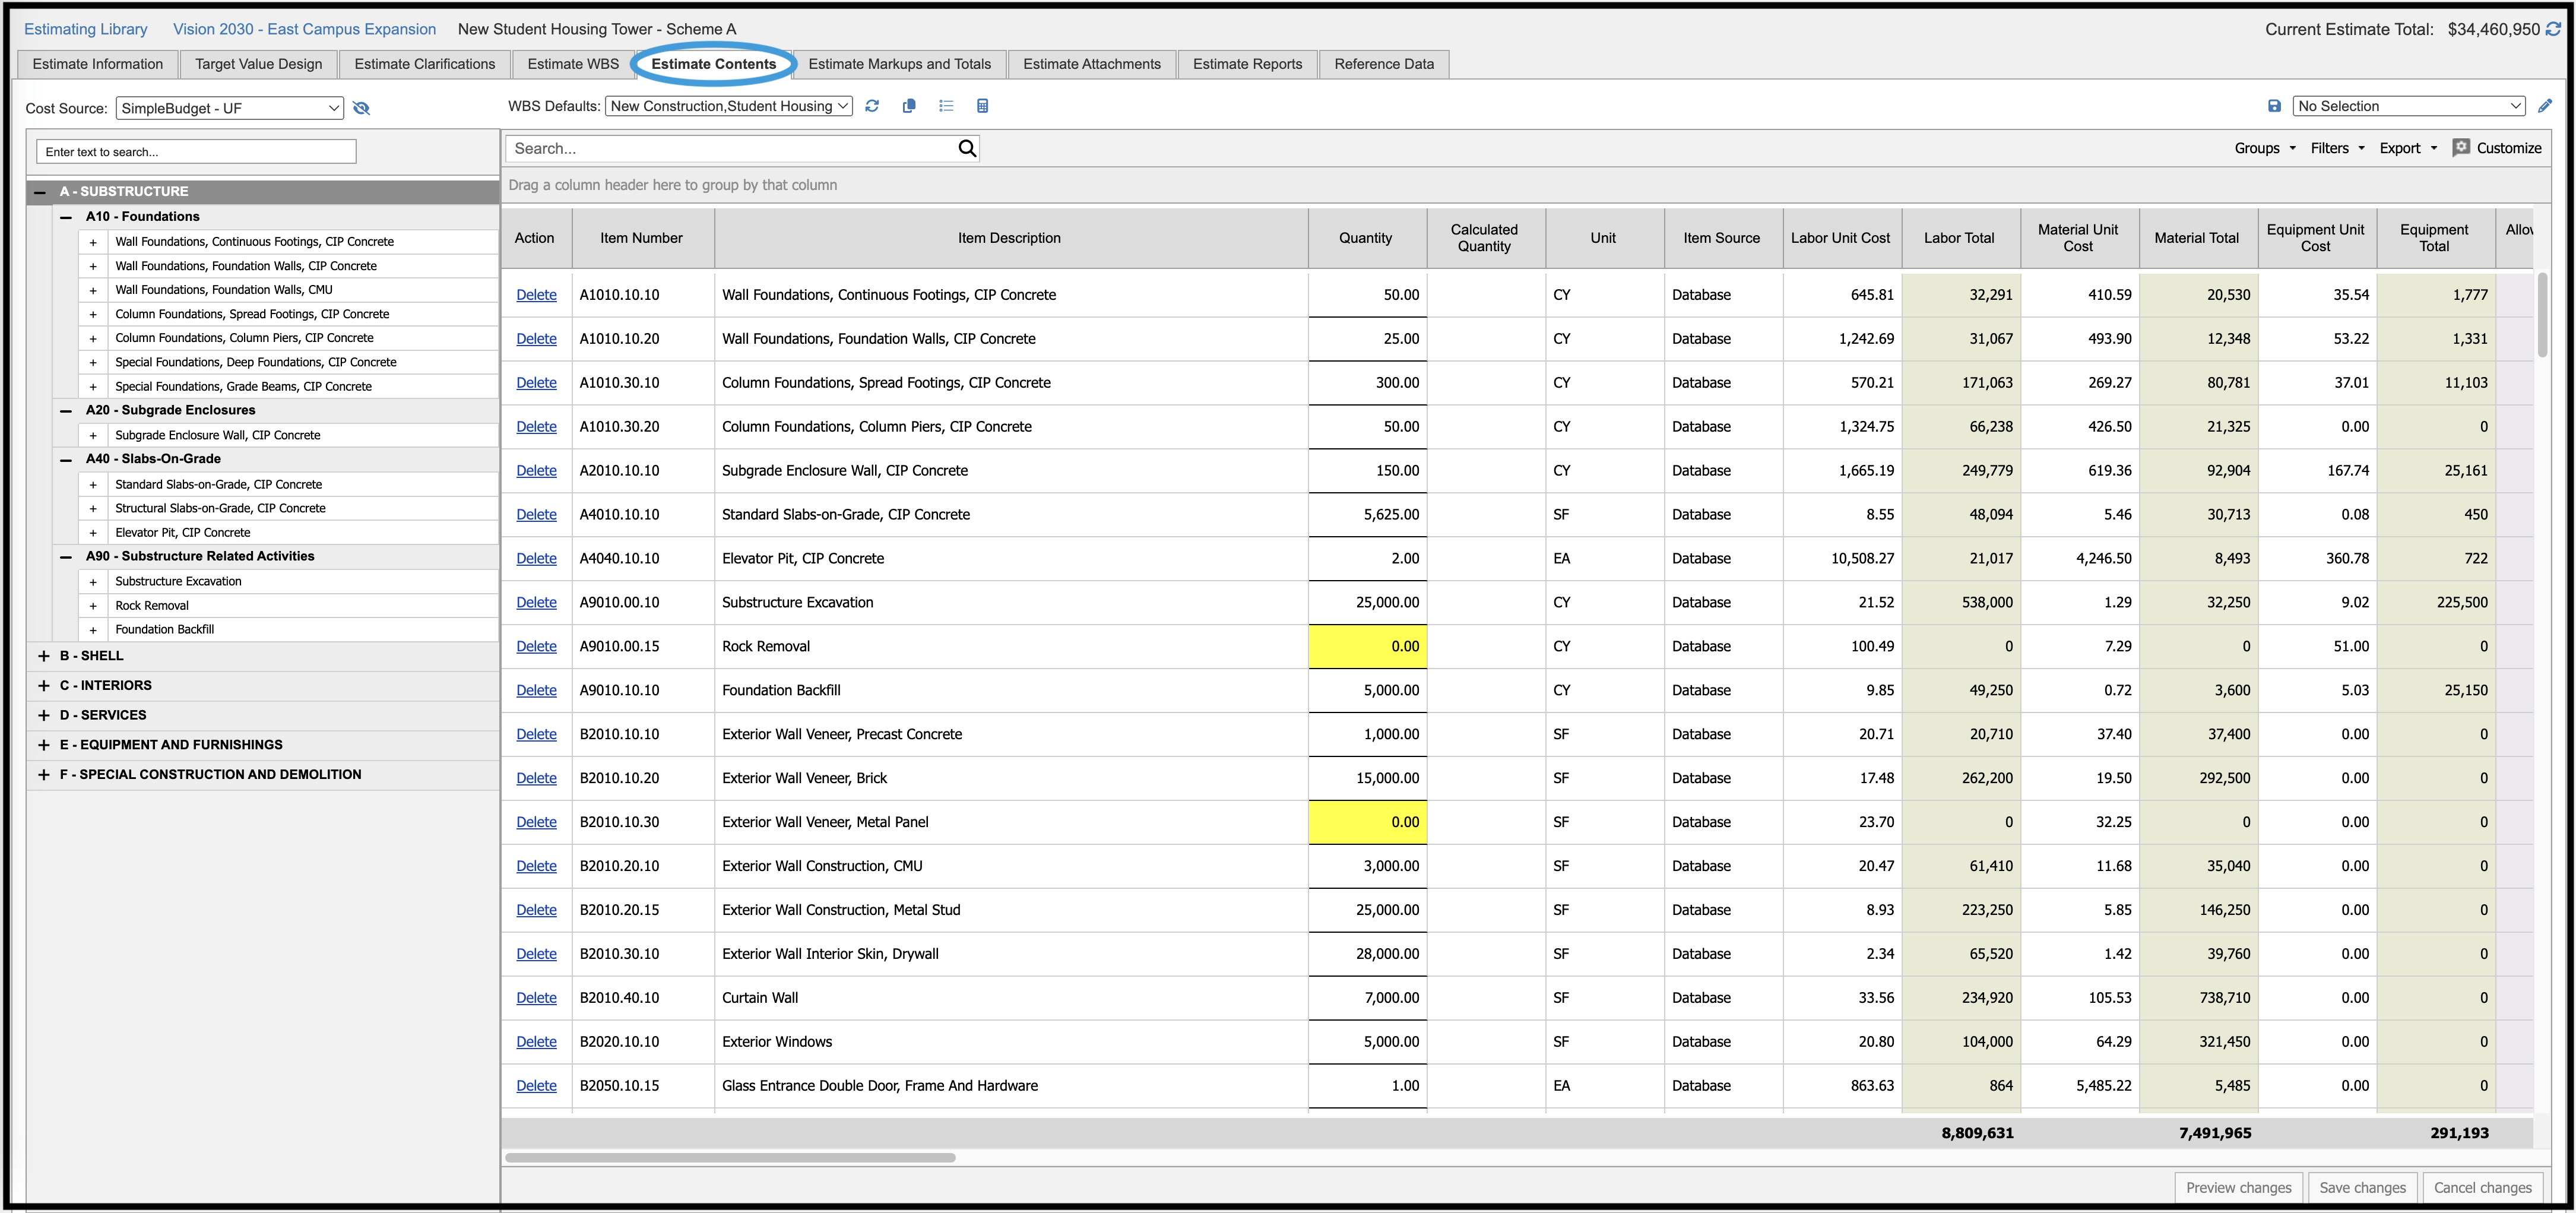
Within the Estimate Contents grid, the following information can be found:
| Action | Item Number | Item Description |
| Quantity | Calculated Quantity | Unit |
| Item Source | Labor Unit Cost | Labor Total |
| Material Unit Cost | Material Total | Equipment Unit Cost |
| Equipment Total | Allowance Unit Cost | Allowance Total |
| Database Item Unit Cost | Item Unit Cost | Item Subcontractor Total |
| Estimate Note | Attachment | Note |
| Scope | WBS 1 | WBS 2 |
| Alternates | UF1-UF4 | MF1-MF4 |
| Item ID | Crew | Rate Table |
| Link |
While most columns contain information that is self-explanatory, please note:
- Estimate Notes add detail to an item within an estimate, while the Note column stores the information in the database.
- The Link column connects the estimate item to an FCA item in the Assets module.
Cost Source #
Estimates can include items from multiple sources. The Cost Source dropdown menu is located on the upper left side of the screen. Depending on your subscription, you can select from FCA Items derived from deficiencies in your Facility Condition Assessment; Simplebid items, our proprietary database of nearly 17,000 items; SimpleBudget elements; or Client Items that you have entered in the system. Simplebid Items and SimpleBudget elements are searchable in both MasterFormat and UniFormat versions.
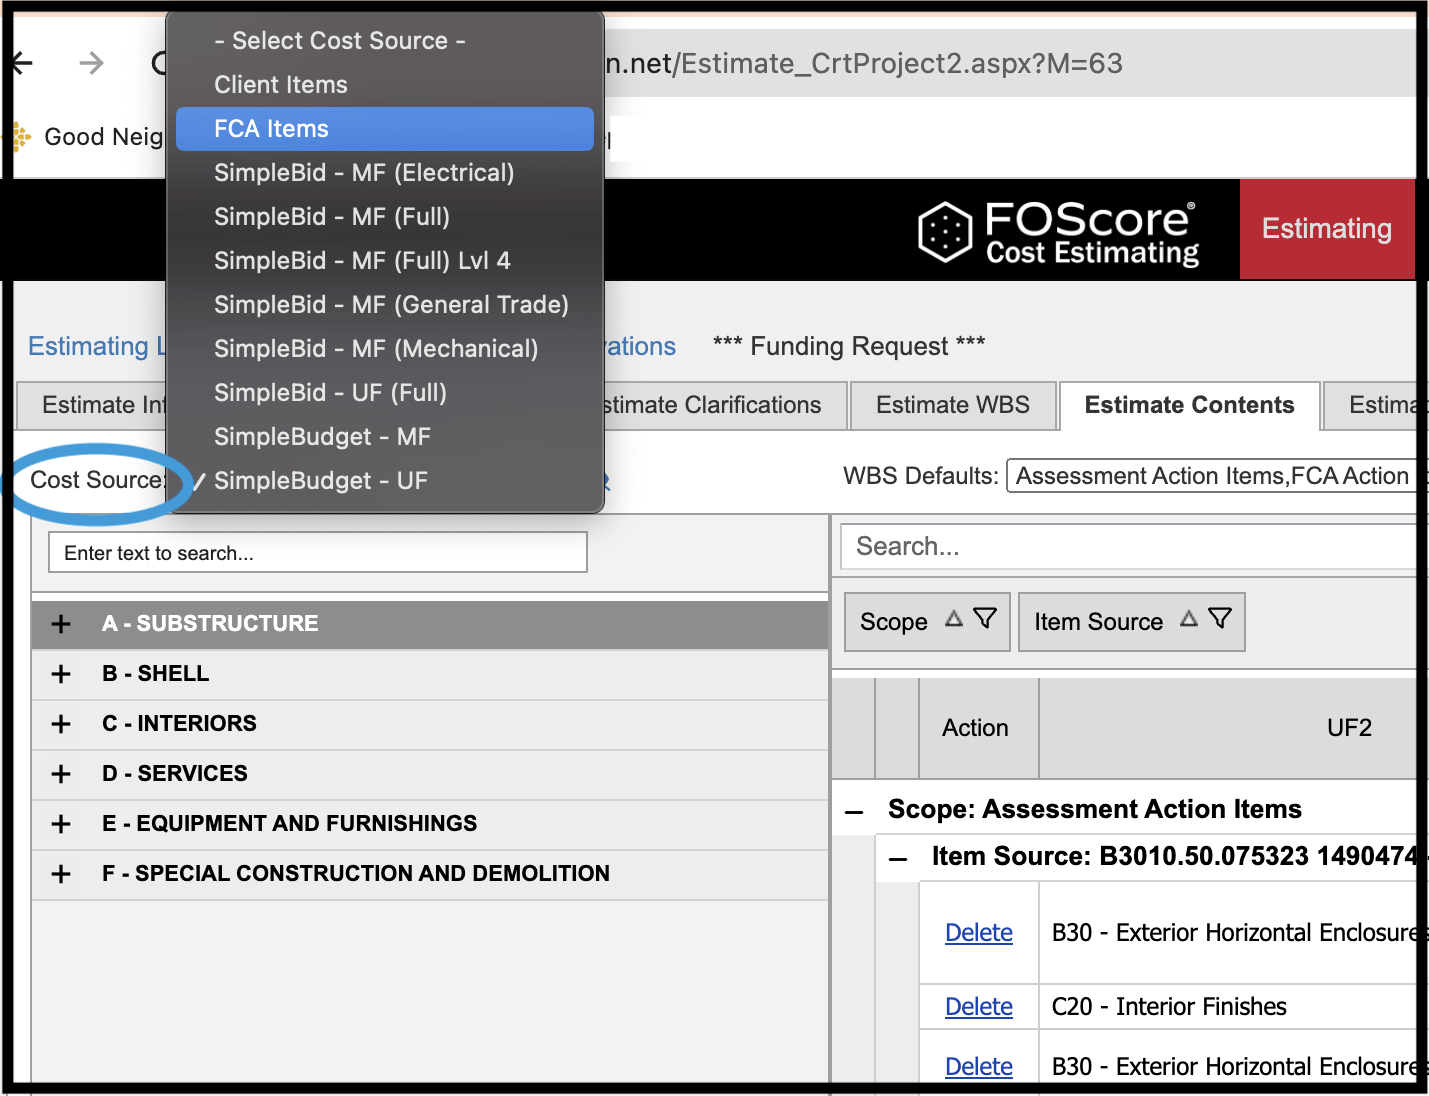
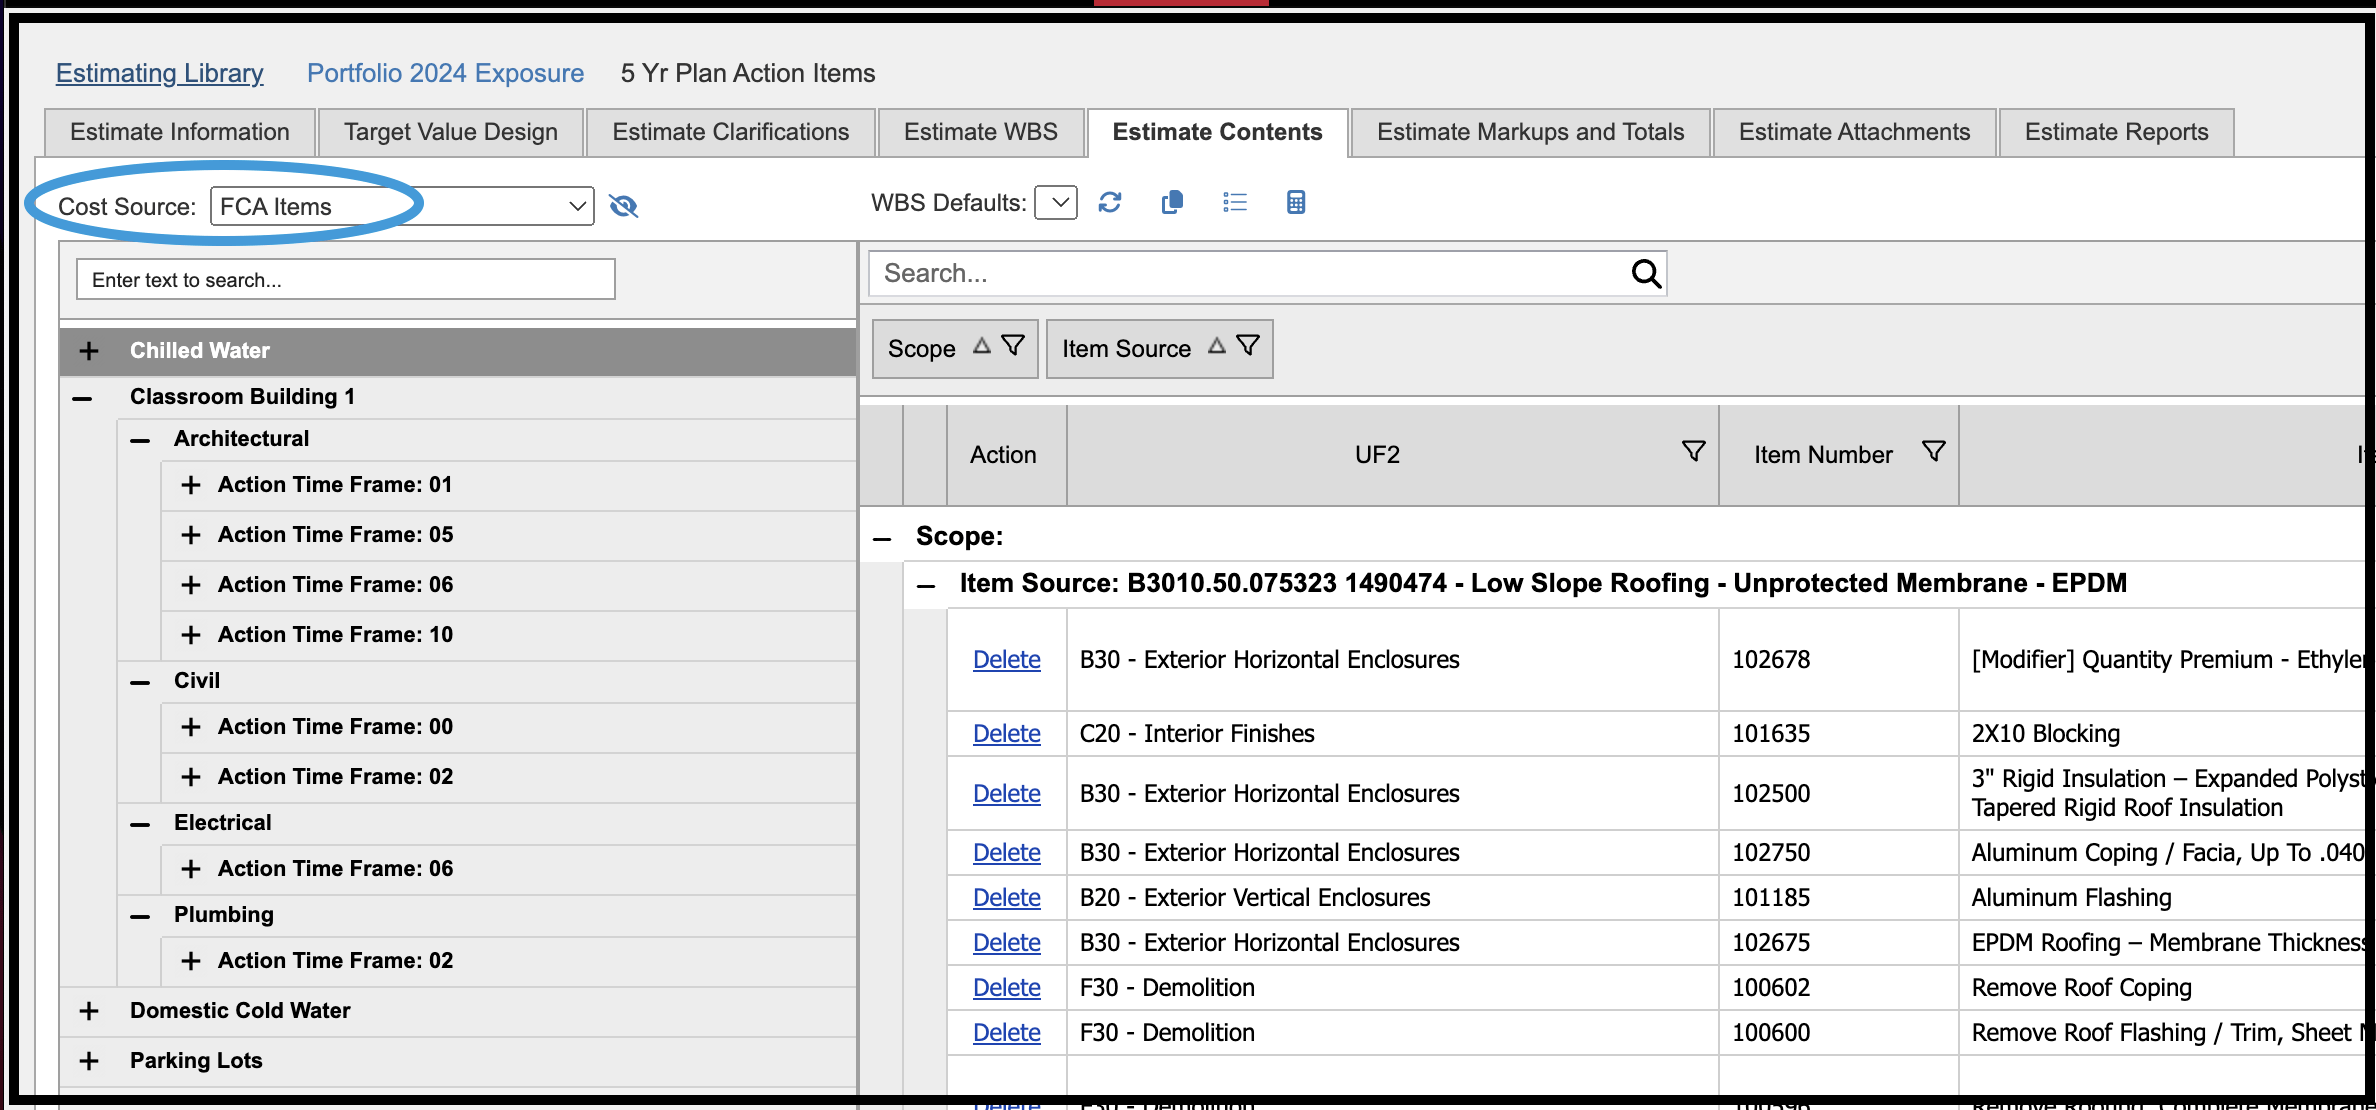
After using the search bar to locate items or locating them in the Cost Source grid, double-click on the item to select it and bring it into the estimate.
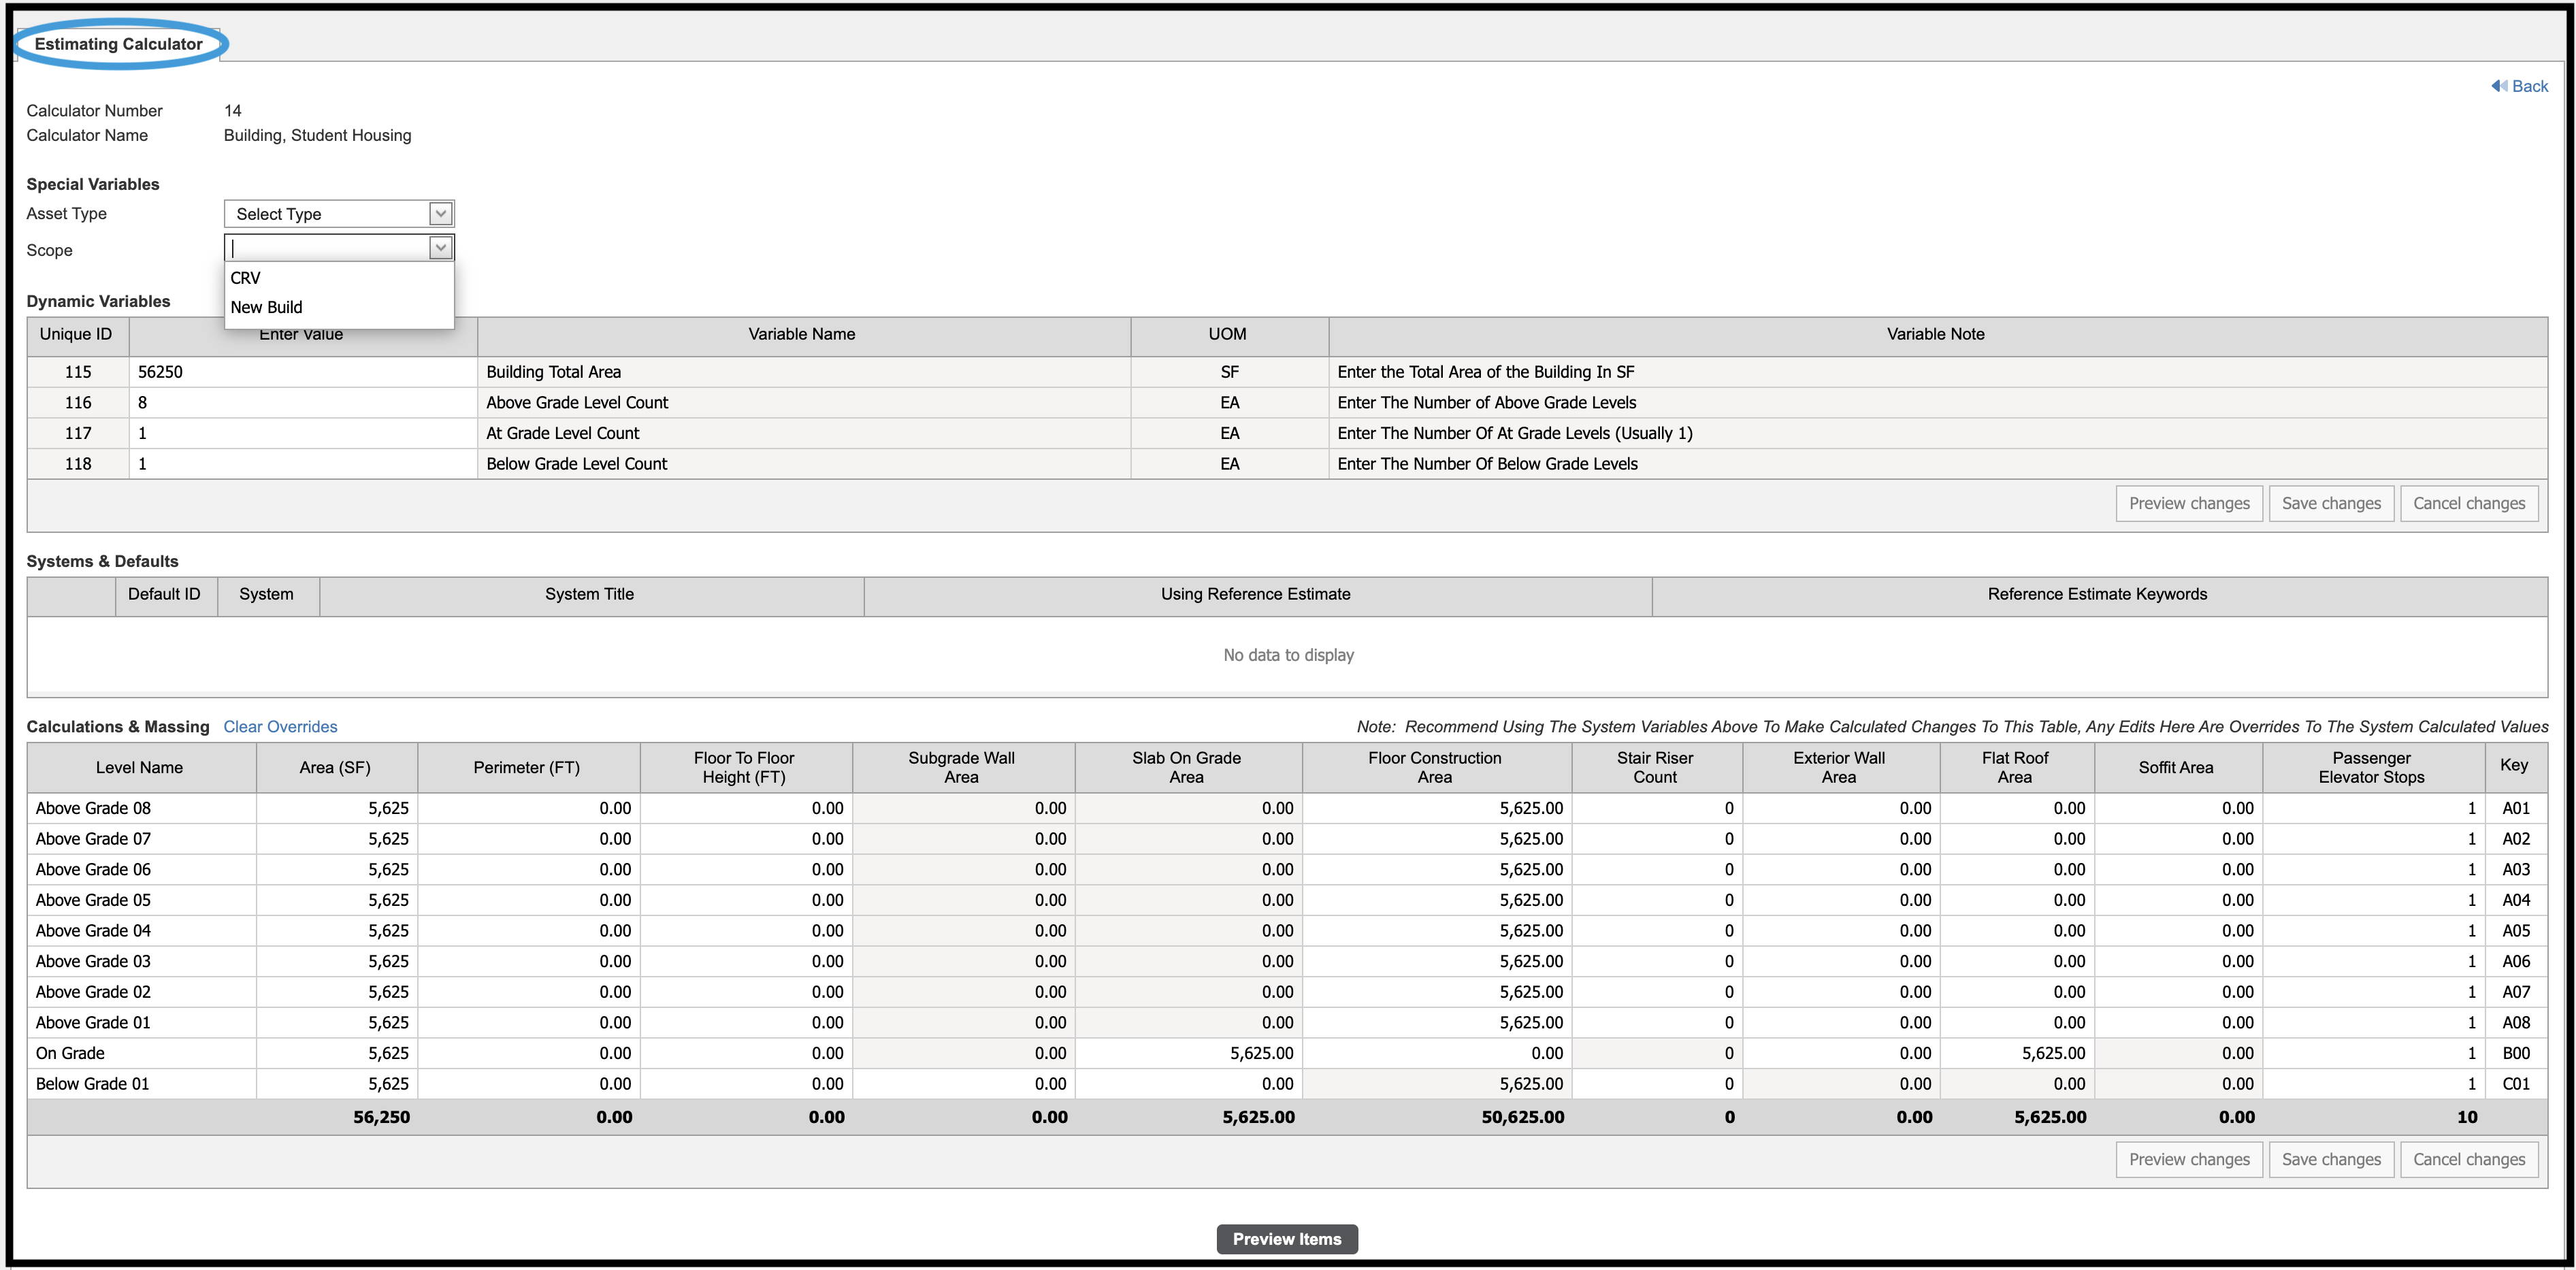
Estimating Calculator #
The system allows you to apply and edit values from past reference estimates with the Estimating Calculator function. Calculators are used to adjust quantities; unit costs are based on the rate table that was selected for the estimate; material and equipment costs are captured from the database in real time. Calculators use past estimates for quantities, not pricing.
Click on the calculator icon to select and run a calculator.
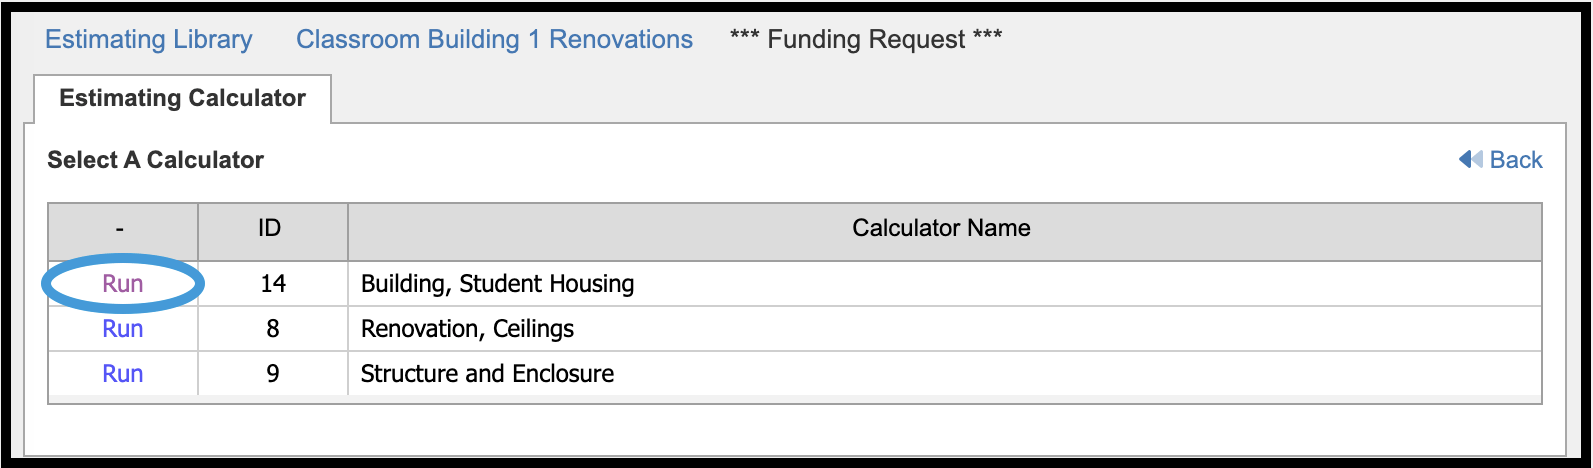
On the Estimating Calculator tab, the following information can be adjusted:
| Dynamic Variables | Systems & Defaults |
| Calculations & Massing | Item Logic |
WBS Defaults #
Move/Copy #
The following data management features are available in the Estimate Contents tab. Refer to the Estimating Library Data Management section above for a detailed description of how to use the features:
- Groups
- Filters
- Export
- Customize Layout
Export #
Estimates Contents can be exported in either Excel or CSV format.
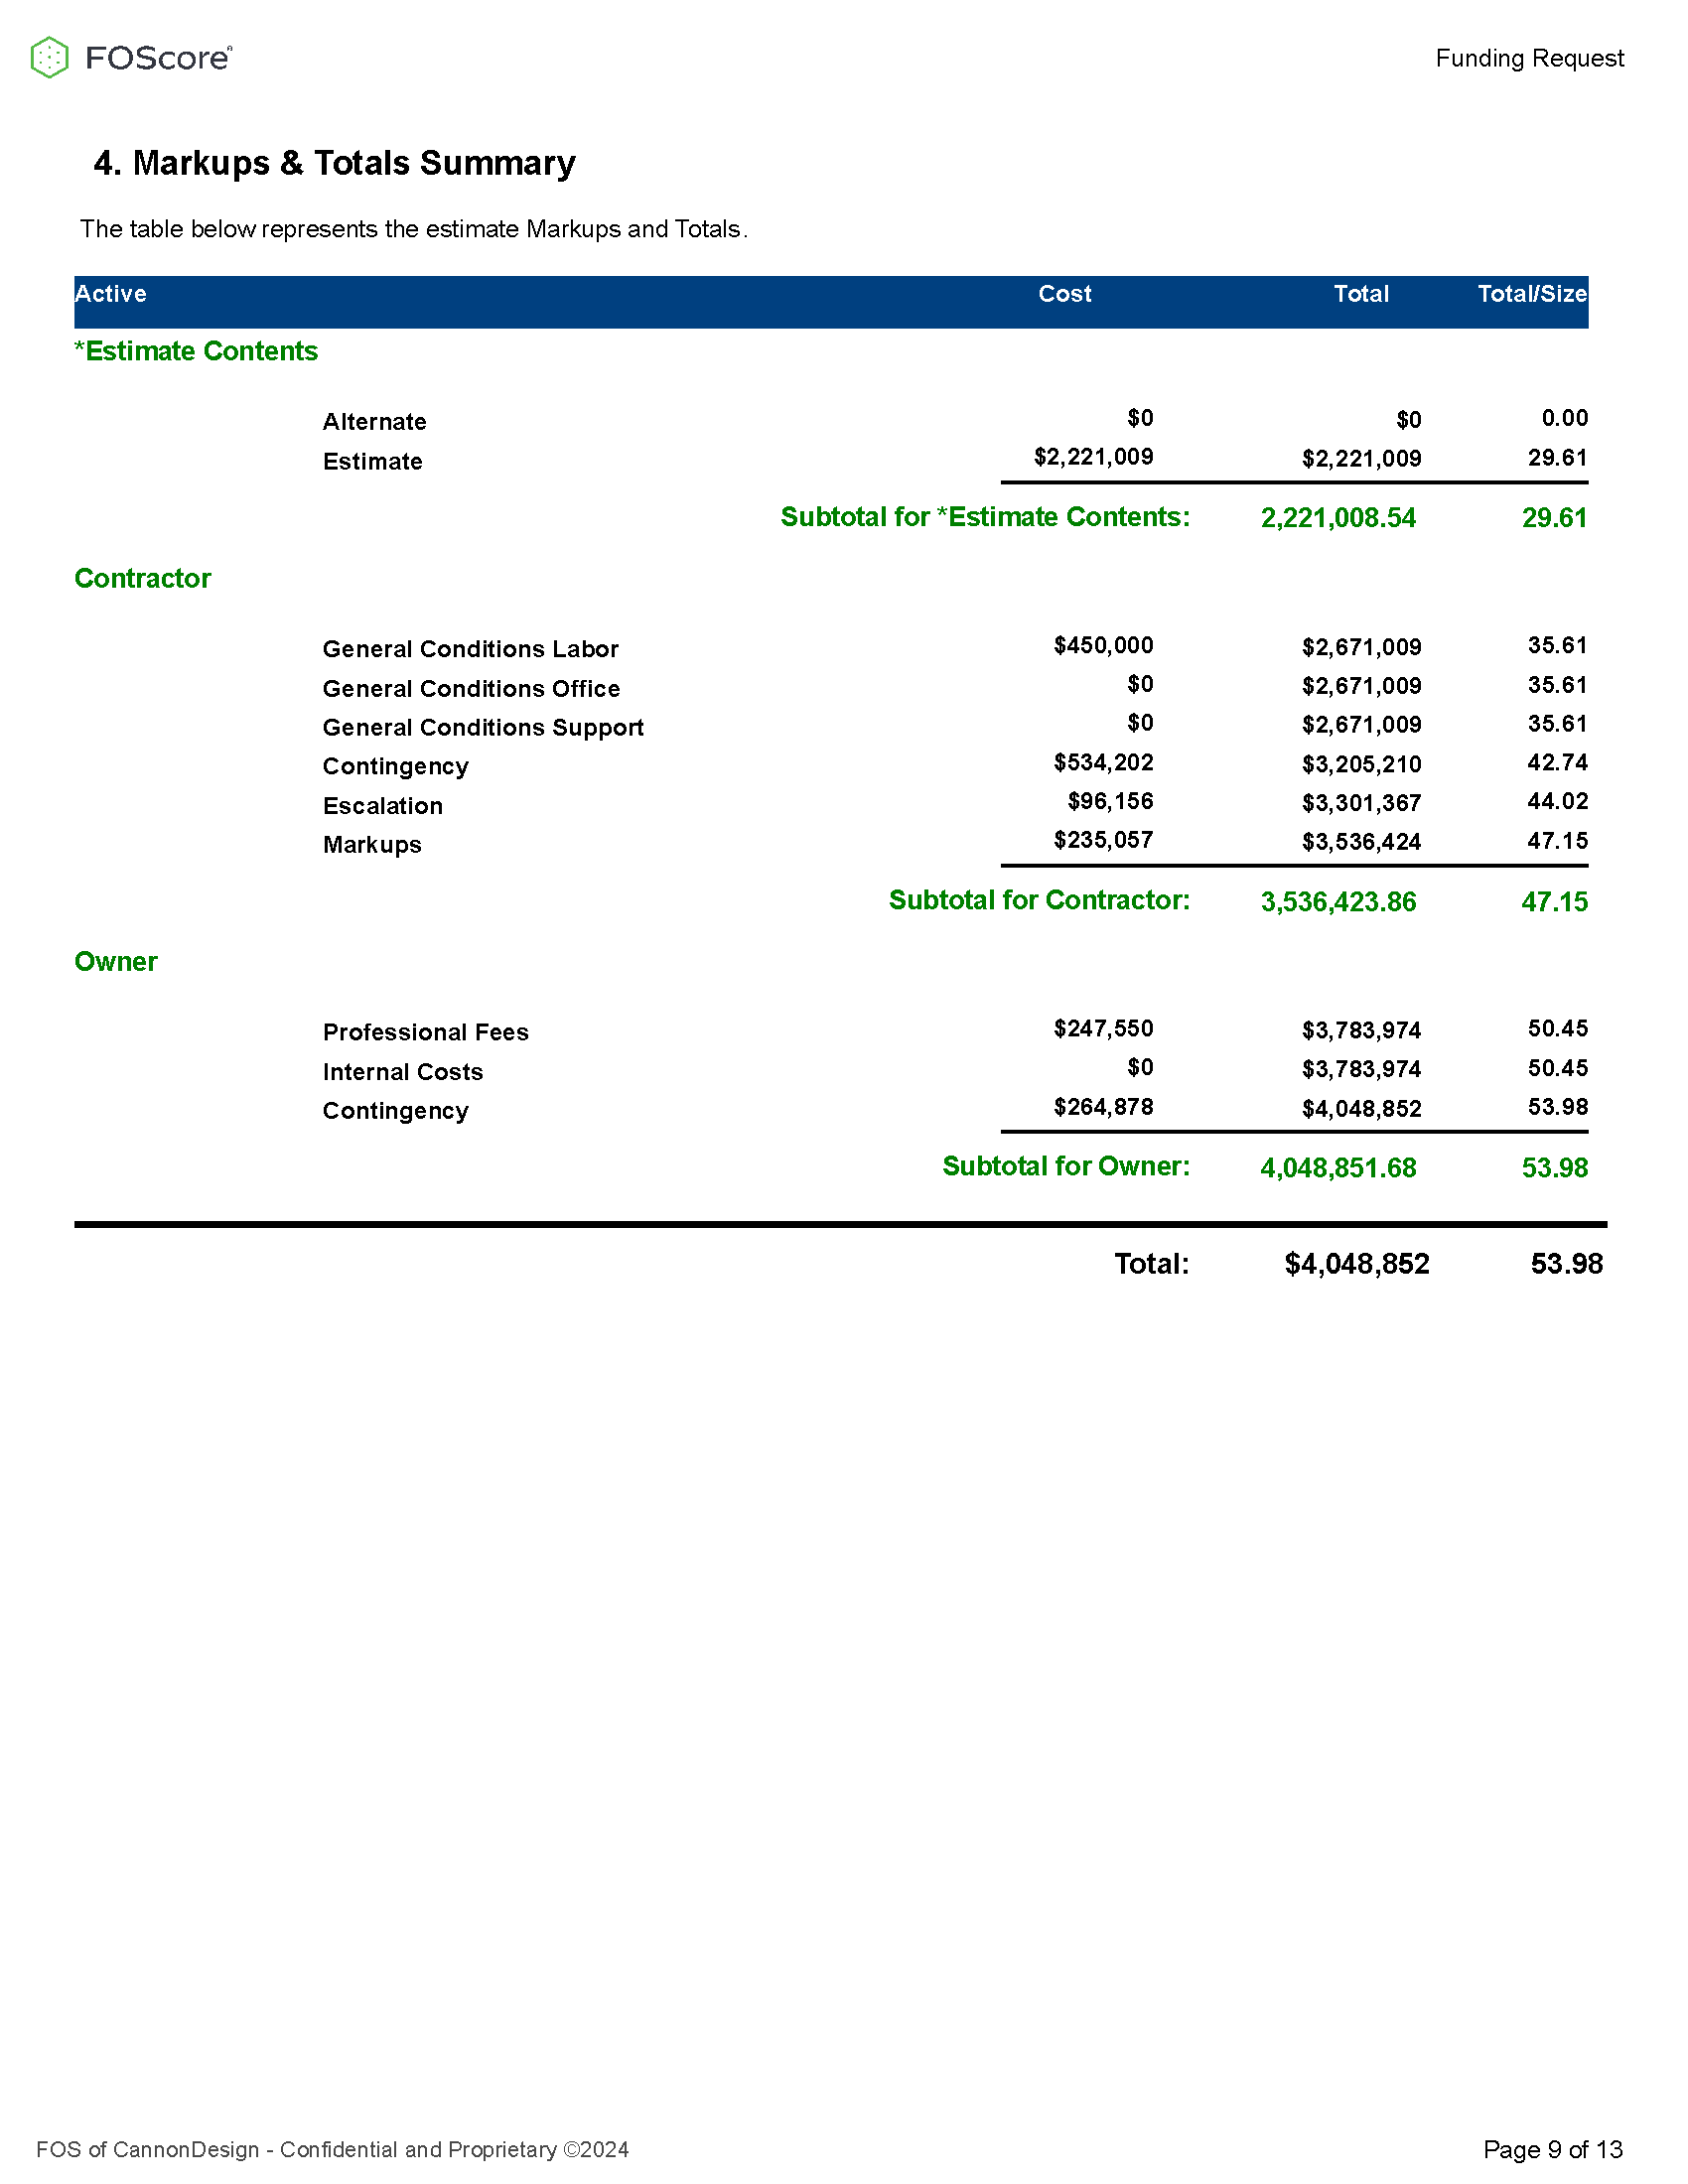
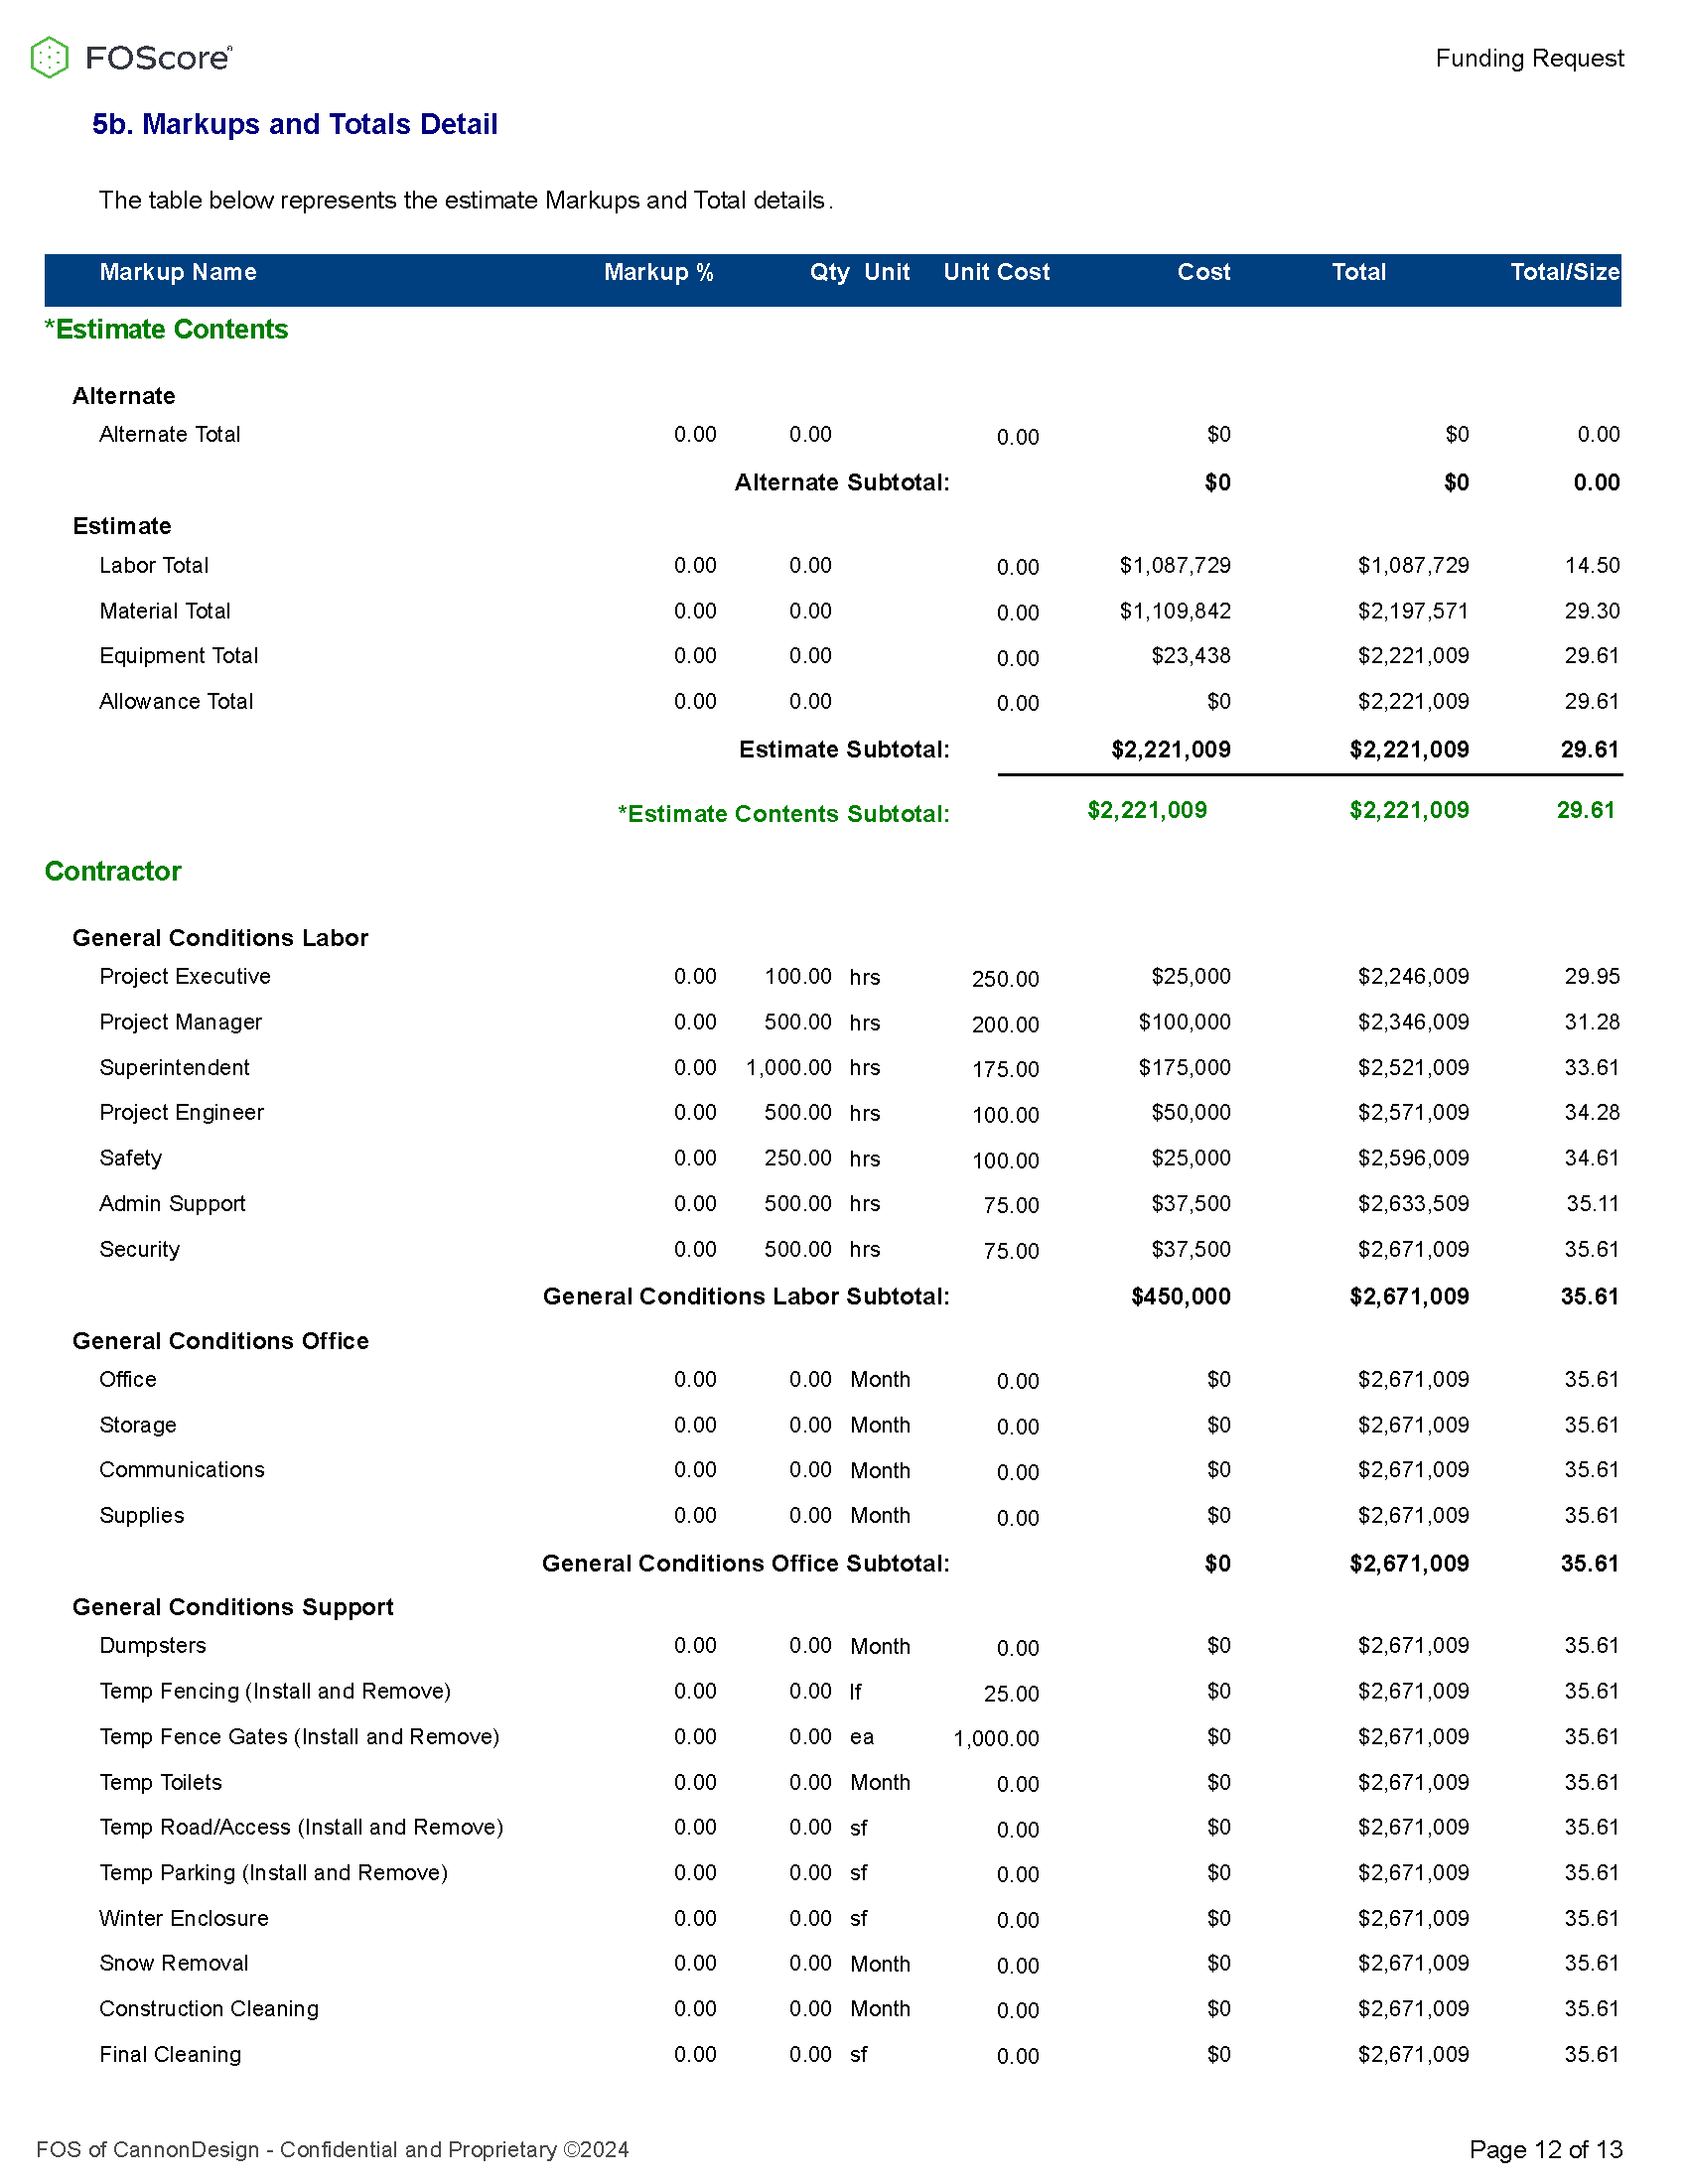
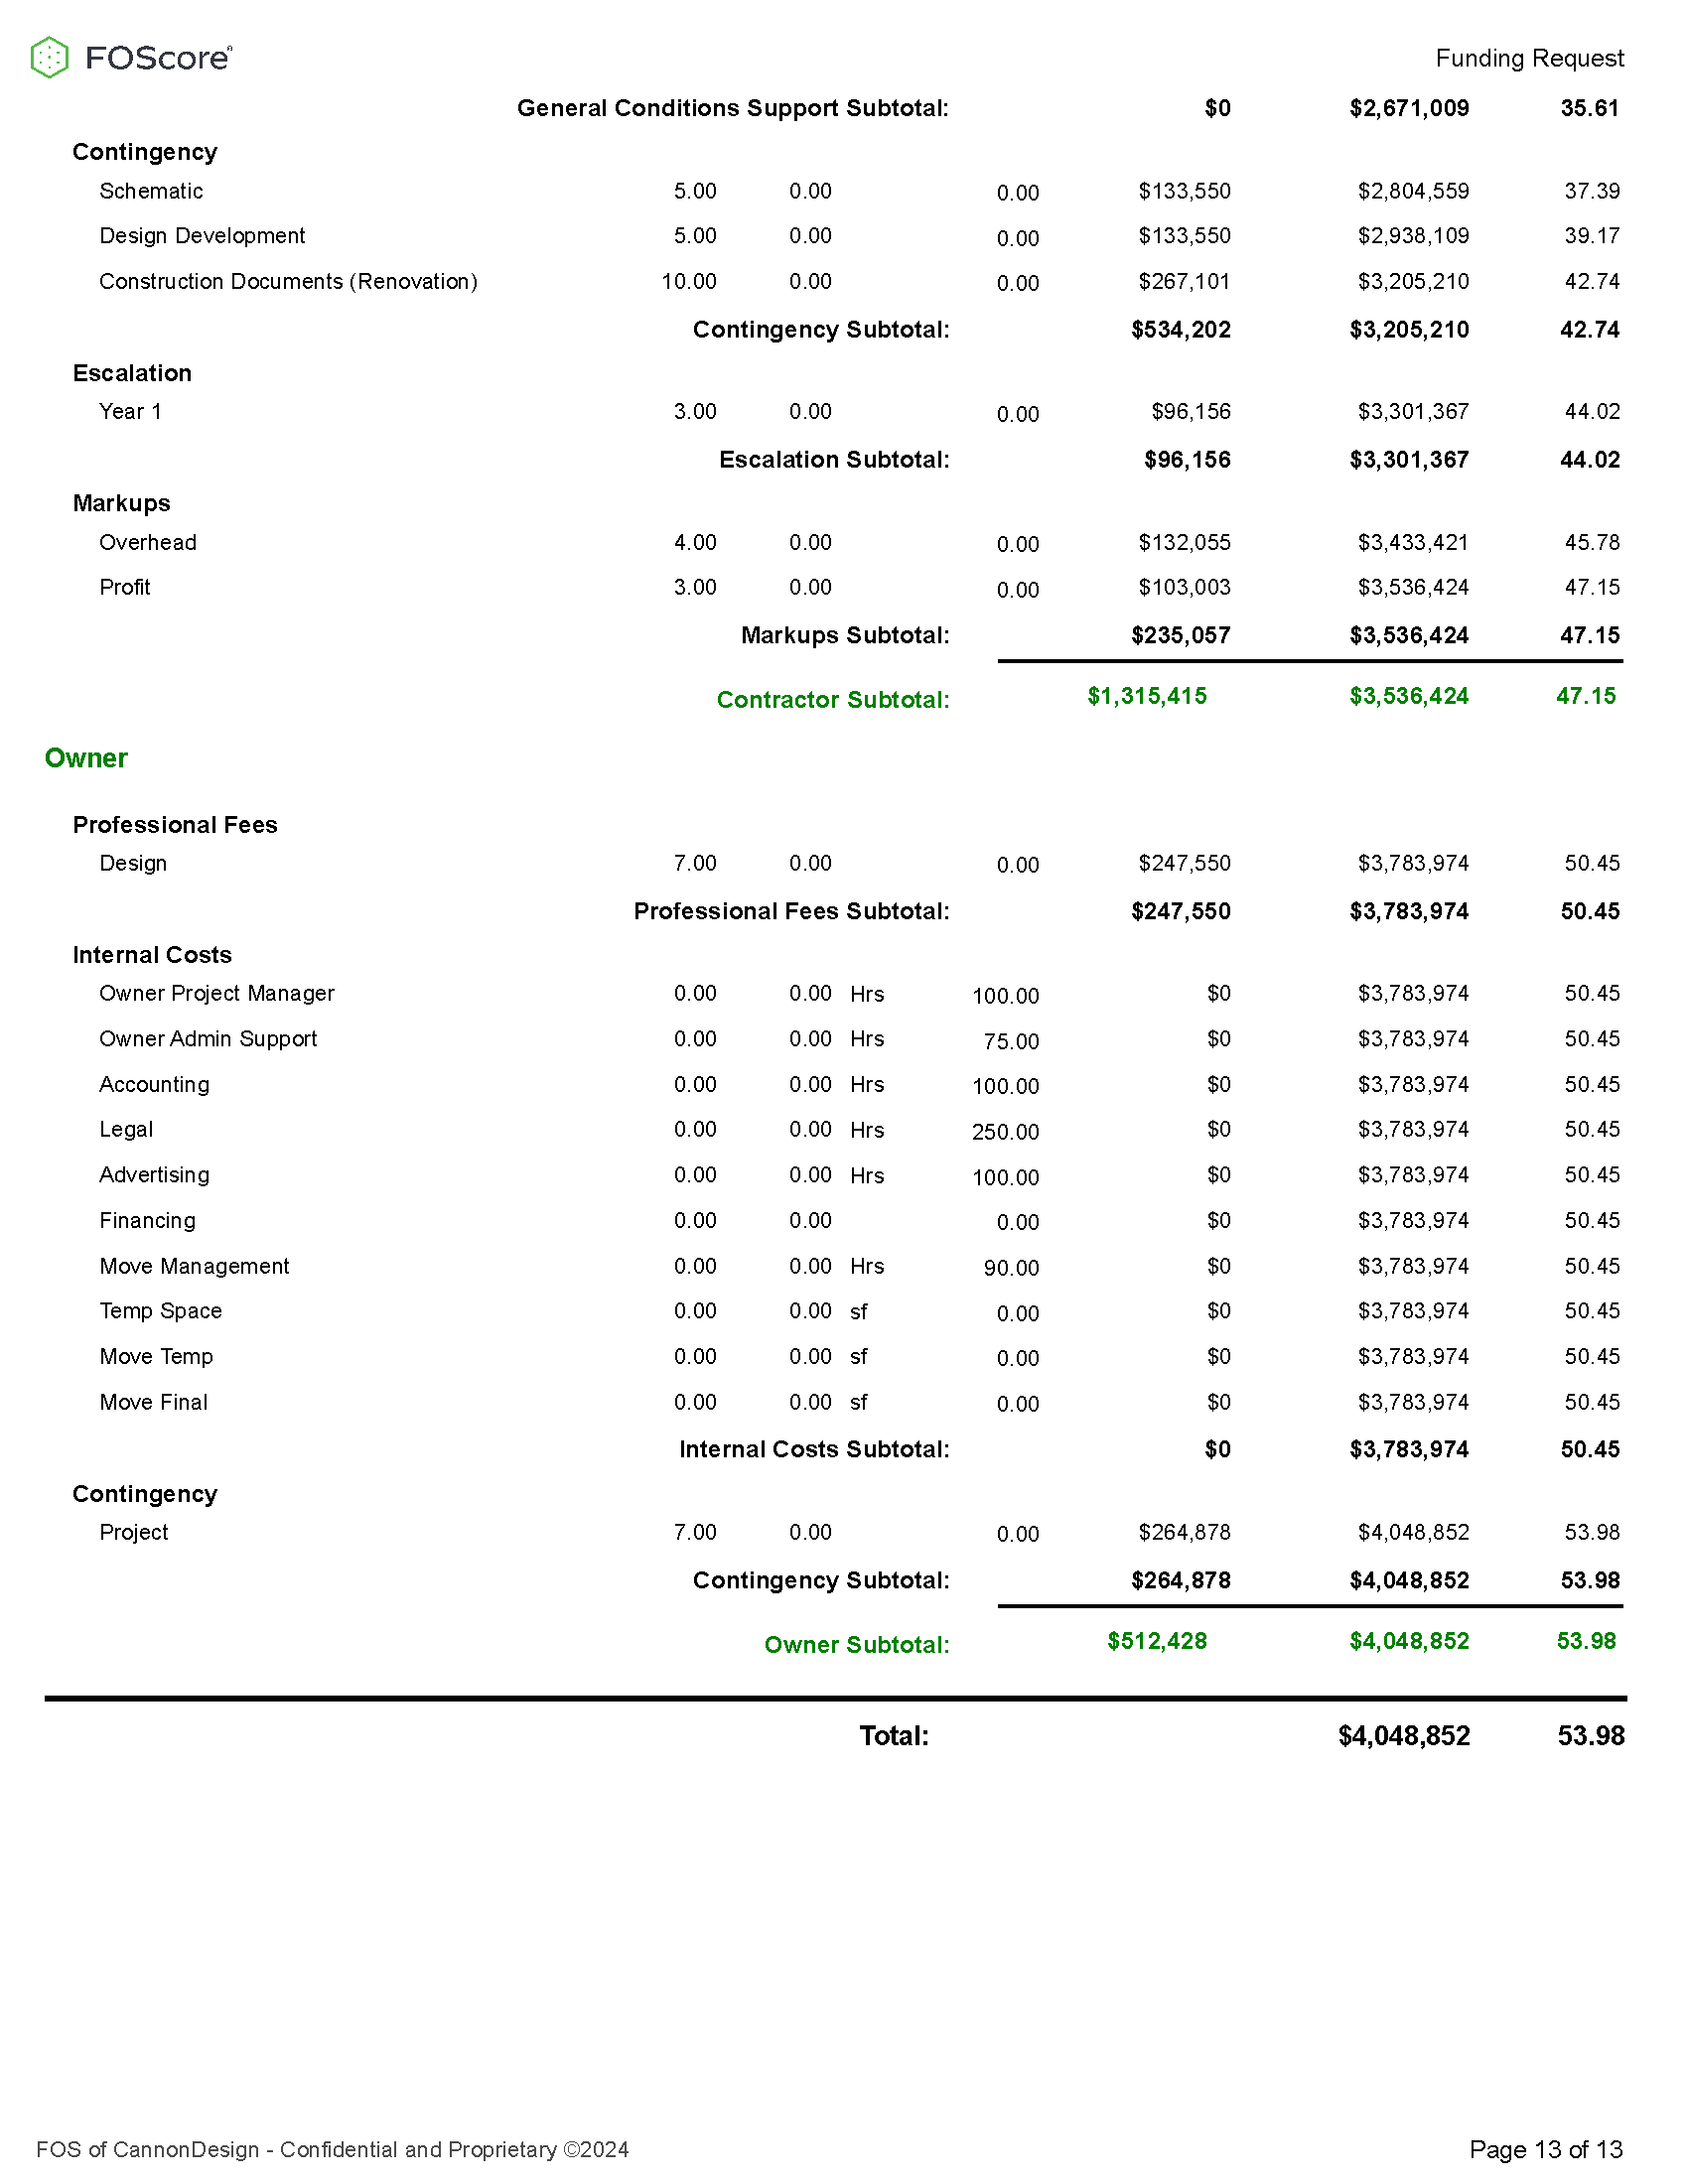
Estimate Markups and Totals #
Markups and totals can further enhance an estimate’s accuracy. Percentages, quantities, and unit costs are among the adjustment options under categories, including contractor and owner costs, labor, contingencies, etc.
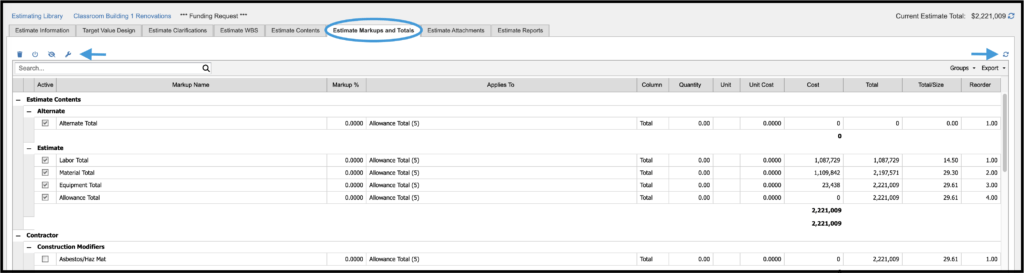
Within the Estimate Markups and Totals grid, the following information can be found:
| Active | Markup Name | Markup % |
| Applies To | Column | Quantity |
| Unit | Unit Cost | Cost |
| Total | Total Size | Reorder |
| Sequence |
As highlighted by arrows in the image above, use the following tools to assist you:
Reset All Markups

Turn On/Off All Markups

Show/Hide Inactive Items

Store Applies To As Client Default

Estimate Attachments #
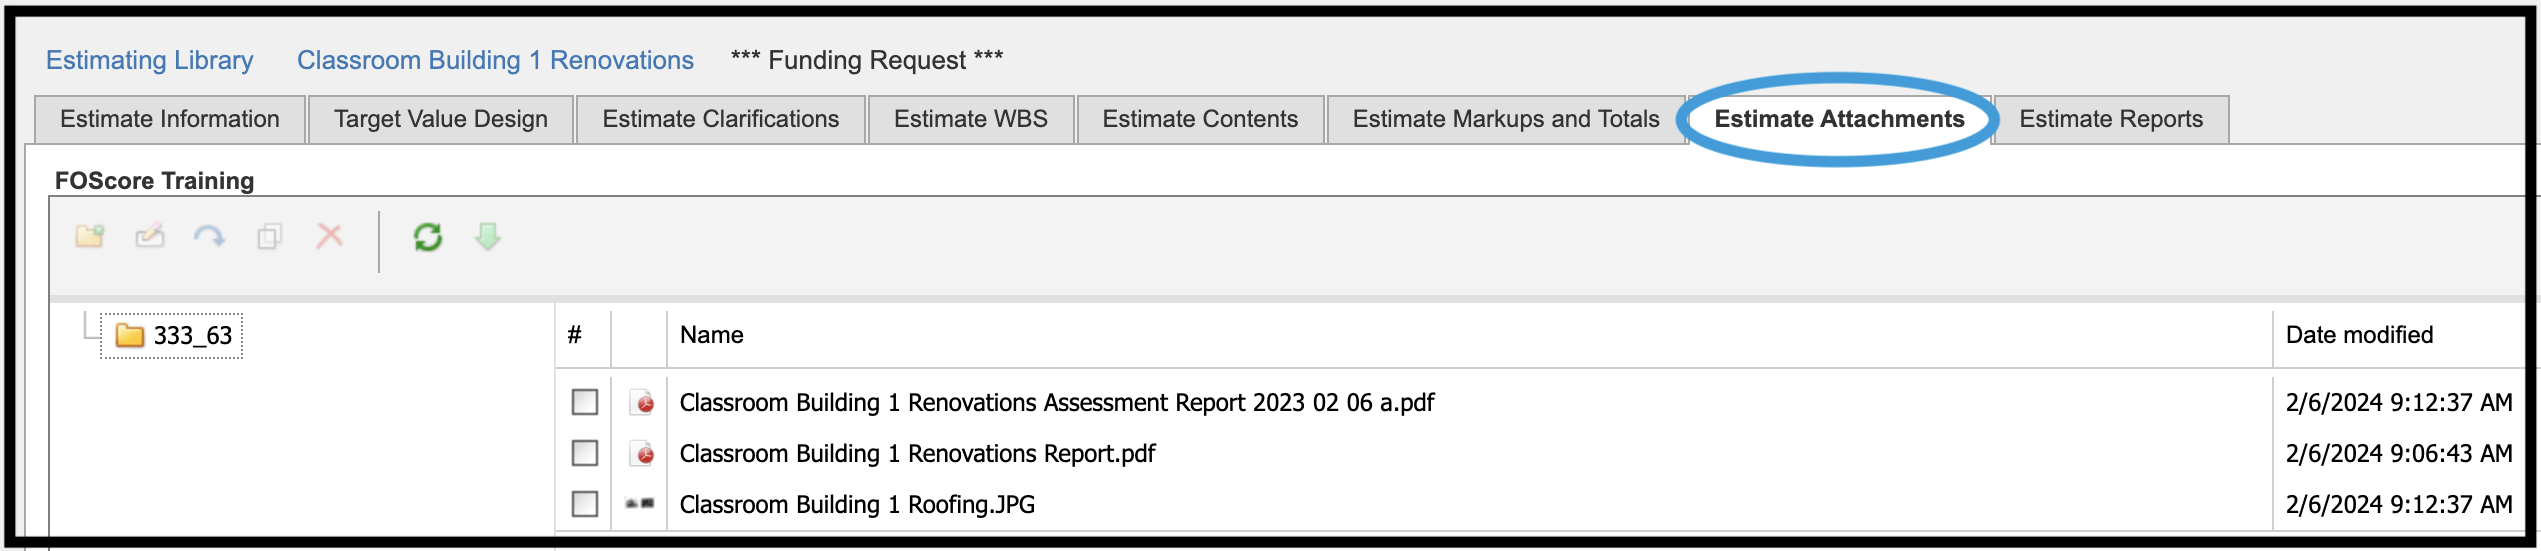
Click on the Browse button at the bottom of this screen to find documents on your desktop you would like to attach to your project. Helpful documents to include are pdfs and jpegs that illustrate the scope of work.
Estimate Reports #
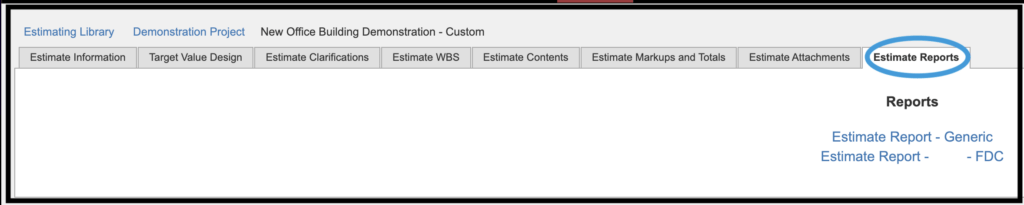
On this tab, you can generate estimate-related reports your FOS representative created for you. Click on the title of the report you would like to generate. A pdf will be launched on your computer.
A sample Estimate Report is shown below. Click on any page to open a new window.

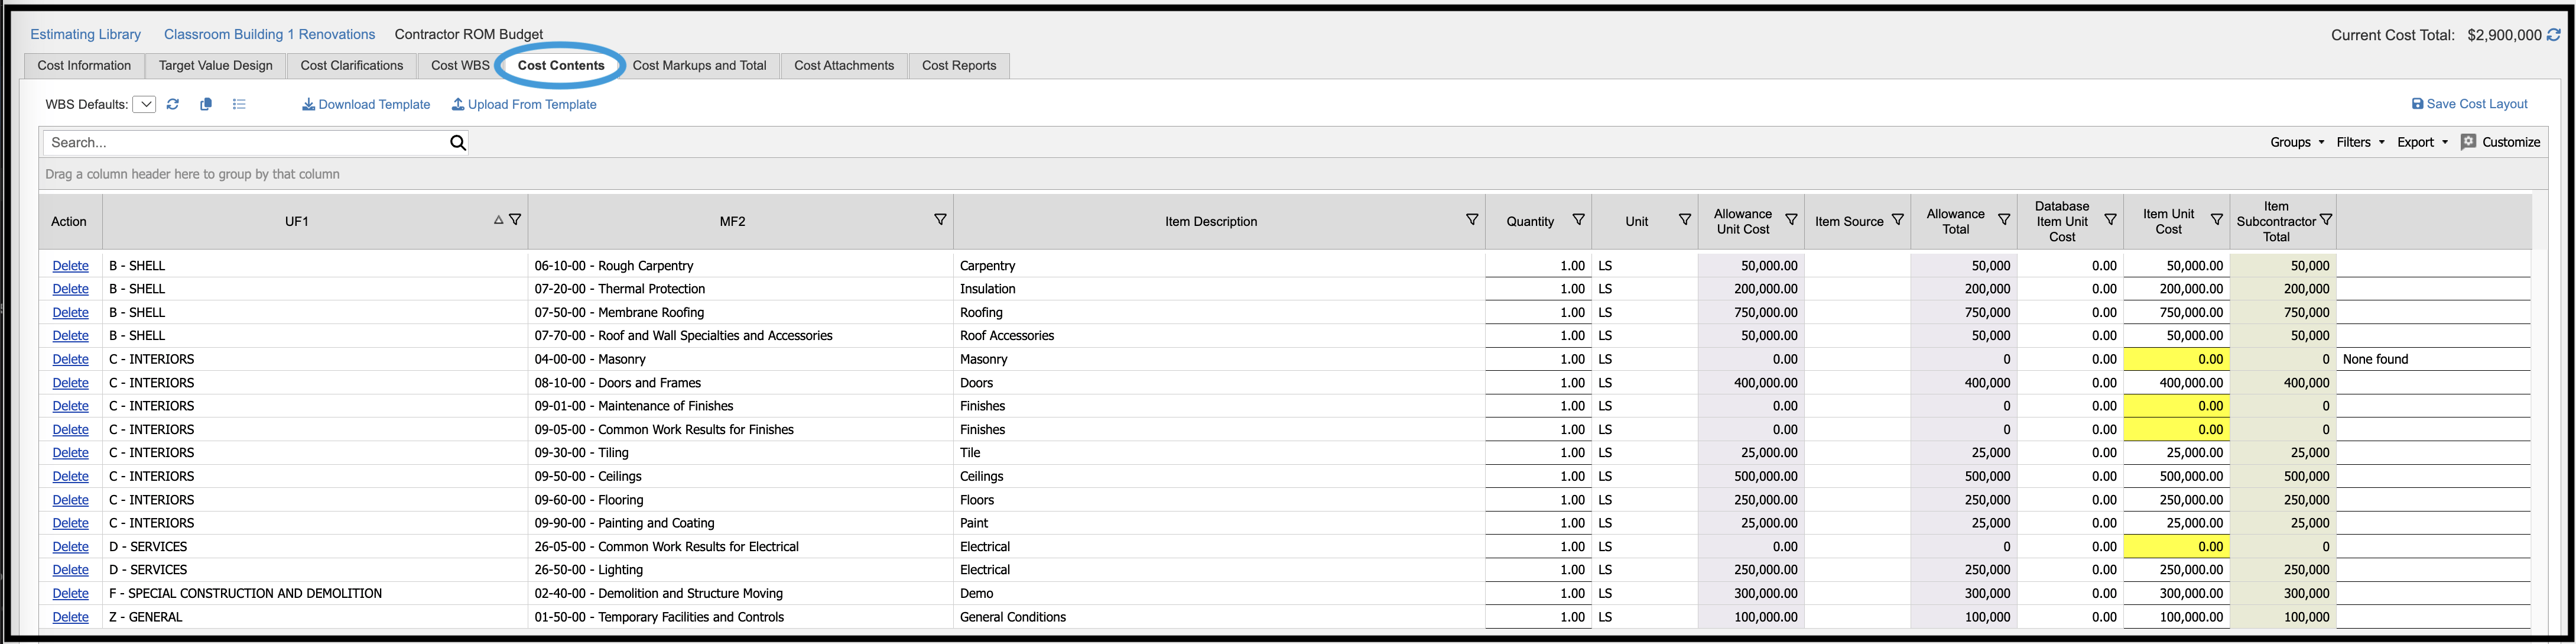
Create External Cost #
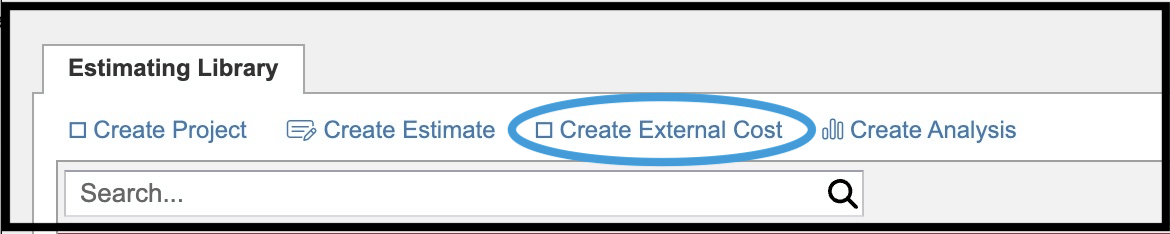
Create External Cost mirrors Create Estimate but is designed for inputting or importing values from a source other than Simplebid, SimpleBudget, or assessment action items. An example would be data submitted by a contractor in Excel format.
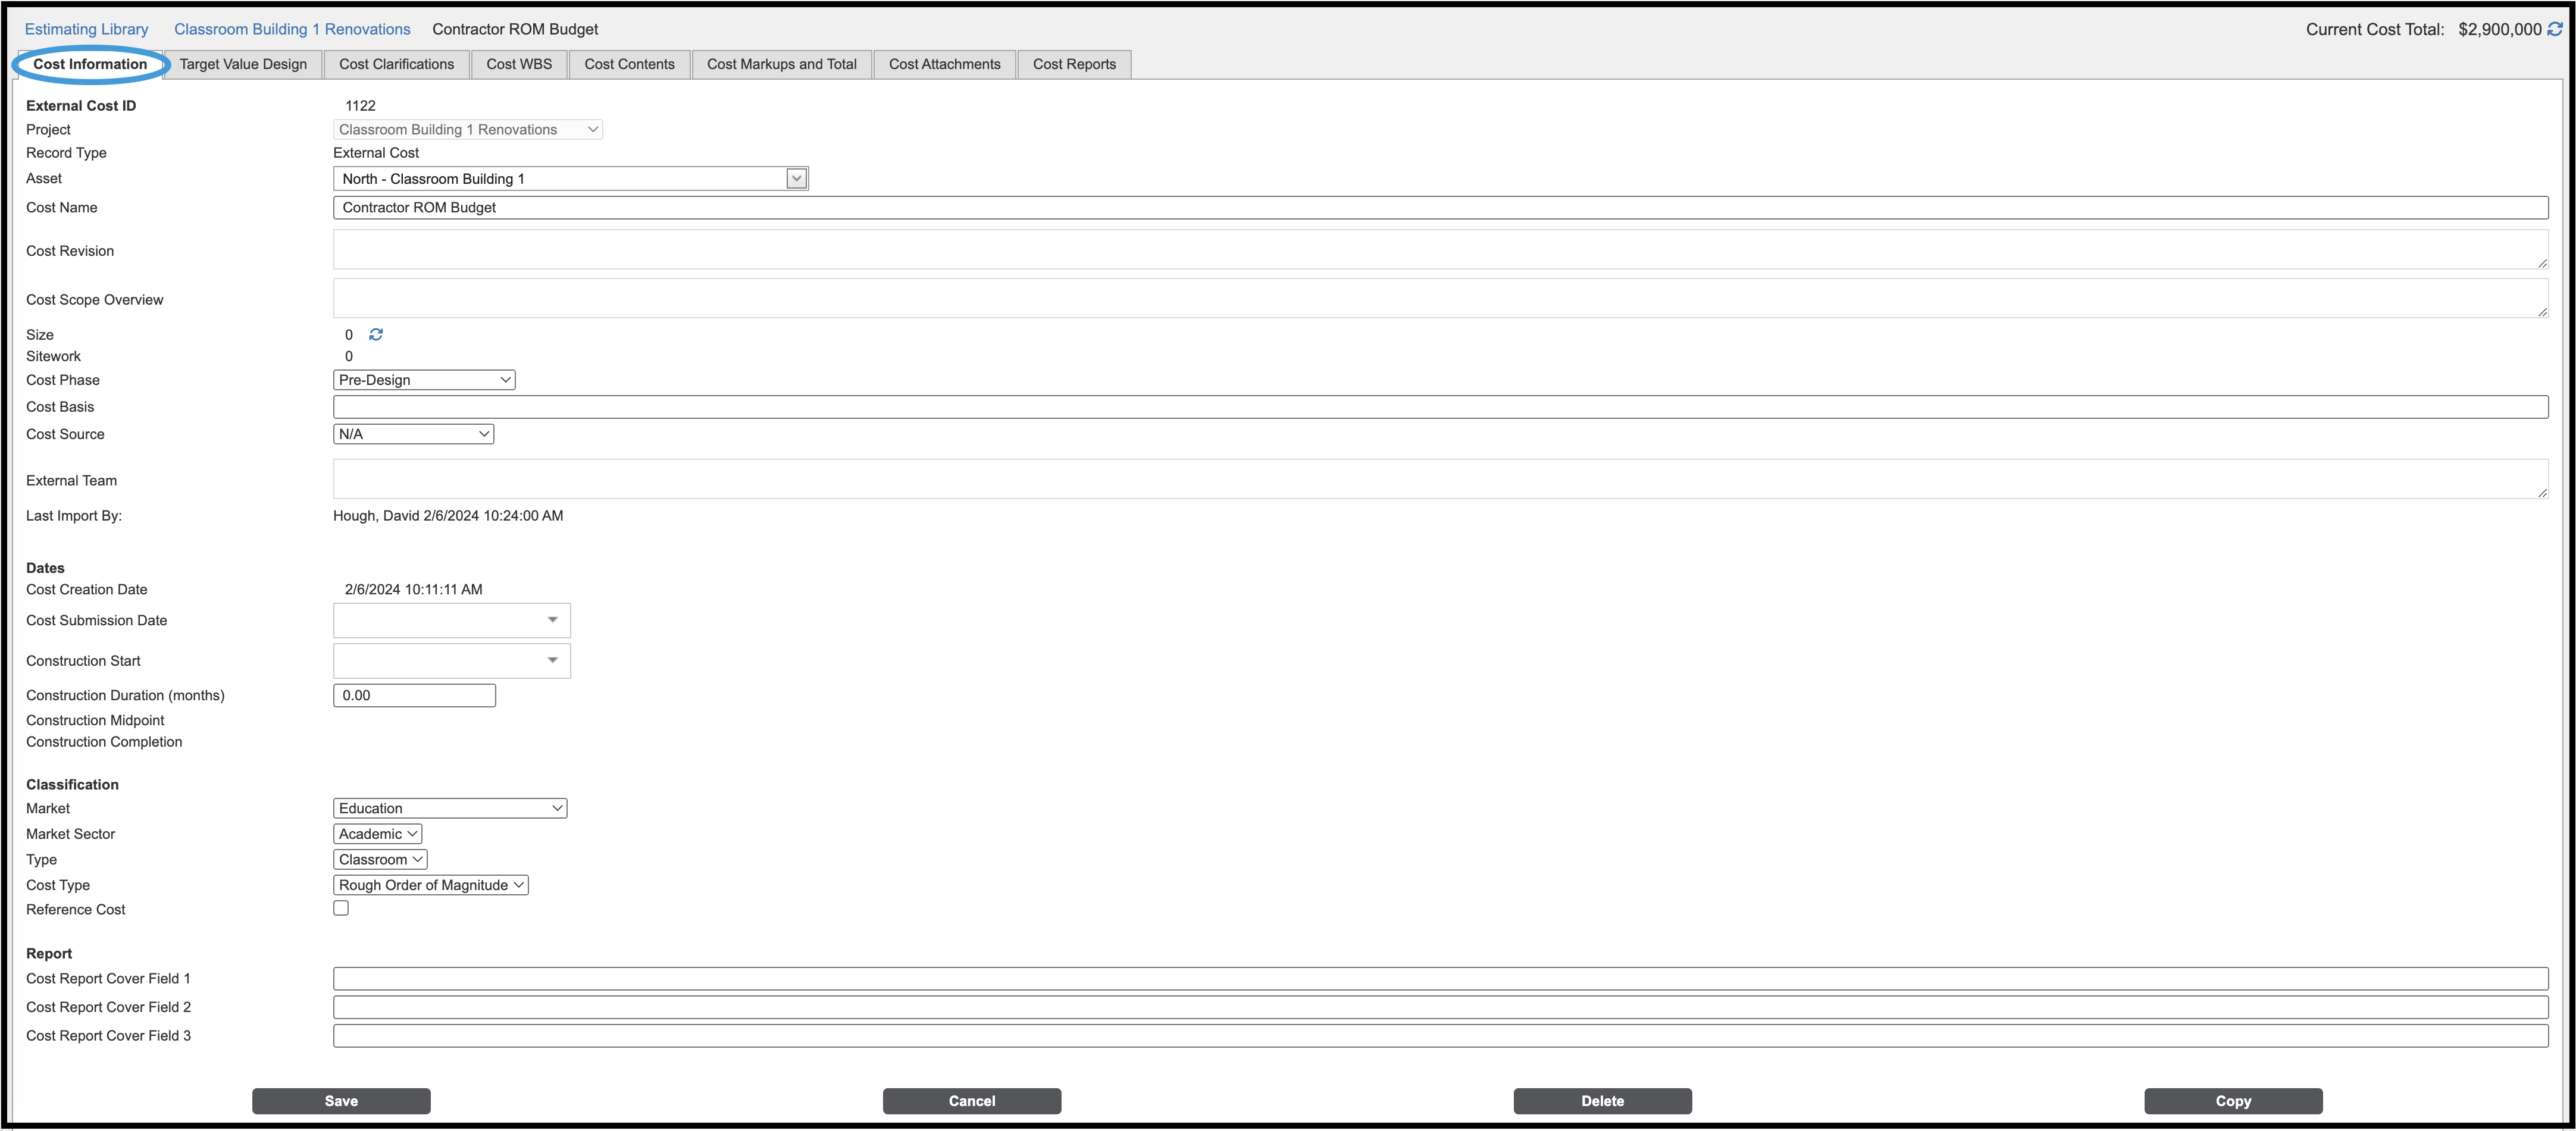
Note that the tabs of Cost Information, Target Value Design, Cost Clarifications, Cost WBS, Cost Contents, Cost Markups and Totals, Cost Attachments, and Cost Reports function like the tabs in Estimate Information (see above).
Create Analysis #
The tools in the Create Analysis area allow comparison of estimates and external costs. Comparative information is available in table and graph formats.
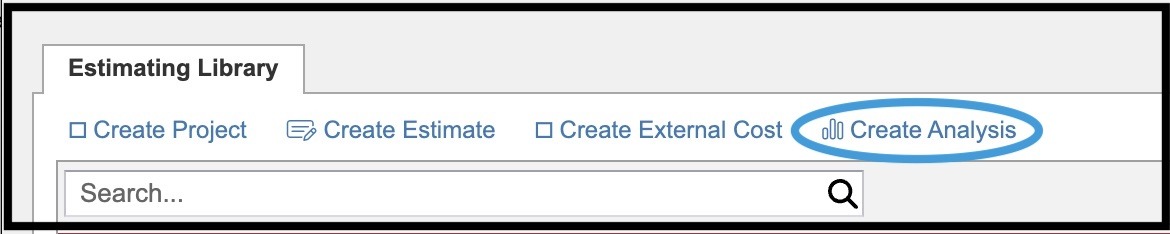
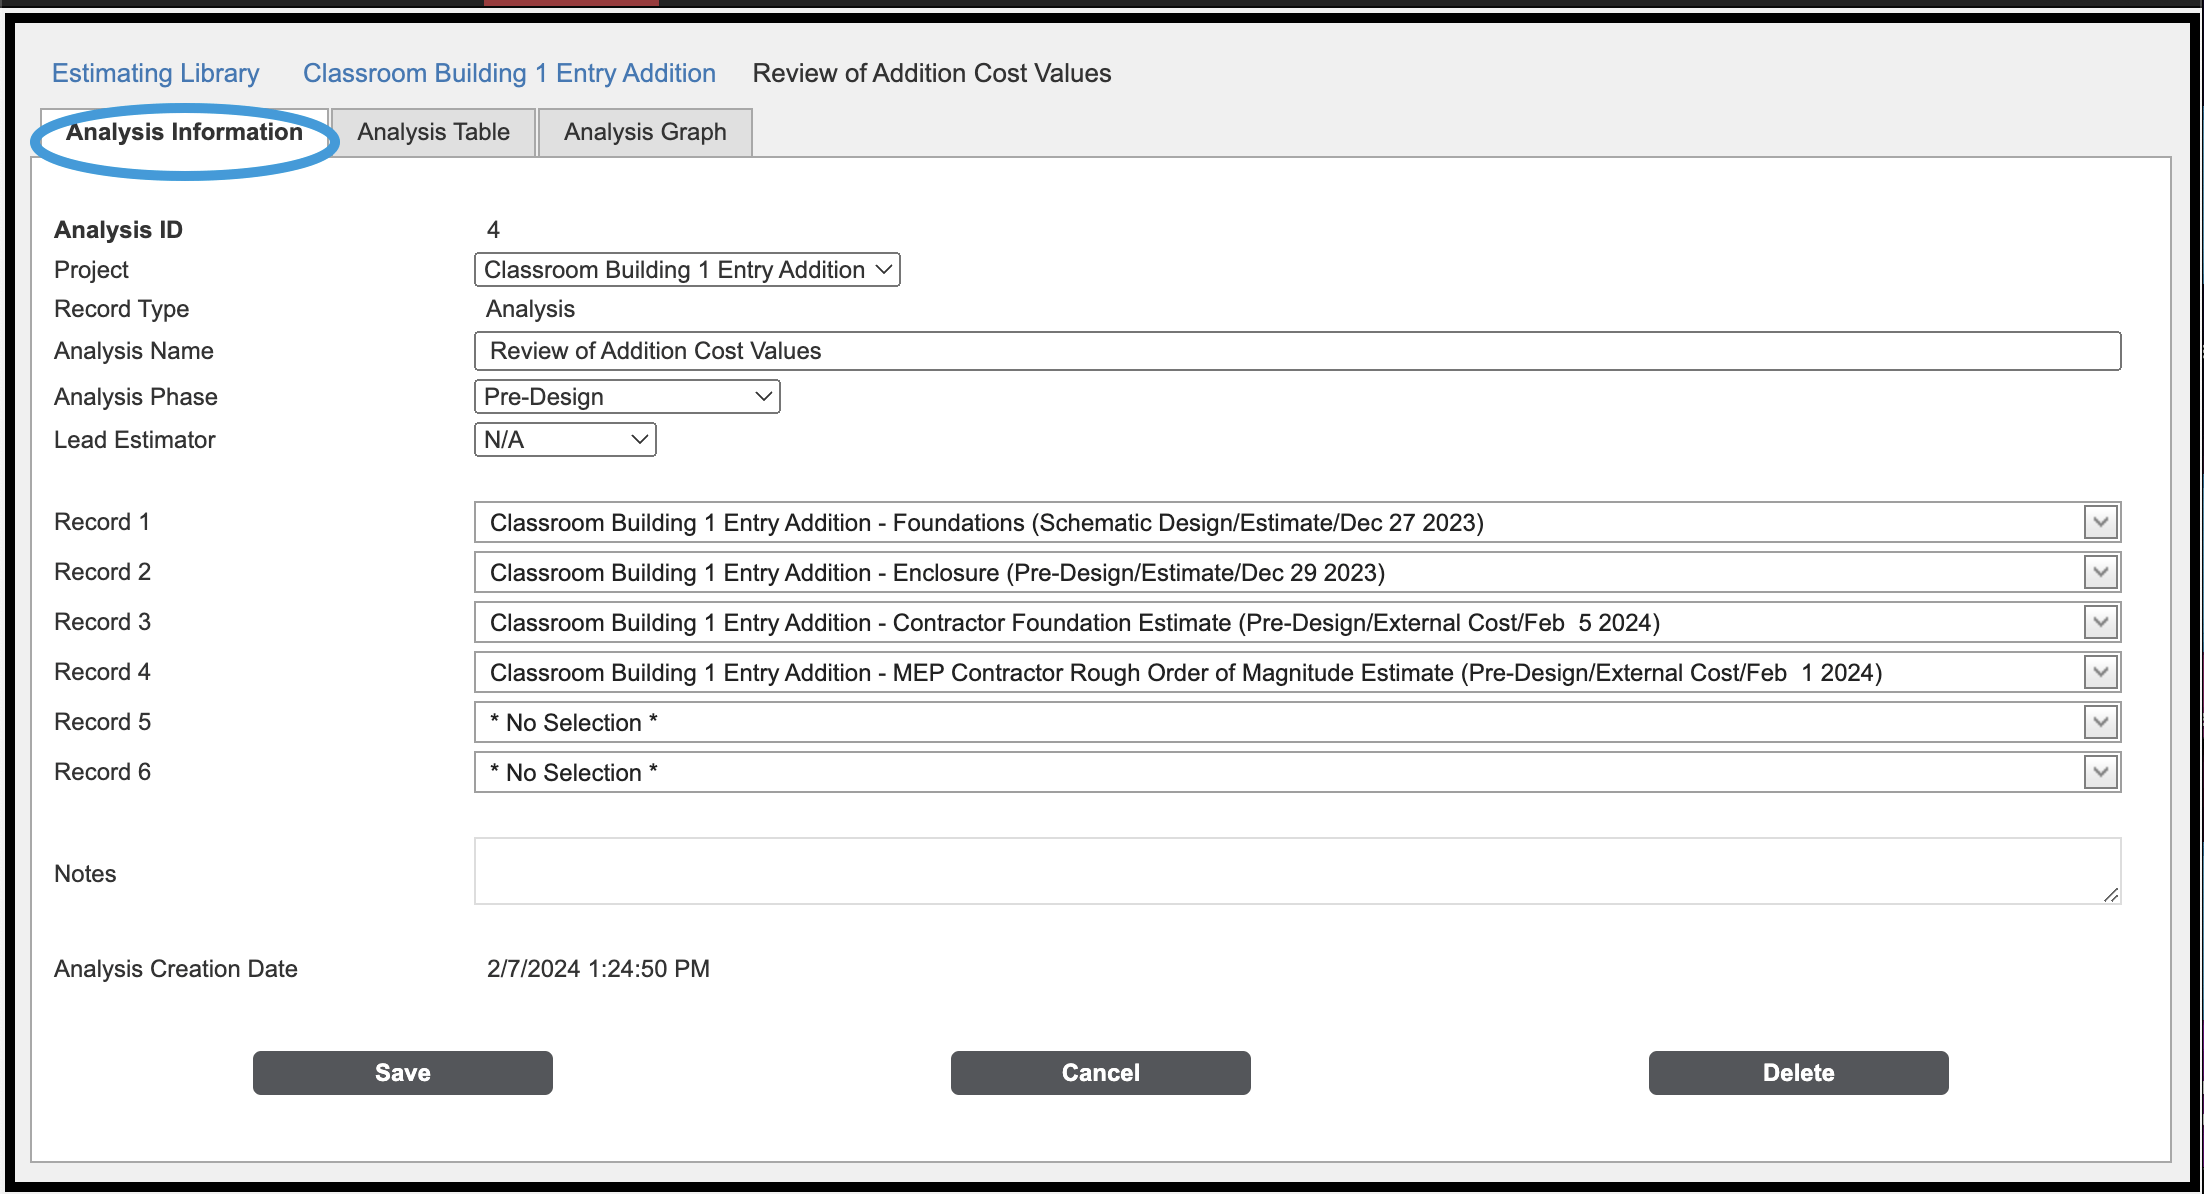
On the Analysis Information tab, select which records you would like to compare, including records from estimates and external costs.
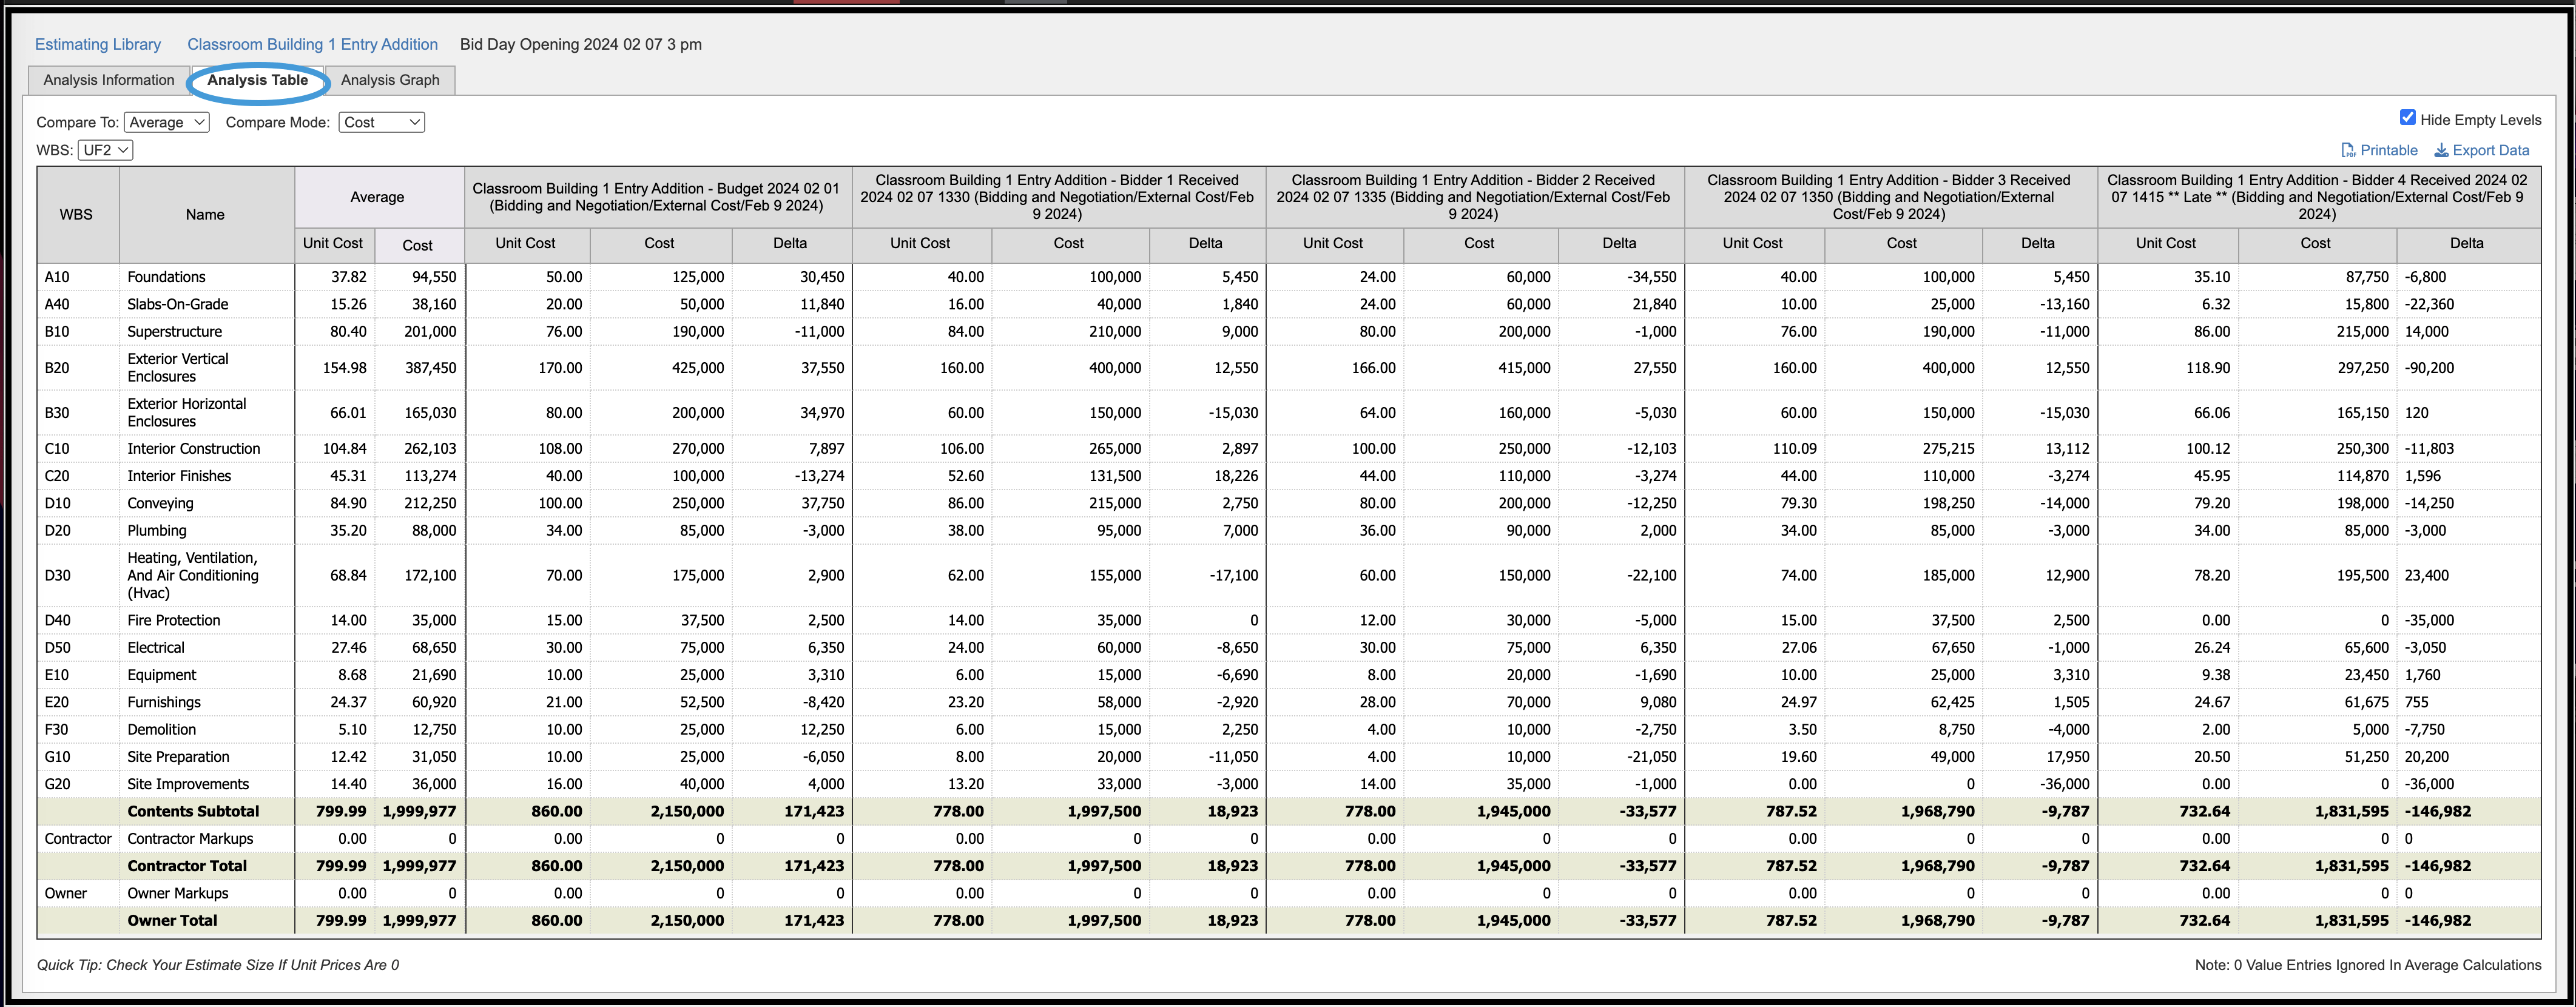
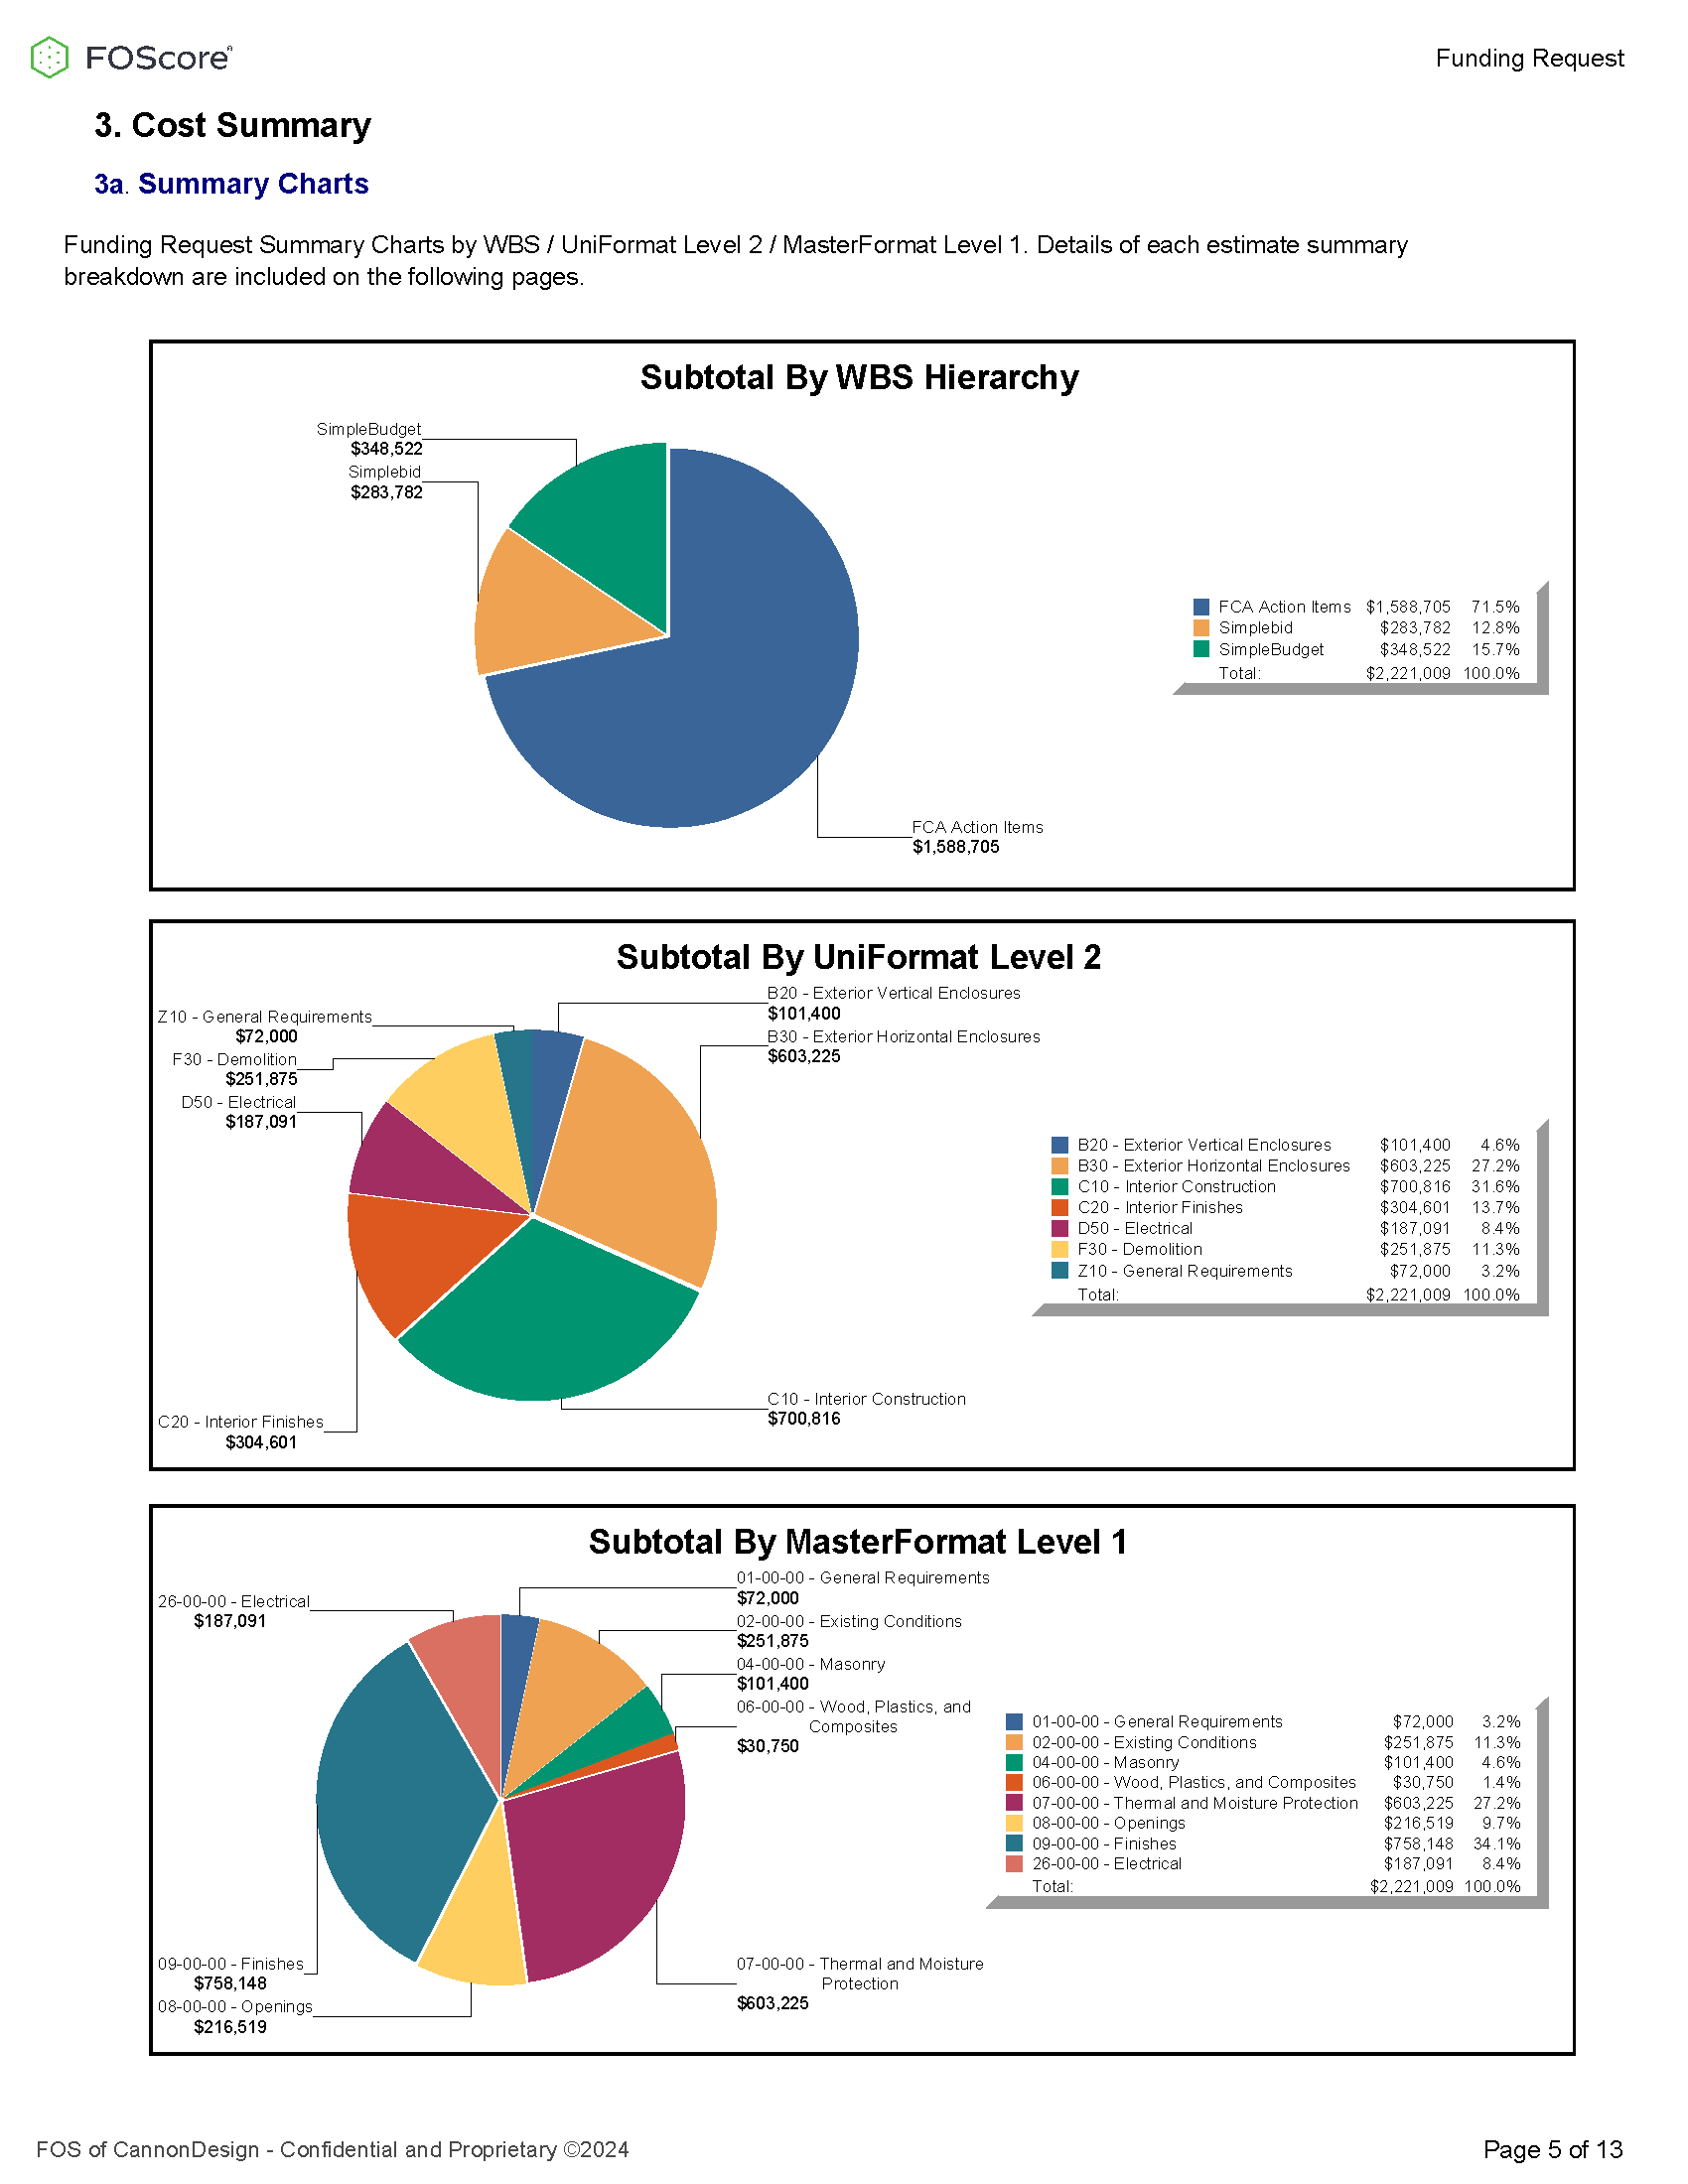
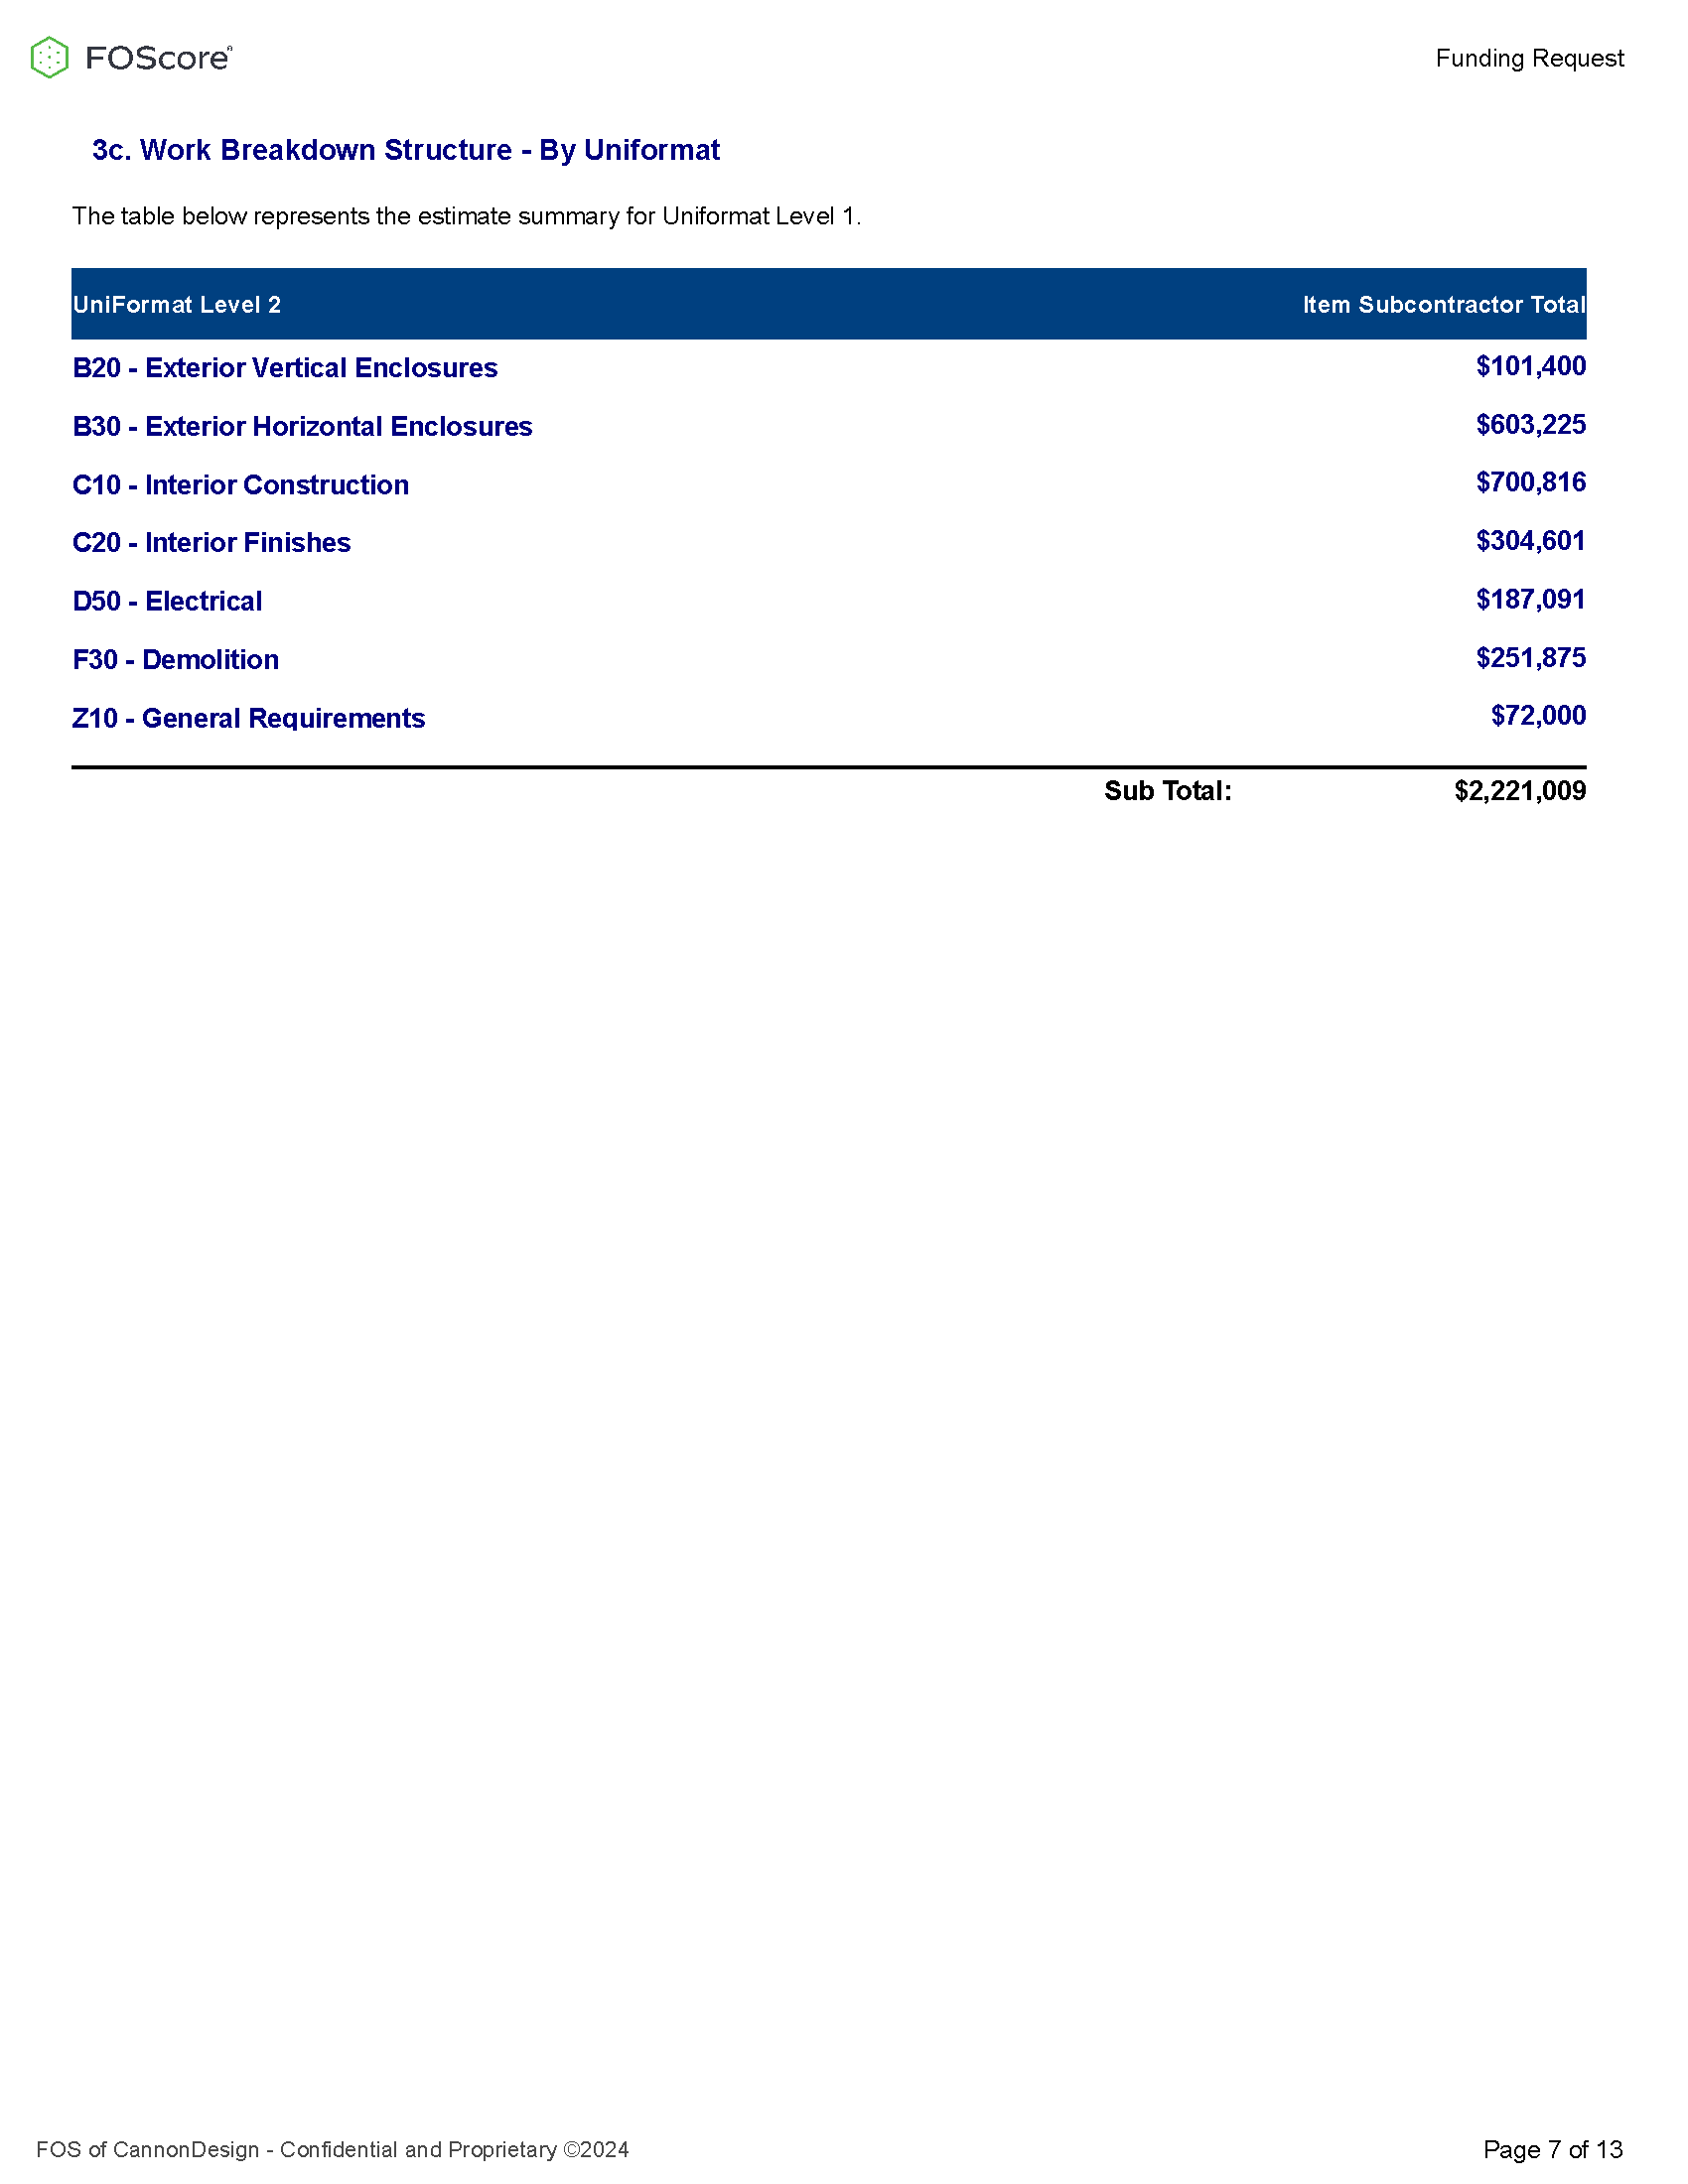
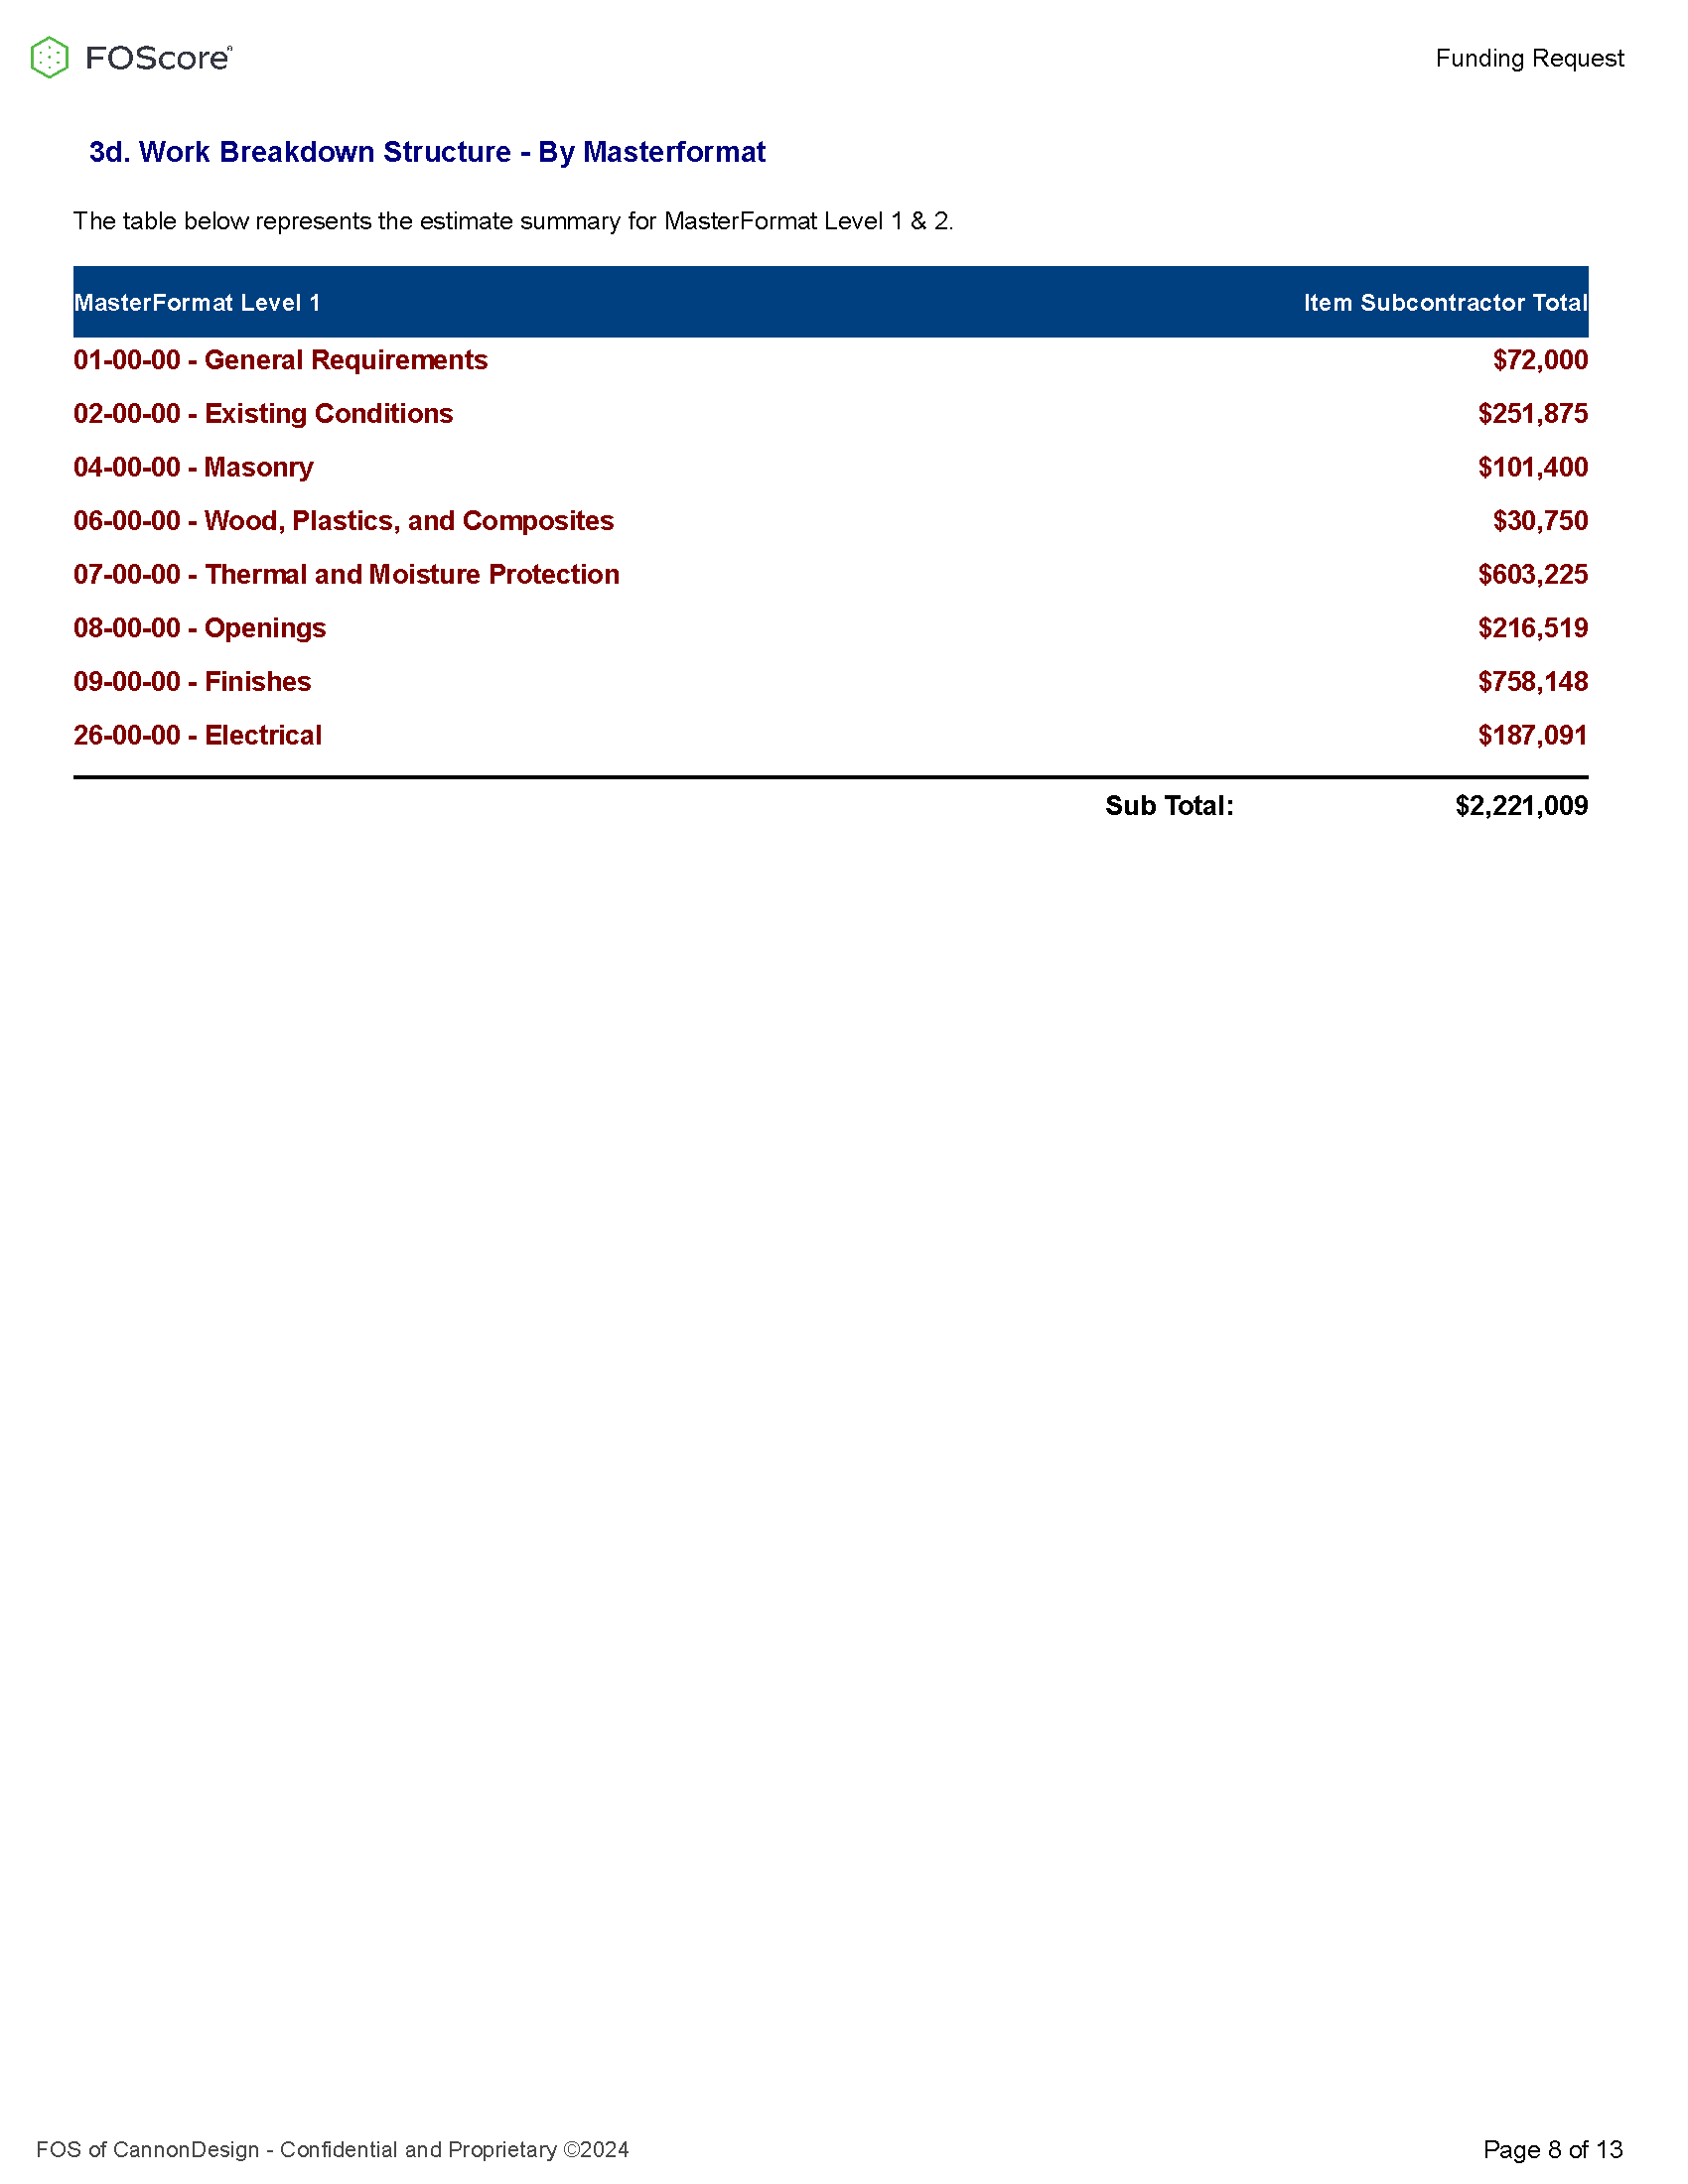
An Analysis Table can be viewed in either Uniformat Level 2 or MasterFormat Level 1. The Compare To dropdown menu features options for comparing based on an average or against a specific record. Modes of comparison include Cost and Unit Cost. The Delta column shows you the difference between the Compare To columns and each of the estimates you have included.

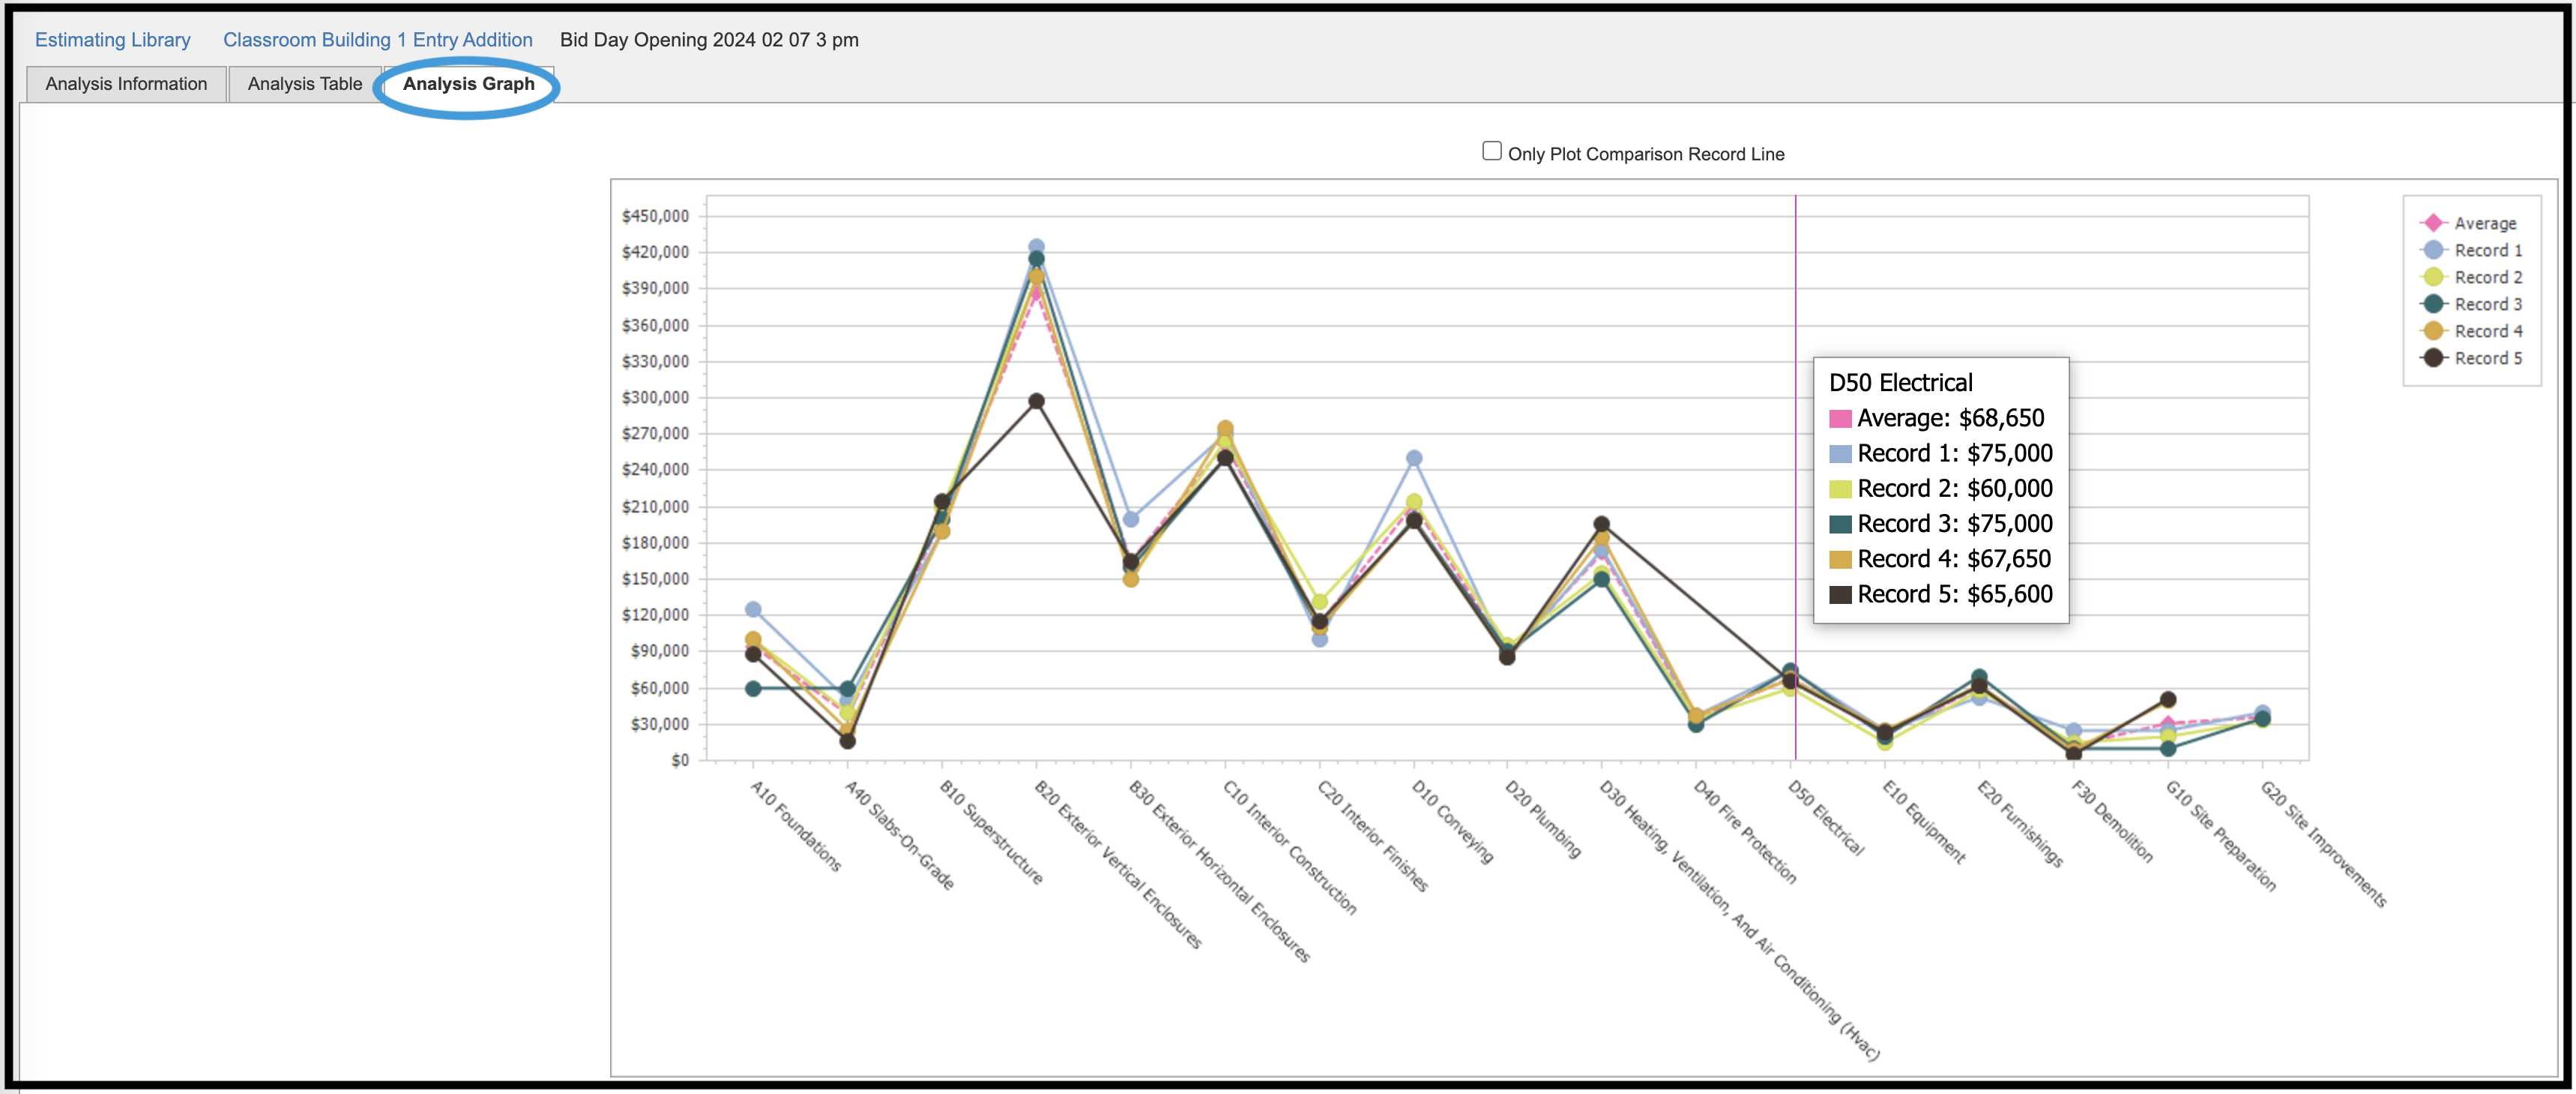
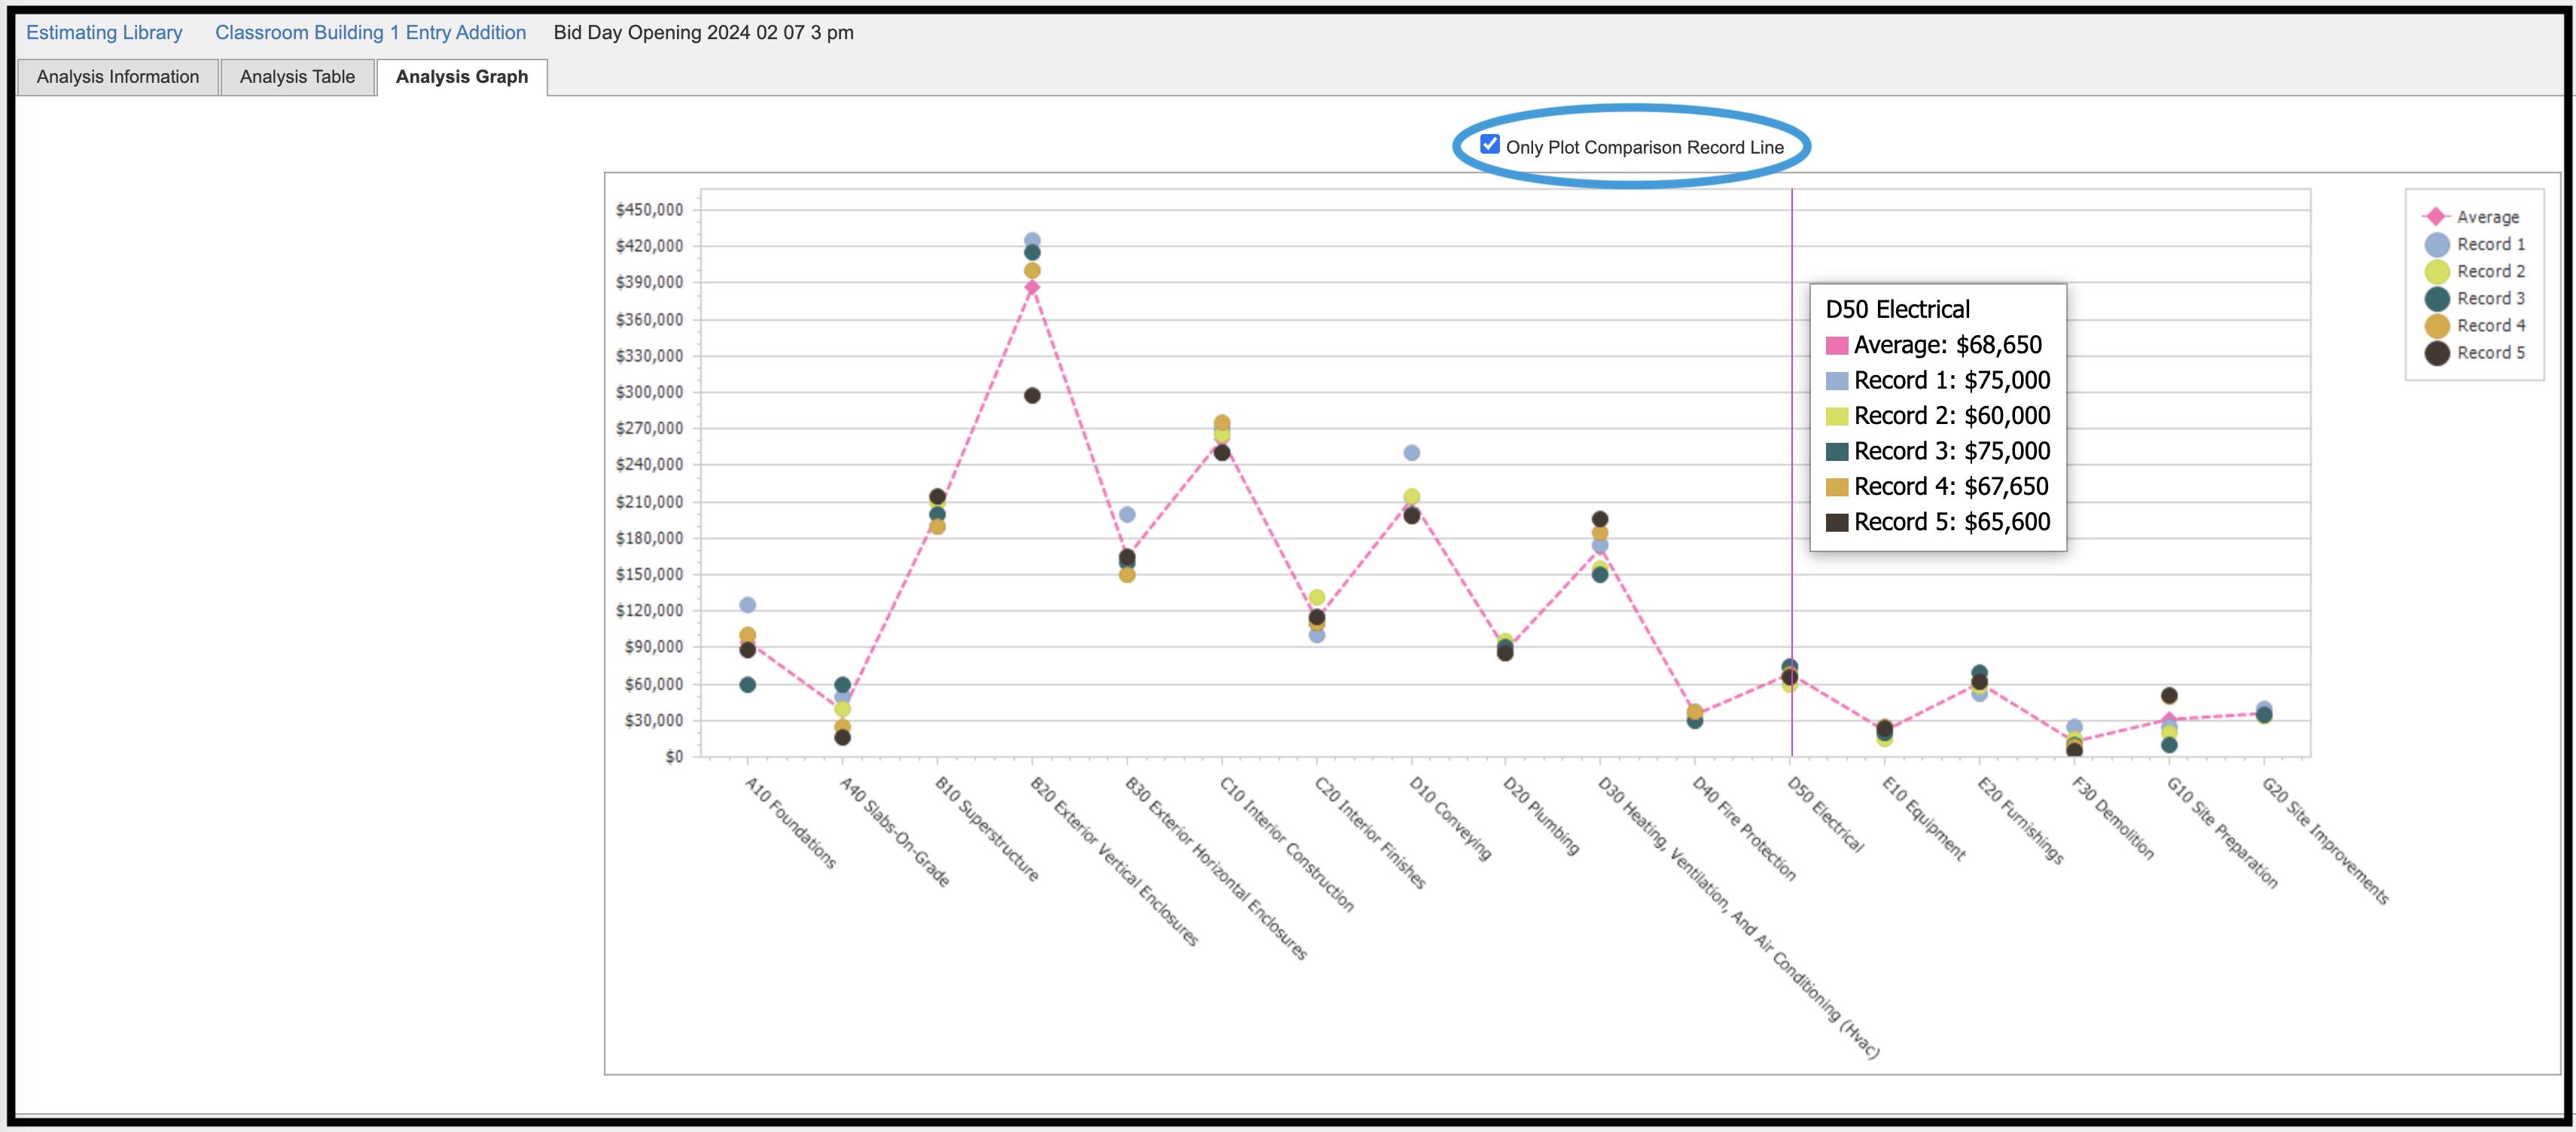
The Analysis Graph features hover notes and the ability to plot only the record comparison line (second image below).
Estimating Admin #
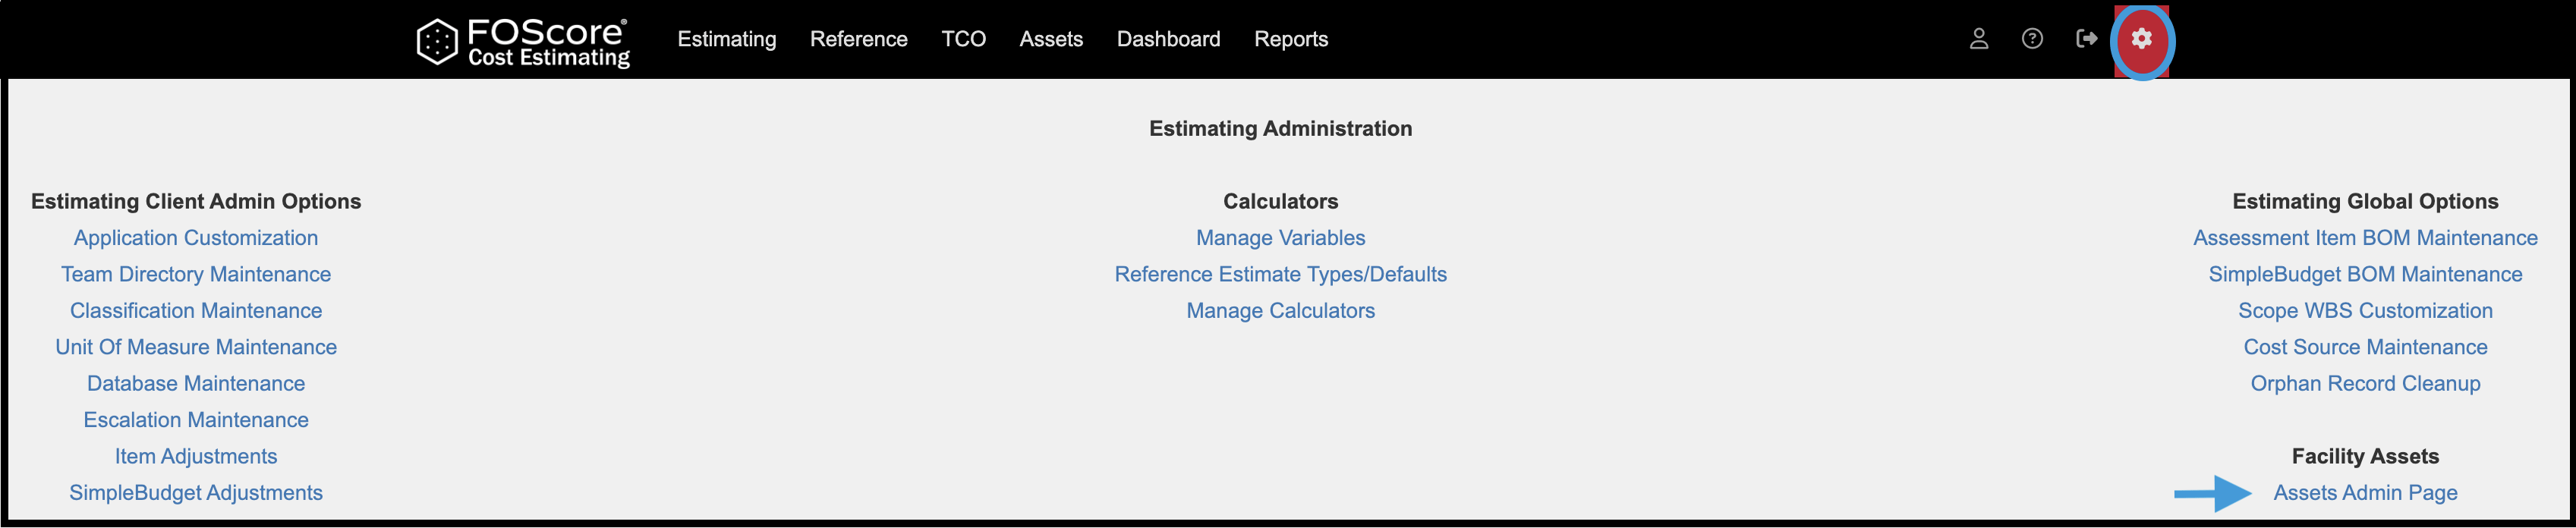
Click on the gear icon in the upper right of the main navigation bar to access the FOScore® Admin modules. To toggle between Estimating Admin and Assets Admin, click the link in the lower right of each menu.
Estimating Client Admin Options #
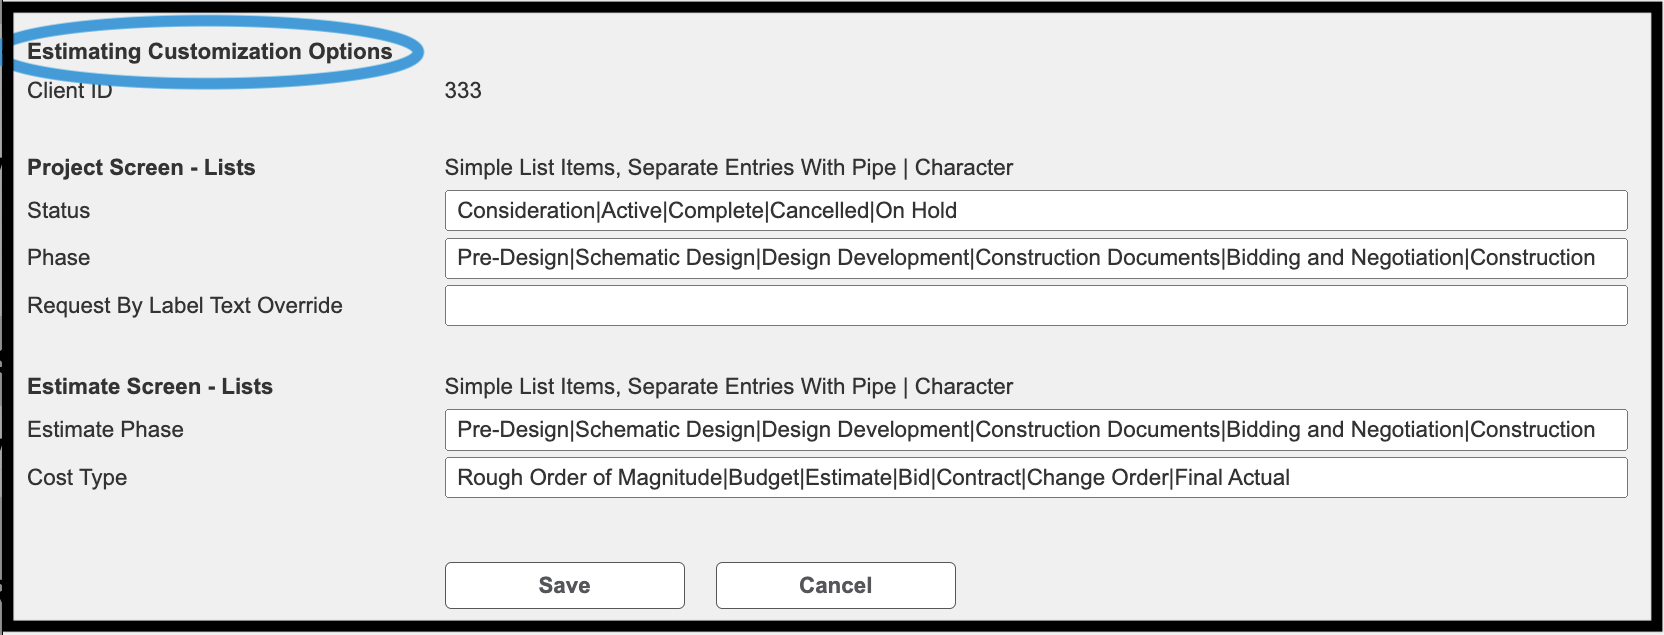
Application Customization #
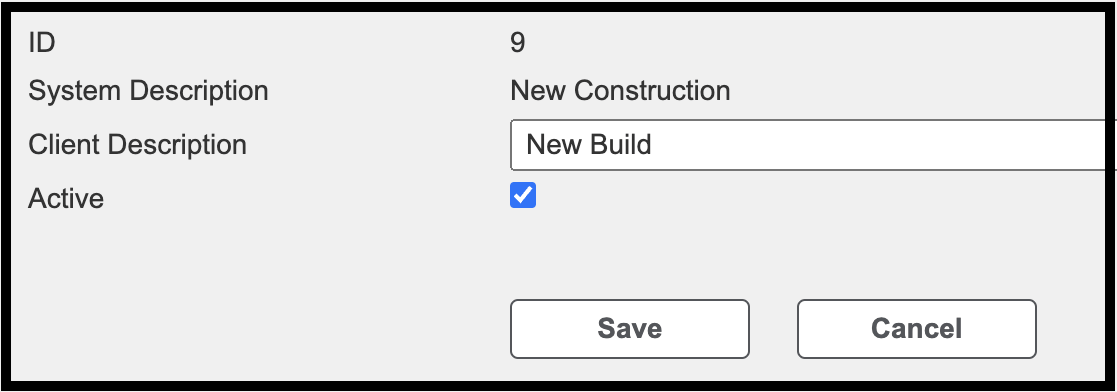
Clicking the Application Customization link of the Admin module allows you to change the text in the Project and Estimate dropdown menus. You can also change or add attributes by using the pipe character |, as shown below.
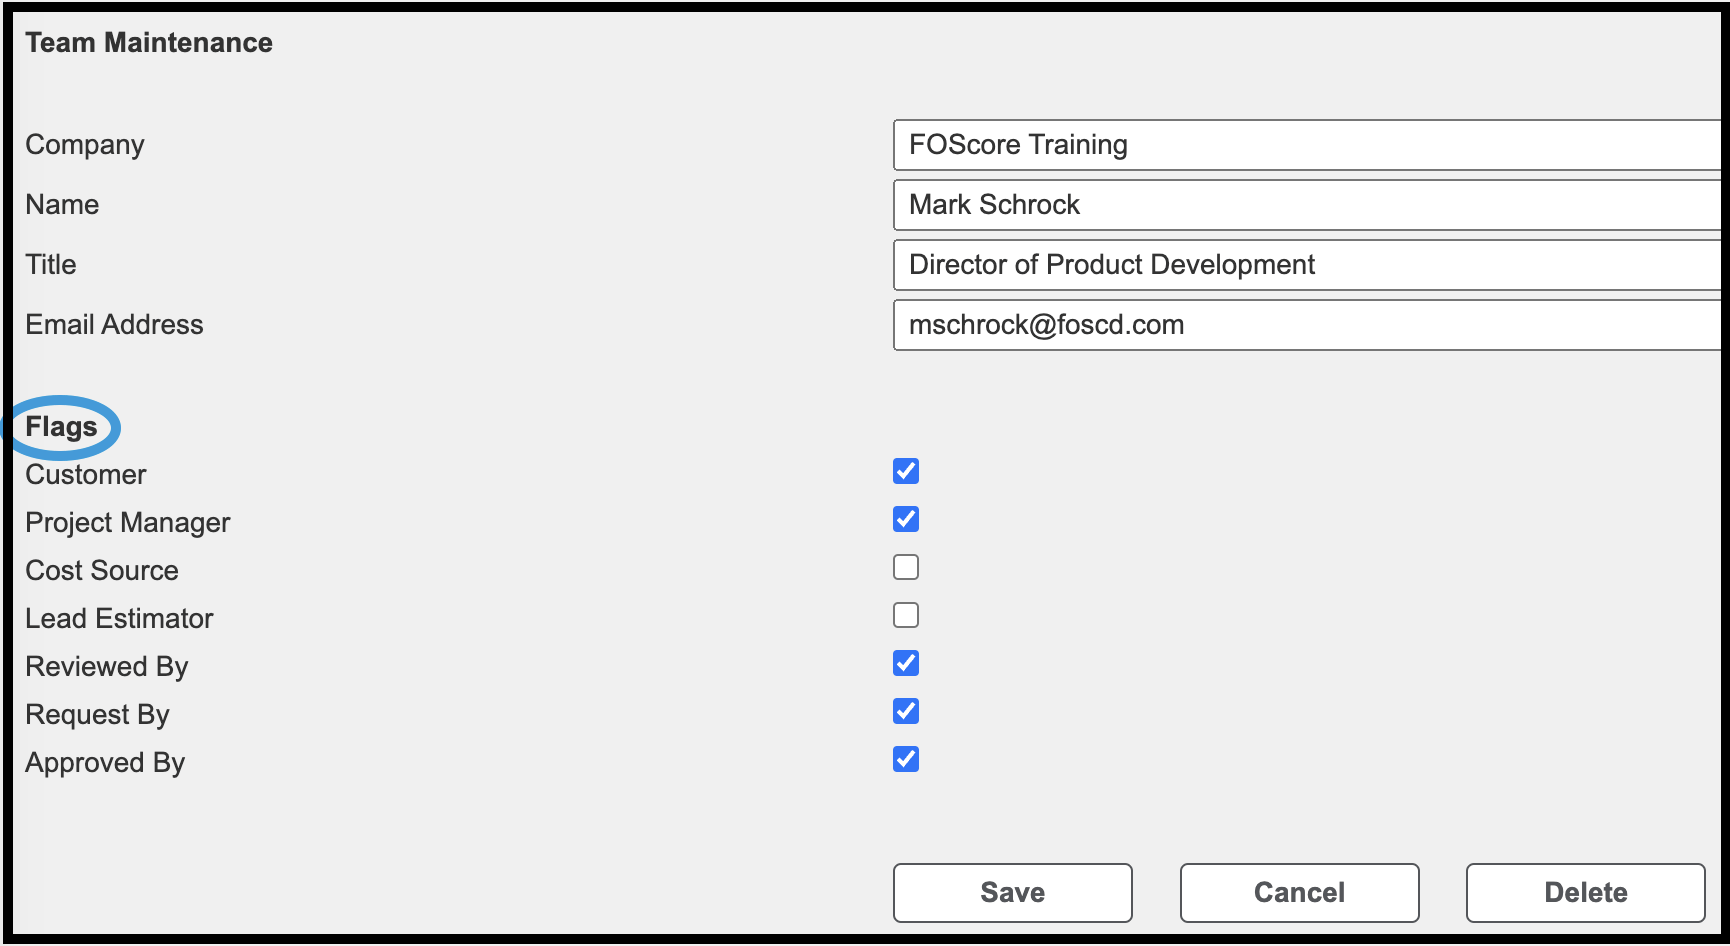
Team Directory Maintenance #
Click the Team Directory Maintenance link to add or remove individuals from your estimating team database. Click Create Record on the upper right of the screen to add individuals. Click the team member’s Directory ID to edit their settings.

Once on the Team Maintenance screen for an individual, you can edit contact information and use the Flags checkboxes to designate what roles can be assigned to the member on the Project and Estimate Information tabs.
Classification Maintenance #
The Classification Maintenance feature serves to ensure consistent nomenclature throughout the estimating process. Consistent terms are used to define a building’s type and use or purpose. Subcategories can be created beneath a main category; for example, within the Education category, Academic, Housing, Office, and Research can be used to identify different building types on campus. An example of further refining the category is the next level, which defines academic spaces as classroom, lab, or library. This feature allows you to create new classifications and edit existing classifications.

To create a new classification, click the Create New link on the upper right side of the screen. To edit or delete an existing classification, click on the pencil to the right of the classification name.
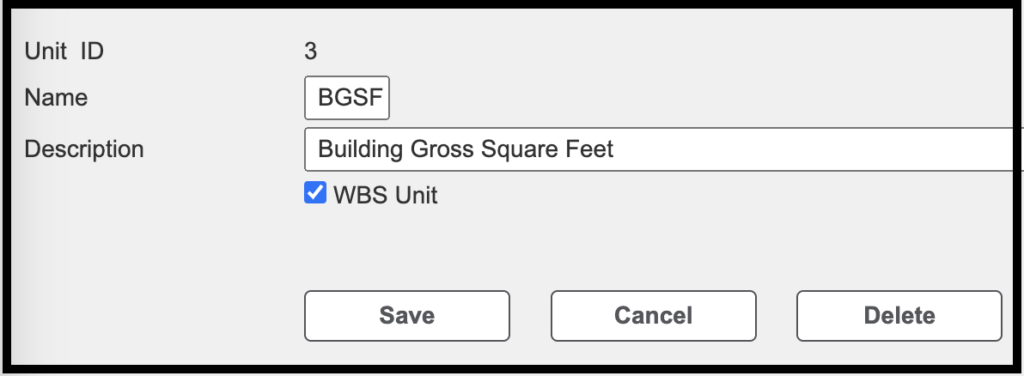
Unit of Measure Maintenance #
Client administrators can create and describe the units of measure used in their estimates. To add a unit of measure, click on Create New Record in the upper right.

Click the Unit ID to edit an existing unit of measure or to designate the unit as a WBS Unit.
Database Maintenance #
In this section of Estimating Admin, you will find the tools you need to create and edit the essential elements of an estimate–resources, crews, items, and rate tables.
Resource/Crew + Items + Rate Table = Estimate
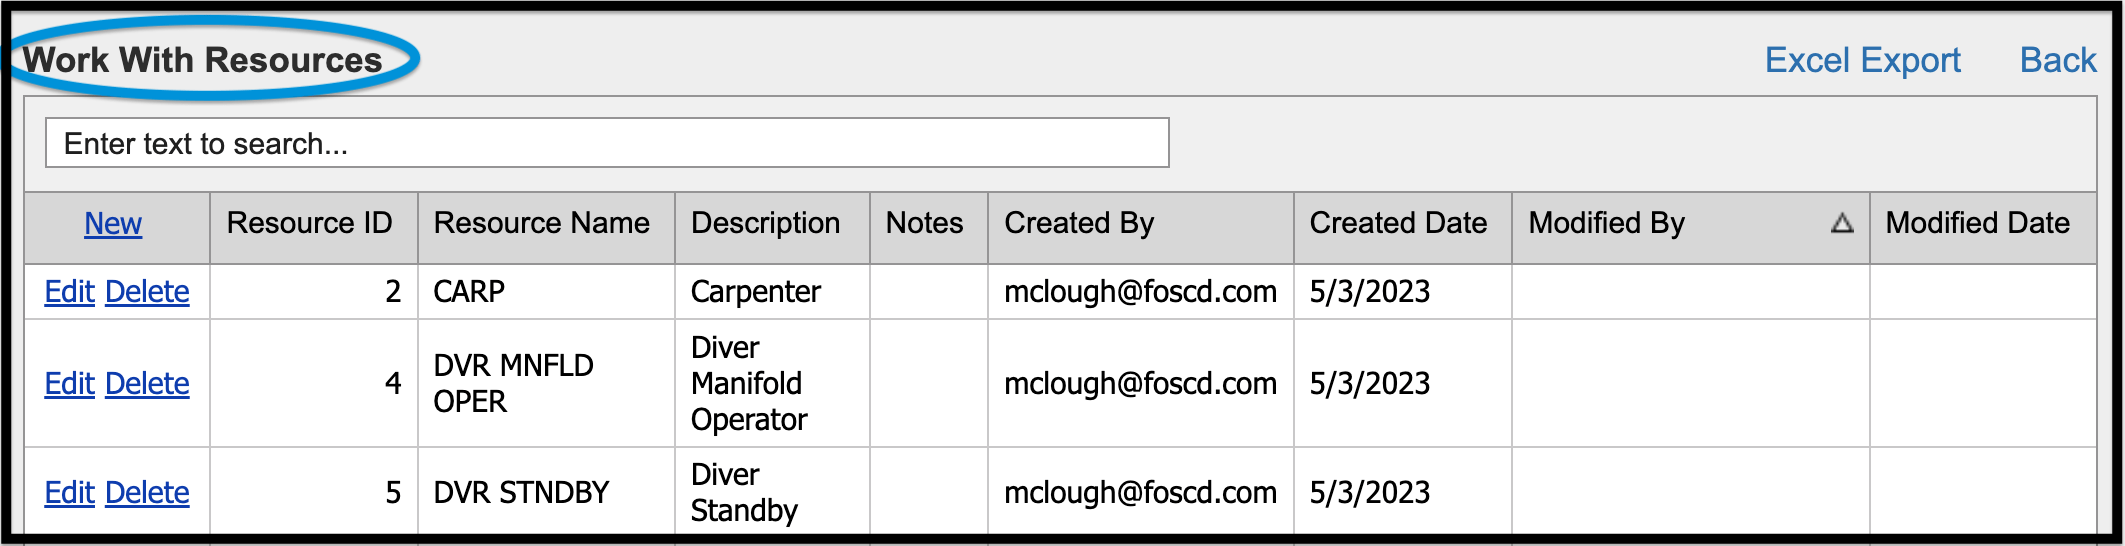
Resources #
Resources are the skilled tradespeople or laborers used to complete an item’s installation. Resources are linked to the rate table, which provides a full list of all prevailing wages for a region.
Resources can be added if needed; the software tracks when the resource was created or modified and by whom.
Create New Resource #
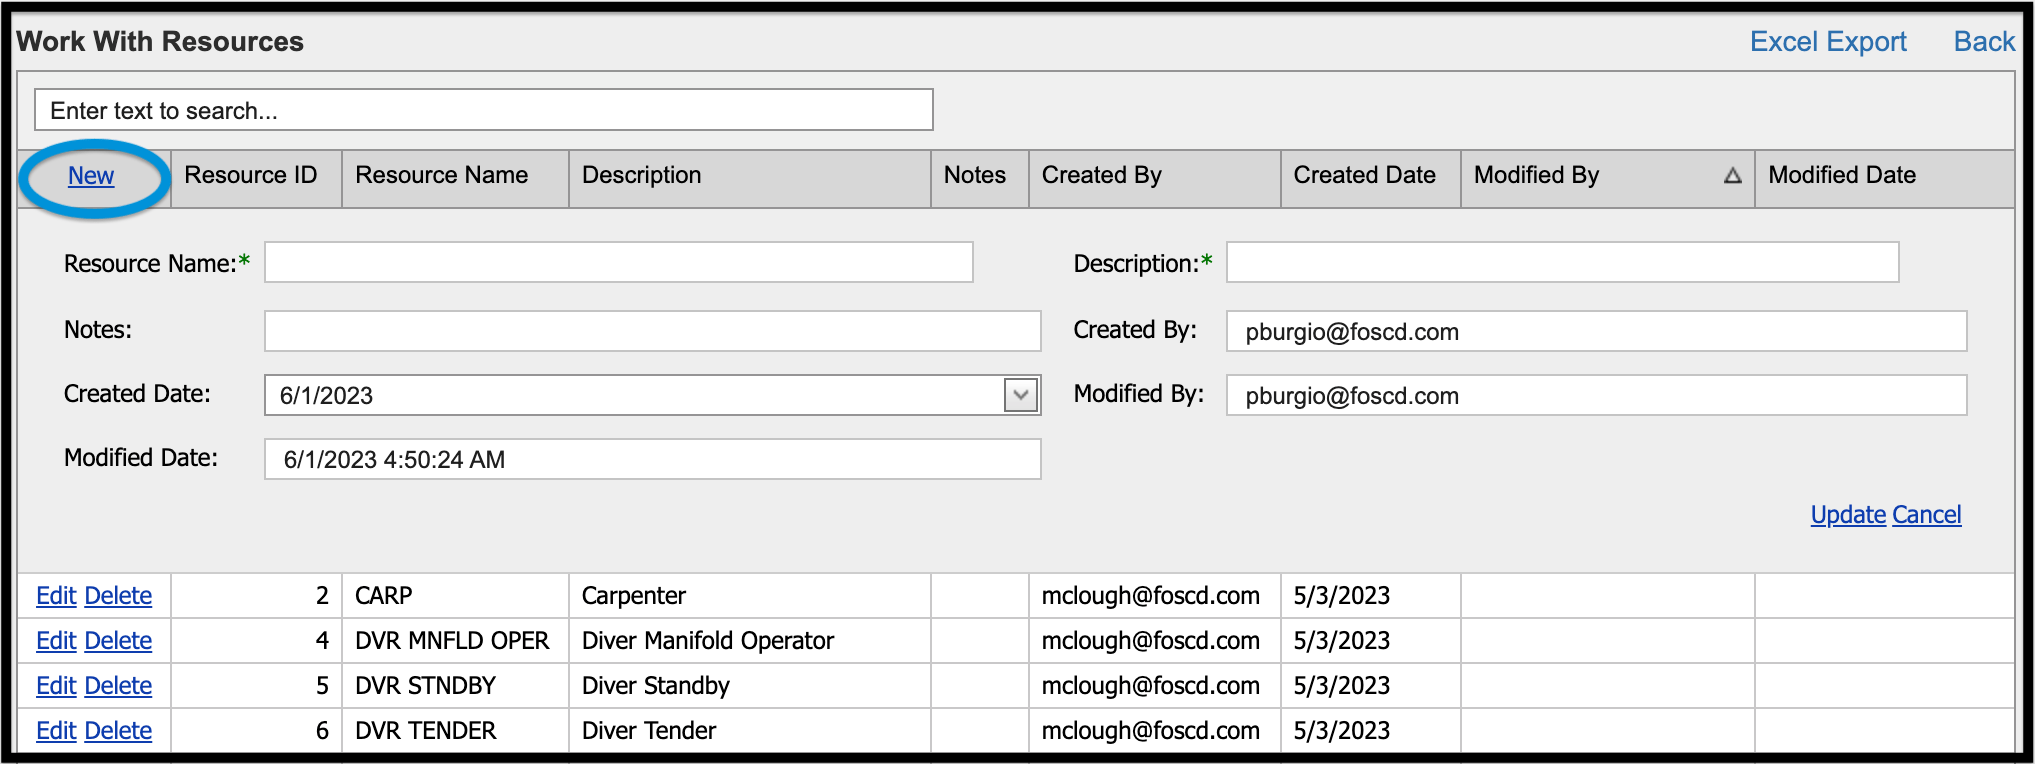
Provide the following information:
- Resource Name
- Notes
- Description
The Created By, Modified By, Created Date, and Modified Date fields will be populated by the system. Once you have entered the required information, click Update to save or Cancel to return to the main screen.
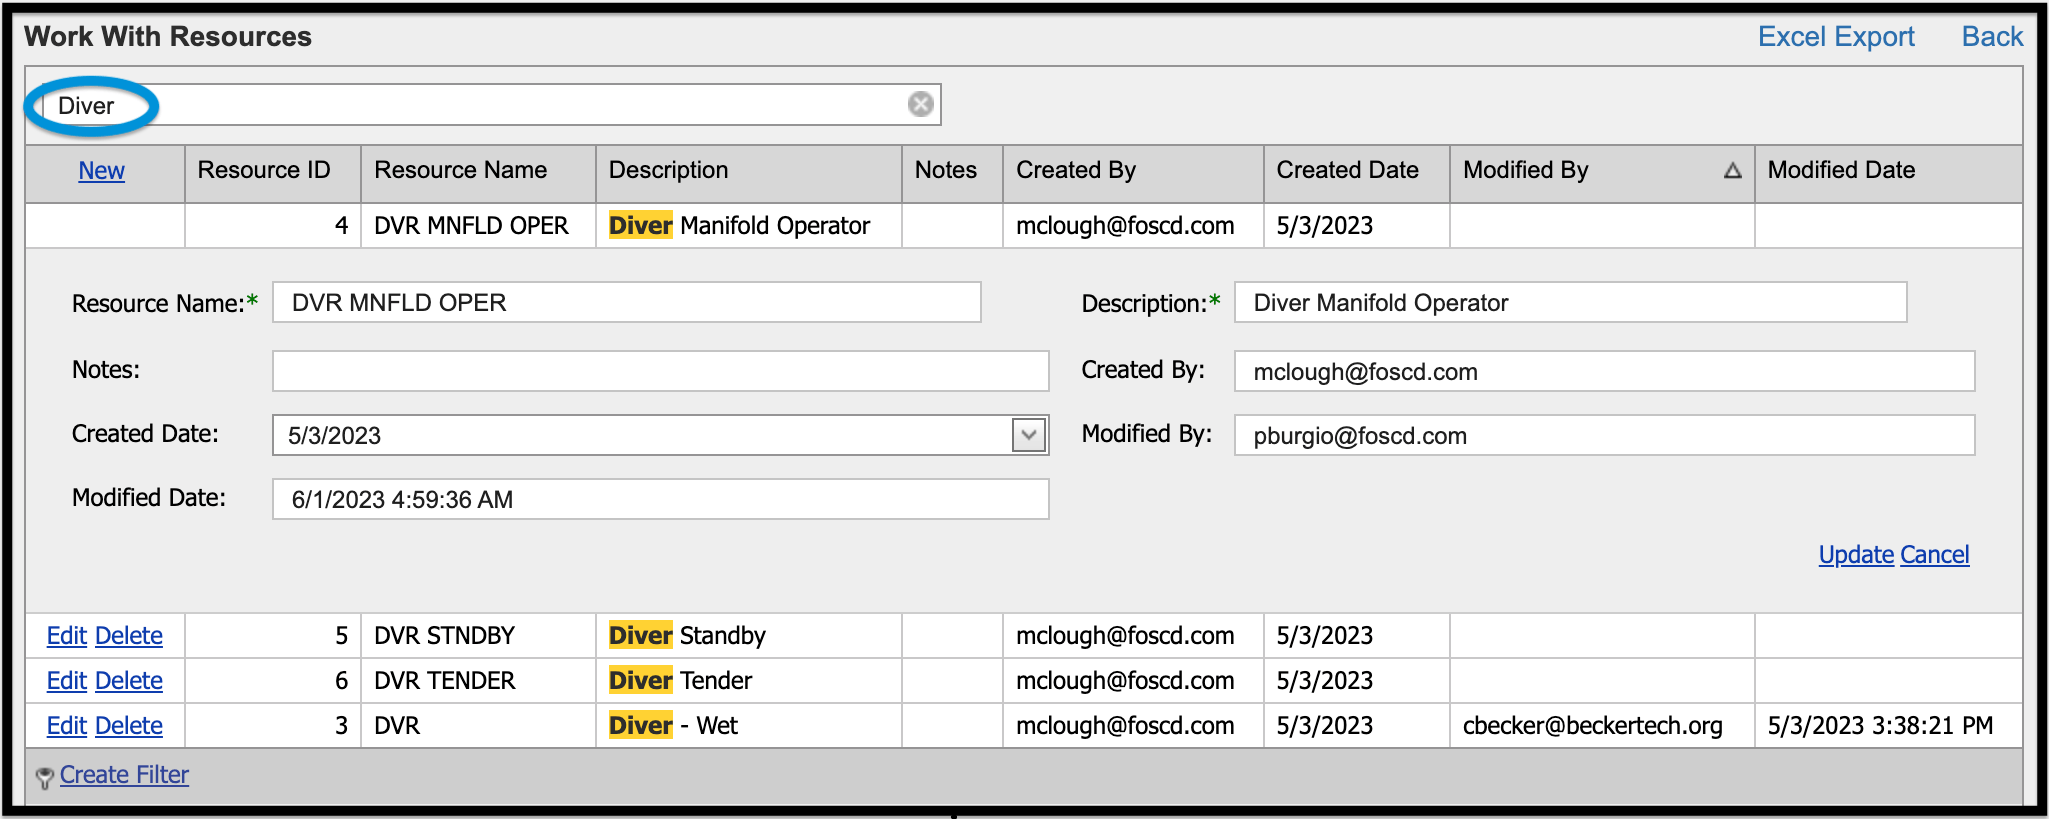
Edit Resource #
To modify an existing Resource, click on the Edit link to the left of the Resource Name. The same screen as New Resource will appear but populated with existing information. Click Update to save your changes or Cancel to return to the main screen with no changes. The system will capture your email address and the date and time the Resource was modified.
To delete a Resource, click the Delete button next to the Resource Name. The system will ask you to confirm or cancel the deletion.
Search #
Use the Search function to narrow the list of Resources on the screen by typing in a keyword or resource ID.
Crews #
A labor resource is a single person. A Crew is made up of one or more resources.
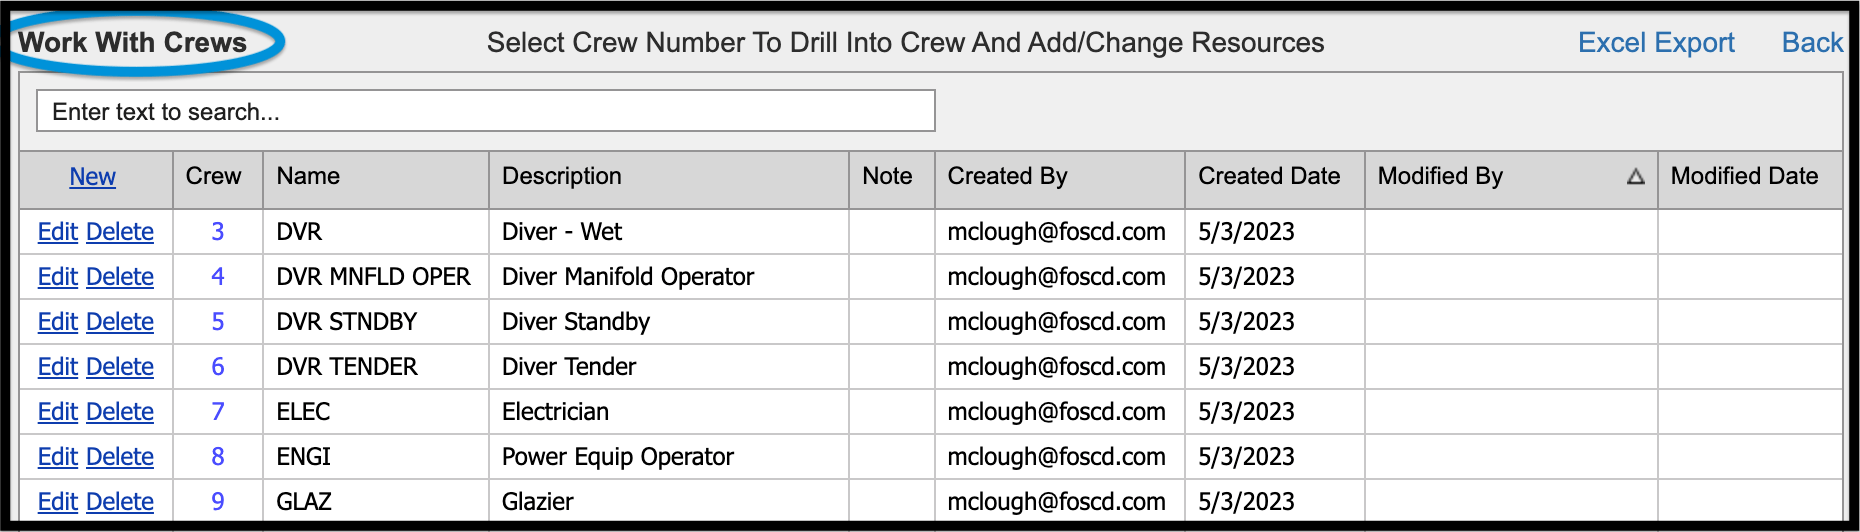
Create New Crew #
To create a new Crew, click on New. The system will assign the Crew Number. After completing the Name, Description, and Note textboxes, click Update to save or Cancel to discard the entry.
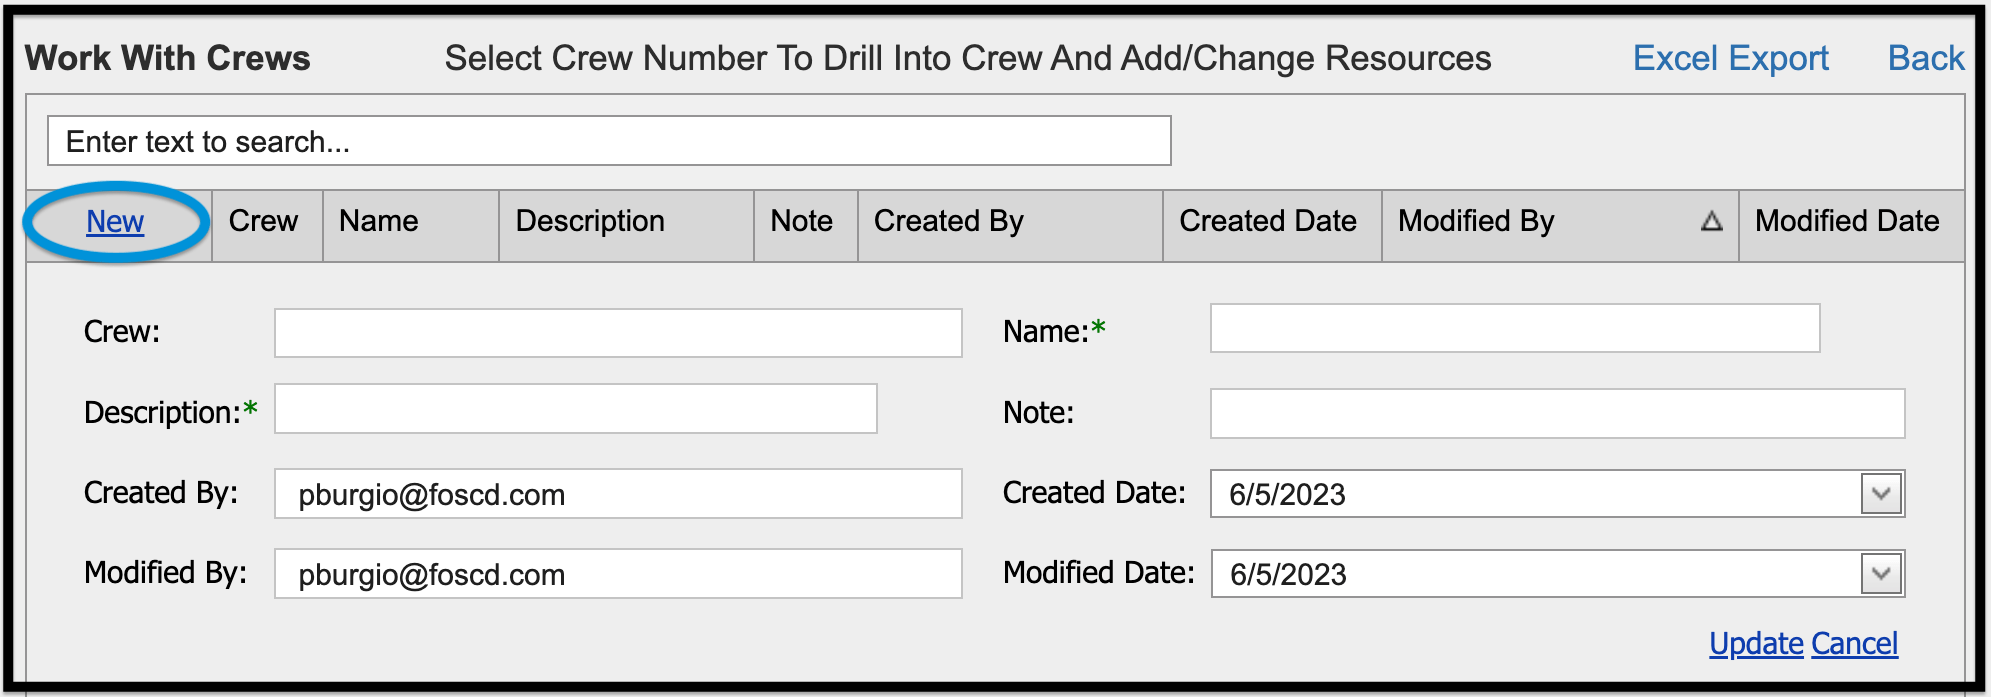
Edit Crew #
The Edit Crew screen allows you to update crew information if needed.
A Crew of multiple Resources is possible. Multiple quantities of a Resource are possible, but that would change labor costs, so it is important to remember how the Crew is being built so that the unit cost reflects the desired outcome.
For example, if your Crew consists of a bricklayer and a laborer, the recommended Quantity would be .5 each. With a Quantity of 1 each, it is recommended that you change the Productivity Rate, which is found in the Factors tab of the Rate Tables Management screen.
Resources and Crews can also be developed using internal cost figures (for internal staff who do not earn the prevailing wage and fringes, for example).
Rate Tables #
Rate tables that have been assigned to the client are housed in this area. Users can customize rate tables by adjusting a copied rate table and inputting client-specified values for factors such as labor productivity, material price, subcontractor markup, etc. Columns are provided in the rate table for dollar and/or percentage adjustments. Wage type dropdown: prevailing wage would likely be the most common. Self-performed could be set for internal employees who are on their own pay scale. (Wage type indicates where the wage and cost data comes from.)


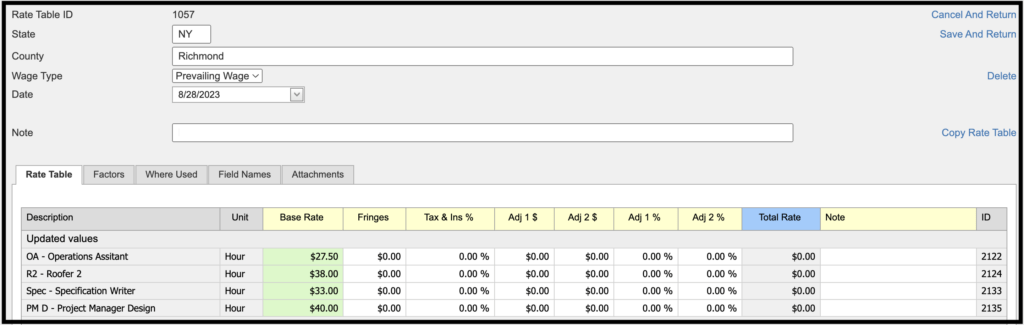
The Factors tab allows users to further modify pricing beyond rates. Adding or deducting percentages for complexities like working on a high rise (to account for lifting equipment and vertical travel for workers) or cost differences in regional locations. Describe the situation in which this would be used in the Notes section.
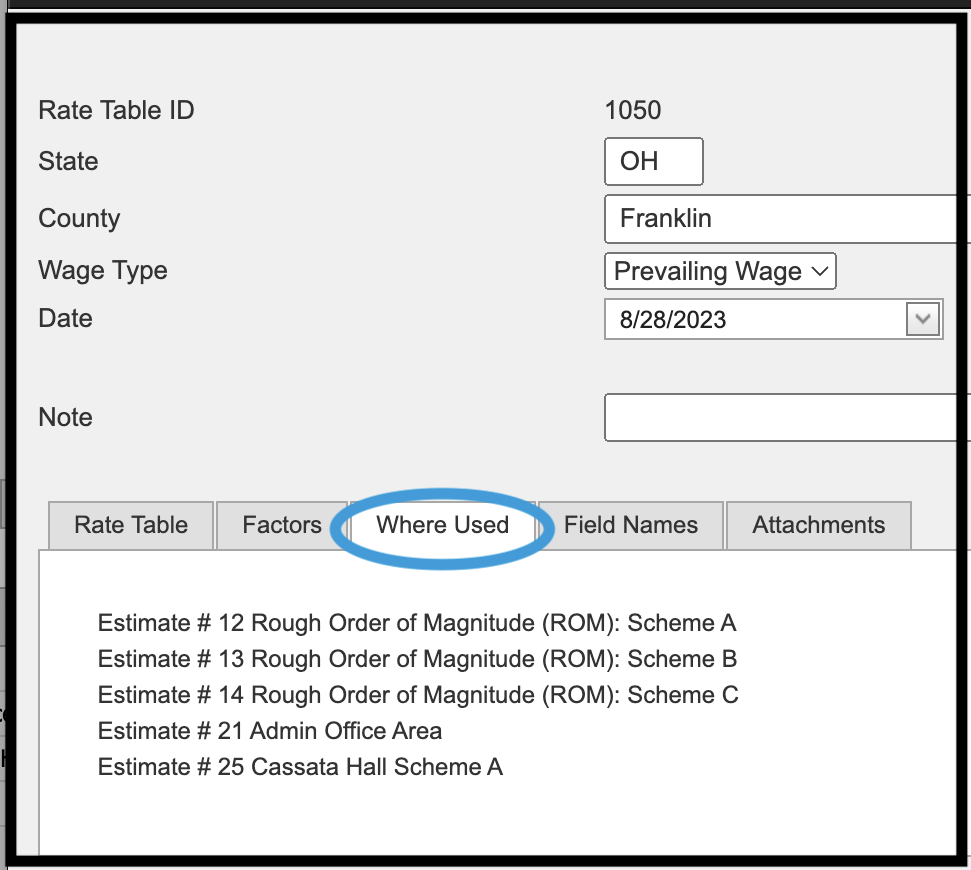
The Where Used tab provides a comprehensive list of estimates using this rate table.
Use the Field Names tab to customize column names for dollar (lump sum) and percentage adjustments, as shown on the rate table.
The Attachments tab provides storage for pdfs associated with a rate table, such as a list of team members or downloads of prevailing wage rates.
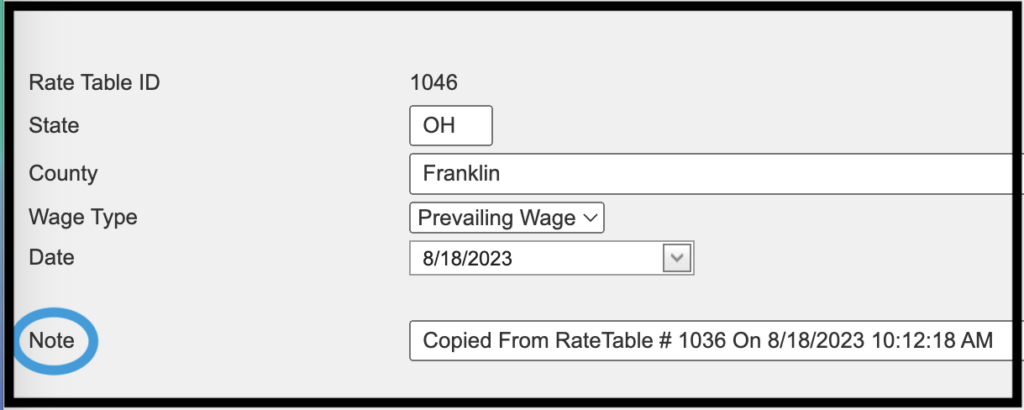
When you copy a rate table, the new rate table can be modified. The new rate table will indicate which original rate table it was copied from.
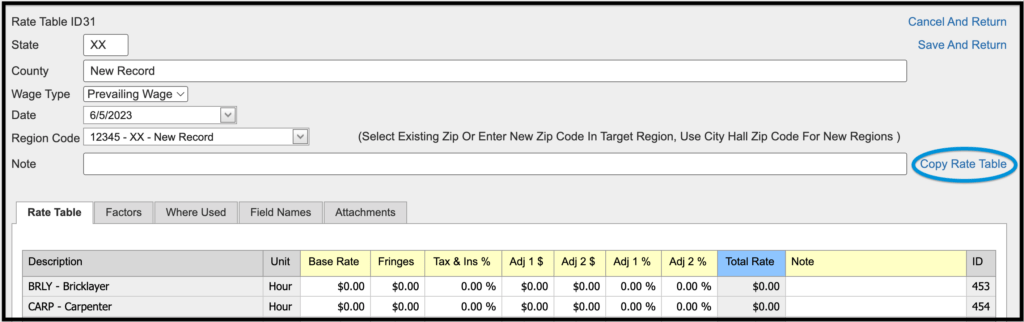
Changes made to a rate table: preview changes will pull changes made into a list showing only those resources; save changes or cancel changes at the bottom of the page. To confirm save–save and return in the upper left.
Items #
The Item database features a log that tracks the previous value and what it was changed to.

MF/UF Descriptions #

Item Group Links #

Linked PDF Files (Global) #

Markups #
Escalation Maintenance #
Item Adjustments #
SimpleBudget Adjustments #
Calculators #
Manage Variables #

Reference Estimate Types/Defaults #
Manage Calculators #
© Copyright 2024, FOS of CannonDesign – All Rights Reserved – Confidential and Proprietary